
Score Big with This DIY Baseball Mason Jar Craft: The Perfect Gift & Decor for Sports Fans!
There’s an undeniable magic in giving a gift that you’ve crafted with your own hands. The effort, the thought, the personal touch – it all culminates in a present that often means more than anything bought off a shelf. And what truly amplifies that joy is witnessing the recipient’s face light up with excitement, knowing they’ve received something truly unique and made just for them. It’s a feeling every DIY enthusiast chases, and this particular project delivers it in spades!
Let’s be honest, finding the perfect gift for the dads, brothers, and male friends in our lives can sometimes feel like trying to hit a home run with two strikes against you. Neckties, gadgets, and generic gift cards often fall short of capturing their unique passions. But what if you could create something that speaks directly to their love for the game, a personalized keepsake that’s both thoughtful and incredibly practical? Enter the DIY Baseball Painted Mason Jar – a brilliant solution for the sports fan in your life, and so much more!
Why This DIY Project Hits a Home Run
This isn’t just any craft project; it’s a versatile, heartwarming, and incredibly cost-effective way to celebrate a passion for sports. Whether you’re aiming for a memorable gift or a clever decorative accent, these mason jars are game-changers. The simplicity of the concept belies the profound impact they can have, transforming a common household item into a canvas for creativity and a vessel for thoughtful gestures. You’ll be amazed at how easily these come together and the multitude of ways they can be enjoyed, making them a true MVP in the world of DIY.
From storing cherished keepsakes to organizing everyday essentials, or even serving as an eye-catching centerpiece, the possibilities are endless. Plus, the sheer satisfaction of creating something so charming and useful from scratch is a reward in itself. It’s a project that encourages personalization, allowing you to tailor each jar to reflect not just a love for baseball, but potentially for any sport or even a broader theme. Get ready to impress with your crafting prowess and score big with this fantastic idea!
Unleashing Your Inner Crafting MVP: What You’ll Need
The beauty of this project lies in its accessibility. You won’t need an arsenal of expensive or obscure supplies. Most of what you require can likely be found around your home or picked up at your local craft or hardware store for very little cost. Gathering your materials is the first step to turning your vision into a tangible tribute to sports enthusiasm.
- Mason Jars: Any size will do, but pint or quart jars are generally the most versatile for gifts and decor.
- Acrylic Craft Paint: You’ll primarily need white for the base, and red for the iconic baseball stitching. If customizing for other sports, choose appropriate team or sport colors.
- Paint Brushes: A larger flat brush for the base coat and a fine-tip brush for details (like the stitches).
- Painter’s Tape or Rubber Bands: Useful for creating clean lines or helping with pattern placement, though not strictly necessary for a freehand baseball design.
- Clear Sealer Spray (Optional but Recommended): A matte or glossy clear coat will protect your paint job and make the jar more durable, especially if it will be handled frequently or used for storage.
- Rubbing Alcohol or Glass Cleaner: For preparing the jar surface.
- Paper Towels or Rags: For cleaning and drying.
- Newspaper or Drop Cloth: To protect your work surface.
Step-by-Step Guide: Crafting Your Champion Mason Jar
Ready to bring your baseball mason jar to life? Follow these simple steps, and you’ll have a professional-looking, handcrafted masterpiece in no time. This process is designed to be straightforward, making it perfect for crafters of all skill levels, from beginners to seasoned DIYers.
Step 1: Prep Your Jars Like a Pro
Cleanliness is key for a flawless finish. Start by thoroughly washing your mason jars with soap and water to remove any dust, grime, or labels. Once clean, dry them completely. For an even better paint adhesion, wipe the exterior of the jar with rubbing alcohol or glass cleaner. This removes any residual oils or film, ensuring your paint sticks perfectly. Let the alcohol evaporate fully before moving on. A clean surface ensures your paint will adhere smoothly and evenly, preventing peeling or bubbling later on. Don’t rush this step; it’s the foundation for a successful project.
Step 2: Lay Down Your Base Coat
Now for the fun part! Using your larger brush, apply an even coat of white acrylic paint to the exterior of the mason jar. You can choose to paint the entire jar or leave the rim and bottom unpainted for a slightly different look. Acrylic paint dries relatively quickly, but it often requires multiple coats to achieve an opaque, uniform color without streaks. Allow each coat to dry completely before applying the next, typically 15-30 minutes depending on paint thickness and humidity. Two to three thin coats are usually better than one thick coat, as thick coats can chip more easily and take longer to cure. Patience here will pay off with a smooth, vibrant base.
Step 3: Mastering the Baseball Stitch
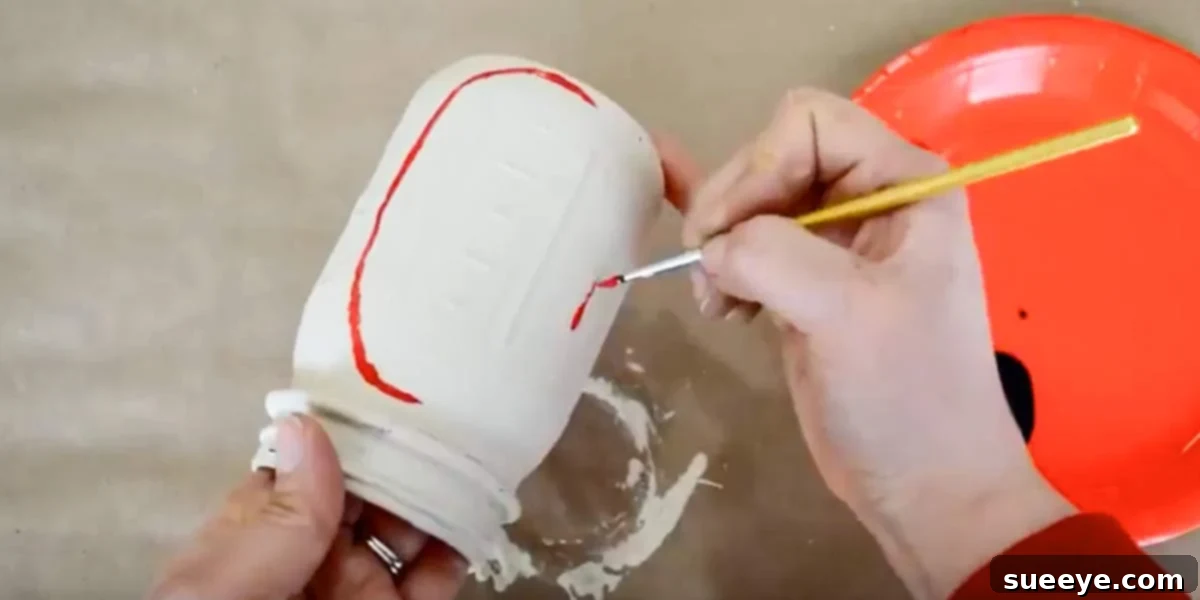
Once your white base coat is fully dry and opaque, it’s time for the signature baseball stitching. This is where the magic truly happens! Dip your fine-tip brush into the red acrylic paint. Start by painting two slightly curved, parallel lines across the jar, mimicking the seams of a baseball. These lines don’t need to be perfectly straight; a slight curve adds to the authentic look. Once your main lines are dry, paint small, short V-shaped stitches along the outside of these lines, pointing inwards towards the center of the jar. These V-stitches should be evenly spaced and consistent in size for the most realistic effect. Don’t be afraid to practice on a piece of paper first if you’re feeling a bit nervous. Remember, a little imperfection can add to the charm of a handmade item!
Step 4: Seal the Deal (Optional but Recommended)
To protect your beautifully painted mason jar and ensure its longevity, especially if it will be used frequently or handled often, consider applying a clear sealer. Once all your paint is completely dry (it’s best to wait at least 24 hours after the final paint coat), take your jar to a well-ventilated area. Apply several light, even coats of clear acrylic sealer spray, allowing each coat to dry fully before applying the next. A matte finish gives a more authentic, chalky feel, while a glossy finish adds a bit of shine and makes cleaning easier. This sealing step will guard against scratches, chipping, and general wear and tear, preserving your artwork for years to come. Make sure the spray is applied evenly to avoid drips.
Pro Tip: For an extra rustic touch, lightly distress the painted surface with fine-grit sandpaper after the sealer has cured. This can give it a vintage, well-loved appearance.
Beyond the Baseball Diamond: Customizing Your Sports Theme
While the baseball theme is a classic, the beauty of this DIY project is its adaptability. With a little creativity, you can easily transform these mason jars to celebrate any sport or team. The fundamental steps remain the same; you’re simply changing the colors and iconic markings.
Basketball Brilliance
To create a basketball-themed jar, use orange paint for the base coat. Once dry, use black paint and a fine-tip brush to add the distinctive lines of a basketball. You’ll need one line going across the jar’s circumference and two slightly curved lines that meet at the top and bottom, forming the classic panel design. These jars would be fantastic filled with orange and black candies, or perhaps tickets to a basketball game. Imagine them as centerpieces for a March Madness party!
Football Fervor
For the gridiron enthusiast, paint your mason jar brown for the football base. Once dry, use white paint to create the laces. Start with a horizontal line across the center of the jar, and then add several short, perpendicular lines across it to form the iconic stitching. These football jars are perfect for tailgating parties, holding cutlery, or as a gift for a coach. You could even add team colors to the top or bottom rims for extra personalization.
Other Sports & Themes
Don’t stop there! Think about soccer balls (white base, black hexagons), tennis balls (fuzzy neon green), or even specific team colors. You can add vinyl decals of team logos (ensure these are applied *before* sealing), player numbers, or names to make them truly unique. The possibilities are only limited by your imagination and the sports you love!
The Ultimate Playbook: Creative Uses for Your Sports Mason Jars
Now that you’ve crafted your beautiful sports-themed mason jars, what’s next? Their versatility is one of their most appealing features. Here are a plethora of ideas to inspire you, transforming these simple jars into cherished gifts, festive party decor, and practical home organizers.
Thoughtful Gifts That Truly Impress
The original idea of putting baseball tickets inside is fantastic, but that’s just the beginning. A handmade gift combined with a thoughtful filling creates an unforgettable present.
- Game Day Tickets: The classic choice! Whether it’s baseball, basketball, football, or even a local high school game, tickets are a surefire hit.
- Snack Attack: Fill the jar with the recipient’s favorite game-day snacks – peanuts, beef jerky, sunflower seeds, or their preferred candy.
- Mini Tool Kit: For the handy sports fan, fill it with small tools like a measuring tape, mini screwdriver set, or even golf tees and markers.
- Gift Card Holder: A gift card to their favorite sporting goods store, a local pub that shows games, or a streaming service for sports, presented in a personalized jar.
- Personalized Memorabilia: Small signed baseballs (if you’re lucky!), collectible pins, or a miniature replica of their team’s trophy.
- Beverage Mixes: Layered ingredients for hot cocoa, iced tea, or even a craft beer mix, topped with a custom label.
- DIY “Open When” Jar: Fill with notes for different occasions related to their sport (e.g., “Open when your team wins,” “Open when you need cheering up”).
MVP Party Decorations
These mason jars are not just for gifts; they’re perfect for elevating your sports-themed parties, from casual game-day gatherings to elaborate baby showers.
- Utensil Holders: Place plastic forks, spoons, and knives in separate jars on your buffet table. A simple yet effective way to add to your party theme.
- Centerpieces: Fill them with fresh flowers in team colors, small flags, or even battery-operated fairy lights for a charming glow.
- Party Favors: Fill smaller jars with candy or small trinkets and give them to guests as a thank-you for coming.
- Drinkware: For a casual gathering, use them as unique drinking glasses (unpainted inside, of course, or with a liner).
- Condiment Caddies: Hold straws, napkins, or individual packets of sugar, salt, and pepper in a stylish, organized way.
- Scorecard/Pencil Holders: Keep them on tables for guests to grab during friendly game-watching competitions.
Home Run Home Organization & Decor
Beyond parties and gifts, these charming jars can add a touch of personality and order to various spaces in your home.
- Children’s Bathroom: As seen on Pinterest, these are adorable for holding toothbrushes, toothpaste, or small hair accessories in a kids’ sports-themed bathroom.
- Little Boys’ Rooms: Perfect for organizing markers, crayons, colored pencils, or small toys on a desk or shelf.
- Desk Organizers: Keep pens, pencils, scissors, and other office supplies tidy in a home office or study area.
- Kitchen Counter: Store cooking utensils, tea bags, coffee stirrers, or even small recipe cards.
- Entryway Catch-All: Place it by the door for keys, loose change, or small notes.
- Decorative Accents: Simply place them on a bookshelf, mantelpiece, or bedside table as a subtle nod to a favorite sport.
Special Occasions & Celebrations
The personalized nature of this craft makes it ideal for a wide array of special moments.
- Father’s Day: A truly heartfelt gift for any sports-loving dad.
- Birthdays: Tailor the jar to their favorite team or sport for a personalized birthday present.
- Baby Showers: As cleverly noted, these are precious for a baseball-themed baby shower, especially for a little boy’s nursery decor.
- Christmas: A unique stocking stuffer or a charming gift under the tree.
- Coach Appreciation: A fantastic way to thank a coach for their dedication and hard work. Fill it with a gift card or a small token of gratitude.
- Graduation: A thoughtful gift for a graduating athlete or sports enthusiast.
Why Choose Handmade? The Value of a Personal Touch
In a world saturated with mass-produced goods, a handmade gift stands out. It’s a tangible representation of time, effort, and care. When you give someone a DIY baseball mason jar, you’re not just giving them a craft; you’re giving them a piece of your creativity and a testament to your thoughtfulness. These gifts are often more cherished and remembered precisely because of the personal connection they represent.
Beyond the emotional value, DIY projects like this are incredibly cost-effective. You can create multiple meaningful gifts for the price of one store-bought item, allowing you to spread joy without breaking the bank. Furthermore, engaging in crafts can be a wonderfully therapeutic and rewarding experience for the maker. There’s a deep sense of satisfaction that comes from transforming simple materials into something beautiful and functional.
Ready to Play Ball?
As you can see, this simple baseball painted mason jar project is packed with potential. It’s easy, affordable, endlessly customizable, and brings a smile to everyone’s face. Whether you’re looking for that perfect, unique gift for a sports fanatic, an eye-catching decoration for your next game-day party, or a clever way to organize your home, these jars are a definite winner. So, gather your supplies, unleash your inner artist, and get ready to create something truly special. We’d love to see your creations! Share your finished baseball mason jars and how you’re using them in the comments below or on social media. Happy crafting!