
Craft Your Own Eco-Chic Masterpiece: The Ultimate Guide to Making a Recycled Denim Rug
Are you looking for an innovative and environmentally friendly way to breathe new life into your worn-out denim? Instead of discarding those old jeans, imagine transforming them into a beautiful, sturdy, and unique home accessory! This comprehensive guide will walk you through the process of creating a stunning recycled denim rug, a project that is not only incredibly satisfying but also helps reduce textile waste. Whether you’re an experienced crafter or just starting your DIY journey, this tutorial offers clear, simple steps to make a durable and stylish rug that reflects your personal touch. Get ready to turn your old denim into a functional work of art for any room in your home.
Why Choose a DIY Recycled Denim Rug? More Than Just a Craft!
Embracing a DIY project like making a recycled denim rug offers a multitude of benefits, extending far beyond simply occupying your time. It’s a statement of sustainability, a canvas for creativity, and a testament to the joy of making something with your own hands. Let’s delve into why this particular craft is so rewarding.
Environmental Impact: Give Old Jeans a New Life
Every year, tons of textile waste end up in landfills, contributing to pollution and resource depletion. Old jeans, particularly, are a common item in many wardrobes that often go unused once they’re out of style or no longer fit. By upcycling them into a rug, you’re actively participating in the circular economy, diverting waste from landfills, and reducing the demand for new materials. This project transforms potential trash into a treasured item, embodying the spirit of responsible consumption and giving your denim a meaningful second act.
Unleash Your Creativity & Personal Style
A handmade denim rug is far more than just a floor covering; it’s a unique piece of home decor that tells a story. Unlike mass-produced items, your rug will carry the unique character of the denim you choose – the varied shades, the subtle fading, and even the remnants of original seams can add texture and charm. You have complete control over the design, allowing you to tailor the size, shape, and color palette to perfectly complement your existing decor. This is your chance to express your individuality and infuse your living space with an item that truly stands out.
Budget-Friendly Home Decor That Lasts
High-quality rugs can be expensive, especially those made from natural, durable fibers. This DIY project offers an incredibly cost-effective alternative, utilizing materials you likely already have lying around – old jeans! With just a few inexpensive crafting supplies, you can create a robust and long-lasting rug that stands up to daily wear and tear. Denim is renowned for its durability, making it an ideal material for a rug that will endure for years, saving you money while adding undeniable style.
A Project for All Ages: Fun for the Entire Family
One of the most heartwarming aspects of this DIY denim rug project is its accessibility and appeal to all ages. It’s a wonderful activity to share with family, fostering creativity and teamwork. The steps are straightforward enough for older children to participate, under adult supervision, making it a fantastic bonding experience. The joy of creating something together, from selecting the jeans to weaving the final strips, creates lasting memories and a tangible keepsake that everyone can be proud of. It’s a rewarding experience that strengthens bonds and teaches valuable crafting skills.
Gathering Your Essentials: What You’ll Need for Your Denim Rug Project
Before you embark on your creative journey, it’s essential to gather all the necessary materials. The beauty of this project lies in its simplicity and the common availability of its components. Here’s a detailed list of what you’ll need to create your very own recycled denim rug:
- Old Jeans: This is your primary material! The number of jeans you’ll need will depend on the desired size and thickness of your rug. For a rug roughly 2×3 feet, you might need 8-12 pairs of adult-sized jeans. Don’t limit yourself to just blue denim; incorporate black, white, gray, or even colored jeans for a more diverse and vibrant look. Wash and dry them thoroughly before cutting.
- Sharp Scissors or a Rotary Cutter: A good pair of fabric scissors will make cutting denim strips much easier. If you plan to make multiple rugs or prefer speed and precision, a rotary cutter with a self-healing mat is an excellent investment.
- Durable Yarn or Twine: This will serve as the “warp” (the vertical strands) of your loom. Choose a strong, non-stretching yarn like cotton, jute twine, or even a robust synthetic blend. The color of the yarn can either blend in with your denim or provide a contrasting accent.
- One Clothespin or Fabric Clip: This small tool will be incredibly helpful for securing the end of your denim strips, making the weaving process smoother and easier to manage.
- A Piece of Sturdy Cardboard: This will be the temporary loom for your rug. The size of the cardboard will determine the maximum dimensions of your rug. For a fairly large rug, as in our example, a piece measuring approximately 4′ x 6′ would be suitable. Ensure the cardboard is thick and rigid enough to hold tension without bending.
- Ruler or Measuring Tape: Essential for precise measurements, both for cutting your cardboard and ensuring consistent denim strip widths.
- Pencil or Marker: For marking cutting lines on your cardboard and denim.
- Fabric Glue (Optional): While not strictly necessary, a dab of fabric glue can provide extra security for knots at the end of your rug, preventing them from unraveling over time.
Step-by-Step Guide: Weaving Your Eco-Friendly Denim Rug
Now that you have all your materials ready, let’s dive into the exciting part: transforming those old jeans into a beautiful, functional rug. Follow these steps carefully, and you’ll be amazed at what you can create!
Step 1: Preparing Your Denim Strips
The foundation of your rug lies in perfectly prepared denim strips. Start by laying your clean, dry jeans flat. Using your ruler and pencil, mark lines for strips that are approximately 1 to 1.5 inches wide. Consistency in width is key for a neat, even rug, so take your time with this step. Cut off the thick seams, waistbands, and pockets to make the fabric easier to work with. You can either cut individual strips from each pant leg or, for a more continuous strip, cut the pant leg into a large rectangle and then cut in a spiral fashion to create one long strip. The original creator notes, “I then pre-cut all my denim strips that would serve as the body of my DIY Denim Rug,” a great tip to have everything ready before weaving begins. Once cut, you can gently tug on the strips to encourage the edges to curl inward, which creates a softer, more rounded look when woven.
Step 2: Constructing Your Cardboard Loom
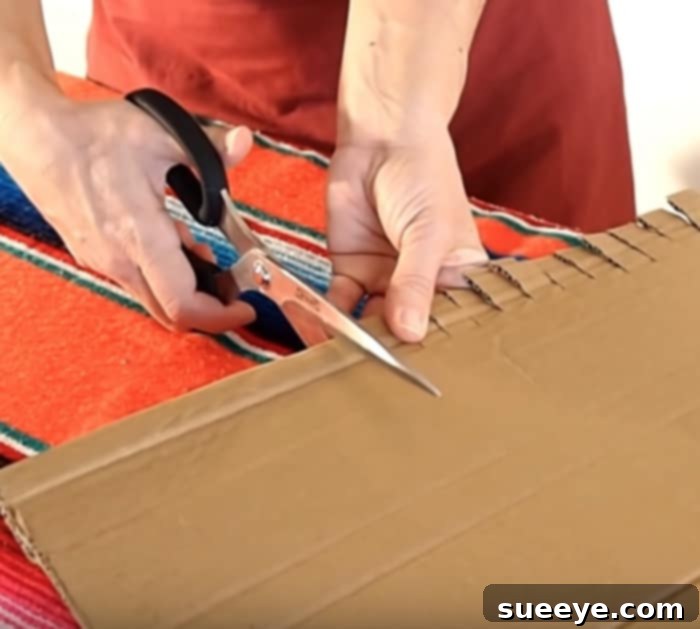
Your cardboard loom is the temporary framework that will hold your rug together during the weaving process. First, determine the desired size of your rug. For instance, if you envision a 4′ x 6′ rug, cut a piece of sturdy cardboard to those exact dimensions. Next, at each of the shorter ends of the cardboard, you’ll need to create small slits. These slits will hold your yarn in place. Using your ruler, mark points approximately half an inch to one inch apart along the entire length of both short edges. Then, carefully cut tiny slits, about half an inch deep, at each of these marked points. Ensure the slits are uniform in size and spacing, as this will directly affect the evenness of your rug.
Step 3: Warping Your Loom with Yarn
Now it’s time to “warp” your loom, which means creating the vertical strands that your denim strips will weave through. Take your durable yarn or twine and secure one end by tying it firmly into the first slit on one side of your cardboard. Then, bring the yarn across the cardboard to the corresponding slit on the opposite side, securing it firmly within that slit. Continue this process, running the yarn end to end across the cardboard, securing it in each of the cut grooves with every pass. Ensure the yarn is taut but not so tight that it warps the cardboard. Maintaining consistent tension is crucial for a flat, even rug. Repeat until all slits are filled, and then secure the final end of the yarn.
Step 4: Beginning the Weaving Process
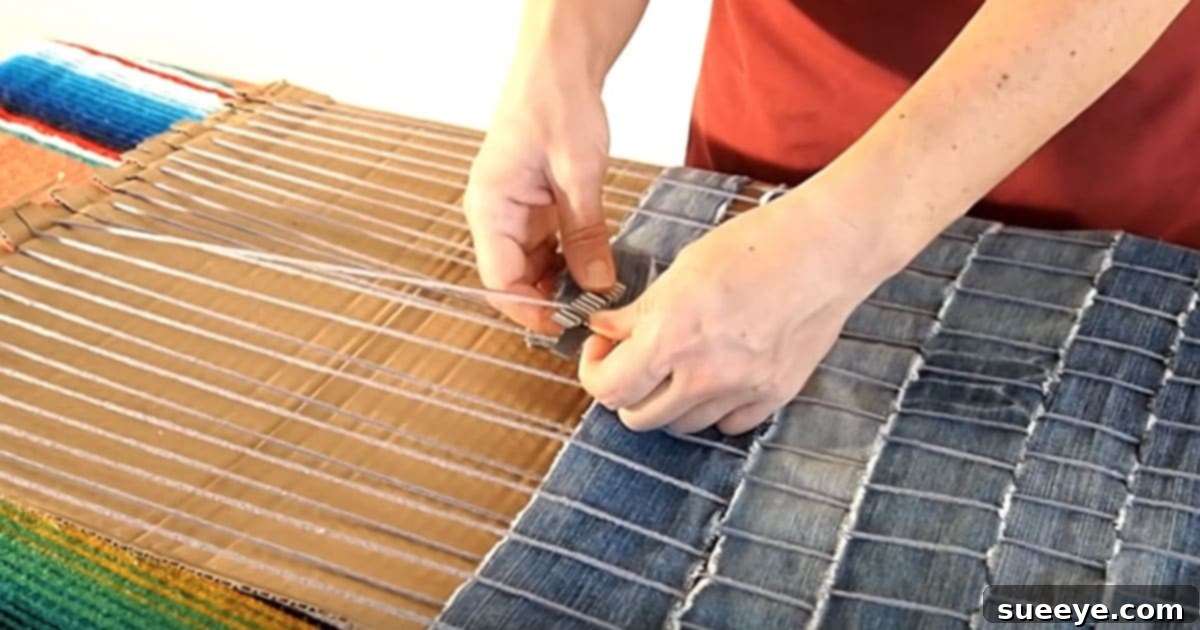
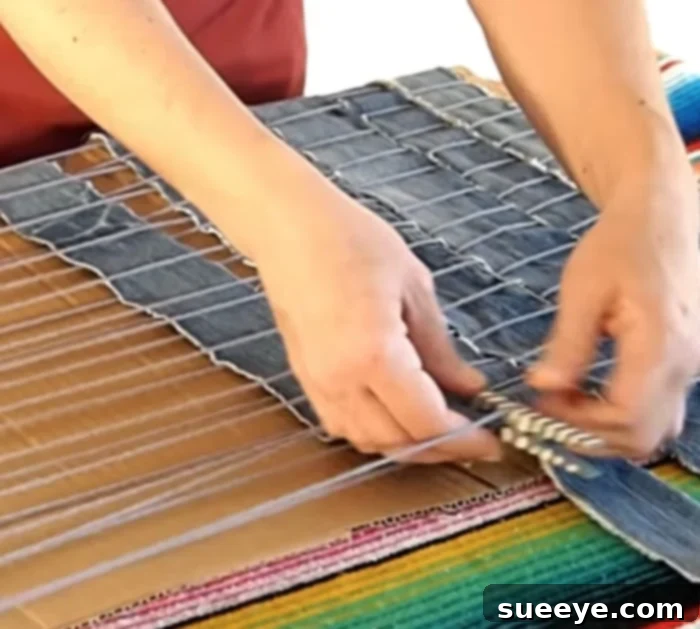
With your loom warped, you’re ready to start weaving! Take one of your prepared denim strips. As described in the original project, “I pinned the clothespin to the end of my pre-cut strip and started weaving each denim strip through the yarn guides I had tied into the cardboard.” This is an excellent technique to manage the strip easily. Begin by weaving the denim strip over the first yarn strand, then under the next, then over, and so on, alternating the pattern across the entire width of your loom. Once you reach the end of the row, gently push the denim strip down towards the starting edge of the rug to keep the weave tight and even. When starting the next row, reverse the pattern: if you went over the first yarn strand in the previous row, go under it in the current row. This creates the classic ‘plain weave’ pattern. Take your time, keeping the tension consistent and the rows straight.
Step 5: Continuing the Weave and Joining Strips
Continue weaving your denim strips, row by row, pushing each new row snugly against the previous one. You’ll eventually reach the end of a denim strip. To join a new strip, you have a few options: you can simply overlap the end of the old strip with the beginning of the new strip by about an inch and continue weaving, allowing the natural tightness of the weave to hold them in place. For extra security and a cleaner finish, you can make a small slit at the end of the finished strip and the beginning of the new strip, then thread them through each other to create a small, flat knot. Alternatively, a small dab of fabric glue can secure the ends discreetly. The key is to maintain a continuous flow of weaving, making sure not to create visible bumps or gaps where strips are joined. Keep your edges as straight as possible by ensuring the denim strips are pulled across evenly. This will slowly but surely build up the body of your rug.
Step 6: Finishing Your Recycled Denim Rug
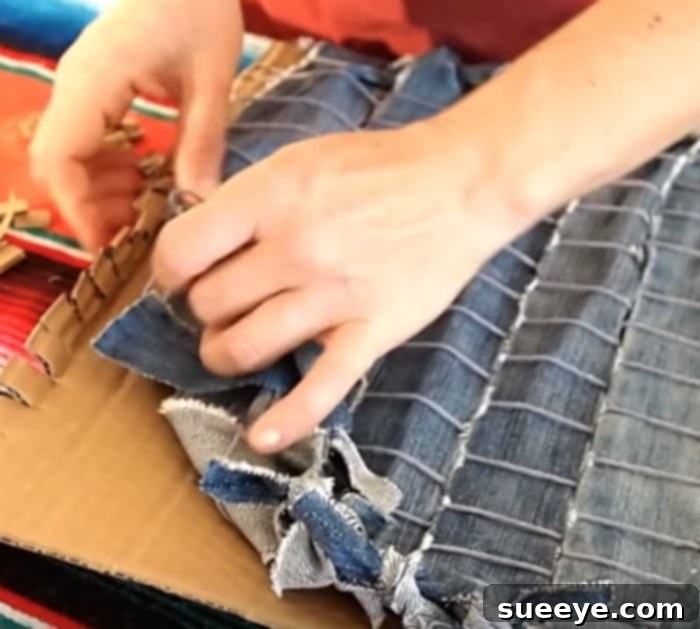
Once your rug has reached the desired length, it’s time for the final, satisfying step of securing your masterpiece. Carefully remove your rug from the cardboard loom. This is done by gently cutting the yarn loops at each end of the cardboard. You will now have fringes of yarn at both ends of your rug. To secure the denim strips and prevent unraveling, take two adjacent yarn fringes and tie them together in a tight double knot, snug against the last row of denim. Repeat this process for all the yarn fringes across both ends of the rug. As the original crafter proudly stated, “Then I made a slit at the end of each strip I had installed and tied them, making a little knot at the end of each strip to secure all the pieces, the easiest thing ever!” This method works perfectly for securing the denim itself. For added security and neatness, you can apply a tiny drop of fabric glue to each knot. Trim any excess yarn or denim ends if desired, and your beautiful, handmade recycled denim rug is complete!
Customizing Your Denim Rug: Unleash Your Inner Designer
One of the greatest joys of crafting your own recycled denim rug is the boundless potential for customization. This isn’t just a utilitarian item; it’s a canvas for your creativity. Here are some ideas to make your denim rug uniquely yours:
Playing with Denim Shades and Textures
Don’t stick to just one wash of denim! Incorporate a variety of light, medium, and dark washes to create striking patterns or an ombre effect. You can also mix in colored denim (black, gray, white, even pastels if you have them) to add pops of color. Experiment with different textures too; some jeans are stiffer, others softer, which can add subtle tactile variations to your rug.
Incorporating Other Fabrics (Optional)
While this is a “denim” rug, you’re not strictly limited. Consider weaving in strips of other sturdy fabrics like canvas, linen, or even old t-shirts (for a softer touch) to add different textures and colors. Just ensure the other fabrics have similar durability and can withstand the same wear as denim.
Adding Embellishments and Finishing Touches
Once your rug is off the loom, you can further enhance its design. Add a braided edge using extra denim strips, or sew on appliques and patches for a whimsical touch. You could even incorporate some subtle embroidery if you’re feeling ambitious. These small details can transform a simple rug into a true statement piece.
Different Shapes and Sizes for Every Space
While a rectangular rug is the easiest to start with, don’t limit your imagination. With a bit of planning, you can adapt the loom concept to create square rugs, runners, or even circular rugs (though circular weaving requires a different loom setup or braiding technique). Think about where the rug will go and tailor its dimensions to perfectly fit the space.
Care and Maintenance for Your Upcycled Treasure
Your recycled denim rug is not only stylish but also incredibly durable. To ensure it remains a beautiful and long-lasting addition to your home, proper care is important. For minor spills or dirt, spot cleaning with a damp cloth and mild detergent is usually sufficient. For a more thorough cleaning, especially for smaller rugs, you can gently hand wash it in a bathtub with cool water and a gentle soap. Avoid harsh detergents or bleach, as these can fade the denim. Rinse thoroughly and press out excess water, then lay it flat to air dry completely. For larger rugs, professional rug cleaning may be an option, but often a good shake outdoors and spot cleaning will keep it fresh. The inherent ruggedness of denim means your rug will stand up well to everyday use, requiring minimal fuss.
Share the Joy: A Rewarding Family Craft
The journey of creating something with your own hands is profoundly rewarding, and this DIY recycled denim rug project offers an extra layer of satisfaction. As the original story beautifully illustrates, “This DIY was one of the most rewarding I’ve ever done.” The personal connection forged through crafting is truly special. The experience of seeing your vision come to life, from a pile of old jeans to a beautiful, functional rug, is incredibly fulfilling. But the joy can extend beyond a solitary endeavor. Sharing this craft with loved ones, particularly children, amplifies its value. “I put one in my Daughter’s bathroom and she loved it so much. She was so excited that Mom made it for her, she begged me to teach her how to make one.” This anecdote highlights the ripple effect of creativity and the powerful bond created when knowledge and skills are shared. Watching a child grasp a new technique, find pride in their creations, and even extend their efforts to make gifts for others, as the daughter did for her brother and the kitchen, underscores the invaluable lessons learned in patience, precision, and perseverance. “I can’t recommend this project enough. It’s so much fun for the entire family.” Indeed, it’s not just about the rug; it’s about the memories made, the skills acquired, and the shared sense of accomplishment that transforms a simple craft into a cherished family activity.
Where to Place Your Stylish Denim Rug
Once your beautiful, handcrafted denim rug is complete, the next delightful decision is where to showcase it! Its durability and unique aesthetic make it versatile enough for almost any room in your home. Here are some popular and creative ideas:
- Bathrooms: Just like the original creator’s daughter, many find these rugs perfect for bathrooms. They add a cozy, rustic touch and are absorbent, making them ideal for stepping out of the shower.
- Kitchens: Place a denim runner in front of your sink or stove. Its hard-wearing nature can withstand spills and foot traffic, while its unique texture adds character to the heart of your home.
- Entryways: Greet guests with a unique, welcoming piece. Denim rugs are excellent for high-traffic areas, trapping dirt from shoes before it spreads throughout the house.
- Bedrooms: Add a soft, comforting accent beside your bed. The varying shades of denim can complement a relaxed, casual bedroom decor.
- Kids’ Playrooms: Durable and easy to clean, a denim rug can withstand the rigors of playtime and add a fun, casual element to a child’s space.
- Home Offices or Studios: Bring a touch of handmade warmth and personality to your workspace, creating a more inspiring environment.
- Pet Mats: These rugs are tough enough to serve as a designated spot for your furry friends, offering them comfort while protecting your floors.
No matter where you choose to place your recycled denim rug, it’s sure to be a conversation starter and a constant reminder of your creative spirit and commitment to sustainable living.
Final Thoughts: Embrace the Art of Upcycling!
Congratulations! You’ve successfully navigated the wonderful world of upcycling and transformed discarded denim into a functional and beautiful piece of home decor. Making a recycled denim rug is more than just a craft; it’s a statement. It’s a testament to your creativity, your dedication to sustainability, and your ability to see potential in the forgotten. This project empowers you to personalize your space with unique, handmade items while making a positive impact on the environment. Whether it’s gracing your daughter’s bathroom, adding warmth to your kitchen, or becoming a cherished gift, your recycled denim rug is a symbol of resourcefulness and charm. So gather those old jeans, unleash your inner artist, and embrace the incredibly rewarding art of upcycling. Happy crafting!