
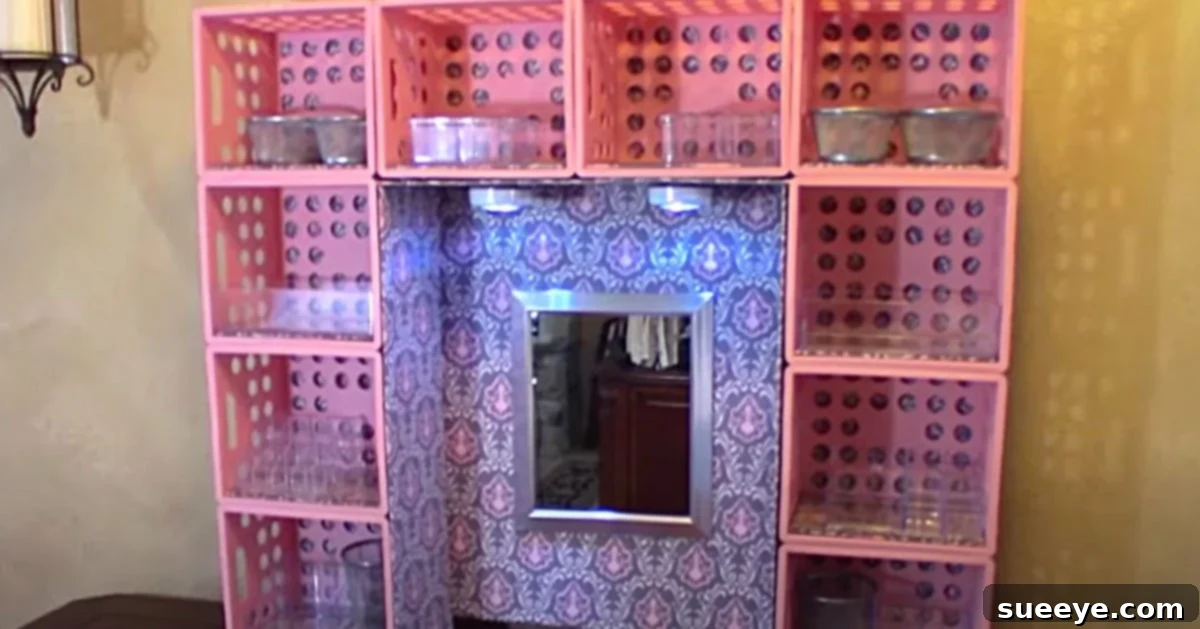
Build Your Own Portable Crate Hutch: The Ultimate DIY Storage Solution for Any Space
Are you constantly seeking clever ways to organize your craft supplies, tidy your desk, or declutter your vanity? Imagine a versatile storage solution that isn’t tethered to a single spot, allowing you the freedom to reconfigure your workspace as inspiration strikes. This incredible DIY hutch project offers precisely that flexibility. Inspired by the exceptionally informative and easy-to-follow tutorial from Kelly Barlow Creations, this guide empowers you to construct a functional and stylish hutch using surprisingly simple and affordable materials. What truly sets this project apart is its inherent portability. For those with a craft tool bench fitted with castors, or a desk that occasionally needs to shift, a hutch that can be wheeled around effortlessly is a game-changer. Kelly’s video meticulously outlines every step, even detailing the cost of materials, which is incredibly helpful for anyone embarking on a budget-conscious DIY endeavor. However, the true spirit of DIY lies in personalization. While her instructions provide a perfect foundation, remember that this is your creation. Feel empowered to substitute materials, adjust the design, and infuse your unique style into every detail. There’s no single “right” way to craft; necessity is often the mother of invention, so if you discover an alternative material or a new approach that enhances the project, embrace it wholeheartedly and let your creativity shine!
Why a DIY Crate Hutch is a Game-Changer for Organization
In the quest for an organized and efficient workspace, whether it’s a bustling craft studio, a tranquil home office, or a chic vanity area, the need for adaptable storage is paramount. Traditional, fixed storage units often come with significant drawbacks: they can be expensive, difficult to customize, and, crucially, immovable. This DIY crate hutch project directly addresses these challenges, offering a superior alternative. First and foremost, it champions affordability. By utilizing inexpensive mini crates, typically found at discount retailers, you can construct a robust and attractive storage unit without breaking the bank. Secondly, its modular nature provides unparalleled customization options. You have complete control over the hutch’s size, shape, and internal configuration, ensuring it perfectly accommodates your specific tools, supplies, or decorative items. No more struggling to fit oddly sized gadgets or products into ill-suited compartments. Finally, and perhaps most compellingly for many, this hutch offers incredible mobility. For individuals who frequently rearrange their workspace, or whose primary workstation (like a craft bench) is on wheels, a portable hutch ensures that all essential items remain within arm’s reach, regardless of where your work takes you. This flexibility dramatically boosts efficiency and enhances the overall user experience, transforming a static workspace into a dynamic and highly functional environment. It’s more than just a storage unit; it’s an intelligent solution designed to evolve with your projects and needs.
Envisioning Your Custom Hutch: Planning and Design
Before you even think about glue or clamps, dedicating a little time to planning and design will ensure your DIY hutch perfectly serves its intended purpose. Begin by clearly defining the primary function of your hutch: Is it destined to hold heavy-duty craft tools, delicate beauty products, a collection of books, or essential office supplies? This fundamental decision will guide your choices regarding material robustness and the overall structural layout. The inherent modularity of mini crates grants you immense design freedom. You can arrange them in a classic grid, create asymmetrical cubby sizes for varied items, or stack them higher or wider to maximize vertical or horizontal space. A simple sketch on paper, or even a rough layout of the actual crates on your floor, can provide invaluable visual clarity. This pre-visualization step helps you determine the precise number of crates required and allows you to anticipate how different items will fit within the cubbies. Consider the dimensions of your most frequently used items. Will your various paint bottles stand upright? Are your makeup brushes tall enough to fit comfortably? Can your charging dock find a dedicated home? Thoughtful planning at this stage is crucial for designing a hutch that is not only aesthetically pleasing but also supremely practical and intuitive to use. Ultimately, the goal is to create a storage solution that simplifies your routines and enhances your daily interactions with your workspace.
Materials: Crafting Your Vision with Essential Supplies
One of the most attractive features of this DIY hutch project is its clever utilization of easily accessible and highly affordable materials. The core components are designed to be budget-friendly, making this an ideal project for those who love creative solutions without a hefty price tag. Here’s a comprehensive breakdown of the essential materials, along with valuable tips for sourcing and potential substitutions:
- 10 Mini Crates: These form the fundamental building blocks and structural integrity of your hutch. Kelly Barlow successfully sourced hers from Walmart for an astonishing $0.88 each, highlighting the incredible cost-effectiveness of this project. When shopping, look for similar plastic or even lightweight wooden mini crates at dollar stores, large retail chains, craft supply stores, or discount home goods retailers. The exact quantity needed can be easily adjusted based on the desired size and complexity of your hutch. If your vision calls for a taller, wider, or more intricate design, simply acquire more crates to match your expanded blueprint.
- 2 Yards of Fabric: This material will serve as the decorative and functional backing for your hutch. A thick cotton fabric is highly recommended due to its durability, ease of handling, and stable texture. Choose a pattern or solid color that seamlessly integrates with your existing room decor, aligns with your personal aesthetic, or complements your workshop environment. For alternative backing solutions, consider sturdy wallpaper, adhesive contact paper for a slicker finish, thin plywood for maximum rigidity, or even a tri-folding poster board if you prefer a lighter, easily customizable option.
- Gorilla Glue: A powerful and reliable adhesive is absolutely essential for creating strong, lasting bonds between the individual crates. Gorilla Glue is an excellent choice, renowned for its superior bonding capabilities across a diverse range of materials. As alternatives, you might consider other robust construction adhesives, quality wood glues, or even a high-strength hot glue for quicker drying times (though hot glue may offer a less permanent bond for heavy loads). Always perform a small test application on a scrap piece of material to ensure compatibility and desired strength before proceeding with your main project. Ensure you purchase enough adhesive to secure all crate connections thoroughly.
- A Frame (or Pre-made Mirror): This element provides an opportunity to add either decorative flair or practical utility to your hutch. A standard picture frame can be repurposed to hold a piece of complementary fabric, a functional corkboard for notes, a mini whiteboard for quick reminders, or even a captivating piece of artwork. Alternatively, incorporating a pre-made mirror offers instant functionality, particularly if your hutch is destined for a vanity, dressing area, or even a compact entryway.
- 10 4×6 Inch Frames: Ingeniously repurposed, these small frames are perfect for creating sturdy and visually appealing shelf bottoms within each crate cubby. Their common size makes them easy to find and often available in economical multi-packs. If picture frames are not readily available or if you prefer a different aesthetic, excellent alternatives include thin cuts of wood, rigid cardboard, durable foam board, or clear acrylic sheets. The primary goal is to establish a flat, stable, and secure surface at the base of each crate opening, preventing smaller items from slipping through the slats.
- LED Push Lights: These compact, battery-operated lights are a fantastic addition, offering practical illumination and enhancing the ambiance of your hutch. They can be effortlessly glued into the cubbies to spotlight your stored items, making them especially useful in dimly lit areas, such as a garage workshop or a bedroom vanity corner. Look for models that come with an adhesive backing for easy installation, or be prepared to use a small amount of additional glue for a more permanent fixture. As creative alternatives, consider small solar-powered lights or thin LED strip lights for a more integrated lighting solution.
- Tri-folding Poster Project Board: This versatile item can serve multiple purposes: as a lightweight yet sturdy backing for sections of your hutch, or as customizable dividers within larger cubbies. Its ease of cutting and shaping makes it ideal for tailoring interior configurations. Foam core board or thin sheets of plywood are viable alternatives, offering increased durability and rigidity if desired.
- Plastic Storage Containers: To elevate the organizational capabilities of your hutch, a selection of small plastic storage containers is invaluable. These containers fit neatly within the crate cubbies, allowing for meticulous categorization of smaller items such as screws, beads, jewelry, makeup brushes, art markers, or office supplies. Crucially, measure the internal dimensions of your assembled crates before purchasing containers to ensure a snug and efficient fit. Clear containers are often preferred, as they allow for quick identification of contents, saving you time and effort.
As you gather your materials, always keep your desired aesthetic and functional goals in mind. The true beauty of DIY lies in the freedom to diverge from the exact list, choosing materials that perfectly resonate with your personal style and fulfill your specific requirements.
Essential Tools for a Smooth Assembly
While the materials list focuses on the components that will form your hutch, having the correct tools on hand is equally important for a smooth, efficient, and enjoyable assembly process. Fortunately, most of these are basic household tools that you likely already own or can easily acquire:
- Clamps: Absolutely essential for securely holding the crates together while the adhesive cures. Both spring clamps and bar clamps are highly recommended to ensure a strong, tight bond that prevents shifting during the crucial drying period.
- Measuring Tape or Ruler: Precision is key in DIY. A reliable measuring tape or ruler will be indispensable for accurate measurements, especially when cutting fabric, cardboard, or any alternative materials for your shelf bottoms.
- Utility Knife or Sharp Scissors: For clean and precise cuts of fabric, poster board, cardboard, or any other flexible materials used in the project. A sharp blade ensures a neat finish.
- Pencil or Marker: For marking cutting lines, drilling points (if applicable), or indicating where glue should be applied. A fine-tip marker can be useful for greater precision.
- Safety Glasses: Always prioritize safety! Wearing safety glasses is highly recommended when working with cutting tools, applying adhesives, or anytime there’s a risk of flying debris or splashes.
- Work Surface: A clean, flat, and stable work surface is crucial for assembly. This provides a steady base for gluing and clamping, ensuring your hutch is built squarely and securely. Protect your work surface with an old sheet or cardboard if necessary.
Step-by-Step Directions: Bringing Your Crate Hutch to Life
Transforming a simple collection of mini crates into a beautifully organized and highly functional hutch is a deeply satisfying process. By following these detailed steps, you’ll be able to construct your personalized storage solution, adapting each stage to fit your specific design vision and practical needs. Remember, the core principles involve careful planning, secure adhesion, and thoughtful arrangement.
Step 1: Planning and Layout
Before any adhesive is applied, dedicate time to meticulously lay out your mini crates on a flat, clean work surface. This preliminary arrangement allows you to visualize the exact configuration of your final hutch. Experiment with different stacking patterns, considering how many tiers you desire, the overall width, and whether you prefer a uniform grid or a more dynamic, staggered design. This is your critical opportunity to finalize the blueprint for your hutch, ensuring it meets all your aesthetic and functional requirements before committing to any permanent bonds.
Step 2: Assembling the Crate Structure
This is the stage where your Gorilla Glue and clamps become indispensable. Apply a generous, even bead of Gorilla Glue to the edges of the crates where they will connect. Firmly press the crates together, ensuring maximum contact, and then immediately secure them with clamps. It is absolutely crucial to clamp them tightly to achieve a robust and enduring bond. If your hutch design is particularly large or complex, consider working in smaller, manageable sections, allowing each segment to fully dry and set before adding subsequent crates or moving the assembly. For a vivid demonstration of effective gluing and clamping techniques to form your basic hutch structure, refer directly to the video tutorial by Kelly Barlow. Always adhere to the specific drying times recommended by your chosen adhesive for optimal strength and longevity.
Step 3: Creating Shelf Bottoms for Cubbies
Once your crate structure is completely dry and stable, it’s time to enhance the functionality of each cubby by adding shelf bottoms. If you’re utilizing 4×6 inch frames, simply remove the glass and backing, and snugly insert the frame into the bottom opening of each crate. Secure them with a small dab of glue if necessary to prevent any unwanted movement. Should you opt for alternative materials like wood, rigid cardboard, or foam board, carefully cut these materials to fit precisely within the base of each crate opening. These custom-fitted bottoms are vital for creating a flat, solid surface, preventing smaller items from slipping through the open slats of the crates and ensuring efficient organization.
Step 4: Adding a Decorative or Functional Back
This step provides a fantastic opportunity for significant personalization and structural reinforcement. You will flesh out the interior as shown in the video or modify it to suit your needs. If you’re using fabric, measure and cut it to perfectly cover the entire back surface of your hutch. Apply a thin, even layer of glue to the back edges of the crates and carefully press the fabric onto the glue, smoothing out any wrinkles or bubbles to achieve a neat finish. For a more rigid and durable back, cut pieces of your tri-folding poster board (or thin plywood) to fit precisely behind specific sections or the entirety of the hutch, securing them firmly with glue. This backing not only significantly enhances the hutch’s stability but also provides a polished, finished aesthetic and crucially prevents items from falling out the back. This is also the ideal moment to integrate your picture frame or mirror; securely attach it to your chosen section of the hutch back for added utility or decorative impact.
Step 5: Integrating LED Lighting
To infuse an extra layer of functionality and a touch of modern style, strategically place your LED push lights within the cubbies. Most push lights are equipped with an adhesive backing for straightforward installation, but it’s always a good idea to reinforce them with a small dab of Gorilla Glue for a more secure and lasting attachment. Consider positioning them at the top or towards the back of the cubbies to effectively illuminate the contents. This feature is particularly beneficial for organizing craft supplies, applying makeup, or when the hutch is situated in areas with limited natural light, adding both practicality and a warm ambiance.
Step 6: Final Organization and Personalization
With the structural assembly complete, the most enjoyable part begins: organizing and personalizing your new hutch! Introduce your plastic storage containers into the cubbies to neatly sort smaller items, ensuring everything has its designated place. Thoughtfully arrange your tools, craft supplies, beauty products, or office essentials within the various sections you’ve created. This project is a gem and looks great on any desk, vanity, or tool bench. Don’t forget to add any final decorative touches that reflect your personality – perhaps small potted plants, cherished photographs, or unique trinkets. Your versatile, custom-built, and beautifully organized hutch is now ready to transform your workspace and elevate your daily routines!
Customization Ideas: Adapting Your Hutch for Every Space
The true genius of this DIY crate hutch lies in its boundless potential for customization. Far beyond its basic structural form, this project can be ingeniously adapted to seamlessly fit virtually any room or serve a multitude of purposes, reflecting your unique needs and aesthetic preferences:
- For the Avid Craft Enthusiast: Tailor your hutch with a variety of container sizes to perfectly accommodate threads, beads, adhesives, specialized tools, and notions. Consider adding small hooks to the sides or interior panels for easy access to scissors, measuring tapes, or cutting tools. Infuse vibrant colors by painting the crates to spark creativity, or integrate a clever roll holder for vinyl sheets or fabric bolts.
- As a Chic Vanity Organizer: Transform the hutch with a sophisticated touch by painting the crates in soft pastels, classic white, or even a sleek black. Utilize the integrated mirror frame for flawless makeup application. Introduce small dividers within cubbies to meticulously separate makeup brushes, palettes, skincare products, and hair accessories. The LED lights become invaluable here, providing perfect illumination for your beauty rituals.
- For a Productive Home Office Desk: Design cubbies to efficiently organize pens, notepads, staplers, paperclips, and small electronic devices. Choose a fabric backing in a calming, professional color or a subtle pattern to maintain a focused atmosphere. A larger cubby can be perfectly sized to house a compact charging station for your phone, tablet, and other gadgets, keeping cables neatly out of sight.
- In a Playful Child’s Room: Brightly colored crates can create an inviting and organized space for toys, storybooks, art supplies, or even small clothing items. Ensure the hutch is designed at an accessible height for little hands and use soft-edged containers for safety. The backing can be adorned with fun, kid-friendly prints or even an interactive element like a mini chalkboard.
- As a Practical Kitchen or Pantry Helper: Utilize the hutch to organize spices, small jars, tea bags, coffee pods, or baking essentials on a countertop or within a pantry. Opt for materials that are easy to wipe clean and consider adding clear labels to each cubby for quick identification. This can be an incredibly efficient way to maximize vertical space in often-cluttered areas.
Furthermore, if your primary workstation (be it a workbench or desk) isn’t already mobile, consider attaching castor wheels to the bottom of the entire hutch unit. This simple addition will dramatically enhance its portability, allowing you to effortlessly reposition your storage as needed, ensuring your essential tools and supplies are always exactly where you need them. The possibilities for adaptation are truly limitless, making this project a fantastic canvas for your ingenuity and design prowess.
The Rewards of DIY Crafting: Beyond the Hutch
Embarking on a DIY project like the creation of this portable crate hutch offers far more than just a functional storage solution. It provides an immeasurable sense of accomplishment and the profound satisfaction that comes from bringing something tangible to life with your own hands. In an era dominated by mass-produced goods, a handmade item possesses a unique charm, character, and an undeniable story. DIY empowers you to infuse your personality into your living and working environments, crafting pieces that perfectly align with your specific aesthetic tastes and practical requirements, all without the often-prohibitive price tag associated with custom-made furniture. Moreover, the process of DIY fosters critical problem-solving skills, nurtures resourcefulness, and can even serve as a wonderfully meditative and stress-relrelieving activity, allowing you to disconnect from daily pressures and engage in a focused, creative endeavor. The journey from a nascent idea to a tangible, useful object is incredibly rewarding. This particular hutch project serves as an ideal entry point for beginners eager to explore the world of DIY, while simultaneously offering seasoned crafters ample opportunity to exercise their creative muscles and experiment with new techniques. So, gather your materials, embrace the hands-on process, and savor every moment of your creative journey!
Conclusion: Your Perfectly Organized Space Awaits
This remarkable DIY hutch, whether it elegantly graces your craft tool bench, thoughtfully enhances your vanity, or meticulously tidies your desk, stands as a testament to intelligent, adaptable, and budget-conscious design. Its deceptively simple construction belies its immense functionality and significant aesthetic potential. By diligently following these clear, step-by-step instructions, drawing invaluable inspiration from Kelly Barlow’s excellent tutorial, and generously infusing your own unique creative flair, you possess the power to construct a bespoke piece of furniture. This isn’t just any storage unit; it’s a solution that not only masterfully solves your daily organizational dilemmas but also seamlessly adds a distinctive touch of personalized charm and efficiency to your entire environment. Embrace the exhilarating freedom of customization, delight in the project’s inherent affordability, and revel in the deep satisfaction of creating a storage solution that truly moves with you, adapting effortlessly to every project, every mood, and every evolving need. Your exciting journey to a more organized, efficient, and beautifully curated space triumphantly begins here. Happy crafting!