
Craft Your Own Stunning Moroccan Star Mini Quilt: An Easy DIY Tutorial for Beginners
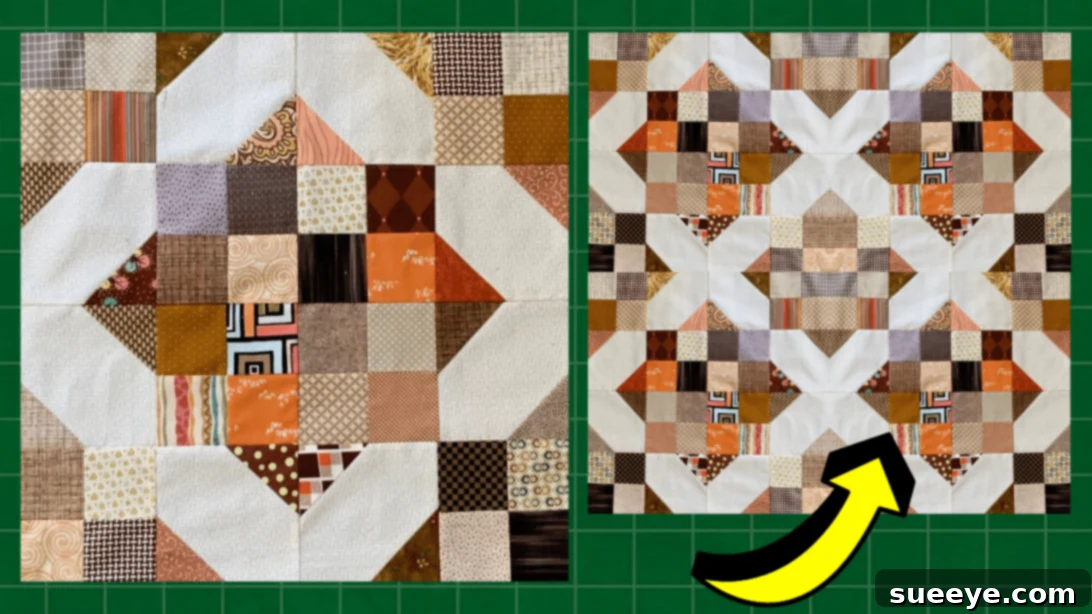
Embark on a delightful quilting journey with the captivating Moroccan Star Mini Quilt project. While exploring a variety of quilting videos and tutorials, I discovered this enchanting design by the talented Teresa DownUnder on YouTube, and its charm was instant. The fabric choices, the intricate yet achievable design, and the beautiful final product immediately resonated with me. It truly looked like a project that even a beginner quilter could confidently tackle, promising a rewarding creative experience without overwhelming complexity.
The beauty of this Moroccan Star Mini Quilt lies not only in its striking visual appeal but also in its versatility. This pattern isn’t just for a mini quilt; its elegant design can be adapted for numerous other quilting endeavors. Imagine this mesmerizing star pattern gracing your home as a chic table topper, a sophisticated table runner, a unique wall hanging, or even as a focal point in a larger quilt. The possibilities are endless, allowing you to infuse your personal style into every stitch. You can experiment with an array of fabric prints and colors, transforming the design to match any decor aesthetic, from vibrant and modern to classic and subdued. The process of assembling the block units is both meditative and enjoyable, making it a perfect project for a relaxing crafting session. Join us as we dive into how to create this beautiful quilt, and prepare to be amazed by what you can accomplish!
RELATED: Easy Medina Fall Star Quilt Block Tutorial
Essential Materials for Your Moroccan Star Mini Quilt
Before you begin sewing, gathering all your materials is crucial for a smooth and enjoyable quilting experience. Having everything laid out and ready will help you maintain your creative flow. Here’s a detailed look at what you’ll need for this enchanting Moroccan Star Mini Quilt project:
- Assorted Print Fabric: These will form the “star” elements and accent pieces of your quilt. The beauty of the Moroccan Star pattern is that it can shine with both bold, contrasting prints or subtle, harmonious tones. Consider using a mix of patterns – a larger floral, a geometric, and a solid complement – to add depth and visual interest. Scraps from previous projects are perfect for this mini quilt, making it a wonderful stash-buster.
- Background Fabric: This fabric will provide the foundation upon which your star design will emerge, creating visual breathing room and making your prints pop. A solid color like white, cream, or a light gray is often ideal, as it allows the intricate star design to truly stand out. However, don’t be afraid to experiment with subtle tone-on-tone prints or even a very light-colored patterned fabric if it complements your chosen prints.
- Marking Pen, Pencil, or Chalk: Precision is key in quilting, and a reliable marking tool is essential for drawing accurate lines for stitching and cutting. Choose a tool that is easily visible on your fabric and, most importantly, one that can be removed cleanly, either by washing or pressing, without leaving permanent marks.
- Ruler: A clear acrylic quilting ruler with precise measurements is indispensable for accurate cutting and squaring up blocks. Look for one with clear markings and non-slip grips to ensure straight cuts every time.
- Needle and Thread: While a sewing machine handles most of the work, a hand-sewing needle and coordinating thread are useful for any minor adjustments, tacking, or even for hand-finishing your binding if you prefer. For machine sewing, choose good quality all-purpose polyester thread that matches or blends with your fabrics.
- Scissors or Rotary Cutter and a Cutting Mat: For precise and efficient fabric cutting, a rotary cutter and self-healing cutting mat are highly recommended. This combination allows for quick, straight cuts, especially when dealing with multiple layers of fabric. Sharp fabric scissors are also essential for smaller cuts and trimming threads.
- Iron and Ironing Board: Pressing your seams correctly at each stage is arguably one of the most critical steps in quilting. It ensures your blocks lie flat, your seams nest perfectly, and your finished quilt looks professional and crisp. A good steam iron will be your best friend throughout this project.
- Sewing Machine: A reliable sewing machine with a quarter-inch foot (if available) will make stitching accurate seams much easier and faster. Ensure your machine is threaded correctly and tension is set appropriately for your fabric.
- Full Tutorial (Measurements and Details): While this guide provides an overview, for precise cutting dimensions and more in-depth visual guidance, you’ll want to refer to the original source. You can find the comprehensive details and measurements for this project by clicking here for the full tutorial by Teresa DownUnder.
How to Make a Moroccan Star Mini Quilt: A Step-by-Step Guide
Creating the Moroccan Star Mini Quilt is a rewarding process that builds confidence with each accurately sewn seam. Follow these steps carefully, taking your time with each one, and you’ll soon have a stunning piece to admire.
General Quilting Tips for Success:
- Precision is Paramount: Measure twice, cut once! Accurate cutting and a consistent ¼-inch seam allowance are critical for your blocks to come together perfectly.
- Press, Don’t Iron: When quilting, you “press” seams, which means lifting and placing the iron down, rather than sliding it. This prevents distorting your fabric.
- Patience is a Virtue: Don’t rush! Enjoy the process. If a seam isn’t right, unpick it and resew. It’s better to take a little extra time than to be disappointed with the final result.
Step-by-Step Assembly:
Step 1: Preparing the Corner Units
Begin by cutting all your chosen fabrics to the specified sizes as detailed in Teresa DownUnder’s full tutorial. Accuracy in this initial step will save you headaches later. Once your pieces are cut, identify your large background squares and your medium print squares. These will form the foundation of your quilt blocks. Take two of the medium print squares and carefully place one on each of two opposite corners of a large background square. Ensure that the right sides of the fabric are facing each other. It’s crucial that their raw edges are perfectly lined up with the raw edges of the background square. Using your marking tool, draw a diagonal line from corner to corner across each of the print squares. Stitch directly along these diagonal lines. This technique, often used for creating half-square triangles (HSTs) or similar units, will form the foundation for the star points.
Step 2: Refining and Building the Four-Patch Blocks
After stitching, carefully trim off the excess fabric layers from the seam allowance, leaving a ¼-inch seam. This step reduces bulk and helps your quilt lie flatter. Once trimmed, press the fabrics open, ensuring your seams are flat and neat. Pressing towards the darker fabric is a common practice to prevent darker fabrics from showing through lighter ones, but sometimes pressing seams open is preferred for reduced bulk. Repeat this process to create another identical piece. Next, gather four of your small print squares. Arrange these into a classic 4-patch block configuration. Carefully stitch these four squares together, pressing the seams as you go. Again, press the seams consistently, either all to one side or open, to ensure uniformity and minimize bulk. Create another identical 4-patch block. These 4-patch units will become central elements in your Moroccan Star design.
Step 3: Assembling the Star and Finishing the Mini Quilt
Now comes the exciting part: assembling all of your meticulously crafted block units into the beautiful Moroccan Star design. Refer to Teresa DownUnder’s video tutorial for a visual guide on the precise arrangement. The video will clearly show you how to orient each piece to form the intricate star shape. Once you have the units arranged correctly, begin stitching them together in pairs. After stitching each pair, press the seams neatly to ensure a crisp finish and to make sure your blocks lay flat. Then, stitch these pairs to each other, forming larger units, and again, press all seams with care. You will need to make a total of four identical main blocks using these assembled units. Once you have your four completed blocks, arrange them together on a flat surface to form the full Moroccan Star design. Take your time to align them perfectly, nesting seams where necessary to achieve sharp points. Stitch these four blocks together, carefully matching seams and points. Finally, give the entire assembled quilt top a good, thorough press. This last press will flatten any remaining wrinkles, set the stitches, and prepare your stunning Moroccan Star Mini Quilt top for batting, backing, and binding.
Personalizing Your Moroccan Star Mini Quilt
Once your quilt top is complete, the creative possibilities don’t end there! Consider how you’ll finish your mini quilt to truly make it your own. For the backing, choose a fabric that complements your quilt top but also feels soft and inviting. Batting, typically a layer of cotton or polyester, will give your quilt its warmth and dimension. For quilting, you can choose simple straight lines that echo the star’s geometry, or opt for free-motion quilting to add intricate textures. Finally, select a binding fabric that frames your quilt beautifully, perhaps a solid color that picks up one of the hues from your print fabrics, or a contrasting stripe for a playful touch. Each of these choices allows you to add another layer of personality to your handmade treasure.
*All these amazing images are thanks to Teresa DownUnder via YouTube. We highly recommend visiting her channel to explore more inspiring videos and tutorials like this one!
Your Beautiful Moroccan Star Awaits
There you have it – a comprehensive guide to creating your very own Easy Moroccan Star Mini Quilt. This project is a fantastic way to develop your quilting skills, whether you’re a complete novice or looking for a quick and satisfying make. The elegance of the Moroccan Star design ensures that your finished piece will be a cherished item, perfect for brightening up any corner of your home or gifting to a loved one. The joy of creating something beautiful with your own hands is truly unmatched. So, gather your fabrics, fire up your sewing machine, and let the magic of quilting unfold. We can’t wait to see your stunning Moroccan Star creations!