
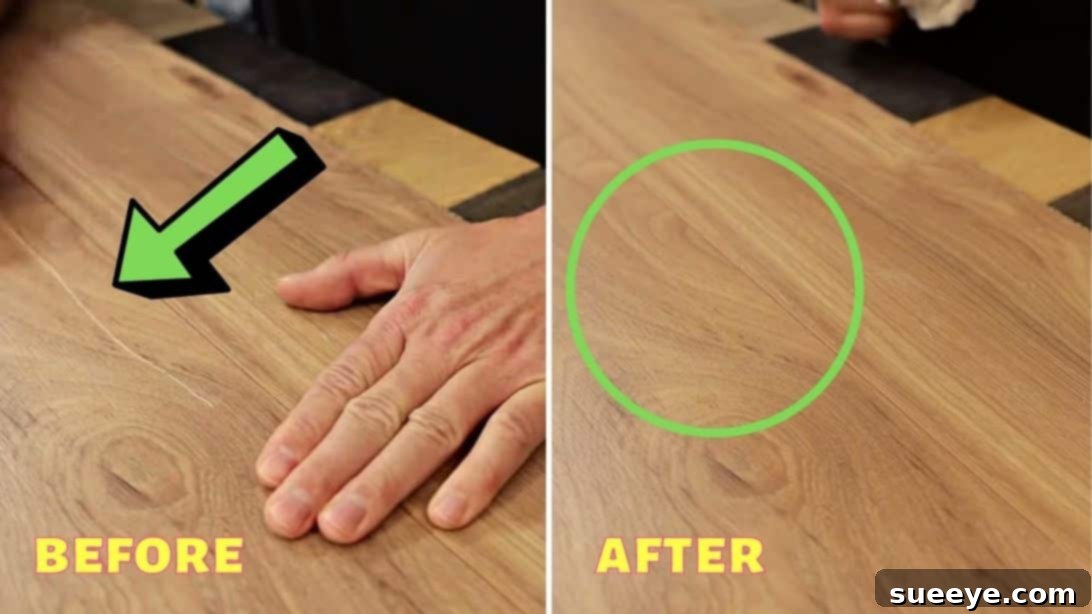
There’s nothing quite as frustrating as noticing unsightly scratches marring the beautiful surface of your floors. Whether you have elegant hardwood, durable vinyl planks, or versatile laminated flooring, these minor imperfections are almost inevitable. They stand out, often revealing lighter-colored fibers beneath the surface, disrupting the aesthetic appeal of your living space. The good news is, you don’t always need costly professional help or extensive repairs to bring your floors back to life. With a simple, affordable tool – a stain pen – you can achieve remarkable results, making those scratches virtually disappear.
This easy and fast do-it-yourself method, brilliantly showcased by The Funny Carpenter on YouTube, is a game-changer for homeowners. It’s not only quick but also incredibly effective at camouflaging scratches, making them barely noticeable to the eye. What’s more, once the stain dries completely, you won’t have to worry about it transferring onto your socks or bare feet. Say goodbye to stress over floor imperfections and hello to a renewed, flawless finish!
Why Do Floor Scratches Happen?
Understanding the common culprits behind floor scratches can help you prevent them in the future. Floors, especially those in high-traffic areas, are constantly exposed to various elements that can cause damage. Some of the most frequent sources of scratches include:
- Furniture Movement: Dragging chairs, tables, or other heavy furniture without proper protective pads is a leading cause of deep gouges and scrapes.
- Pet Claws: Even well-manicured pets can leave their mark, especially if their nails aren’t regularly trimmed. The impact of their running and playing can also contribute to wear.
- Dirt and Grime: Tiny particles of dirt, sand, and grit tracked in from outside act like sandpaper underfoot. These abrasive elements can cause micro-scratches that accumulate over time.
- Dropped Objects: Keys, utensils, toys, or other hard objects accidentally dropped can create sudden, noticeable nicks and dents.
- High Heels and Footwear: Certain types of footwear, particularly high heels or shoes with small, hard soles, can exert significant pressure on the floor, leading to indentations or scratches.
While prevention is always key, some scratches are simply unavoidable. That’s where this simple stain pen trick comes in, offering a perfect solution for those minor but annoying imperfections.
Materials You’ll Need for Your Floor Repair
Gathering your supplies beforehand ensures a smooth and efficient repair process. You’ll be surprised how few items are required for such a transformative fix:
- Stain Pen for Wood or Floors: This is the star of our repair kit. Ensure you select a color that closely matches your floor. It’s often better to go slightly lighter than darker, as you can always build up the color. There are various types, including oil-based and wax-based pens, each offering slightly different finishes.
- Dry Paper Towel or Clean Cloth: Essential for buffing and pushing the stain into the scratch and wiping any immediate excess from the surface.
- Wet Paper Towel or Damp Cloth: Crucial for wiping away excess stain quickly and cleanly to ensure a seamless blend with your existing flooring.
Step-by-Step Directions: Fixing Your Floor Scratches Effortlessly
This method is straightforward, but attention to detail will yield the best results. Follow these steps to restore your floor’s pristine appearance:
Step 1: Preparing the Area and Initial Stain Application
Before you begin applying any stain, proper preparation is vital. A clean surface ensures the stain pen adheres correctly and evenly, leading to a much more effective repair.
- Clean the Area Thoroughly: Start by wiping the scratched area of your floor completely clean. Use a mild floor cleaner or just a damp cloth to remove any dust, dirt, grime, or debris that might be present. Allow the area to dry fully before proceeding. A clean surface allows for better stain absorption into the scratch and prevents dust from getting trapped beneath the repair.
- Choose the Right Stain Pen: With the area prepped, select a stain pen that is the absolute closest match to your floor’s color. Hold the pen cap or apply a tiny dot in an inconspicuous area of your floor (like in a closet or under a large piece of furniture) to accurately gauge the match. If unsure between two shades, it’s often safer to start with the lighter option, as you can always layer to deepen the color.
- Apply the Stain to Scratches: Carefully draw the stain pen along the length of each scratch. Aim to follow the lines of the scratch precisely, working with the grain of the wood or laminate if visible. Don’t press too hard; a light, even application is usually sufficient for surface scratches. For deeper gouges, you might need a slightly heavier hand, but remember you can always add more stain in subsequent passes.
- Buff with a Dry Towel: Immediately after applying the stain to a scratch (or a small, manageable section of scratches), grab your dry paper towel or clean cloth. Rub it gently yet firmly along the stained scratch. This action is critical as it helps to push the stain deeper into the scratch gaps, ensuring maximum coverage and penetration. It also helps to blend the freshly applied stain seamlessly with the surrounding floor and removes any immediate excess from the surface, preventing an unnatural-looking “blob” of color.
Step 2: Finishing Touches and Drying
The next step is crucial for achieving a natural, flawless finish and preventing any sticky residue or uneven coloring.
- Wipe Off Excess with a Wet Towel: Without delay, take your wet paper towel or damp cloth and lightly wipe over the treated area. This step is critical for removing any remaining excess stain from the surface of your floor, ensuring that the color is only in the scratch itself and not bleeding onto the untouched, pristine areas. Work quickly but gently, ensuring you don’t rub the stain out of the scratch. The goal is to clean the surrounding surface.
- Allow to Dry Completely: After carefully wiping, give the stained area ample time to dry. Drying times can vary significantly depending on the type of stain pen you’ve used (oil-based vs. water-based), the humidity levels in your home, and how much stain was applied. Typically, this can range from a few minutes to an hour. Once completely dry, the stain will be permanent and will not transfer onto socks, bare feet, or anything else that comes into contact with it. For deeper scratches that might still be visible after the first application, you might find that a second, lighter application followed by immediate buffing and wiping can further improve the repair once the first layer is thoroughly dry.
This identical method can be applied effectively across various flooring types, including classic hardwood, resilient golden oak vinyl planks, and durable mid-tone laminated floors. The fundamental key to success is always to ensure the stain pen color closely matches your specific floor’s hue for the most seamless and invisible repair.
Tips for Best Results and Longevity
To ensure your floor scratch repair looks its best and lasts, consider these additional tips:
- Test in an Inconspicuous Area: This cannot be stressed enough. Always perform a patch test in a hidden spot (e.g., under a rug, behind a large piece of furniture, or in a closet) to confirm the stain color is a good match and that you’re satisfied with the outcome before treating prominent areas.
- Work in Good Lighting: Natural light or a bright, focused work light will help you clearly see the scratches and apply the stain accurately, ensuring proper blending and coverage.
- Go with the Grain: Especially for hardwood or laminate floors with a visible wood grain, apply the stain in the direction of the grain. This technique helps the repair blend in naturally and makes it much less noticeable.
- Multiple Thin Coats: For deeper scratches or areas where you need more color intensity, it’s always better to apply several thin layers of stain, allowing each to dry slightly, rather than one thick, heavy coat. This builds up the color gradually and provides a more natural, uniform finish.
- Use a Steady Hand: Precision is key for this type of detailed repair. Take your time to carefully trace the scratches. If your hand isn’t steady, consider using a ruler or painter’s tape to guide your application (though be careful not to damage the surrounding floor with tape adhesive).
Preventing Future Floor Scratches: A Proactive Approach
While this stain pen trick is fantastic for repairs, proactive measures can significantly reduce the occurrence of future scratches and extend the life and beauty of your floors:
- Furniture Pads: Apply high-quality felt pads to the bottom of all furniture legs that sit directly on your floors, including chairs, tables, and sofas. Regularly check and replace these pads as they wear down or become dirty, as worn pads can actually cause scratches.
- Area Rugs and Mats: Place area rugs in high-traffic zones, entryways, and under heavy furniture. Entry mats are especially important for trapping abrasive dirt, sand, and grit before it spreads throughout your home.
- Regular Cleaning: Sweep or vacuum your floors frequently (daily in high-traffic areas) to remove abrasive dirt and debris. Use a soft-bristled broom or a vacuum with a hard floor attachment. Mop with appropriate floor cleaners as recommended by your flooring manufacturer; avoid harsh chemicals that can damage finishes.
- Trim Pet Nails: Keep your furry friends’ nails trimmed short and smooth to minimize scratches from their paws, especially if they are active indoors.
- Implement a Shoe Policy: Consider implementing a “no shoes in the house” policy, especially for outdoor footwear that can track in sharp pebbles, dirt, and moisture. Designate a shoe-off zone at your entryway.
- Lift, Don’t Drag: When moving furniture or any heavy objects, always lift them rather than dragging them across the floor. Use furniture sliders for larger, heavier items to safely move them without causing damage.
When to Consider Professional Help
While the stain pen method is incredibly effective for minor to moderate surface scratches, there are instances where professional intervention might be necessary:
- Deep Gouges: If the scratch is very deep, extends through multiple layers of the flooring, or has visibly damaged the core material of the plank or wood, a stain pen may not be sufficient to fully conceal the damage or restore structural integrity.
- Widespread Damage: If large sections of your floor are heavily scratched, deeply gouged, or show extensive wear and tear, a complete refinishing (for solid hardwood floors) or plank/tile replacement (for laminate or vinyl) might be a more comprehensive and lasting solution.
- Structural Damage: Any signs of warping, buckling, significant water damage, or widespread delamination indicate issues beyond simple surface scratches that often require professional assessment and repair to prevent further deterioration.
For such cases, consulting with a reputable flooring professional can provide you with the best assessment and tailored repair options, ensuring the long-term health and appearance of your floors.
Conclusion: Restore Your Floors with Ease
Floor scratches don’t have to be a permanent eyesore that diminishes the beauty of your home. With the simple, budget-friendly technique of using a stain pen, you can effectively camouflage those annoying marks on your vinyl, hardwood, or laminated floors, bringing them back to life. This accessible DIY approach not only saves you significant time and money compared to professional repairs but also provides the satisfaction of a job well done, leaving your floors with a refreshed, well-maintained appearance. Remember the key principles for success: meticulous cleaning and preparation, careful color matching, precise and light application, and quick cleanup of any excess stain. By incorporating this quick fix into your regular home maintenance routine, along with diligent preventive measures, your floors can continue to look beautiful, inviting, and virtually flawless for many years to come.
*Many thanks to The Funny Carpenter via YouTube for sharing these invaluable tips and for the images used in this comprehensive guide. If you found this tutorial helpful and appreciate practical DIY solutions, be sure to visit and subscribe to his channel for more brilliant home improvement ideas!