
There’s a special kind of joy that comes from observing the vibrant life in your own backyard. Attracting local wild birds is a wonderful way to connect with nature, and creating a welcoming environment for them doesn’t have to be complicated or expensive. If you’re looking for an incredibly simple, low-budget, and eco-friendly way to support your feathered friends, this DIY bird feeder project, inspired by the clever creators at 3MB Vlogs, is an absolute game-changer. Perfect for summer and truly any season, you’ll soon find yourself wanting to make these delightful feeders for every outdoor area around your home. I’ve even placed one by each window, transforming ordinary views into dynamic wildlife showcases.
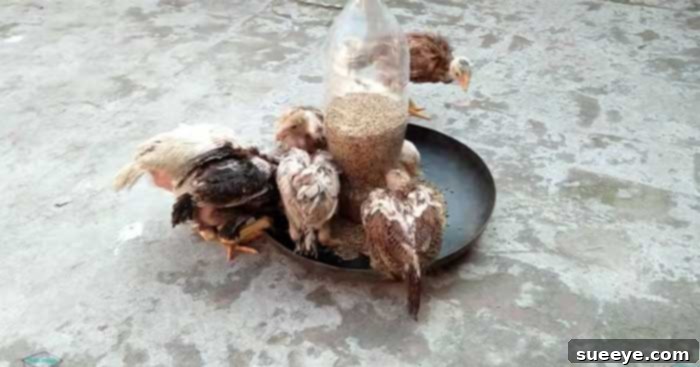
What makes this particular homemade bird feeder so appealing is its remarkable simplicity. The entire project takes mere minutes to assemble and primarily utilizes items you likely already have lying around your house. The only essential purchase will be the birdseed itself, transforming discarded materials into a valuable resource for your local ecosystem. Beyond attracting beautiful songbirds, these versatile feeders also make excellent, gravity-fed chicken feeders if you have a coop and wish to provide a consistent food source for your flock.
Why Embark on a DIY Bird Feeder Project?
Creating your own bird feeder offers a multitude of benefits that extend beyond simply providing food for birds. It’s a rewarding activity with positive impacts on your wallet, the environment, and even your personal well-being.
Eco-Friendly Upcycling and Waste Reduction
In an age where environmental consciousness is paramount, upcycling plastic bottles into functional bird feeders is a fantastic way to contribute to waste reduction. Instead of sending another 2-liter bottle to a landfill, you’re giving it a second life as a mini wildlife sanctuary. This small act of recycling transforms potential pollution into a haven for nature, aligning perfectly with sustainable living practices and inspiring others to consider creative reuse.
Cost-Effective Bird Watching
Store-bought bird feeders can range from moderately priced to quite expensive, especially for durable or aesthetically pleasing models. This low-budget DIY bird feeder eliminates that cost barrier almost entirely. By utilizing readily available materials, you can enjoy the rewarding hobby of bird watching without a significant financial investment. All you truly need to buy is the birdseed, making it an accessible project for everyone.
Engaging and Educational for All Ages
This simple craft is an ideal family activity. Children can participate in various stages of the project, from cleaning the bottle to helping fill it with seeds. It’s a hands-on way to teach them about recycling, the importance of caring for local wildlife, and basic craft skills. Watching the birds flock to a feeder they helped create provides an invaluable lesson in cause and effect, fostering a deeper connection to the natural world around them.
A Direct Connection to Nature
Placing a homemade bird feeder in your yard or by a window creates a direct, tangible link to nature. You’ll have the opportunity to observe a variety of bird species up close, learning about their behaviors, songs, and feeding habits. This daily dose of wildlife can be incredibly therapeutic, offering moments of peace and wonder that can significantly enhance your quality of life.
Essential Materials for Your Upcycled Bird Feeder:
Gathering your materials is the first step in this fun and straightforward project. You’ll be surprised at how few items are required to create a functional and attractive bird feeder.
- 2-Liter Bottle (or similar large plastic bottle): The star of our show! A clean, dry 2-liter soda bottle works perfectly, but you can also experiment with larger water bottles, milk jugs, or even juice containers. Ensure it’s thoroughly washed and dried to remove any residue that might harm the birds.
- Wood Burner Pen or Exacto Knife: These tools are crucial for creating the seed dispensing holes. A wood burner pen provides cleaner, smoother edges and melts the plastic, while an Exacto knife (or a sharp utility knife) allows for precise cuts. Safety is paramount when using either tool; always exercise caution and, if using an Exacto knife, work on a protected surface.
- Plate (or shallow dish): This will serve as the base where the birdseed collects, allowing birds easy access. An old ceramic saucer, a sturdy plastic plate, or even the bottom of another plastic container can work. Choose a plate that is wide enough to catch falling seeds but not so large that it becomes unwieldy. The wider the plate, the more space for birds to perch and feed simultaneously.
- Hot Glue (and a Hot Glue Gun): For securely attaching the bottle to the plate. Hot glue provides a quick bond. For a more durable, weather-resistant, and long-lasting connection, consider using a stronger adhesive like E-6000 or a construction adhesive formulated for outdoor use.
- Optional: Hanging Mechanism: String, wire, S-hook, or a small chain can be used to suspend your feeder.
- Optional: Funnel: Extremely helpful for neatly filling the bottle with birdseed, minimizing spills and waste.
- Optional: Small Dowel or Stick: For creating perches if your chosen plate doesn’t offer enough resting space for birds.
Directions: Your Step-by-Step Guide to a Homemade Bird Feeder:
Step One: Preparing the Seed Dispensing Holes in the Bottle
Start by carefully burning or cutting holes into the bottom section of your clean, dry 2-liter bottle. The ideal placement for these holes is between the natural creases or indentations at the bottle’s base. These creases often provide structural integrity, and placing holes there helps maintain the bottle’s shape while ensuring controlled seed flow. The goal is to create openings just large enough for the birdseed to trickle out easily, but not so big that it pours out too quickly or allows rain to enter easily.
If you’re using a wood-burning tool, work slowly and steadily in a well-ventilated area. The heat will melt through the plastic, creating clean, rounded holes. Be mindful of fumes and avoid direct inhalation. If opting for an Exacto knife, place the bottle on a stable, protected cutting surface (like a cutting mat) and make small, precise cuts. You may need to make several passes to create a clean opening. Ensure the edges are not too sharp, as they could potentially harm birds. You could also use a small drill bit for this step, though ensure it’s specifically for plastic to avoid cracking. Remember, the size of the holes is crucial: too small, and the seed won’t dispense; too large, and it will empty too quickly or become saturated with water.
Image Credit: 3MB Vlogs via YouTube video. This image illustrates the secure attachment of the bottle to the plate, ready for seed.
Step Two: Securely Attaching the Bottle to the Plate
Once your seed dispensing holes are complete, it’s time to attach the bottle to your chosen plate. This step forms the essential structure of your gravity-feed bird feeder. Apply a generous circle of hot glue directly to the center of the plate where the bottle will sit. Quickly and firmly press the bottom of the bottle onto the glue, ensuring it is centered and upright. Hold it in place for a minute or two until the hot glue cools and sets.
While hot glue provides a fast and convenient bond, its durability, especially outdoors in varying weather conditions, can be limited. For a more robust and long-lasting feeder, consider using a stronger adhesive like E-6000 glue or a weather-resistant construction adhesive. These types of glues often require a longer curing time (check product instructions), but they offer superior strength and resilience against moisture and temperature fluctuations, ensuring your feeder withstands the elements for much longer. Whichever adhesive you choose, ensure the bond is strong and stable, as this will prevent the feeder from tipping over when full or in windy conditions.
Step Three: Filling Your Feeder and Optimal Placement
With the structure complete, it’s time for the most exciting part: filling your new bird feeder with delicious birdseed! Using a funnel for this step is highly recommended as it helps prevent spills and ensures the seed goes directly into the bottle, making the process neat and efficient. Carefully pour your chosen birdseed into the top of the bottle. If your holes were properly cut in Step One, the seed will automatically begin to fall out of the bottom openings and collect in the plate, creating a continuous feed system.
Once filled, your feeder is ready for placement. Consider these factors for optimal bird attraction and feeder maintenance:
- Visibility and Safety: Place the feeder in an area where you can easily observe the birds, but also consider their safety. Ideally, it should be within 10-15 feet of cover (like a bush or tree) to offer refuge from predators, yet far enough from dense foliage to prevent ambushes by cats or other lurking creatures.
- Accessibility for Cleaning and Refilling: Choose a spot that’s easy for you to reach regularly. Bird feeders require routine cleaning and refilling, so convenience is key.
- Protection from Elements: While birds are hardy, try to position the feeder in a somewhat sheltered spot to protect the seed from heavy rain and strong winds. This helps keep the seed dry and prevents spoilage.
- Squirrel Management: If squirrels are an issue in your area, consider placing the feeder on a pole with a baffle or away from jump-off points.
This simple gravity-fed design also makes cleaning a breeze. When it’s time for a refresh (ideally every 1-2 weeks to prevent mold and disease spread), simply unhook it, empty any remaining seed, and rinse it thoroughly with a garden hose or a mild soap and water solution. Ensure it’s completely dry before refilling to prevent seed clumping and mold growth. Regular cleaning is vital for the health of your visiting birds.
Image Credit: 3MB Vlogs via YouTube video. This image demonstrates the final step of filling the feeder, showcasing the seed collecting in the base.
Choosing the Right Birdseed for Your DIY Feeder
The type of birdseed you offer will largely determine which feathered friends visit your feeder. For general use in a feeder like this, a high-quality mixed seed blend (without cheap fillers like red milo) is a good starting point. However, if you want to attract specific species, consider these popular options:
- Black Oil Sunflower Seeds: A favorite of many bird species, including finches, chickadees, cardinals, and grosbeaks. Its thin shell is easy for small birds to crack.
- Nyjer (Thistle) Seed: Ideal for attracting goldfinches, house finches, and pine siskins. Requires a special thistle feeder, so not suitable for this design unless you modify the holes significantly.
- White Proso Millet: Preferred by ground-feeding birds like juncos, sparrows, and doves.
- Peanut Pieces: Attracts woodpeckers, nuthatches, and jays.
Always store birdseed in a cool, dry place in an airtight container to keep it fresh and free from pests. Offering a variety of seeds can increase the diversity of birds visiting your garden.
Enhancements and Maintenance Tips for Your Long-Lasting Feeder
Customization and Personal Touches
While functional as is, you can personalize your DIY bird feeder to better suit your garden’s aesthetic. Consider painting the bottle with non-toxic, outdoor-grade acrylic paints or adding decorative elements. You can also attach small dowels or sturdy sticks near the plate to create additional perching spots for birds, making it even more inviting.
Ensuring Durability and Weather Resistance
For added longevity, especially if you used hot glue, you might want to apply a sealant around the bottle-to-plate joint to enhance weather resistance. You can also construct a simple “roof” from a larger plastic plate or a piece of thin wood, attached above the bottle, to further protect the seed from heavy rain and snow.
Ongoing Maintenance for Bird Health
Beyond regular cleaning, keep an eye on the feeder for any signs of wear and tear. Periodically check the glue bond and the integrity of the plastic, especially after harsh weather. Promptly repair any damage to ensure the feeder remains safe and functional for your avian visitors. Fresh, dry seed is critical; wet, moldy seed can be harmful to birds. If the seed gets wet, discard it and refill with fresh, dry seed after cleaning and drying the feeder thoroughly.
Embrace the Joy of DIY Bird Feeding
This low-budget DIY bird feeder project is more than just a simple craft; it’s an invitation to connect with nature, practice sustainable living, and provide a vital resource for local wildlife. It’s incredibly easy to make, uses materials you might otherwise discard, and offers countless hours of enjoyment as you watch a parade of feathered friends visit your creation. So, gather your materials, follow these straightforward steps, and get ready to transform your outdoor space into a vibrant haven for birds. Happy bird watching!