
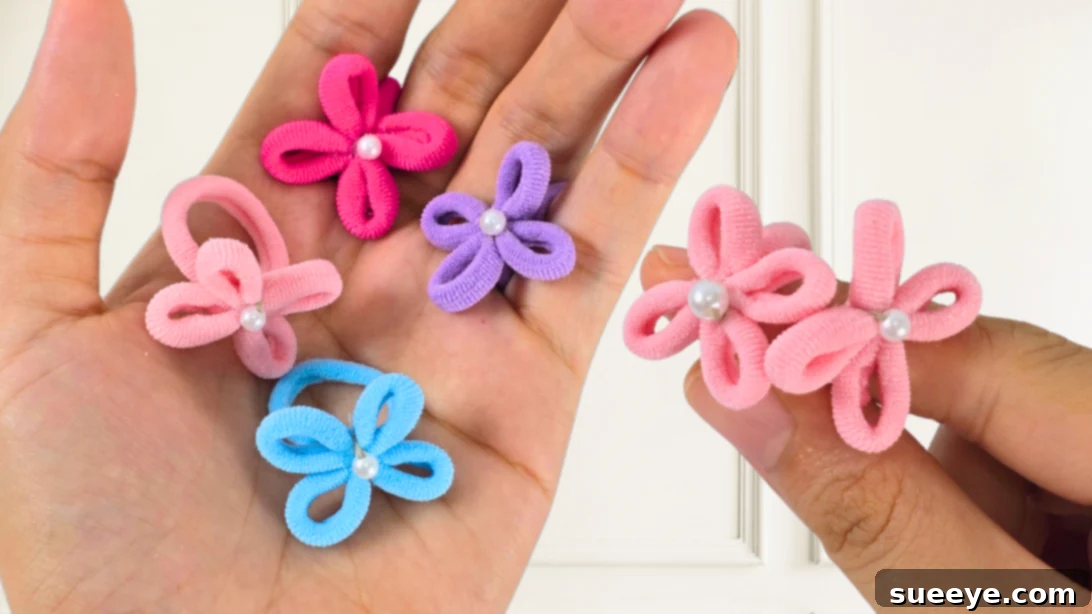
Unleash your creativity and transform mundane everyday items into captivating fashion statements with our guide to crafting **DIY hair tie rings**. These delightful accessories are more than just simple adornments; they are a vibrant expression of personal style, adding a unique touch to any ensemble. Imagine turning ordinary hair ties into charming, wearable art that pops with color and personality. Beyond their primary use, these versatile creations can also serve as decorative accents for various crafts or DIY projects around your home. Children, especially, will adore sporting these cheerful rings, whether in their hair or on their fingers, making this an engaging and rewarding craft for all ages to enjoy.
One of the most appealing aspects of these handmade flower rings is their incredible simplicity. Forget about complicated patterns, advanced sewing techniques, or expensive specialized tools. All you truly need are a few basic supplies you likely already have: a handful of hair ties and a small decorative element such as a bead, a lustrous pearl, or a whimsical charm. In a matter of minutes, you can effortlessly transform plain, functional hair ties into stylish, practical, and utterly unique rings. This accessibility makes it a perfect project for beginners and seasoned crafters alike, promising instant gratification with beautiful results.
These charming DIY ring pieces are not solely for your personal enjoyment. They also make incredibly thoughtful and budget-friendly gifts for friends, family, or even as delightful party favors. Each ring, meticulously crafted by hand, offers an unparalleled opportunity for customization. You can easily tailor them to match a specific outfit, reflect a particular mood, or even celebrate the current season. This level of personalization ensures that every single hair tie ring you create is a truly one-of-a-kind accessory, imbued with a personal touch that store-bought items simply cannot replicate. They are also fantastic items for small craft projects or to sell at local craft fairs, offering a handmade charm that customers adore.
Whether you’re seeking a quick and satisfying weekend project to unwind, an ingenious way to repurpose an overflowing collection of hair ties, or a fun, interactive craft to enjoy with friends and loved ones, DIY hair tie rings are an impeccable choice. Their swift creation time means you can produce several beautiful pieces in just one sitting, making them ideal for spontaneous crafting sessions. They are not only fast to make and endlessly fun to design, but they also represent a cute, functional, and fashionable addition to any accessory collection. Prepare to be delighted by how effortlessly you can populate your jewelry box or gift stash with these adorable handmade treasures.
Why Craft Your Own Hair Tie Rings? Unlocking the Benefits of DIY
Diving into the world of DIY hair tie rings offers a multitude of advantages beyond just having a pretty accessory. Firstly, there’s the undeniable appeal of **cost-effectiveness**. Crafting these rings at home is significantly cheaper than purchasing similar items from boutiques, allowing you to create a diverse collection without breaking the bank. You’re essentially transforming inexpensive, readily available hair ties into valuable, stylish pieces.
Secondly, **unlimited personalization** is at your fingertips. Unlike mass-produced items, your handmade rings can be perfectly customized. Choose colors that complement your wardrobe, select beads that match your favorite gemstones, or incorporate charms that reflect your hobbies and passions. This bespoke quality means your accessories will always be a true reflection of your unique personality and style, adapting to any season, occasion, or mood.
Moreover, this craft embraces **eco-friendliness and repurposing**. Instead of discarding stretched-out or forgotten hair ties, you can give them a new lease on life, reducing waste and contributing to a more sustainable lifestyle. It’s a wonderful way to minimize your environmental footprint while simultaneously nurturing your creative spirit. This mindful approach to crafting transforms potential waste into beautiful, functional objects.
For many, crafting is a **therapeutic and relaxing activity**. The simple, repetitive motions of threading and securing can be incredibly meditative, offering a welcome break from daily stresses. It’s a chance to engage your hands and mind in a focused, enjoyable task, fostering a sense of accomplishment and calm. This creative outlet can be a fantastic way to de-stress and express yourself artistically.
Finally, these projects are **perfect for all ages and skill levels**. The simplicity of the technique makes it an excellent activity for children to develop fine motor skills and creativity, while adults can appreciate the quick gratification and customization options. It’s also a fantastic group activity for craft parties, sleepovers, or family bonding time, fostering shared memories and beautiful creations.
Gathering Your Essentials: What You’ll Need for Hair Tie Rings
Before embarking on your crafting journey, ensure you have all the necessary components. The beauty of this project lies in its minimal material requirements, making it accessible and affordable.
Materials
- Hair Ties: You’ll need at least three for each ring – two for the flower petals and one for the ring band. Experiment with various colors, widths, and materials (elastic, fabric-covered, velvet) to create different textures and visual effects. Repurpose old ones for a sustainable twist!
- Decorative Element (Pearl, Bead, Charm): This will be the focal point of your flower. Consider pearls for a classic look, colorful beads for a playful vibe, or small charms for a personalized touch. Ensure your chosen embellishment has a hole large enough for your needle and thread to pass through easily.
- Needle: A sharp, sturdy sewing needle is essential. Choose one with an eye large enough to accommodate your thread but fine enough to pass through the hair ties without snagging. An embroidery needle can work well.
- Thread: Opt for strong, durable sewing thread or embroidery floss that matches or complements your hair ties. Polyester thread is a good choice for its strength. Using a double strand will add extra durability to your finished ring.
- Scissors: A small pair of sharp craft scissors will be handy for cutting thread cleanly.
- Optional: Fabric glue (for extra security on knots), thimble (to protect your finger), ring blanks (if you prefer a metal base over a hair tie ring band).
Step-by-Step Guide: How to Make Your Own Hair Tie Rings
Follow these straightforward steps to create your beautiful hair tie flower rings. The process is quick, enjoyable, and yields charming results every time.
-
Step 1: Prepare Your Materials and Thread Your Needle
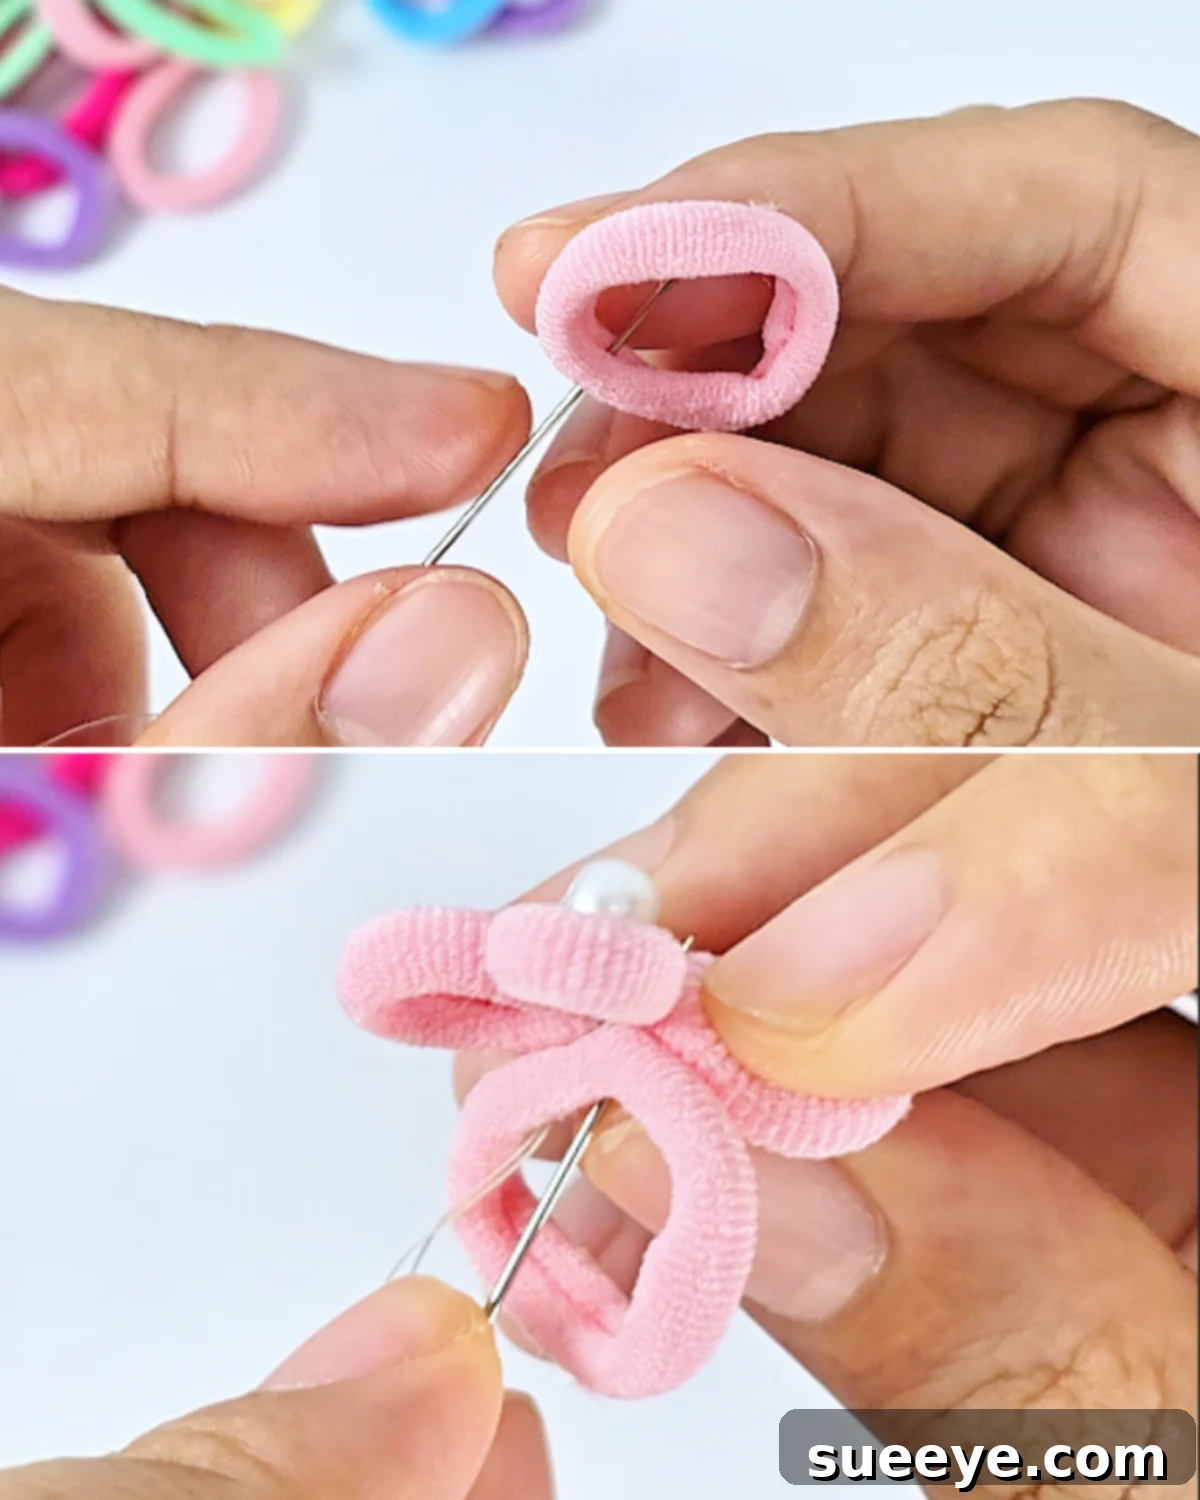
Begin by selecting the hair ties you wish to use for the flower portion and the base ring. Choose colors that harmonize or contrast for a striking effect. If you’re incorporating beads or charms, have them ready. Next, thread your needle with a manageable length of sewing thread or embroidery floss – typically around 18-24 inches. For enhanced strength and durability, double your thread and tie a secure knot at the end. Now, take two hair ties and stack them neatly, one on top of the other. Carefully insert your threaded needle directly through the very center of both stacked hair ties, pulling the thread all the way through until the knot catches at the starting point. Ensure the hair ties remain aligned as you do this.
-
Step 2: Form and Secure the Charming Flower Shape
With the thread now pulled through the center of the stacked hair ties, gently but firmly pull the thread taut. As you pull, the hair ties will naturally begin to pucker and fold, gathering at the center to form a delightful flower-like shape with distinct “petals.” Once you’re satisfied with the flower’s appearance, wrap the thread tightly around the pinched center a few times. This action secures the shape, preventing it from unraveling. After wrapping, sew a small, secure knot close to the center, perhaps looping through a few stitches to ensure it holds firmly. Trim any excess thread, leaving a neat finish.
-
Step 3: Adorn with a Pearl or Embellishment
Now it’s time to add the sparkling centerpiece. Thread your chosen pearl, bead, or embellishment onto the needle. Position this decorative element precisely in the center of your newly formed hair tie flower. Carefully sew the pearl or bead onto the flower, passing the needle through the center of the flower and then back up through the bead several times. This ensures the embellishment is firmly attached and won’t come loose with wear. Aim for neat, inconspicuous stitches to keep the focus on your beautiful centerpiece.
-
Step 4: Attach the Ring Band for Wearability

This final step transforms your flower into a wearable ring. Take a separate, single hair tie – this will serve as your comfortable ring band. Position this hair tie underneath the flower you’ve just created, ensuring it forms a circular shape that can comfortably fit around a finger (or be used as a hair loop). Using your needle and thread, sew the hair tie base securely to the underside of the flower, making several strong stitches. Ensure the attachment points are robust enough to withstand regular use. Hide your final knot discreetly and trim any remaining thread. You’ve now completed your very own handmade hair tie ring!
Creative Ways to Style and Use Your Hair Tie Rings

Beyond the Finger: Versatile Uses for Your Handmade Creations
- Elevate Your Hair Game: While primarily designed as finger rings, the base (being a hair tie) allows them to function beautifully as a decorative accent for your hair. Use them to secure ponytails, adorn braids, or add a charming flourish to a half-updo. Their soft, comfortable design ensures they won’t pull or snag your hair, making them both stylish and practical for everyday wear or special occasions.
- Chic Napkin Rings for Entertaining: Impress your guests by transforming these rings into unique napkin holders. Simply wrap them around neatly folded table napkins for a delightful and decorative touch. This idea is perfect for casual dinners, festive parties, seasonal table settings, or even as an elegant addition to a bridal shower brunch. It adds a personalized, handmade elegance to your table decor.
- Personalize Your Home Decor: Bring a touch of handmade charm to your living space. Add these vibrant flower rings to the necks of glass jars, decorative bottles, or small vases to instantly personalize and brighten your home decor. They are a creative way to dress up storage containers, display pieces, or even add a whimsical element to your plant pots, infusing any room with a cozy, crafted feel.
- Heartfelt Handmade Gifts & Party Favors: These customizable hair tie rings make exceptional gifts. They are thoughtful, affordable, and incredibly easy to tailor for any recipient or occasion. Give them as birthday presents, thank-you tokens, stocking stuffers, or craft fair items. They also serve as memorable and unique party favors for events like tea parties, baby showers, or children’s birthdays, leaving guests with a sweet memento.
- Incorporate into Other DIY Craft Projects: Unleash their potential as versatile embellishments for a myriad of other craft projects. Use them as charming accents on handmade greeting cards, scrapbook pages, photo frames, or even as decorative elements on small gift boxes. Their cheerful floral design can add a unique and delightful detail to almost any creative endeavor, making your projects truly stand out.
Tips for Success and Customization: Elevate Your Craft
To ensure your hair tie rings are not only beautiful but also durable and truly unique, consider these expert tips:
- Color Coordination is Key: Experiment with different color combinations for your hair ties and embellishments. Choose monochromatic shades for an elegant look, complementary colors for a vibrant pop, or contrasting hues for a bold statement. Think about the outfits you’ll wear them with or the season you’re crafting for.
- Varying Sizes and Textures: Don’t limit yourself to one type of hair tie. Using different sizes for the flower petals (e.g., smaller ties for inner petals, larger for outer) can create a more dimensional look. Incorporate hair ties with varied textures like velvet, ribbon, or patterned fabric for added visual interest.
- Beyond the Pearl: While pearls offer classic elegance, explore other embellishments. Rhinestones, small buttons, fabric rosettes, or even tiny handmade clay charms can personalize your rings even further. Ensure whatever you choose can be securely sewn or glued.
- Reinforce for Durability: For rings that will see frequent wear, consider adding a tiny dot of fabric glue to your knots after tying them. This provides extra security against unraveling. Use strong, high-quality thread and double-stitch where possible, especially when attaching the decorative element and the ring base.
- Creative Ring Bases: While this tutorial uses another hair tie for the ring band, you can also attach your flower creations to plain metal ring blanks (often found at craft stores) for a more traditional jewelry feel. This offers another layer of versatility for your finished pieces.
- Consider the Occasion: Craft themed rings for holidays (e.g., red and green for Christmas, pastels for Easter), special events (e.g., school colors for graduations), or seasonal wear (e.g., bright colors for summer, earthy tones for autumn).
Embrace Your Inner Crafter: The Joy of DIY Hair Tie Rings
In conclusion, crafting your own hair tie rings is a wonderfully accessible and deeply rewarding DIY project. It’s an invitation to tap into your creativity, offering a simple yet profound way to personalize your style, craft thoughtful gifts, and even repurpose everyday items into beautiful treasures. The ease of creation, coupled with endless customization possibilities, ensures that each ring you make is a reflection of your unique flair. So, gather your materials, let your imagination take flight, and embark on this delightful crafting journey. You’ll be amazed at the charming accessories you can create!
You Must Try These Other Crafts!
Seasonal
Make the Cutest DIY Christmas Ornament With a Tuna Can
Seasonal
DIY Christmas Ornaments | Glitter Foam
Crafts
Decorate Your Tree With Adorable 5 Minute Santa Gnome Ornaments
Seasonal
DIY Honeycomb Paper Christmas Tree Ornament
*If you love this craft and want to explore more creative projects, be sure to visit our official website, follow our Facebook page for daily inspiration, and subscribe to our YouTube channel for engaging video tutorials and exciting new DIY ideas!