
DIY Coin Battery: Unlock the Power of Everyday Items for Simple Energy
In our modern world, the ubiquitous battery powers everything from our smartphones to essential emergency equipment. While commercial batteries are convenient, understanding their fundamental principles through hands-on creation offers a unique and valuable learning experience. This guide will walk you through the exciting process of building your very own coin battery, often referred to as a “Voltaic Pile,” using common household items. Inspired by an innovative demonstration by Dave Hax on YouTube, this project is not just a fun experiment but a powerful introduction to the fascinating world of electrochemistry. Whether you’re a curious hobbyist, a science fair participant, or simply seeking a practical skill, creating a functional battery from scratch is an incredibly rewarding endeavor.
The beauty of the coin battery lies in its simplicity. It demonstrates how a chemical reaction between different metals, separated by an electrolyte solution, can generate an electrical current. This basic setup, when properly constructed, can produce enough voltage to power small devices like an LED light. Beyond its immediate utility as a makeshift power source, this project offers profound educational value, making abstract scientific concepts tangible and easily observable. Prepare to transform humble coins and foil into a source of electricity and gain a deeper appreciation for the energy that drives our world.
The Science Behind Your DIY Coin Battery: Understanding the Voltaic Pile
To truly appreciate your homemade battery, it’s essential to grasp the scientific principles at play. The coin battery is a direct descendant of the Voltaic Pile, invented by Alessandro Volta in 1800, marking the creation of the first true electrical battery. Its operation is rooted in electrochemistry, the study of chemical reactions that produce electricity and vice versa. Your coin battery functions as an electrochemical cell, where a spontaneous chemical reaction generates a flow of electrons, which we perceive as electricity.
Each “sandwich” within your coin battery stack—consisting of a copper coin, an electrolyte-soaked cardboard disc, and an aluminum foil disc—forms an individual electrochemical cell. Here’s a breakdown of the roles each component plays:
- Copper Coin (Cathode): This acts as the positive electrode. In an electrochemical cell, the cathode is where reduction (gain of electrons) typically occurs.
- Aluminum Foil (Anode): This serves as the negative electrode. The anode is where oxidation (loss of electrons) takes place. Aluminum is chosen for its reactivity and availability. (Historically, zinc was often used as the anode in early Voltaic Piles).
- Vinegar and Salt Solution (Electrolyte): This conductive solution facilitates the movement of ions between the copper and aluminum. The acidic nature of vinegar reacts with the metals, while the salt (sodium chloride) significantly increases the solution’s conductivity, allowing for a more efficient flow of charge.
When these individual cells are stacked one on top of another in the correct sequence, they are effectively connected in series. This means the voltage produced by each cell adds up, resulting in a higher total voltage output from the entire stack. This cumulative voltage is what makes the battery capable of powering small electrical loads, making your stack a compact, multi-cell power source.
Essential Materials for Your Homemade Coin Battery:
Creating your coin battery requires a few simple, easily accessible items. Most can be found in your home or purchased affordably from a local store. Precision in selecting and preparing these materials will significantly impact your battery’s performance.
- Pure Copper Coins: The more coins you use, the higher the voltage your battery will generate. For US currency, pennies minted before 1982 are predominantly copper. Ensure coins are clean and free of excessive tarnish for optimal conductivity.
- Aluminum Foil: Standard kitchen-grade aluminum foil is perfect. This will serve as one of your electrodes.
- Thin Cardboard: Materials like cereal boxes, manila folders, or even thick paper are suitable. The cardboard must be thin enough to absorb the electrolyte effectively but sturdy enough to maintain its shape.
- Distilled White Vinegar: This common household item provides the necessary acidic medium for your electrolyte.
- 1 Teaspoon of Table Salt: Regular table salt (sodium chloride) is crucial. When dissolved in vinegar, it dramatically increases the solution’s electrical conductivity.
- Packing Tape or Electrical Tape: Essential for securely holding the battery stack together, ensuring good electrical contact, and preventing the components from shifting or drying out.
- 2 Insulated Wires: Approximately 6-8 inches long each. These should have about half an inch of insulation stripped from both ends for connections.
- 2 Alligator Clips: These make connecting your battery to testing equipment or small devices much easier and safer.
- Scissors or Craft Punch: For cutting uniform circles from the cardboard and foil. Consistency in size is important.
- Small Bowl or Dish: To mix and soak your electrolyte solution and discs.
- Optional: Voltmeter or Multimeter: Highly recommended for accurately measuring the voltage output of your battery and troubleshooting.
- Optional: Small LED Light (low voltage): A great way to visually demonstrate that your battery is working. A 1.5V or 3V LED is ideal.
Step-by-Step Directions: How to Build Your Coin Battery
Constructing your coin battery is a straightforward process, but attention to detail in each step will ensure a successful and functional power source. Follow these instructions carefully:
1. Prepare Your Electrolyte Solution:
Begin by mixing your electrolyte. Pour about half a cup of distilled white vinegar into a small bowl. Add one teaspoon of table salt and stir thoroughly until the salt is completely dissolved. This saline vinegar solution is critical for facilitating the chemical reactions that generate electricity.
2. Cut and Prepare Discs:
Using one of your copper coins as a template, carefully trace and cut out an equal number of circles from both the aluminum foil and the thin cardboard. You will need one cardboard disc and one aluminum foil disc for each copper coin you plan to use. Additionally, cut one extra aluminum foil disc for the very top of your stack. For example, if you aim to use 15 copper coins, prepare 15 cardboard discs and 16 aluminum foil discs. Ensure all discs are consistently sized, matching the diameter of your coins as closely as possible.
3. Soak the Discs:
Submerge all your cardboard discs and aluminum foil discs into the prepared vinegar and salt solution. Allow them to soak for a minimum of 5-10 minutes. This step is crucial; the cardboard must be thoroughly saturated to act as an effective electrolyte reservoir, and the foil needs proper wetting to participate in the electrochemical reaction. The copper coins do not need to be soaked, but they should be clean.
4. Assemble the Battery Stack (The Voltaic Pile):
This is the core of your battery. The order of stacking is paramount for creating a series of functional cells. On a clean, dry surface, begin to stack your components carefully, one on top of the other, following this precise sequence:
- Start with a single clean copper coin at the bottom.
- Place one of your soaked cardboard discs directly on top of the copper coin.
- Place one of your soaked aluminum foil discs on top of the cardboard disc.
- Repeat this pattern: Copper coin, followed by a soaked cardboard disc, then a soaked aluminum foil disc.
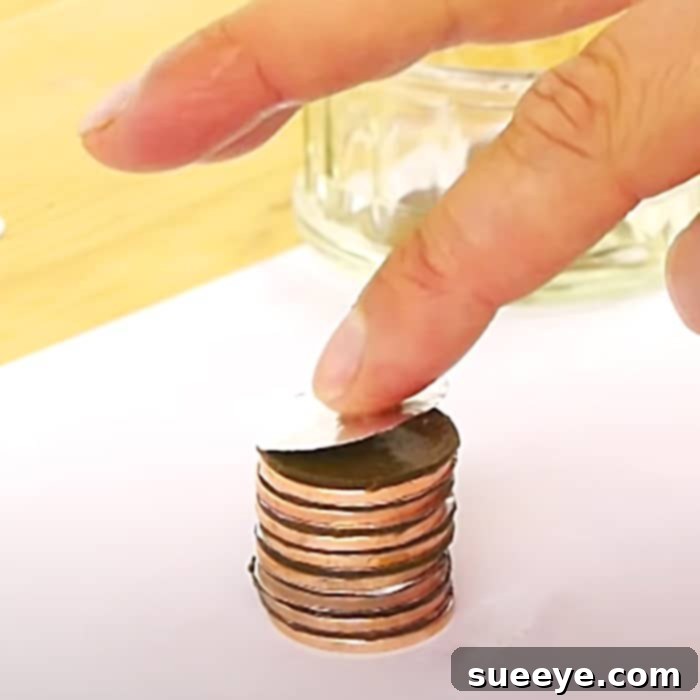
Continue building your stack in this exact sequence until you have used all your copper coins. Your stack should always conclude with an aluminum foil disc on the very top. So, if you used 15 copper coins, your final stack will comprise 15 copper coins, 15 cardboard discs, and 16 aluminum foil discs (15 for each cell + 1 for the top terminal). The integrity of this layering is vital for good electrical contact and current generation.
5. Secure the Stack:
Once your complete stack is assembled and stable, carefully wrap it tightly with packing tape or electrical tape. This step is crucial for two reasons: it holds all the components firmly in place, ensuring consistent electrical contact between layers, and it helps to seal the stack, slowing down the drying out of the electrolyte. Apply enough tape to create a compact, stable cylinder without crushing the components.
6. Connect the Wires and Alligator Clips:
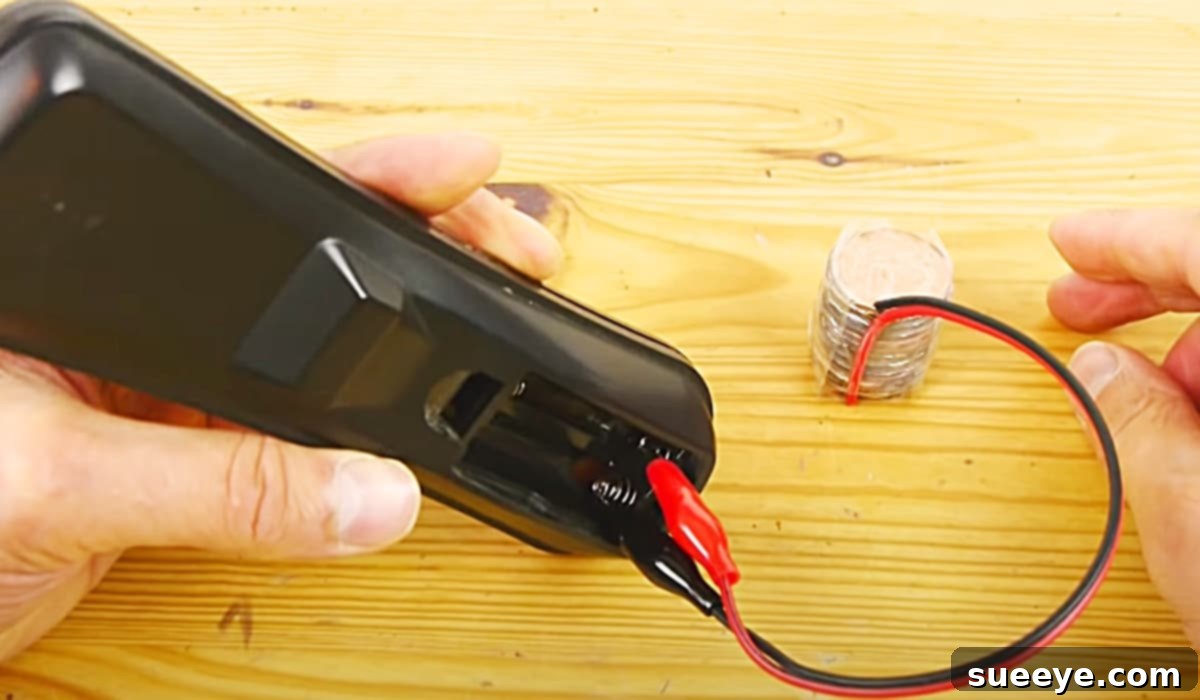
Prepare your insulated wires by stripping about half an inch of insulation from each end if they aren’t already stripped. Take one wire and securely tape one stripped end to the very bottom copper coin of your assembled battery stack. This copper coin will serve as your negative (-) terminal. Take the second wire and securely tape one stripped end to the very top aluminum foil disc of your stack. This aluminum foil disc will serve as your positive (+) terminal.
Attach an alligator clip to the free end of each wire. These clips provide a convenient way to connect your homemade battery to a voltmeter for testing or to any small electrical load you wish to power.
7. Test Your Battery!
Your DIY coin battery is now complete and ready for testing! The most effective way to gauge its performance is with a voltmeter or multimeter. Connect the positive (+) alligator clip from your battery to the positive terminal of your voltmeter, and the negative (-) alligator clip to the negative terminal. You should observe a voltage reading on your meter. Each individual “cell” (copper-cardboard-foil sandwich) typically produces around 0.5 to 0.6 volts. Therefore, a stack of 15 cells could generate anywhere from 7.5 to 9 volts. You can also connect a small, low-voltage LED light (ensuring correct polarity) to visually confirm your battery is producing power.
Troubleshooting and Tips for Success
If your coin battery isn’t working as expected or producing sufficient voltage, don’t be discouraged! Here are common issues and practical solutions to help you troubleshoot:
- Poor Electrical Contact: This is the most frequent problem. Ensure the stack is wrapped very tightly with tape, pressing all layers together firmly. Check that the wires are securely taped to the very bottom copper coin and the very top aluminum foil disc, making direct contact.
- Dry Electrolyte: The cardboard discs must remain moist for the chemical reaction to continue. If they dry out, the battery will stop working. You might need to re-soak them or lightly moisten the stack with more electrolyte solution.
- Incorrect Stacking Order: Double-check the sequence of your stack. It must consistently follow: Copper, Soaked Cardboard, Soaked Aluminum Foil, and repeat. Any deviation will break the circuit.
- Dirty or Oxidized Metals: Tarnish or dirt on the copper coins or foil can hinder conductivity. Use clean, possibly polished, coins for best results.
- Insufficient Number of Cells: A single cell produces very low voltage. You need a stack of at least 5-10 cells to generate enough power to light a typical LED. The more cells, the higher the voltage.
- Short Circuits: Ensure that no metal parts are directly touching each other without an electrolyte-soaked cardboard separator. This would create a short circuit, preventing power generation.
Pro Tip: For potentially higher voltage and slightly longer duration, some experimenters opt for zinc washers instead of aluminum foil, as zinc tends to have a greater electrochemical potential difference with copper in this setup. However, aluminum foil is generally more accessible for a quick DIY project.
Practical Applications and Limitations of Your Coin Battery
While your homemade coin battery won’t replace commercial power packs for high-drain devices, it serves several valuable purposes and offers a deeper understanding of energy generation:
- Educational Instrument: It’s an unparalleled tool for teaching fundamental concepts of electrochemistry, basic circuits, and battery operation to students of all age levels, from elementary school to advanced physics classes.
- Science Fair Project: The coin battery is a classic, engaging, and highly adaptable project for science fairs. Variables such as different electrolytes, metals, or stacking configurations can be explored for further experimentation.
- Emergency Demonstrations: In a very low-power emergency scenario, a large, well-constructed stack might provide enough temporary voltage to light a small, highly efficient LED, showcasing rudimentary off-grid power generation.
- Hands-On Learning: The sheer satisfaction of creating electricity from everyday objects is a powerful motivator for learning and exploring scientific principles.
It’s equally important to understand the inherent limitations of this type of battery:
- Low Power Output: Compared to standard commercial batteries, the coin battery produces relatively low voltage and extremely low current. It’s not suitable for powering anything beyond small LEDs or very low-power circuits.
- Short Lifespan: This is a primary (single-use) battery. The chemical reactions are not designed for longevity. The electrolyte will eventually dry out, and the metals will corrode, leading to a rapid decline in power and eventual failure.
- Not Rechargeable: Once the chemical reactants are depleted or the electrolyte dries, the battery cannot be recharged.
- Potential for Mess: Working with wet components means there’s a risk of leaks if the battery isn’t securely taped, especially as the electrolyte can be corrosive.
Safety Considerations for Your DIY Battery Project
While building a coin battery is generally safe, it’s crucial to follow basic safety guidelines to ensure a positive and risk-free experience, particularly for younger participants:
- Adult Supervision: Children should always be supervised by an adult when handling materials, especially when cutting discs or working with the electrolyte solution.
- Chemical Handling: Vinegar is acidic. Avoid direct contact with eyes, and wash hands thoroughly with soap and water after preparing and handling the electrolyte solution. In case of eye contact, rinse immediately with plenty of water.
- Sharp Objects: Exercise caution when using scissors or a craft punch to cut the cardboard and foil discs. Always cut away from your body.
- Electrical Safety: Although the voltage and current produced are low and generally not harmful, it’s good practice to treat all electrical experiments with respect. Avoid creating direct short circuits that could heat wires.
- Disposal: Once the battery is no longer functional, disassemble it. While the components are not typically classified as hazardous waste, it’s environmentally responsible to dispose of them properly according to local guidelines, especially separating the metal components.
Beyond the Coin Battery: Further Exploration and Experiments
The coin battery project is an excellent starting point for deeper scientific exploration. Once you’ve successfully built and tested your initial battery, consider these ideas to expand your learning and experimentation:
- Experiment with Different Electrolytes: Try substituting the vinegar and salt solution with other acidic or saline liquids. Common alternatives include lemon juice, pickle brine, or even plain saltwater. Observe and measure how these different electrolytes affect the voltage and current output.
- Explore Different Metals: Vary the types of metal used for your electrodes. Instead of aluminum foil, try using zinc washers (galvanized washers), magnesium strips, or even various types of coins (if available and legally permissible). Different metal combinations will yield different electrochemical potentials and, consequently, different voltages.
- Investigate Series and Parallel Connections: After mastering a single battery stack (which is a series connection of cells), research how to connect multiple stacks in parallel. Connecting batteries in series increases voltage, while connecting them in parallel increases current capacity.
- Build a Larger Array: Can you scale up your design? Construct a larger array of coin cells to see if you can power slightly more demanding loads, such as a small fan or multiple LEDs simultaneously.
- Measure Current (Amperage): Use a multimeter set to measure current (amperes) to understand not just the voltage but also how much current your battery can supply. This will give you a better idea of its practical power output.
Creating your own coin battery is more than just a science experiment; it’s an empowering experience that fosters curiosity, problem-solving skills, and a practical understanding of fundamental electrical principles. Embrace the joy of discovery, continue to experiment, and enjoy the satisfaction of generating electricity with your own hands!