
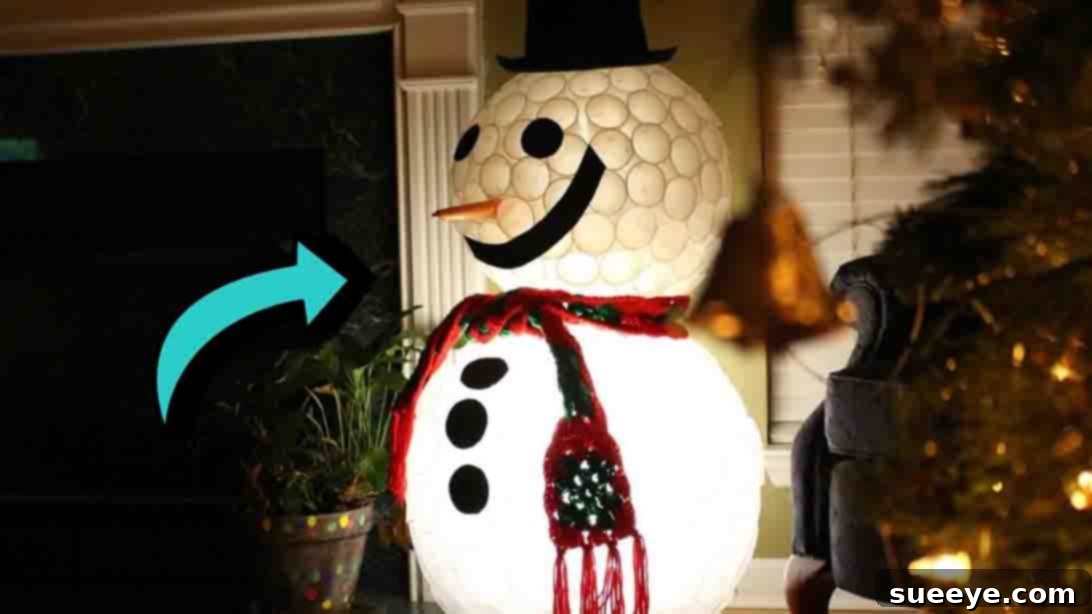
Craft a Dazzling Light-Up Snowman: Your Ultimate Guide to Eco-Friendly Holiday Decor with Recycled Plastic Cups!
The holiday season beckons with its promise of warmth, joy, and the delightful opportunity to transform your home into a festive wonderland. What better way to embrace the spirit of Christmas than by creating a truly magical, yet incredibly simple, DIY decoration? We’re thrilled to unveil an ingenious crafting project that is not only enchanting but also remarkably sustainable: a **radiant light-up snowman fashioned entirely from recycled plastic cups**! This brilliant idea, brought to life by the creative minds at Fentertainment on YouTube, offers a fresh perspective on holiday crafting. Imagine a charming, frosty friend illuminating your living space, casting a soft, inviting glow that captures the very essence of winter wonder. The best part? It’s a wonderfully eco-conscious and budget-friendly endeavor, turning everyday plastic cups into a stunning centerpiece.
In today’s world, where sustainability is increasingly paramount, upcycling projects like this plastic cup snowman offer a fantastic opportunity to reduce waste and contribute positively to our environment. This isn’t just an ordinary craft; it’s an inexpensive DIY project that predominantly utilizes materials you likely already have around your home, or can easily procure without a significant financial outlay. There’s no need for specialized tools or advanced crafting expertise; this project is designed to be accessible and enjoyable for everyone, from enthusiastic beginner crafters to families seeking a meaningful and engaging activity to share. So, gather your loved ones, call your friends, and prepare to embark on a delightful creative journey that culminates in a truly spectacular and personalized Christmas decoration. Join us as we delve into the comprehensive step-by-step instructions and discover exactly how to bring this adorable, glowing snowman to vibrant life!
RELATED: Explore More Unique & Creative Light-Up Snowman Tutorials!
Why Choose This Eco-Conscious DIY Plastic Cup Snowman Project?
Beyond its undeniable charm and festive appeal, opting to craft a snowman from recycled plastic cups provides a myriad of advantages that make it an exceptional choice for your holiday activities and decor:
-
Embrace Sustainable Living: At its heart, this project champions the principles of upcycling and waste reduction. By diverting plastic cups from landfills and transforming them into a cherished holiday decoration, you actively participate in environmental stewardship. It serves as a fantastic, hands-on educational tool for children, illustrating the value of recycling and the boundless potential of repurposed materials.
-
Remarkably Budget-Friendly: The cost of holiday decorating can often escalate quickly. However, this DIY snowman stands out as an exceptionally economical option. The primary components—plastic cups—are frequently leftovers from celebrations or can be acquired at a very low cost. Most supplementary materials are common household craft supplies, making this an incredibly accessible project regardless of your budget.
-
Perfect for Family Bonding: This craft project is ideally suited for participants of all ages. Younger children can enthusiastically assist with the decorating phase, while older children and adults can take on the assembly aspects. It provides a wonderful opportunity for quality family time, fostering creativity, encouraging teamwork, and laying the groundwork for cherished holiday memories that will last for years to come.
-
A Truly Unique & Captivating Decoration: Unlike mass-produced decorations, your handmade plastic cup snowman will possess a distinctive personality and a heartwarming story behind its creation. The integration of a clamp light elevates it into a glowing focal point, emanating a warm, inviting ambiance that is guaranteed to captivate your holiday guests and spark delightful conversations.
-
Unleash Your Creative Freedom: The essence of DIY lies in the power of personalization. From the selection of your snowman’s facial expression to the choice of its hat, scarf, and any additional embellishments such as glitter or decorative buttons, you are granted complete artistic license to ensure your snowman is truly one-of-a-kind. Customize it to seamlessly integrate with your existing holiday decor theme or let your imagination soar to create something utterly whimsical!
Essential Materials for Your Glowing Recycled Cup Snowman
As you prepare to embark on this delightful crafting adventure, the first step is to gather all the necessary materials. One of the best aspects of this project is its reliance on simple, readily available items, many of which you might already have. Here’s a detailed list of what you’ll need to construct your enchanting light-up snowman:
- Plastic Cups: You will require two distinct sizes to form the two main sections of your snowman. We recommend approximately 5 oz cups for the head and larger 16 oz cups for the body. The precise quantity needed will vary based on your desired snowman size, but it’s always prudent to have a few extra on hand. Opt for clear or white cups to achieve the best light diffusion, though experimenting with colored translucent cups can create interesting effects.
- Heavy-Duty Stapler & Plenty of Staples: A robust stapler is absolutely crucial for securely joining the plastic cups together. Ensure your stapler is well-stocked with staples before you begin.
- Black Foam Paper: This will be used for meticulously cutting out the snowman’s eyes and buttons. As alternatives, black construction paper, felt, or even sturdy cardstock can also be effectively utilized.
- Classic Snowman Accessories: To give your snowman its iconic and endearing character, you’ll need a small hat, a festive scarf, and a charming carrot-shaped nose. These mini accessories can be easily purchased from craft stores, or you can craft them yourself using fabric scraps, felt, or even painted cardboard for a truly homemade touch.
- Hot Glue Gun & Glue Sticks: An indispensable tool for assembly! The hot glue gun will be vital for securely attaching the head to the body, fixing the delicate facial features, and adding all the delightful decorative accessories. Always exercise caution and ensure adult supervision when operating a hot glue gun.
- Clamp Light: This is the magical component that imbues your snowman with its enchanting glow! Select a clamp light that can safely and comfortably fit within the larger body sphere of your snowman. For optimal energy efficiency and minimal heat emission, an LED bulb is highly recommended.
Organizing all your materials beforehand will significantly streamline the crafting process, making it a more enjoyable and efficient experience, especially when crafting with a group or family.
Step-by-Step Directions: Assembling Your Recycled Plastic Cup Snowman
With all your supplies meticulously gathered, it’s time to dive into the construction of your adorable light-up snowman. Follow these detailed instructions closely to ensure you build a sturdy, beautiful, and spectacularly glowing finished product.
Step 1: Crafting the Snowman’s Head (The Smaller Sphere)
Begin your project with the smaller 5 oz plastic cups, which will form the charming head of your snowman. This initial stage requires a steady hand and a keen eye for detail to achieve a perfectly spherical shape.
-
Initiate the Base Circle: Take your first plastic cup and orient it on its side, ensuring the rim is facing outwards. Now, take a second cup and firmly staple it to the side of the first cup, making sure their rims are perfectly aligned. Continue this stapling process, attaching each subsequent cup to the previous one, maintaining a consistent circular arrangement. Your aim is to complete a robust and even ring of cups. The total number of cups in this initial ring will directly influence the final circumference and size of the snowman’s head.
-
Construct the Half-Sphere Structure: Once your base circle is complete and secure, begin building upwards. Place new cups strategically over the gaps created by the two cups directly below them, stapling them firmly to the rims of the supporting cups. Continue adding layers in this manner, gradually working your way towards the center. Visualize the process as constructing a miniature igloo; as you add successive layers, the structure will naturally curve inwards, steadily forming a stable dome or a perfect half-sphere. Verify that each staple provides a strong and reliable connection to prevent any structural instability.
-
Complete the Spherical Form: With a stable half-sphere established, carefully flip the entire structure over. Now, resume the process of stapling cups, progressively closing the open side to create a complete, fully enclosed ball shape. The objective is to achieve a sturdy, hollow sphere that will serve as the snowman’s head. Dedicate sufficient time to ensure all cups are securely fastened, resulting in a uniform and symmetrical head. Once finished, set this completed sphere aside with care.
-
Prepare the Facial Features: From your black foam paper, meticulously cut out two identical circular shapes to serve as the snowman’s eyes. You can freehand these or use a small coin or button as a stencil for uniformity. If you intend to add buttons to the snowman’s body, now is an opportune moment to cut a few more identical circles and set them aside for later use. For an added touch of charm and sparkle, consider cutting even smaller white circles to place within the black eyes, creating a reflective highlight.
Step 2: Constructing the Body, Assembling, and Illuminating Your Snowman
With the snowman’s head now complete and safely set aside, your next task is to build the larger body section and then bring your entire creation to life with festive decorations and its captivating light source.
-
Build the Snowman’s Body (The Larger Sphere): Precisely repeat the stapling technique and layering process detailed in Step 1, but this time, utilize the larger 16 oz plastic cups. This will form the more voluminous and foundational part of your snowman. Crucially, ensure that this sphere is noticeably larger than the head to maintain classic snowman proportions. Just as before, construct a stable base circle, then meticulously layer cups upwards and inwards until you have a complete, robust, and sturdy sphere. Pay meticulous attention to securing each individual cup with staples to guarantee strong structural integrity.
-
Assemble Your Snowman: Once both the head and body spheres are successfully completed, it’s time for the exciting moment of joining them. Carefully position the smaller head sphere directly on top of the larger body sphere. Using your hot glue gun, apply a generous and continuous bead of hot glue around the entire contact area where the two spheres meet. Press them firmly together and hold steady for several moments, allowing the glue to set and bond securely. For an additional layer of stability, you may also carefully add a few more staples around the joining circumference, strategically stapling cups from the head to the body where feasible.
-
Decorate and Personalize Your Snowman: Now comes the truly enjoyable and creative phase – decorating! Take the eyes you meticulously cut from black foam paper and hot glue them precisely into position on the snowman’s head. If you prepared extra circles for buttons, carefully glue them down the front of the snowman’s body, spacing them evenly. Next, gently attach the carrot nose, the festive hat, and the cozy scarf using your hot glue gun. This is your opportunity to express maximum creativity! You can angle the hat jauntily, drape the scarf elegantly, or incorporate other charming embellishments such as glitter, small faux twig arms, or even a miniature broom. This stage is where your snowman truly develops its unique and endearing personality!
-
Add the Magical Light Source: The final and most captivating step is the installation of the clamp light. Carefully and discreetly open one of the plastic cups at the back or bottom section of the larger body sphere, just enough to allow the insertion of the clamp light. Position the clamp light securely inside the body of the snowman so that its illumination permeates and brightens the entire structure from within. Firmly secure the clamp light to one of the internal cup rims or edges. Plug it in, and marvel as your recycled plastic cup snowman comes alive with a warm, inviting, and utterly magical glow! Always ensure that the chosen light source is safely contained and does not generate excessive heat that could affect the plastic cups.
Personalize Your Light-Up Snowman: Unleash Your Creative Variations and Expert Tips
The true charm of this DIY project lies in its remarkable adaptability. While the core instructions provide a robust and fantastic foundation, we wholeheartedly encourage you to infuse your snowman with your unique style, artistic flair, and boundless creativity. Here are some inspiring ideas to personalize your light-up plastic cup snowman, making it truly one-of-a-kind:
-
Create a Snowman Family: Why stop at just one? Use varying sizes of cups to craft an entire family of snowmen! Imagine a delightful trio of different-sized glowing snowmen clustered together, creating a heartwarming winter scene.
-
Experiment with Color: Although clear or white cups are traditional and excellent for light diffusion, consider venturing into colored plastic cups. Blue cups could conjure an “icy” or frosty snowman, while festive red or green cups could create a truly avant-garde holiday character. Alternatively, you could lightly paint the exterior of clear cups with translucent colors for a custom-tinted glow.
-
Accessory Extravaganza: Don’t limit your accessorizing to just a hat and scarf. Add charming tiny mittens, cozy earmuffs, or even small, natural twig arms for a more rustic and earthy appeal. Adorn the snowman’s hat with glitter, miniature bells, or vibrant faux berries. A delicate tiny wreath or a garland artfully draped around the snowman’s neck could also add an irresistible touch of elegance.
-
Alternative Lighting Solutions: If a clamp light doesn’t quite fit your vision or space, explore other options. Consider stringing battery-operated LED fairy lights inside the snowman for a softer, more diffused, and magical glow. For smaller versions, battery-operated LED tea lights could also work wonderfully. Always ensure that any chosen light source is safe, remains cool to the touch, and does not generate excessive heat near the plastic.
-
Expressive Facial Features: Unleash your inner artist by experimenting with diverse shapes and sizes for the eyes and mouth. Give your snowman a playful wink, a wide, joyful smile, or even add a touch of rosy blush or paint to its cheeks for a heartwarming flush.
-
Enhanced Base Decor: Elevate your snowman’s display by placing it on a bed of faux snow, fluffy cotton balls, or shimmering glitter to create a complete and enchanting winter landscape. You could even surround it with miniature pine trees, tiny gift boxes, or other small festive figurines to build a captivating holiday vignette.
-
Interactive Elements: For an extra layer of charm and surprise, consider discreetly attaching a small battery-operated sound module that plays delightful Christmas carols when a specific button is pressed. (Ensure such elements are safely installed and do not interfere with the lighting mechanism.)
Allow your imagination to be your ultimate guide! This DIY light-up snowman is not merely a holiday decoration; it is a blank canvas awaiting your unique artistic touch and holiday spirit.
Conclusion: Embrace the Joy of Sustainable Holiday Crafting!
Creating this captivating **DIY light-up snowman from recycled plastic cups** is far more than just a simple craft project; it is a joyous opportunity to imbue your home with a deeply personalized sense of holiday cheer, actively embrace sustainable practices, and forge cherished, lasting memories with your loved ones. This project beautifully illustrates how everyday, ordinary items can be effortlessly transformed into something truly magical and exquisitely beautiful with just a dash of imagination, a sprinkle of effort, and a whole lot of festive spirit.
This charming, glowing snowman stands as a heartwarming testament to the remarkable power of upcycling, unequivocally proving that stunning and impactful holiday decor doesn’t necessarily have to come with an exorbitant price tag or a significant environmental footprint. Whether it elegantly graces your entryway, brilliantly illuminates a tabletop as a centerpiece, or becomes a comforting, glowing addition to a child’s room, its warm and inviting radiance will undoubtedly bring forth abundant smiles and an enduring sense of wonder throughout the entire holiday season.
So, meticulously gather your supplies, enthusiastically call upon your crafting companions, and allow the infectious spirit of the holidays to gracefully guide your hands. Share your magnificent creations with pride, inspire others to embark on their own sustainable crafting journeys, and luxuriate in the unique and profound satisfaction of illuminating your home with a truly handmade masterpiece. Happy crafting and may your holidays be filled with light and joy!