
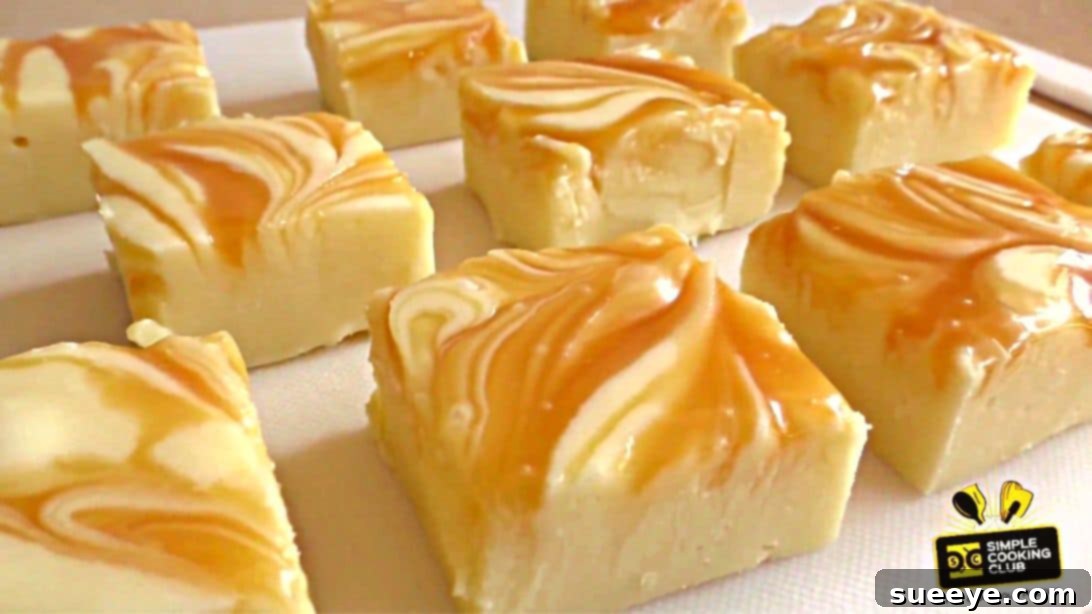
Are you looking for a quick, delicious, and incredibly simple dessert to whip up? Do you have some leftover white chocolate lingering in your pantry from past baking adventures, just waiting for its moment to shine? If so, then you’ve stumbled upon the perfect solution! This amazing recipe for White Chocolate Caramel Fudge Bars, inspired by the creative culinary minds at Simple Cooking Club on YouTube, transforms basic ingredients into an irresistible treat that will delight your taste buds. Get ready to discover how to create these yummy, fudgy, and utterly decadent bars with minimal effort and maximum flavor.
This isn’t just another fudge recipe; it’s a game-changer for anyone who loves sweet, creamy desserts but lacks the time or desire for complex baking. Requiring only four essential ingredients and absolutely no baking, these white chocolate caramel fudge bars come together in a flash, making them ideal for last-minute gatherings, a thoughtful homemade gift, or simply satisfying your own sweet cravings. Imagine a rich, smooth white chocolate fudge base, beautifully swirled with luscious caramel – a combination that’s pure bliss in every bite. Follow our easy-to-understand written instructions below, and for a visual guide, be sure to watch the video tutorial from Simple Cooking Club. Prepare to impress your family and friends with this dessert, which promises to be a new favorite in your repertoire.
4-Ingredient White Chocolate Caramel Fudge Bars Recipe: Your Ultimate No-Bake Treat
Why You’ll Love These White Chocolate Caramel Fudge Bars
- Effortlessly Simple: With just four ingredients, this recipe minimizes shopping and prep time.
- No-Bake Convenience: Forget about preheating ovens! This recipe comes together quickly on the stovetop or in the microwave.
- Decadent Flavor: The rich sweetness of white chocolate pairs perfectly with the buttery notes of caramel for an unforgettable taste.
- Perfect Texture: Enjoy a wonderfully smooth, melt-in-your-mouth fudgy consistency that’s simply divine.
- Versatile Treat: Ideal for dessert, snack time, potlucks, holiday gifting, or simply a sweet indulgence.
- Budget-Friendly: Uses common, affordable ingredients you likely already have on hand.
- Crowd-Pleaser: Everyone, from kids to adults, will adore these delightful fudge bars.
Essential Ingredients for Your Fudge Bars
The beauty of this recipe lies in its simplicity. Just four humble ingredients come together to create something truly magical. Using quality ingredients will elevate the flavor, so choose wisely!
- 3 cups of White Chocolate: This is the star of our fudge! You can use white chocolate chips, baking bars, or even leftover white chocolate from other recipes. Opt for good quality white chocolate as it will greatly impact the final taste and texture of your fudge. Cheaper white chocolate sometimes contains less cocoa butter and more vegetable fats, which can affect how smoothly it melts and sets.
- 4 tbsp of Softened Butter: Unsalted butter is usually preferred in baking to control the salt content, but salted butter will also work if that’s what you have. Ensure it’s softened to room temperature, as this helps it incorporate smoothly with the other ingredients, creating a homogeneous and creamy mixture. Butter adds richness, flavor, and helps achieve that signature fudgy texture.
- 1 can of Sweetened Condensed Milk (approximately 14-15 oz): This is the secret ingredient that binds everything together, providing incredible sweetness and a wonderfully creamy consistency without requiring much effort. It’s crucial for the no-bake aspect of this fudge, as it helps it set perfectly in the fridge. Do not confuse it with evaporated milk, as they are very different!
- Caramel Sauce: Whether you choose a store-bought jar of your favorite caramel sauce or opt to make your own from scratch, this element adds a beautiful swirl of flavor and a visually appealing contrast to the white chocolate. The amount is entirely up to your preference – drizzle generously for an intense caramel hit or lightly for just a hint.
Equipment You’ll Need
- A large, microwave-safe mixing bowl (or a heavy-bottomed saucepan for stovetop method)
- Rubber spatula or wooden spoon for stirring
- 8×8 inch (or similar size) square baking pan or springform pan
- Parchment paper or foil for lining the pan
- Sharp knife for slicing
Step-by-Step Instructions to Create Your Fudge Bars
Let’s get started on making these incredible white chocolate caramel fudge bars. Remember, patience with the melting and chilling steps is key to achieving the perfect texture.
Step 1: Preparing the Fudge Base – Melting Together Your Key Ingredients
Begin by gathering your large, microwave-safe mixing bowl. Into this bowl, add your three cups of white chocolate (whether chips, chopped bars, or morsels), the four tablespoons of softened butter, and the entire can of sweetened condensed milk. This trio forms the rich, sweet, and creamy foundation of your fudge.
Place the bowl into your microwave. Heat the mixture initially for about 60 to 70 seconds. This initial burst of heat will start the melting process. After the first heating, remove the bowl and stir the mixture well. You’ll notice the ingredients starting to soften and combine. Return the bowl to the microwave and heat for an additional 30 seconds. The goal here is to gently melt the white chocolate and integrate all ingredients without scorching. After this second heating, take the bowl out and give everything a really good, vigorous stir for about 15 to 20 seconds. Continue stirring until the mixture is completely melted, smooth, and beautifully combined, forming a glossy, consistent fudge batter. If there are still a few stubborn lumps, you can microwave for very short intervals (10-15 seconds) and stir thoroughly after each, until perfectly smooth. Alternatively, you can use a double boiler method on the stovetop for a more controlled melting process, stirring constantly until smooth.
Step 2: Assembling, Chilling, and Enjoying Your Caramel Swirl Fudge
Before pouring your delicious fudge mixture, prepare your chosen pan. An 8×8 inch square baking pan or a springform pan works wonderfully. For easy removal, line the pan with parchment paper or aluminum foil, leaving an overhang on the sides. This “sling” will allow you to lift the set fudge out of the pan effortlessly.
Carefully pour the creamy white chocolate fudge batter into your prepared pan, spreading it evenly with your spatula to create a smooth, flat surface. Now comes the fun part: drizzling the caramel sauce! Take your caramel sauce and generously drizzle it all over the top of the white chocolate fudge. Don’t be shy; the more caramel, the better! Once drizzled, take a toothpick, skewer, or the tip of a knife and gently swirl the caramel into the white chocolate. This creates beautiful marbled patterns, ensuring a delightful caramel ribbon in every bite. Avoid over-swirling, as you want distinct streaks of caramel, not a fully mixed-in uniform color.
Once your fudge is assembled and swirled to perfection, it’s time for the crucial chilling phase. Carefully place the pan into the refrigerator. Leave it there to set for at least an hour, or preferably longer, until the fudge is firm to the touch and completely set. Rushing this step might result in a soft, messy fudge that’s difficult to slice. The longer it chills, the firmer and easier it will be to cut.
When the fudge is fully set, remove the pan from the refrigerator. Use the parchment paper overhang to lift the entire block of fudge out of the pan and place it onto a cutting board. For clean, neat slices, use a sharp knife. You can even run the knife under hot water and wipe it dry between cuts to achieve perfectly defined bars. Slice the fudge into your desired bar sizes, serve them up, and get ready to enjoy this absolutely incredible, easy-to-make white chocolate caramel fudge!
Tips for Perfect Fudge Every Time
- Don’t Overheat: When melting the white chocolate mixture, be careful not to overheat it. White chocolate can seize (become grainy and hard) if exposed to too much direct heat too quickly. Gentle heating and thorough stirring are key.
- Quality Ingredients Matter: While simple, the quality of your white chocolate and caramel sauce will significantly impact the final taste.
- Line Your Pan Properly: Parchment paper is your best friend for easy removal. Ensure it covers the bottom and has an overhang on the sides.
- Adjust Caramel to Taste: Feel free to add more or less caramel sauce based on your preference. For a stronger salted caramel flavor, sprinkle a little flaky sea salt on top before chilling.
- Patience is a Virtue (for Chilling): Do not rush the chilling process. A minimum of one hour is good, but two hours or more will ensure a perfectly set fudge that’s easy to cut.
- Warm Knife for Slicing: For incredibly neat cuts, dip your knife in hot water and wipe it dry before each slice. This will help prevent the fudge from sticking and ensure clean edges.
- Air Bubbles: After pouring the fudge into the pan, gently tap the pan on your counter a few times to release any trapped air bubbles for a smoother surface.
Variations to Customize Your Fudge Bars
While delicious as is, these white chocolate caramel fudge bars are also incredibly versatile! Feel free to get creative with these customization ideas:
- Nutty Crunch: Fold in chopped nuts like pecans, walnuts, or almonds into the fudge mixture before pouring into the pan.
- Chocolate Lover’s Dream: Drizzle melted milk or dark chocolate on top of the caramel swirl for a triple chocolate effect. Or, mix in some mini chocolate chips directly into the fudge base.
- Holiday Spice: Add a pinch of cinnamon, nutmeg, or pumpkin spice to the fudge mixture for a festive touch, especially during autumn. A tiny drop of peppermint extract (not oil) can also create a wonderful winter variation.
- Extract Enhancements: A teaspoon of vanilla extract or a few drops of almond extract added to the melting mixture can deepen the flavor profile.
- Candy Mix-ins: Consider adding crushed candy canes, M&M’s, or other small candies into the fudge for added texture and flavor.
- Coconut Delight: Stir in some shredded coconut into the white chocolate fudge base for a tropical twist.
- Different Toppings: Instead of just caramel, you could also swirl in a fruit jam, peanut butter, or even a different type of frosting.
Storage and Shelf Life
To keep your white chocolate caramel fudge bars fresh and delicious:
- Refrigeration: Store the fudge bars in an airtight container in the refrigerator. This will help them maintain their firm texture and extend their shelf life.
- Shelf Life: When stored properly in the fridge, these fudge bars will stay fresh and enjoyable for up to 1-2 weeks.
- Freezing: For longer storage, you can freeze the fudge bars. Wrap individual bars tightly in plastic wrap, then place them in a freezer-safe airtight container or bag. They can be frozen for up to 2-3 months. Thaw in the refrigerator or at room temperature before serving.
Indulge in the Simplicity and Sweetness
There you have it – a remarkably easy, 4-ingredient recipe for white chocolate caramel fudge bars that promises pure delight with minimal fuss. Whether you’re a seasoned baker or a complete novice in the kitchen, this no-bake wonder is approachable, rewarding, and incredibly satisfying. It’s the perfect way to transform simple pantry staples into an elegant and irresistible dessert that’s sure to become a beloved favorite.
So, don’t let those leftover white chocolate chips sit idle any longer! Gather your ingredients, follow these simple steps, and prepare to be amazed by the fudgy, sweet, and caramel-swirled goodness you create. Share these delectable bars with your loved ones after a savory meal, pack them in lunchboxes, or simply enjoy them with a cup of coffee. No matter the occasion, these white chocolate caramel fudge bars are guaranteed to bring smiles.
A huge thank you again to Simple Cooking Club via YouTube for inspiring this fantastic recipe and for the images used here. If you enjoyed making and tasting these fudge bars, we highly recommend visiting their channel for more brilliant and easy-to-follow cooking tutorials. Happy baking (or rather, no-baking)!