
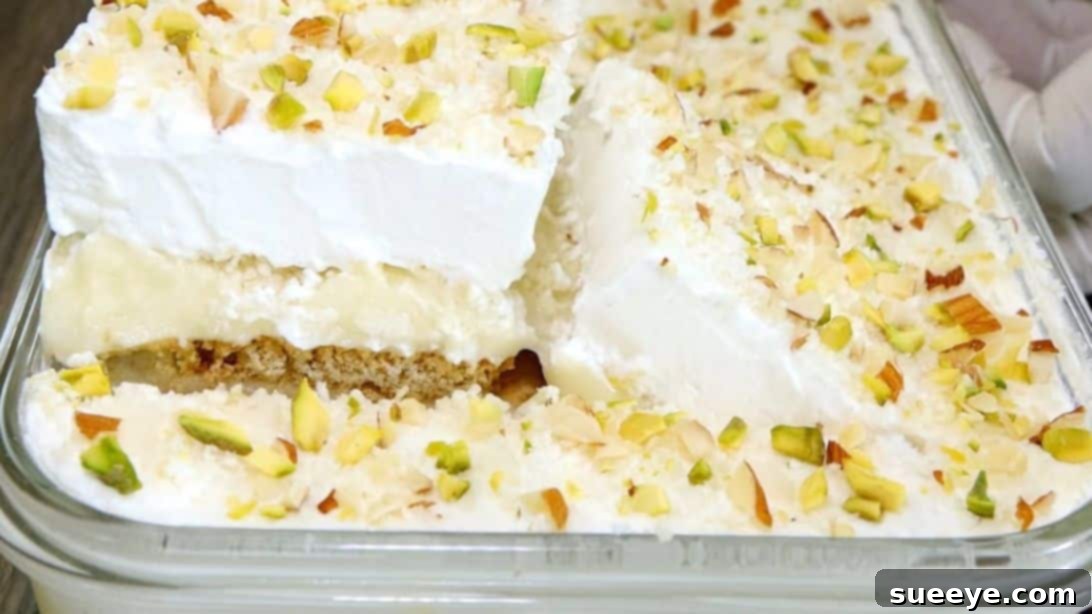
Prepare to be enchanted by one of the simplest yet most exquisite desserts you’ll ever make! I recently stumbled upon this incredible easy milk cake dessert recipe by Hands Touch and was instantly captivated. Naturally, I had to try it at home, and the results were beyond my wildest expectations. This isn’t just a dessert; it’s an experience – light, lusciously creamy, and possessing that rare melt-in-your-mouth texture that leaves you craving more. The thoughtful addition of chopped nuts and desiccated coconut elevates the flavor profile, introducing delightful nutty and tropical notes that perfectly complement the rich milk base. Trust me, you absolutely don’t want to miss out on crafting this heavenly treat. Whether you’re a seasoned baker or a complete novice, this recipe promises a spectacular outcome with minimal effort. Dive into the full instructions below and get ready to impress!
Irresistible Easy Milk Cake Recipe: Your Next Favorite Dessert
If you’re searching for a dessert that combines elegance with ease, look no further than this delightful milk cake. It’s the perfect treat for family gatherings, special occasions, or simply to satisfy a sweet craving. The beauty of this recipe lies in its simplicity and the incredible depth of flavor it achieves with everyday ingredients. Get ready to create a dessert that will have everyone asking for the recipe!
Why This Milk Cake Will Become Your Favorite
- Effortlessly Delicious: This recipe proves that you don’t need complex techniques or fancy ingredients to create a truly spectacular dessert. It’s a no-bake wonder that comes together with ease.
- Heavenly Texture: Prepare for a dessert that is incredibly light, moist, and creamy. Each bite literally melts in your mouth, leaving a delicate sweetness.
- Perfectly Balanced Flavors: The combination of rich milk, subtle vanilla, crunchy nuts, and fragrant coconut creates a harmonious symphony of tastes that is both comforting and exotic.
- Visually Appealing: With its distinct layers and beautiful topping, this milk cake is as pleasing to the eye as it is to the palate, making it an ideal centerpiece for any dessert spread.
- Customizable: While perfect as is, this recipe also offers plenty of room for your personal touch, allowing you to experiment with different toppings and flavorings.
Ingredients You’ll Need
Gathering your ingredients is the first step to creating this magical milk cake. Most of these items are likely already in your pantry, making this a convenient choice for a last-minute dessert. Quality ingredients make a difference, so opt for fresh dairy products where possible.
- 2 cups of whole milk: Essential for the creamy base, whole milk provides the best richness.
- Digestive biscuits: These form the sturdy and flavorful base layers of our cake. You’ll need enough to cover your baking dish in multiple layers.
- 1/4 cup of all-purpose flour: Acts as a thickening agent for the milk mixture, ensuring a smooth and custard-like consistency.
- 1/4 cup of milk powder: Enhances the milky flavor and contributes to the creamy texture.
- 1/2 cup of granulated sugar: Provides the perfect level of sweetness to the cake layers. Adjust to your preference.
- 1 teaspoon of vanilla essence: A classic flavor enhancer that adds warmth and depth to the dessert.
- 1 1/2 cups of unsalted butter: Crucial for richness and helping the milk mixture achieve its desirable thickness and sheen.
- 1/2 cup of heavy whipping cream: The base for our fluffy, light topping. Ensure it’s very cold for optimal whipping.
- 2 tablespoons of powdered sugar: Sweetens the whipped cream and helps stabilize it.
- 3 tablespoons of desiccated coconut: Adds a lovely tropical aroma and texture, both within the layers and as a garnish.
- 3 tablespoons of chopped pistachio and almond: Provides a delightful crunch and nutty flavor, enhancing the overall experience. Feel free to use your favorite blend of nuts.
Essential Kitchen Equipment
You won’t need an extensive list of tools for this recipe, making it even more accessible. Here are the basic items that will ensure a smooth preparation process:
- A medium-sized baking dish (approx. 9×13 inches or similar, depending on desired thickness).
- A sturdy saucepan.
- A whisk (for lump-free mixing).
- A spatulda or spoon for spreading.
- A large mixing bowl (for whipping cream).
- An electric hand mixer or stand mixer (for whipping cream).
- Measuring cups and spoons.
Step-by-Step Instructions: Crafting Your Milk Cake Masterpiece
Follow these detailed steps carefully, and you’re guaranteed to create a stunning and delicious milk cake that will be the highlight of any meal. Precision and a little patience are key to achieving that perfect melt-in-your-mouth consistency.
Step 1: Laying the Biscuit Foundation
Begin by arranging a single layer of digestive biscuits evenly at the bottom of your chosen baking dish. Ensure there are no large gaps, as this layer will serve as the sturdy base for your cake. If needed, you can gently break biscuits to fill in smaller spaces around the edges. This initial layer is crucial for the structural integrity and provides a pleasant textural contrast to the creamy filling.
Step 2: Preparing the Creamy Milk Base
In a medium saucepan, combine 2 cups of fresh whole milk, 1/2 cup of granulated sugar, and 1/4 cup of all-purpose flour. It’s essential to whisk these ingredients vigorously and thoroughly at this stage to prevent any lumps from forming. A smooth, homogenous mixture before heating will ensure a silky-smooth final product. Take your time to break down any flour clumps.
Step 3: Enriching with Milk Powder
Once your initial milk mixture is perfectly smooth, add 1/4 cup of milk powder to the saucepan. Continue to mix diligently until the milk powder is fully dissolved and well incorporated. This step significantly boosts the creamy texture and rich milky flavor of your dessert, giving it that characteristic “milk cake” essence.
Step 4: Gentle Heating and Continuous Stirring
Place the saucepan over a low to medium flame. The key here is continuous stirring. Do not walk away from the pot! Keep stirring constantly with a whisk or wooden spoon to prevent the mixture from sticking to the bottom and burning, which can ruin the flavor. This also helps in achieving a uniform cooking and thickening of the mixture, ensuring a consistent texture.
Step 5: Adding Butter and Vanilla for Perfection
As the mixture begins to warm and slightly thicken, add 1 1/2 cups of unsalted butter and 1 teaspoon of vanilla essence. Continue stirring diligently. The butter will melt and integrate, adding a beautiful sheen and richness, while the vanilla infuses a wonderful aroma. Stir until the mixture achieves a slightly thick, custard-like consistency that coats the back of a spoon. It should be thick enough to hold its shape but still pourable. Immediately pour a generous portion of this warm milk mixture over the digestive biscuit layer you prepared in Step 1. Using a spatula, gently spread it evenly across the biscuits, ensuring every piece is well-covered.
Step 6: Layering, Topping, and Cooling
Add another uniform layer of digestive biscuits on top of the first milk mixture. Then, pour more of the warm milk mixture over this new biscuit layer, spreading it evenly. While this layer is still soft, generously sprinkle desiccated coconut and your chopped almond and pistachio mixture over the entire surface. This adds both flavor and a beautiful visual appeal. Now, set the dish aside at room temperature to cool down slightly before refrigeration. This step is important for the layers to settle and for the flavors to meld.
Step 7: Whipping Up the Creamy Topping
In a clean, chilled mixing bowl, combine 1/2 cup of heavy whipping cream and 2 tablespoons of powdered sugar. Using an electric hand mixer or stand mixer, whisk on medium-high speed until soft peaks form. The cream should be light, airy, and hold its shape when you lift the beaters, but not be stiff. Gently and evenly spread this delightful whipped cream layer over the cooled coconut and chopped nuts, creating a beautiful, cloud-like topping for your cake.
Step 8: Final Garnish and Chilling for Perfection
For a final touch of elegance and added texture, sprinkle more desiccated coconut and chopped nuts over the whipped cream layer. This not only makes the cake look more appealing but also reinforces those wonderful nutty and tropical flavors. Once garnished, cover the dish with plastic wrap and place it in the refrigerator for at least 3 hours. For the best results and a truly firm, well-set cake with fully developed flavors, chilling it overnight is highly recommended. Once thoroughly chilled, slice the cake into desired portions, serve on a plate, and prepare to enjoy a truly divine homemade dessert!
Tips for Achieving the Perfect Milk Cake
- Preventing Lumps: When adding flour and milk powder, always whisk them into cold milk first before heating. This ensures a smooth, lump-free custard.
- Constant Stirring: Do not underestimate the importance of continuous stirring during the heating process. This prevents scorching and ensures even thickening.
- Quality Ingredients: Using good quality whole milk and butter will significantly enhance the flavor and richness of your cake.
- Chill Thoroughly: The chilling time is not just for setting; it allows the flavors to meld beautifully and the biscuits to soften to a cake-like consistency. Do not rush this step.
- Cold Whipping Cream: Ensure your whipping cream, bowl, and even beaters are very cold before whisking. This helps achieve stiff peaks quickly and easily.
Variations and Customizations
This easy milk cake recipe is wonderfully adaptable, allowing you to get creative with flavors and toppings:
- Biscuit Choices: While digestive biscuits are classic, feel free to experiment with other plain biscuits like Marie biscuits, shortbread, or even graham crackers for a different base flavor.
- Nut Combinations: Mix and match your favorite nuts. Walnuts, pecans, or even a sprinkle of crushed hazelnuts can add a unique twist.
- Flavor Infusions: For an aromatic touch, consider adding a few drops of rose water or a pinch of ground cardamom to the milk mixture. Orange zest or lemon zest can also brighten the flavor profile.
- Chocolate Lover’s Dream: Drizzle some melted chocolate or sprinkle chocolate shavings over the top for a decadent upgrade.
- Fruit Topping: Garnish with fresh berries like strawberries or raspberries just before serving for a burst of freshness and color.
- Caramel Swirl: A light drizzle of caramel sauce over the whipped cream can add another layer of sweetness and complexity.
Serving and Storage Suggestions
This milk cake is best enjoyed chilled. Serve it with a cup of tea or coffee for a delightful afternoon treat, or as a refreshing dessert after a meal. To store, keep the cake covered tightly with plastic wrap or in an airtight container in the refrigerator. It will remain fresh and delicious for up to 3-4 days. While technically freezable, the texture of the biscuits and cream might change slightly upon thawing, so fresh is always best.
Frequently Asked Questions (FAQs)
Can I use low-fat milk for this recipe?
While you can use low-fat milk, for the best rich and creamy texture, whole milk is highly recommended. Whole milk contributes significantly to the melt-in-your-mouth quality of the cake.
What if I don’t have milk powder?
Milk powder enhances the milky flavor and creaminess. If you don’t have it, you can omit it, but your cake might be slightly less rich. You could try adding an extra tablespoon of flour for thickening, but it won’t replicate the milk powder’s flavor contribution.
How can I make this cake firmer?
Ensuring your milk mixture thickens sufficiently on the stove is key. Don’t rush the simmering process. Also, adequate chilling time (preferably overnight) is crucial for the cake to set properly and achieve a firm, sliceable consistency.
Can I prepare this milk cake ahead of time?
Absolutely! This milk cake is an excellent make-ahead dessert. Preparing it the day before you plan to serve it allows it ample time to chill and for the flavors to fully develop, resulting in a more cohesive and delicious cake.
Is this recipe suitable for dietary restrictions?
This specific recipe contains dairy and gluten (from biscuits and flour). For dairy-free alternatives, you would need to use plant-based milk, dairy-free butter, and coconut cream for whipping. For gluten-free, use gluten-free biscuits and a suitable gluten-free flour blend, adjusting quantities as necessary.
Your Easy Milk Cake Dessert Awaits
This easy milk cake dessert recipe truly delivers on its promise of an incredibly delicious and simple treat. It’s a testament to how humble ingredients, when combined with a little love and patience, can create something truly spectacular. The delightful layers of softened biscuits, rich creamy filling, and fluffy whipped topping, all adorned with crunchy nuts and aromatic coconut, make for an unforgettable culinary experience. So, roll up your sleeves, gather your ingredients, and embark on this delightful baking journey. You’ll be amazed at how quickly this melt-in-your-mouth milk cake becomes a cherished favorite in your home. Enjoy every creamy, dreamy bite!