
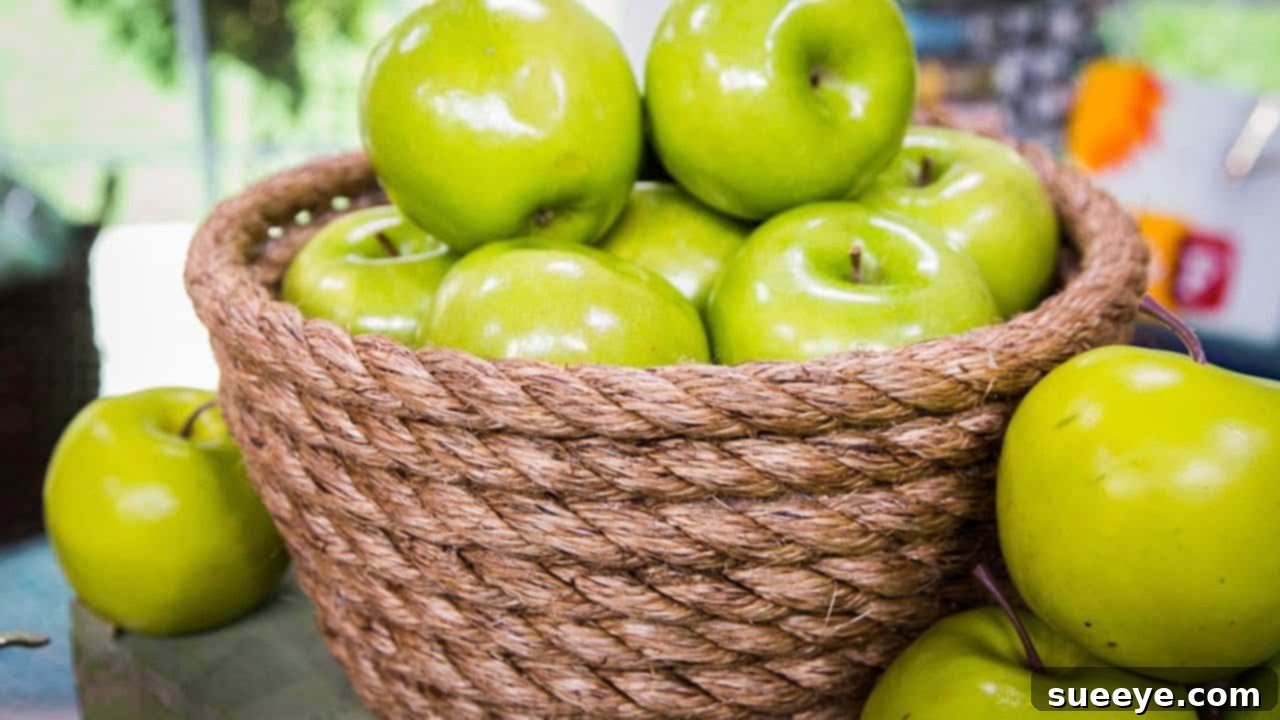
Transform Your Home with Easy DIY Rope Bowls: A Step-by-Step Guide
There’s something uniquely satisfying about creating beautiful home decor with your own hands, especially when it’s surprisingly simple, incredibly affordable, and yields stunning results. This DIY rope bowl project is a shining example of just that. Forget expensive store-bought items; with nothing more than some ordinary rope and your trusty hot glue gun, you can craft elegant, versatile bowls that will instantly elevate any room. This clever craft is not only a fantastic way to add a personal touch to your living space, but it also makes for an thoughtful and unique handmade gift for friends and family. Dive into the world of creative crafting and discover how easy it is to make these stylish, functional, and budget-friendly rope bowls.
Why DIY Rope Bowls Are Your Next Must-Try Project
In a world increasingly focused on unique, personalized touches, handmade decor stands out. DIY rope bowls offer a multitude of benefits that make them an irresistible craft project:
- Budget-Friendly Elegance: Compared to designer decorative bowls, crafting your own rope bowls is incredibly cost-effective. Rope is an inexpensive material, and a hot glue gun is a common crafting tool, making this project accessible to everyone.
- Unleash Your Creativity: With endless possibilities in terms of rope type, color, and bowl shape, you have complete creative control. Design bowls that perfectly match your existing home aesthetic or experiment with bold new looks.
- Versatile Home Decor: These bowls are more than just pretty objects. They can serve as catch-all trays for keys, jewelry, or office supplies, stylish planters for small plants, unique fruit bowls (with a liner), or simply beautiful decorative centerpieces.
- Thoughtful Handmade Gifts: A handmade gift carries a special sentiment. These rope bowls are perfect for housewarmings, birthdays, holidays, or just a thoughtful gesture, showcasing your effort and care.
- Beginner-Friendly: You don’t need advanced crafting skills to make these. The process is straightforward, making it an ideal project for beginners looking to dip their toes into DIY home decor.
- Quick to Complete: Many designs can be completed in an hour or two, meaning you can enjoy instant gratification and see your creative vision come to life without a lengthy commitment.
Essential Supplies You Will Need
Before embarking on your rope bowl adventure, gather these key materials. Having everything ready will ensure a smooth and enjoyable crafting experience.
- Rope: This is the star of your project!
- Types: Cotton rope (soft, easy to work with, wide range of colors), jute twine (rustic, natural look), sisal rope (coarser texture, durable), nylon rope (strong, can be colorful).
- Thickness: Choose based on the desired look. Thicker rope creates a more substantial, quicker-to-build bowl, while thinner rope allows for more intricate detail but requires more coiling.
- Quantity: The amount needed will vary significantly based on the size of your bowl and the thickness of your rope. It’s always a good idea to buy more than you think you’ll need.
- Hot Glue Gun and Glue Sticks:
- Glue Gun: A reliable hot glue gun is paramount. Consider one with a comfortable grip and a steady glue flow. Both high-temperature and low-temperature guns can work; high-temp generally offers a stronger bond, but low-temp is safer for beginners.
- Glue Sticks: Stock up! You’ll use more than you expect. All-purpose clear glue sticks are usually sufficient.
- Bowls or Molds: These will serve as your temporary guides.
- Material: Plastic, glass, or ceramic bowls work well. Ensure they have a smooth, non-porous surface from which the glue won’t permanently stick.
- Shape & Size: Experiment with different shapes – shallow, deep, wide, narrow – to create a variety of bowls.
- Sharp Scissors: For cleanly cutting the rope.
- Optional but Recommended:
- Non-Stick Mat or Parchment Paper: To protect your work surface from glue drips and ensure easy removal of the bowl from the mold if accidental adhesion occurs.
- Clips or Clothespins: Can be useful for holding sections of rope in place while glue dries, especially on larger projects.
- Work Gloves: To protect your hands from hot glue, though careful handling is usually sufficient.
Step-by-Step Guide: Crafting Your Beautiful Rope Bowl
Creating your rope bowl is a meditative and rewarding process. Follow these detailed steps to bring your vision to life.
Step 1: Preparation is Key
First, set up your workspace. Lay down a protective sheet, non-stick mat, or parchment paper to shield your table from hot glue. Ensure your hot glue gun is plugged in and preheating. Select your mold bowl, ensuring it’s clean and stable. This bowl will guide the shape of your rope creation, but you will NOT glue the rope directly to it.
Step 2: Starting the Base of Your Bowl
Take one end of your chosen rope. To prevent fraying and create a neat starting point, apply a small dab of hot glue to the very end and press it firmly, coiling it tightly into a small, flat spiral. Once secure, begin to coil the rope around this initial point, applying a thin, continuous line of hot glue to each spiral as you go. Press each new coil firmly against the previous one, ensuring there are no gaps and that the base remains perfectly flat. Continue creating this flat spiral until the base reaches the desired diameter – typically the size of the bottom of your chosen mold bowl. This forms the stable foundation of your rope bowl, much like a thick coaster.
Step 3: Building the Sides of Your Bowl
Once your base is complete and sturdy, it’s time to build upwards. Place your completed rope base onto the bottom of your mold bowl. Instead of continuing to spiral outward flatly, you will now begin to spiral the rope *up* the sides of the mold bowl.
Apply a line of hot glue along the edge of your finished base. Carefully press the next coil of rope onto this glue line, but slightly above the plane of the base, guiding it upwards along the curve of your mold bowl. Continue spiraling and gluing the rope, ensuring each new coil adheres firmly to the coil below it and follows the contour of your mold bowl. The mold bowl acts solely as a temporary guide for shape; avoid applying glue directly to it. Maintain consistent pressure and a steady glue stream to create a seamless, strong wall for your bowl. You can adjust the angle at which you hold the rope to create different side shapes – a straight wall, an outward flare, or even an inward curve.
Step 4: Finishing Touches and Shaping
Continue building the sides until your rope bowl reaches the desired height. Once you are satisfied with the height and shape, it’s time to finish the top edge. Cut the rope cleanly with your scissors. Apply a generous amount of hot glue to the very end of the cut rope and press it firmly against the last spiral, ensuring it’s neatly tucked in and secure. This prevents unraveling and creates a polished finish.
Step 5: Allowing Time to Set and Release
This is a crucial step! Do not rush it. Once you’ve completed the last coil, gently set your rope bowl aside, keeping it around the mold bowl, and allow the hot glue to fully cool and set. While 30 minutes is often sufficient for smaller bowls, larger or thicker bowls might benefit from an hour or even more to ensure maximum adhesion and stability. Once completely cool and firm, carefully begin to pry the rope bowl away from its mold. Start at the rim and work your way down, gently flexing the mold if possible. The hot glue should not stick to the smooth surface of your mold, allowing for easy separation. And voilà – your beautiful, handmade rope bowl is complete!
Tips and Tricks for Perfect Rope Bowls
Achieving a professional-looking finish is easy with a few simple techniques:
- Consistent Glue Application: The key to a sturdy and attractive bowl is an even, consistent bead of hot glue. Avoid using too much (which can seep out and look messy) or too little (which won’t provide a strong bond).
- Tight Coiling: Press each new spiral firmly against the previous one to eliminate gaps and create a solid, stable structure.
- Watch Your Fingers: Hot glue is, well, hot! Be careful when pressing rope, especially near freshly applied glue. Use a silicone thimble or the end of a craft stick if needed.
- Test Your Mold: Before starting, make sure your chosen mold bowl has a smooth surface. If you’re concerned about sticking, lightly rub the exterior of the mold with a thin layer of petroleum jelly or wrap it in plastic wrap.
- Trim Frayed Ends: Keep a pair of sharp scissors handy to snip any stray rope fibers or glue strings as you go.
- Embrace Imperfection: Remember, it’s handmade! Small variations add to the charm and uniqueness of your piece.
Creative Variations and Embellishments
Once you’ve mastered the basic rope bowl, unleash your creativity with these ideas:
- Color Blocking: Use different colored ropes in sections to create striped or color-blocked designs.
- Mixed Materials: Incorporate other materials like fabric strips, yarn, or even thin leather cords into your spirals for varied textures.
- Adding Handles: Create two loops of rope and glue them securely to the upper rim of your bowl for easy carrying or a basket-like look.
- Decorative Accents: Hot glue beads, small tassels, pompoms, or faux flowers to the finished bowl for extra flair.
- Unique Shapes: Don’t limit yourself to round bowls! Experiment with oval molds, square containers, or even free-form shapes.
- Flat Creations: Extend the base-making technique to create beautiful rope coasters, placemats, or trivets.
- Layered Effects: Coil a thinner rope around a thicker one before gluing to create a subtle two-tone or textured effect.
Caring for Your Handmade Rope Bowl
Your beautiful rope bowl is a durable piece of decor, but a little care goes a long way:
- Dusting: Use a soft brush, a dry cloth, or a vacuum cleaner with a brush attachment to gently remove dust.
- Spot Cleaning: For small marks, dab with a damp cloth and mild soap. Avoid saturating the rope.
- Avoid Moisture: Keep your rope bowls away from excessive moisture, as it can weaken the glue bond and potentially damage natural fibers.
- Not Food Safe: Unless explicitly lined with a food-safe material, these bowls are generally not recommended for direct contact with unpackaged food.
Beyond the Bowl: Other Rope Craft Ideas
The techniques learned from making rope bowls can be applied to a myriad of other charming home decor projects:
- Rope Coasters and Trivets: Simply create flat, sturdy rope spirals.
- Rope Placemats: Enlarge the flat spiral concept for unique table settings.
- Rope Planter Covers: Follow the bowl technique around a plant pot for a stylish cover.
- Rope Mirror Frames: Glue coiled rope around an existing mirror frame for a rustic or nautical touch.
- Rope Keychains or Tassels: Use smaller rope pieces for charming accessories.
Conclusion
Creating your own DIY rope bowls is an incredibly rewarding and accessible craft project that brings together simplicity, affordability, and beautiful results. From the initial coil to the final flourish, each step offers an opportunity for creative expression and the satisfaction of making something truly unique with your own hands. Whether you’re looking to refresh your home decor on a budget, craft a thoughtful handmade gift, or simply enjoy a relaxing and productive creative outlet, these rope bowls are the perfect solution. Gather your supplies, ignite your glue gun, and prepare to transform humble rope into stunning works of art that will be cherished for years to come. Happy crafting!