
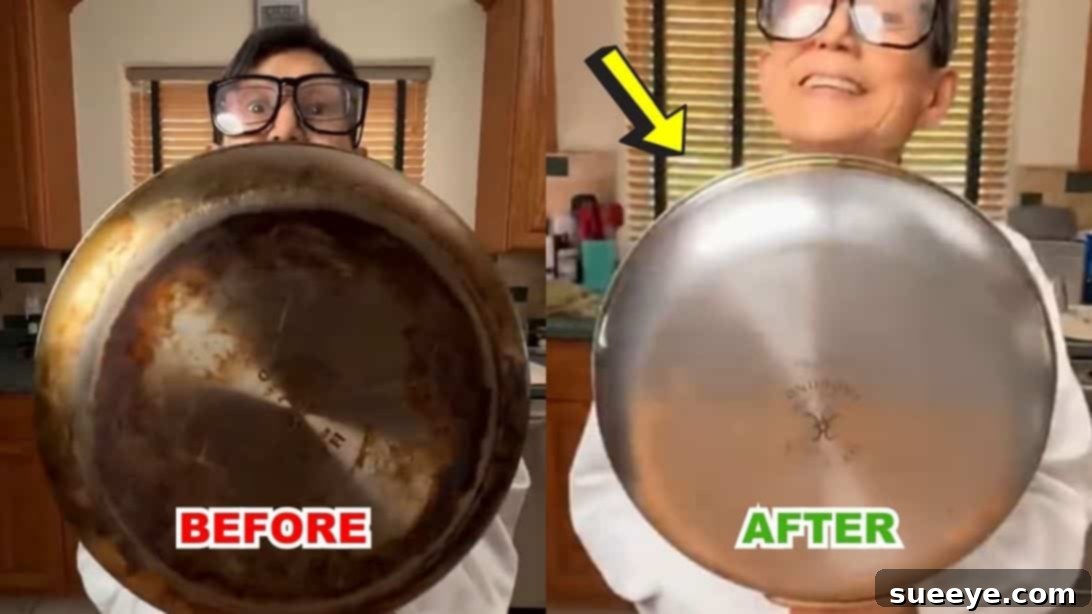
The Ultimate Pan Cleaning Hack: Restore Your Cookware to Brand New
Every home chef knows the struggle: while the inside of your pans might sparkle, the exterior often tells a different story. Stubborn burnt-on grease, carbonized food, and unsightly stains on the back of your cookware can be incredibly frustrating, making even the most pristine kitchen feel a little less perfect. The good news is, you don’t have to live with a collection of dingy pans. There’s a plethora of “hacks” circulating online, promising miraculous transformations, but how do you know which ones genuinely deliver? We’ve delved into the world of pan cleaning to bring you a definitive answer, thanks to a systematic test conducted by the popular YouTube personality, Cooking with Lynja.
Lynja put three of the most talked-about pan cleaning methods to the test, allowing us to witness the results side-by-side without you having to waste your precious time and resources on ineffective solutions. Her approach was simple yet ingenious: dividing the back of a heavily soiled pan into sections with tape, she applied each method to a distinct area. This brilliant visual comparison provides undeniable proof of which technique truly reigns supreme in the battle against baked-on grime and deep discoloration. Before you embark on your own pan-restoration journey, remember a crucial safety tip: always wear protective gloves to shield your skin from potential irritants and chemicals involved in some of these powerful cleaning processes.
The Scientific Approach to Pan Cleaning: Understanding the Methods
To truly understand why some pan cleaning methods excel while others fall short, it’s helpful to grasp the basic principles at play. Burnt-on food and grease often consist of carbonized residues and polymerized oils, which are tough to remove with just soap and water. These stubborn layers require a more aggressive approach. Effective cleaning strategies typically involve a strategic combination of chemical action (acids or bases to break down substances), abrasive action (scrubbing to physically remove particles), and sufficient dwell time (allowing the chemicals to work their magic). Let’s explore the three popular methods tested by Lynja and dissect their potential effectiveness based on these principles.
Method 1: The Classic Duo – Baking Soda & Vinegar for Pan Restoration
This dynamic duo is a classic in natural cleaning circles, often touted for its versatility and eco-friendliness. But how does this widely recommended home remedy fare against the toughest pan stains?
- Key Ingredients:
- Baking soda (sodium bicarbonate)
- White vinegar (acetic acid)
- Steel wool
Step-by-Step Process: Lynja began by generously sprinkling baking soda over a designated section of the pan’s back, ensuring ample coverage of the grimy areas. Following this, she poured white vinegar directly onto the baking soda, initiating a satisfying fizzing reaction. This effervescent mixture was then carefully spread evenly across the soiled area, ensuring maximum contact with the stubborn stains. The solution was allowed to sit undisturbed, typically for about 20 minutes, giving the chemicals time to work on loosening the residue. After the waiting period, she vigorously scrubbed the treated section with steel wool, using circular motions to dislodge the grime, before rinsing it thoroughly with clean water.
The Science Behind It: Baking soda acts as a mild abrasive, its fine crystalline structure helping to scour away grime without excessively scratching surfaces (though caution is still advised with very delicate finishes). Chemically, it’s a mild alkali, which can effectively help to saponify (turn into soap) fats and oils, making them more soluble and easier to lift. Vinegar, an acid, reacts with the baking soda to create carbon dioxide gas. This physical bubbling action can help to lift and loosen stubborn deposits from the pan’s surface. The acetic acid in vinegar also contributes by dissolving mineral deposits (like hard water stains) and breaking down certain greases. When combined, this reaction can be quite effective for lighter stains and general buildup on cookware.
Expected Outcome: This method is generally good for moderate grime and regular maintenance. While powerful for a natural solution, its composition might limit its efficacy against years of severely caked-on carbon and deeply embedded residue. It’s an excellent starting point for less severe cases.
Method 2: Enhanced Natural Power – Baking Soda, Vinegar & Lime for Tough Grime
Building on the first method, this approach introduces the additional punch of citrus, often celebrated for its natural degreasing and brightening properties. The idea here is to amplify the natural cleaning power.
- Key Ingredients:
- Baking soda
- White vinegar
- Fresh lime (or lemon)
- Sponge
Step-by-Step Process: For this method, Lynja first created a thick, spreadable paste by mixing baking soda and white vinegar in a separate bowl. This paste, designed for maximum adherence, was then carefully applied to the next taped section of the pan’s underside, coating the stained areas thoroughly. The innovative step here involved squeezing fresh lime juice directly over the applied paste, adding a concentrated burst of citrus acid. With the citrus active, she then proceeded to scrub the area using a soft sponge, aiming to work the paste and lime into the grime, before finally rinsing away the mixture with water.
The Science Behind It: The initial baking soda and vinegar paste works similarly to Method 1, providing abrasive and chemical loosening action. The addition of lime juice introduces citric acid, which is a stronger organic acid than the acetic acid found in vinegar. Citric acid is renowned for its ability to dissolve mineral deposits (such as rust and hard water spots) and effectively cut through grease. The combination aims to boost the chemical breakdown of the tough residues. However, relying on a soft sponge for scrubbing might limit its physical abrasive power, especially when dealing with hard, carbonized layers, compared to the more aggressive steel wool.
Expected Outcome: Theoretically, the added citric acid should enhance the cleaning power, offering a slightly more potent natural solution. However, if the grime is extremely tenacious and deeply embedded, even the boosted natural acids might struggle. The limitation imposed by the softer sponge as the primary scrubbing tool could also be a significant factor in its ability to remove heavily carbonized layers.
Method 3: The Heavy Hitter – Bar Keepers Friend & Water for Ultimate Pan Shine
Often hailed as a secret weapon in professional kitchens and home cleaning arsenals, Bar Keepers Friend is specifically formulated for the toughest cleaning challenges that standard detergents can’t handle. This method focuses on industrial-strength cleaning power.
- Key Ingredients:
- Bar Keepers Friend (powdered cleanser)
- Water
- Steel wool
Step-by-Step Process: Lynja initiated this powerful method by mixing a small amount of Bar Keepers Friend powder with water in a bowl to form a thick, workable slurry or paste. This potent mixture was then applied evenly to the final section of the pan’s back, covering all areas of discoloration and grime. Without an extended waiting period, which is often unnecessary for this product, she immediately went to work, vigorously scrubbing the area with steel wool. The abrasive action combined with the chemical power of the product was applied directly to the stains. After thorough scrubbing, the pan was rinsed clean with water, revealing the results.
The Science Behind It: Bar Keepers Friend contains oxalic acid, a potent organic acid, along with finely ground abrasive particles. Oxalic acid is highly effective at removing rust, tarnish, and oxidation stains from various surfaces, including stainless steel, copper, and ceramic. It works by chemically reacting with these compounds, making them soluble and easier to wipe away. The abrasive particles provide the necessary physical scrubbing action to dislodge stubborn, cooked-on residues that chemical action alone might struggle with. The combination of a strong acid and effective abrasives makes it particularly formidable against severely burnt-on food, grease, and heavy carbon buildup, making it a go-to for deep cleaning and restoration.
Expected Outcome: Given its specialized and powerful formulation, Bar Keepers Friend is expected to deliver superior results on tough, oxidized stains and heavy carbon buildup, often restoring surfaces to a near-new condition with minimal effort compared to other methods.
The Verdict: Which Pan Cleaning Method Truly Shines for Cookware Restoration?
After meticulously testing all three methods with a consistent approach, the results were clear and visually striking. The taped sections on the pan provided an undeniable side-by-side comparison, allowing for a precise and objective evaluation of each technique’s efficacy against years of accumulated grime and discoloration.
Looking at the photo above and below, it’s immediately evident that Method 2 (Baking Soda, Vinegar, and Lime with a sponge) was the least effective of the three. Despite the theoretical boost from citric acid, this method struggled to make a significant impact on the heavy, baked-on grime. The cleaned section showed minimal improvement, leaving much of the carbonized residue untouched and the pan’s exterior still looking dingy. This could be attributed to several factors: perhaps the chemical action wasn’t strong enough for the severity of the stains, or more likely, the use of a soft sponge simply couldn’t provide the necessary abrasive power to physically dislodge the hardened carbon layers that had built up over time.
Method 1 (Baking Soda & Vinegar with steel wool) performed considerably better. This classic combination managed to remove a good portion of the grime, resulting in noticeable improvement in its designated section. It successfully lifted some of the baked-on grease and light carbon, making the area visibly cleaner than the untreated or Method 2 sections. This demonstrates that for moderate buildup or as a regular maintenance solution, the abrasive action of steel wool combined with the fizzing chemical reaction of baking soda and vinegar can be quite effective. However, while good, it didn’t achieve a complete restoration to a “like-new” state, leaving some residual staining, discoloration, and hints of embedded grime.
The clear winner, by a significant margin, was Method 3 (Bar Keepers Friend & Water with steel wool). The results were nothing short of impressive and truly transformative. The section treated with Bar Keepers Friend and vigorously scrubbed with steel wool was dramatically cleaner, practically sparkling and looking as good as new. This method proved exceptionally effective at cutting through the toughest, most stubborn burnt-on grease, carbonized food, and deep discoloration, restoring the pan’s surface to its original luster and shine. The powerful combination of oxalic acid and fine abrasives clearly made all the difference, demonstrating why this product is a favorite among cleaning enthusiasts and professionals for challenging tasks where other methods fall short.
Beyond the Hack: Tips for Maintaining Pristine Cookware and Preventing Grime Buildup
While discovering the most effective cleaning hack for severely soiled pans is invaluable, prevention and regular maintenance are equally important to keep your cookware looking its best and to minimize the need for intensive deep cleaning. Incorporating these habits into your kitchen routine will ensure your pots and pans remain gleaming longer:
1. Clean After Every Use
The simplest and most effective way to prevent stubborn buildup is to clean your pans thoroughly after each use. Don’t let food residues or grease sit and harden, as they become significantly harder to remove over time. A quick wash with warm, soapy water, or even a pre-soak, can save you hours of scrubbing later.
2. Address Spills and Overflows Immediately
If something boils over or spills onto the sides or bottom of your pan during cooking, wipe it up gently as soon as it’s safe to do so. Fresh spills are liquid and much easier to remove than those that have been cooked onto the surface and carbonized by heat.
3. Choose the Right Heat Setting for Your Cookware
Using excessively high heat can cause oils to polymerize and food to burn onto the exterior of your pans, especially if the flame extends beyond the base of the pot. Always match the burner size to your pan and use appropriate heat levels for the task at hand to prevent scorching and unnecessary residue buildup on the outside.
4. Use Appropriate Cooking Fats and Oils
Some oils have a lower smoke point and can burn and create sticky residues more easily when exposed to high heat. While this primarily affects the cooking surface, it can also contribute significantly to exterior grime. Be mindful of the oils you use and their behavior at high temperatures, opting for oils with higher smoke points for high-heat cooking.
5. Utilize Degreasers for Regular Cleaning Tasks
For everyday grease buildup that isn’t severely burnt, a good quality kitchen degreaser or even a strong dish soap specifically designed to cut through grease can be very effective. Apply the degreaser, let it sit for a few minutes to break down the fats, then scrub and rinse thoroughly.
6. Consider Regular Light Polishing for Shine
For stainless steel and copper pans, a routine polish with a specialized cleaner can help maintain their shine and prevent tarnish or discoloration from setting in. This is a proactive, preventative measure that keeps the surfaces looking new and reduces the frequency of needing deep, intensive cleaning.
7. Protect Your Surfaces During Storage
When storing pans, especially those with restored exteriors, consider placing paper towels, felt protectors, or soft cloths between them. This helps to prevent scratches and the transfer of residual grime or moisture from one pan to another, keeping both the interior and exterior in better condition for longer.
Final Thoughts: Embrace a Cleaner, Brighter Kitchen Today
The comprehensive experiment conducted by Cooking with Lynja unequivocally points to Bar Keepers Friend used with steel wool as the most potent and effective solution for restoring heavily soiled pan bottoms. It stands out as the ultimate pan cleaning hack, capable of transforming even the most neglected cookware back to a gleaming, like-new condition. While baking soda and vinegar offer a decent natural alternative for lighter grime and regular maintenance, for truly stubborn, baked-on messes, Bar Keepers Friend is the undisputed champion that delivers unparalleled results.
Don’t let dirty pans be a source of frustration or an eyesore in your kitchen any longer. Armed with this knowledge and the right tools, you can confidently tackle even the toughest stains and enjoy the immense satisfaction of pristine, sparkling cookware. Give Method 3 a try, following the safety precautions, and prepare to be amazed by the dramatic transformation. Your kitchen, and your overall cooking experience, will undoubtedly thank you for it!