
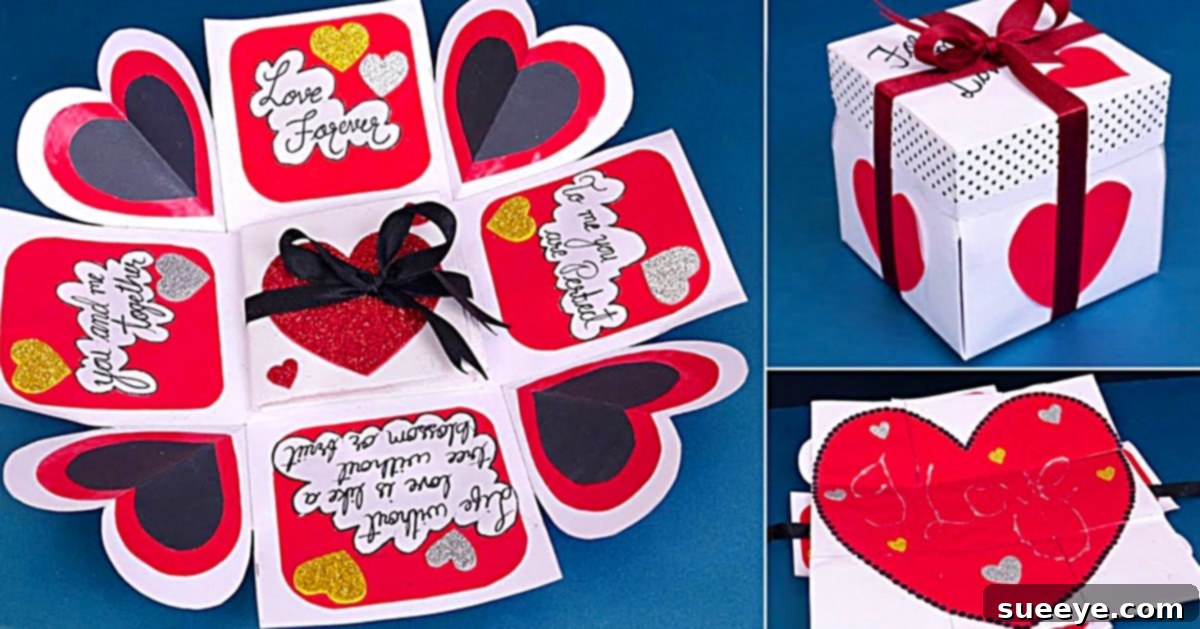
Craft the Perfect Valentine: A DIY 3D Love Card & Gift Box Tutorial
As Valentine’s Day draws near, the annual quest for the ideal expression of love begins. While store-bought gifts have their place, nothing quite conveys genuine affection like a handmade present. This year, elevate your romantic gesture with a spectacular DIY 3D Love Card that ingeniously doubles as a charming gift box. Imagine the delight on your loved one’s face as they unfold a personalized, three-dimensional masterpiece, meticulously crafted by your own hands. This engaging project, inspired by an excellent online tutorial, allows for complete customization of messages, colors, and designs, ensuring each creation is as unique as the bond you share. Best of all, you likely already possess most of the essential materials, transforming this intricate-looking craft into an accessible and enjoyable creative journey. Prepare to transform simple paper and a few craft room staples into a truly unforgettable token of love.
Why Choose a Handmade Valentine? The Power of Personalization
In an age dominated by mass production, a handmade Valentine stands out as a beacon of thoughtfulness and individuality. Opting for a DIY approach offers numerous advantages:
- Unparalleled Personal Touch: Unlike generic cards, a DIY creation allows you to infuse your personality, inside jokes, and heartfelt sentiments directly into the design. Every fold, every stroke of the marker, and every chosen word becomes a testament to your unique relationship.
- Memorable and Cherishable: A handmade card transcends its function as a mere message delivery system; it becomes a cherished keepsake. Its tactile nature and the effort invested make it far more memorable than something purchased off a shelf, often being treasured for years to come.
- Cost-Effective Creativity: You don’t need to break the bank to create something spectacular. This project utilizes common craft supplies, proving that the most impactful gifts often come from creativity and effort, not expense.
- An Enjoyable Crafting Experience: The process of making the card itself is a rewarding activity. It offers a wonderful opportunity to unwind, tap into your creative side, and channel your positive energy into something beautiful for someone special.
- A Unique Gift and Card in One: The innovative design of this particular 3D card means it can hold a small gift or additional notes, adding another layer of surprise and utility. It’s a double delight for the recipient!
By choosing to craft your Valentine, you’re not just making a card; you’re creating an experience, a memory, and a tangible symbol of your love that is truly one-of-a-kind.
Essential Materials for Your DIY 3D Love Card
One of the many appealing aspects of this DIY Valentine project is that it requires only a handful of readily available craft supplies. You might already have most of these items stashed away in your craft drawer, making it incredibly convenient to get started right away. Gather these essentials to begin your creative journey:
- Markers (Red and Black): These vibrant colors are classic choices for Valentine’s Day, symbolizing love and passion. While professional-grade markers like Copic provide exceptional blendability and rich pigmentation, any good quality markers, including popular brands like Sharpies, will work perfectly. Ensure they are permanent or fast-drying to prevent smudging, especially if you plan to write on glossy paper. Consider adding a fine-tip marker for intricate details and a broader tip for filling in larger areas or bold messages.
- Paper (Red, Black, and White): The foundation of your beautiful card! Using a combination of these three colors creates a striking contrast and a visually appealing design. Opt for cardstock or a slightly thicker paper (around 65-80 lb) for durability, as the card involves folding and some structural integrity. However, regular printer paper can also be used if you handle it gently. Experiment with different textures, such as matte or slightly glossy finishes, to add another dimension to your project.
- Scissors: A sharp pair of craft scissors is indispensable for clean, precise cuts. If you have intricate designs or prefer smoother edges, a small pair of detail scissors can be very helpful. Ensure your scissors are comfortable to hold, as you’ll be doing a fair amount of cutting.
- A Glue Stick: For neat and mess-free adhesion. A good quality glue stick provides strong enough bond for paper crafts without causing wrinkling or warping, which liquid glues can sometimes do. Look for an acid-free option to ensure your card lasts longer without yellowing. You might also want a small amount of liquid craft glue for any embellishments or ribbons that need a stronger hold.
- One Piece of Black Ribbon: A beautiful ribbon adds an elegant finishing touch, allowing you to tie the card closed or use it as a decorative accent. Black offers a sophisticated contrast to the red and white paper. The length will depend on how you wish to tie it, but typically a 12-18 inch piece is sufficient. Satin or grosgrain ribbons work well due to their flexibility and smooth texture.
- A Heart-Shaped Template (to trace onto the paper): Precision is key when cutting hearts, and a template makes this task much easier and ensures consistency. You can create your own by folding a piece of paper and cutting out half a heart, print one from online resources, or use a cookie cutter. Having various sizes might also be beneficial for creating layered effects.
Having all your materials organized and ready before you begin will make the crafting process much smoother and more enjoyable. Let’s get started on transforming these simple items into a magnificent token of love!
Step-by-Step Guide to Crafting Your 3D Valentine’s Card
Creating this stunning 3D love card and gift box is a wonderfully rewarding experience, and with these detailed instructions, you’ll be able to bring your vision to life with ease. Follow each step carefully, and don’t hesitate to infuse your own creative flair along the way.
Step 1: Preparing Your White Paper Base
Begin by taking your primary piece of white paper, which will serve as the structural base for your 3D card. Lay it out flat on your workspace. The original design suggests preparing this paper in “raw sections,” which typically implies either cutting it into a specific grid or folding it to define the different sections of the card that will eventually fold into the box. Carefully measure and mark out the sections according to the dimensions provided in the video tutorial (or your preferred size). Precision at this stage is crucial for ensuring that your card folds together perfectly. Use a ruler and a pencil to create faint guidelines for cutting and folding. This initial setup is vital for the card’s overall stability and aesthetic appeal.
Step 2: Tracing and Cutting Your Main Heart Shapes
Next, take your chosen heart-shaped template. On a separate piece of paper (or perhaps directly on the prepared white base if your design allows), trace your beautiful heart shapes. The original tutorial specifies tracing these hearts onto “10cm corner squares,” which suggests a specific layout where hearts are positioned strategically within square sections, leaving some parts attached to form a continuous fold-out structure. Carefully cut out these heart shapes, ensuring that the “end points are left attached” as shown in the example image. This is a critical detail that allows the card to fold and unfold dynamically, creating the impressive 3D effect. Take your time with cutting to achieve clean, smooth edges, as these hearts will be a prominent feature of your finished card.
Step 3: Assembling Decorative Hearts in Red and Black
Now, it’s time to introduce more color and depth to your design. Using your red and black paper, trace and cut out additional heart shapes. These can be slightly smaller than your main white hearts, or varying sizes to create a layered effect. As the image demonstrates, you will then glue these red and black hearts together. This layering creates a beautiful contrast and adds visual interest. For instance, you might cut a slightly larger black heart and a slightly smaller red heart to layer on top, making the red pop. Ensure you use your glue stick sparingly and evenly to avoid any lumps or excess glue seeping out, which can wrinkle the paper. This step allows for a lot of creative freedom in color combination and heart arrangement.
Step 4: Crafting Personalized Message Clouds
This is where your personalized touch truly shines! On a separate piece of white or light-colored paper, write your heartfelt Valentine’s messages. Use your best handwriting, or even try some creative calligraphy for an extra special touch. You can write short, sweet notes, inside jokes, compliments, or romantic quotes. Once your messages are penned, carefully cut them into charming “little cloud shapes” or other whimsical forms, as depicted in the example. These message clouds will float within your 3D card, revealing sweet sentiments as it unfolds. Vary the sizes and shapes of your clouds for a dynamic and visually engaging effect. This step allows for immense creativity and makes each card genuinely unique to its recipient.
Step 5: Assembling the Central Elements and Inner Folds
With your individual decorative elements ready, it’s time to bring them together onto your main card structure. Begin by cutting out smaller squares, preferably with rounded corners for a softer aesthetic, from contrasting paper. These squares will serve as anchors or decorative frames for your messages and hearts. Carefully stick these onto your main central piece of the card. Following this, adhere your layered red and black hearts that you prepared in Step 3. Position them thoughtfully to create a balanced and visually appealing composition. As specified, and likely demonstrated in the accompanying video tutorial, this stage also involves constructing a “center folding card” with even more hearts and messages. This refers to the mechanism that allows the card to expand into its 3D form. Pay close attention to the video’s guidance on where to place folds and adhesive to ensure the pop-up elements work seamlessly.
Step 6: Folding Your Card into a Neat Little Box
This is the magical step where your flat creation transforms into a delightful 3D surprise! Once all the inner components are securely glued and positioned, it’s time to fold the entire card. Following the predetermined score lines and folds you made in Step 1 and refined in Step 5, carefully collapse the structure into a “neat little box.” This intricate folding mechanism is what gives the card its impressive dual functionality. Ensure all folds are crisp and precise, allowing the box to form cleanly. You may need to gently crease the edges with a ruler or bone folder for a professional finish. The outer layers will come together to form the box, encasing the beautiful 3D heart display within. This transformation is truly satisfying and sets this Valentine apart from traditional cards.
Step 7: Adding the Finishing Touch – The Ribbon
Once your 3D card is perfectly folded into its box shape, take your piece of black ribbon. This ribbon will serve both a decorative and functional purpose. Carefully wrap it around the folded card/box and tie it into an elegant bow or knot. The black ribbon provides a sophisticated contrast against the vibrant red and white, adding a touch of class and ensuring the box remains securely closed until it’s presented to your loved one. This final detail elevates the entire presentation, making the reveal even more special. You can also experiment with different ribbon colors or add other small embellishments like glitter, stickers, or even a tiny wax seal for extra charm.
Creative Customization: Making Your 3D Love Card Truly Yours
While the provided tutorial offers a fantastic foundation, the true joy of DIY lies in personalizing your creation. Here are some ideas to make your 3D Valentine’s card even more special and reflective of your unique relationship:
- Vary Your Color Palette: Don’t feel limited to red, black, and white. Consider pastels for a softer look, metallics for a touch of glamour, or even your partner’s favorite colors.
- Experiment with Textures: Incorporate glitter paper, velvet flock paper, or patterned cardstock to add tactile interest.
- Beyond Cloud Shapes: Instead of cloud-shaped messages, try stars, tiny banners, or even speech bubbles.
- Add Embellishments: Small adhesive gems, sequins, stickers, or even miniature photos can enhance the visual appeal.
- Incorporate More Messages: Write secret messages on the back of hearts or create tiny envelopes to hide additional notes.
- Theme it Up: If your loved one has a specific hobby or interest, incorporate subtle elements related to that. For example, small musical notes for a musician or tiny gears for an engineer.
- Different Ribbon Styles: Use lace, twine, or a personalized printed ribbon instead of plain black.
- Size It Differently: Adjust the dimensions to create a larger, more impactful box, or a smaller, more intimate keepsake.
The possibilities are endless! Let your imagination guide you and create a Valentine that tells your story.
The Double Whammy: A Card and a Gift Box in One!
What makes this DIY project truly exceptional is its innovative dual functionality. This isn’t just a card; it’s also a miniature gift box! Once folded, the internal structure forms a secure space perfect for holding small, precious tokens of affection. Imagine slipping in:
- A delicate piece of jewelry
- A handwritten love letter rolled into a scroll
- A special key chain or charm
- Concert tickets or a voucher for a shared experience
- A small bag of their favorite candies or chocolates
This “double whammy” feature enhances the surprise and value of your handmade gift, turning a beautiful card into an unforgettable treasure chest of love. It adds an extra layer of thought and practicality, demonstrating your creativity and attention to detail.
Tips for Success and Troubleshooting Common Issues
Even seasoned crafters can encounter challenges. Here are some tips to ensure your 3D love card comes out perfectly, along with solutions for common hiccups:
- Precision is Key: Always measure twice, cut once. Use a ruler and a light pencil mark for all cuts and folds. Err on the side of caution.
- Sharp Tools: Dull scissors or craft knives can lead to jagged edges. Ensure your tools are sharp for clean, professional-looking cuts.
- Test Folds: Before applying glue, do a dry run of all your folds to ensure everything aligns correctly. This helps you anticipate and correct any misalignments.
- Less is More with Glue: Apply glue sticks evenly and sparingly to avoid wrinkling the paper. If using liquid glue, a thin line is usually sufficient.
- Allow Drying Time: Give each glued section ample time to dry before moving to the next step, especially before folding, to prevent components from shifting.
- Troubleshooting Wrinkles: If paper wrinkles slightly, you can try gently pressing it under a heavy book overnight, but prevention is always better.
- Heart Placement: For the pop-up hearts, ensure they are attached at the correct “end points” as indicated. If they don’t pop up smoothly, re-check these attachment points.
- Video Reference: If you’re unsure about a step, always refer back to the original video tutorial for visual clarification. It’s an invaluable resource.
With a little patience and attention to detail, you’ll create a stunning card that’s sure to impress!
Conclusion: Crafting Love, One Fold at a Time
As you complete your gorgeous DIY 3D Love Card and Gift Box, take a moment to appreciate the love and effort you’ve poured into it. This isn’t just a piece of paper; it’s a handcrafted testament to your affection, a unique expression of sentiment that a store-bought item simply cannot replicate. The joy of giving a personalized, handmade gift is truly unparalleled, and this innovative card-box hybrid offers a delightful surprise for your special someone. This Valentine’s Day, choose to make a lasting impression with a gift that combines creativity, thoughtfulness, and undeniable charm. So gather your materials, embrace your inner artisan, and prepare to spread some heartfelt joy with a truly unique creation that will be cherished long after the chocolates are gone.