
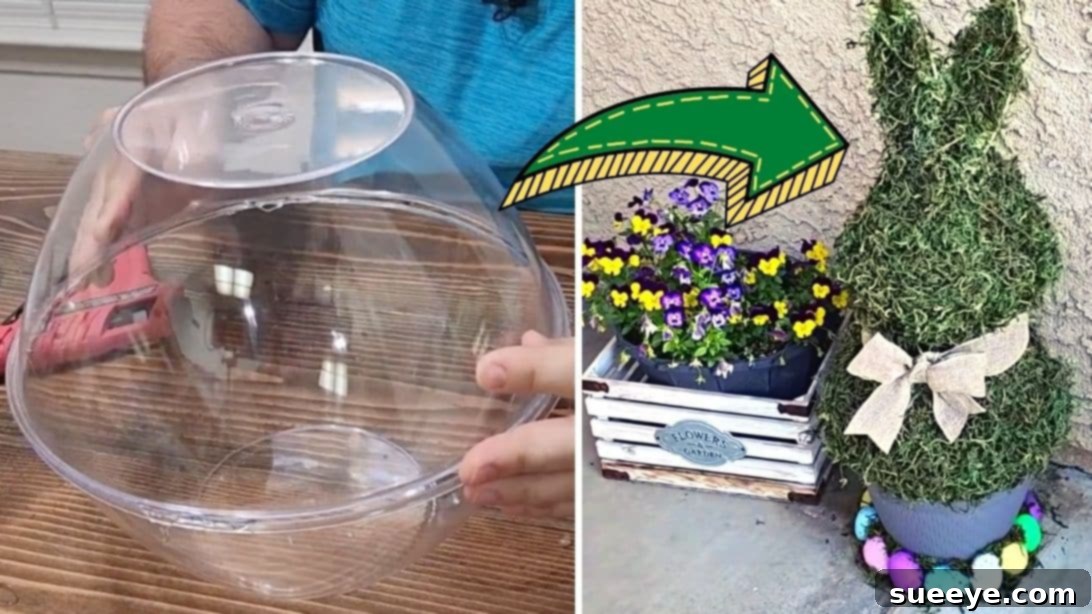
Transform Your Porch with an Adorable DIY Easter Bunny: The Ultimate Dollar Store Craft
As Easter approaches, the excitement of spring fills the air, and what better way to celebrate than by adorning your home with festive, handmade decorations? If you’re looking for an impactful yet incredibly budget-friendly project, or perhaps a fantastic last-minute DIY idea to brighten your outdoor space, you’ve landed in the perfect spot! This comprehensive guide will walk you through creating a charming, oversized Easter bunny that will undoubtedly become the centerpiece of your porch decor, greeting all your guests with whimsical spring cheer. The best part? You can gather most of the essential supplies from your local Dollar Store, proving that stunning holiday decor doesn’t have to break the bank.
Imagine a delightful, custom-made Easter bunny statue gracing your entryway, bringing smiles to passersby and adding that special touch to your seasonal display. This tutorial, inspired by the creative minds at Hometalk on YouTube, simplifies the crafting process, ensuring even beginner DIY enthusiasts can achieve impressive results. Get ready to unleash your creativity and craft a unique piece that reflects the joyous spirit of Easter, making your home truly shine with springtime charm!
Why Choose DIY for Your Easter Decor?
Embracing DIY projects for holiday decorations offers a myriad of benefits beyond just saving money. Firstly, it allows for unparalleled personalization. Unlike mass-produced items, your handmade Easter bunny will possess a unique charm and character, reflecting your personal style and effort. This personal touch makes your home feel more inviting and truly your own, setting your decor apart from anything store-bought. Secondly, crafting can be an incredibly rewarding and relaxing activity. It provides a wonderful opportunity to unwind, engage your creative faculties, and even involve family members in a fun, shared experience. Children especially love participating in holiday crafts, and this project can be adapted for older kids under supervision, fostering their creativity, developing their fine motor skills, and creating lasting family memories. Lastly, DIY promotes sustainability. By reusing simple items or repurposing materials, you’re contributing to a greener lifestyle while creating beautiful new objects. This particular project is a fantastic example of transforming everyday, inexpensive items into something truly spectacular for your spring and Easter festivities, embodying both creativity and ecological consciousness.
The Magic of Dollar Store Finds: Crafting on a Budget with Ease
One of the most appealing aspects of this DIY Easter bunny project is its incredible affordability, thanks to the clever use of Dollar Store materials. These stores are treasure troves for crafters, offering a wide array of basic supplies at unbeatable prices. For this project, common household items like plastic bowls are ingeniously transformed into the main structure of our bunny. This approach not only keeps costs down significantly but also demonstrates that you don’t need expensive specialty items to create high-impact decor. It’s a testament to how imagination and a little ingenuity can turn humble bowls into a delightful seasonal display. The accessibility of Dollar Store items means you can gather everything you need quickly and without fuss, making this an ideal project for those spontaneous crafting urges or for anyone looking to maximize their decorative impact without stretching their budget. Embrace the creative challenge of transforming everyday items into extraordinary decor!
Materials You’ll Need: Gather Your Crafting Essentials
Before diving into the fun part, let’s ensure you have all the necessary supplies within reach. One of the greatest advantages of this DIY project is its reliance on readily available and inexpensive materials, most of which can be sourced from your local Dollar Store or craft supply retailer. This comprehensive list ensures you’re fully prepared to create your stunning Easter bunny without any last-minute trips.
- 2 Large Plastic Bowls: These will form the main, voluminous body of your bunny. Opt for sturdy plastic bowls that are roughly the same size and can be easily joined together to create a symmetrical form.
- 2 Small Plastic Bowls: These will be used to construct the bunny’s head, fitting proportionally onto the larger body section. Again, ensure they are of similar size for a balanced look.
- Dollar Store Wire Bunny Head: You’ll primarily be using the ears from this item. If a complete wire bunny head isn’t available, look for any stiff wire, thick felt, or even cardboard that can be cut and shaped into suitable bunny ears.
- Scissors: A reliable pair of scissors or wire cutters will be essential for snipping the wire bunny ears and cutting the cardboard base.
- Floral Foam Block: A small section of a standard floral foam block will be needed to securely anchor the bunny ears to the head.
- Spray Paint (Desired Color): White, cream, light grey, or pastel colors like soft pink or baby blue are traditional choices for bunnies. Choose a shade that complements your outdoor decor. Ensure the paint is suitable for plastic surfaces and dries quickly.
- Hot Glue Gun and Plenty of Glue Sticks: This will be your primary bonding agent for assembling the bowls and attaching embellishments. Always exercise caution and follow safety guidelines when using a hot glue gun.
- Plastic Flower Pot: A medium-sized plastic flower pot will serve as the stable base for your bunny, providing both support and a finished look.
- Adhesive Spray: An essential item for securely attaching the decorative moss to your bunny’s body. Look for a strong, fast-drying adhesive.
- Fake Moss (or decorative greenery): This adds a lovely, naturalistic texture and springtime feel to your bunny. Choose a color that enhances your chosen spray paint. Green, light green, or even a mixed variety would work.
- Cardboard: A sturdy piece of cardboard, perhaps recycled from an old shipping box, will be used to create an additional stable base for the flower pot.
- Assorted Easter Eggs: A collection of colorful plastic or foam Easter eggs will be used to embellish the base, adding a festive touch and completing the look of your display.
Having everything organized and laid out before you start will make the crafting process much smoother, more efficient, and ultimately more enjoyable. Now, let’s hop to it and begin transforming these simple items into a charming Easter decoration that will delight everyone!
Step-by-Step Guide: Crafting Your Easter Bunny Masterpiece
Follow these detailed instructions to assemble your adorable Easter bunny. Take your time with each step, paying attention to detail, and don’t be afraid to add your personal flair as you go!
Step 1: Constructing the Bunny’s Body, Head, and Ears
Begin by taking your two large plastic bowls. These will form the main, plump body of your Easter bunny. Apply a generous, continuous bead of hot glue evenly around the entire rim of one bowl. Work quickly but carefully. Immediately, carefully place the second large bowl directly on top, aligning their rims perfectly to form a seamless sphere. Press them together firmly and hold for at least 30 seconds to a minute, allowing the hot glue to set and create a strong, permanent bond. Ensure there are no gaps for a neat and secure finish. This combined structure forms the foundational base of your bunny’s body.
Next, replicate this precise process with your two smaller plastic bowls. Apply hot glue around the rim of one small bowl and firmly press the second small bowl on top, holding them until the glue dries completely and creates a stable, smaller sphere. This smaller, joined pair will serve as the bunny’s head. Once both the large and small bowl sets are completely dry and securely bonded, it’s time to connect them to form the full bunny shape. Carefully apply hot glue around the center of the top large bowl (which will be the neck area of your bunny) and gently center the joined small bowls on top, creating the head. Hold firmly until the glue sets, ensuring the head is stable, upright, and well-aligned with the body. You now have the basic, three-dimensional form of your charming Easter bunny!
Now for the iconic bunny ears that will truly bring your creation to life. Take your Dollar Store wire bunny head. Using sturdy scissors or a pair of wire cutters, carefully cut off only the ears from the rest of the wire frame. Exercise caution to avoid bending or damaging the ears’ shape. Next, retrieve your floral foam block. Cut a small, manageable piece from the block – roughly 1-2 inches in length and width – that can sit stably and inconspicuously on top of the bunny’s head (the joined small bowls). Securely hot glue this floral foam piece directly onto the very center top of the bunny’s head. This foam will act as a sturdy and hidden anchor for the ears. Finally, gently insert the cut bunny ears into the center of the floral foam, adjusting them so they stand upright, are evenly spaced, and face forward. For extra security and to ensure they withstand outdoor conditions, you can add a dab of hot glue around the base of the ears where they meet the foam.
Step 2: Painting, Texturing, and Adding Finishing Touches for a Polished Look
With the bunny’s main structure complete, it’s time to bring it to vibrant life with color and texture. Take your entire assembled bunny (body, head, and ears) outdoors or into a very well-ventilated area, such as a garage with open doors. Place it on a drop cloth, old newspaper, or a cardboard box to protect your work surface from overspray. Thoroughly spray paint the entire piece, ensuring complete and even coverage from all angles. Use smooth, consistent, sweeping motions, holding the can approximately 6-8 inches away from the surface to prevent drips and ensure an even coat. You will likely need to apply several thin coats, allowing each coat to dry completely to the touch before applying the next, to achieve a uniform and vibrant finish, especially on plastic surfaces. White, soft pink, or light blue are classic, charming choices for an Easter bunny, but feel free to choose any color that complements your existing spring or outdoor decor theme. Once painted, allow the bunny to dry thoroughly according to the spray paint manufacturer’s instructions, which could take several hours or even overnight, depending on humidity and temperature.
While your bunny is drying, prepare its sturdy base. Grab your plastic flower pot. Apply a generous amount of hot glue around the inner rim of the pot. Carefully insert the bottom of your painted bunny (the joined large bowls) into the pot, centering it and pressing down firmly. Hold it in place until the glue completely sets and cools, ensuring the bunny is securely seated and stable within its pot base. This provides the necessary stability for your outdoor porch display, making it resistant to gentle breezes.
Now for the lovely, naturalistic mossy texture! Once the bunny and pot are securely joined and the paint is completely dry, take your adhesive spray. Working in small, manageable sections to prevent the adhesive from drying too quickly, spray a patch of adhesive onto the bunny’s body and head (intentionally avoiding the pot for now). Allow the adhesive to become tacky for a few seconds as per the product instructions. Then, immediately press your fake moss onto the sprayed area, gently patting it down to adhere securely and create a lush texture. Repeat this process, working systematically around the entire bunny, until its body and head are completely covered in a beautiful, soft mossy texture. This step adds a wonderful, organic dimension to your Easter decor, making the bunny look like it just hopped out of a whimsical spring garden. The faux moss makes the bunny appear lush and inviting, perfect for spring.
To ensure your bunny stands firmly and has a polished, finished bottom, cut a large circle from your piece of sturdy cardboard. This circle should be slightly larger in diameter than the base of your plastic flower pot, providing a broader and more stable footing. Apply hot glue liberally around the entire rim of the cardboard circle and firmly attach it to the underside of the plastic flower pot. Press and hold until the glue sets. This creates a solid, flat base that will prevent your bunny from tipping over, especially if placed outdoors on a windy day, and also gives it a cleaner, more complete appearance. Lastly, to add that extra festive touch and complete your charming display, artfully arrange and hot glue an assortment of colorful Easter eggs around the cardboard base, creating a charming nest-like appearance. You can use plastic, foam, or even painted hard-boiled eggs for this, making sure they are securely attached to prevent them from rolling away.
Tips for a Flawless DIY Easter Bunny Project
Achieving a professional-looking finish for your DIY Easter bunny is easier than you think with a few helpful tips and tricks. These suggestions will ensure your crafting experience is smooth and your final product is stunning:
- Work in a Well-Ventilated Area: This is crucial, especially when spray painting or using adhesive spray. Always ensure you are in an open space, outdoors, or a room with excellent air circulation to avoid inhaling fumes. Consider wearing a mask for added protection.
- Safety First with Hot Glue: Hot glue guns operate at high temperatures and can cause burns. Always be mindful of the hot nozzle and molten glue. It’s advisable to wear thin crafting gloves if you are prone to accidental touches. Have a bowl of cold water nearby for immediate relief in case of minor burns.
- Allow Ample Drying Time: Patience is truly a virtue in crafting. Rushing the drying process for hot glue, spray paint, or adhesive spray can compromise the integrity and appearance of your finished bunny. Always refer to product instructions for recommended drying times between coats and before proceeding to the next step.
- Even Spray Paint Application: For a smooth, streak-free, and uniform finish, apply spray paint in several light, even coats rather than attempting one thick coat. This technique prevents drips, clumping, and ensures better, more consistent coverage, especially on tricky plastic surfaces.
- Secure Adhesion of Moss: When applying fake moss, press it firmly onto the adhesive until it feels securely attached. For added durability and weather resistance, especially if your bunny will be displayed outdoors, you can apply a light, clear sealant spray over the moss once it’s fully dry.
- Stabilize Your Base Thoroughly: The combination of the plastic flower pot and the cardboard circle is crucial for the bunny’s stability. Double-check that all components are securely glued and firmly attached to prevent your bunny from toppling over, particularly in windy outdoor conditions.
Personalize Your Easter Bunny: Customization Ideas to Make it Uniquely Yours
While the classic mossy bunny is inherently charming, don’t hesitate to infuse your unique style and personality into this project. Customization allows your Easter bunny to perfectly complement your home and taste:
- Color Variations Beyond White: Instead of traditional white or green, consider painting your bunny in delightful pastel shades like soft lavender, cheerful mint green, or gentle baby blue. For a more whimsical or playful look, try adding polka-dotted patterns, subtle stripes, or even a gradient effect.
- Add Expressive Facial Features: Give your bunny a friendly personality by adding simple eyes and a nose. You can use permanent markers for a minimalist look, craft paint for a more artistic touch, or even small craft buttons, googly eyes, or felt cutouts for a tactile finish.
- Accessorize with Bows and Embellishments: Tie a festive ribbon bow around your bunny’s neck in a contrasting or complementary color. You could also attach small silk flowers, delicate artificial butterflies, or even a tiny basket filled with more colorful eggs or sweet treats.
- Sparkle and Shine: For a touch of whimsy and enchantment, apply a fine glitter spray over the painted or mossed surface once everything is dry. This adds a magical shimmer that catches the light beautifully.
- Themed Seasonal Accents: Beyond just Easter eggs, consider surrounding the base of your bunny with small artificial carrots, tiny fluffy chicks, miniature birdhouses, or other spring-themed embellishments to create a rich and immersive display.
Displaying Your Charming Porch Decor: Finding the Perfect Spot
Once your magnificent DIY Easter bunny is complete and fully dry, it’s time to find its perfect spot to shine and delight everyone who sees it!
- Front Porch Focal Point: The most obvious and impactful place for your large bunny is right on your front porch. Position it prominently near your front door, alongside other potted plants, or at the top of your porch steps. Its impressive size makes it a natural focal point, welcoming guests with open arms (or ears!).
- Garden Accent: If your garden has a protected spot, such as nestled among flower beds or near a garden bench, the bunny can add a playful and unexpected touch amidst your spring blooms. Just ensure it’s not in an area prone to heavy rain or direct harsh weather unless you’ve applied a robust outdoor sealant.
- Indoor Statement Piece: For those without a dedicated outdoor porch or who prefer indoor decor, this large bunny can make a wonderful statement piece in an entryway, a sunny living room corner, or even as a cheerful addition to a child’s playroom.
- Pair with Other Decor: To create a cohesive and inviting spring scene, complement your bunny with other Easter-themed items. Think colorful wreaths on your door, festive garland draped along railings, or smaller egg displays and floral arrangements that tie into your chosen color scheme.
- Creative Lighting: For evening enjoyment and to extend its charm after dusk, consider placing a small solar-powered spotlight near your bunny to illuminate it. Alternatively, drape a string of battery-operated fairy lights around its base or even within the moss for a magical glow.
Your handmade Easter bunny isn’t just a decoration; it’s a testament to your creativity, a reflection of your personal style, and a warm welcome for anyone who approaches your home. It’s guaranteed to bring joy and a festive spirit to your outdoor or indoor space throughout the entire spring season, making your home feel vibrant and alive.
*Thanks to Hometalk via YouTube for all images and the original inspiration for this wonderful craft. If you enjoyed this tutorial and loved their creative approach, we highly recommend visiting their channel for more fantastic DIY ideas and subscribing to stay updated on their latest projects!
Conclusion: Celebrate Spring with Your Handcrafted Masterpiece
Creating your very own oversized Easter bunny for your porch or garden is a delightful and rewarding project that seamlessly combines affordability, boundless creativity, and a heartwarming touch of seasonal charm. By meticulously following this detailed tutorial, you’ve successfully transformed simple, inexpensive Dollar Store items into a captivating and substantial piece of holiday decor that will undoubtedly bring smiles to faces and significantly enhance the beauty of your home. This DIY Easter bunny stands as a testament to the fact that impressive, eye-catching decorations don’t require a hefty budget or extensive crafting experience. Instead, a little imagination, some basic supplies, and a few hours of enjoyable, focused work can yield truly spectacular results that you’ll be proud to display.
We hope this comprehensive guide has not only inspired you but also empowered you to embrace the joy of DIY and add a truly personal and vibrant touch to your Easter and spring celebrations. Whether you stick closely to the classic design or venture to customize it with your own unique flair and additional embellishments, your handmade bunny will be a continuous source of pride and a warm, inviting welcome to all who visit your home. Happy crafting, enjoy the beauty of your new creation, and happy Easter!