
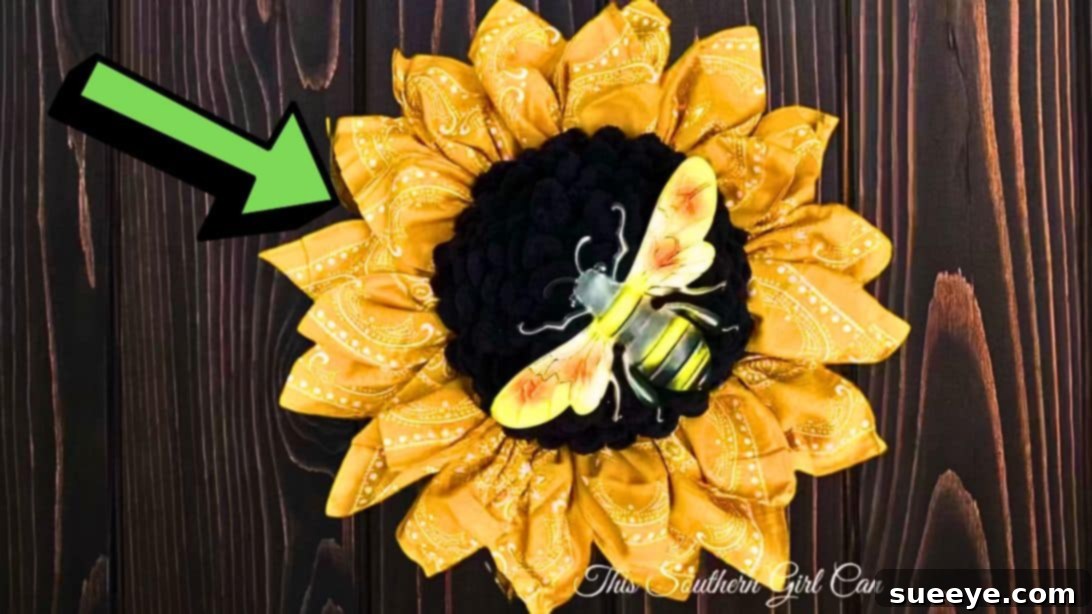
Craft a Vibrant DIY Sunflower Bandana Wreath for Spring & Summer Home Decor
As the days grow longer and nature awakens, there’s no better way to infuse your home with the spirit of the season than with a beautiful, handcrafted wreath. This tutorial guides you through creating a captivating **DIY Sunflower Bandana Wreath**, a project that promises vibrant charm and a personal touch to your spring and summer decor. Inspired by the brilliant creativity of This Southern Girl Can on YouTube, this easy-to-follow guide transforms simple bandanas into a stunning floral masterpiece. Get ready to add a burst of sunshine to your front door or any wall in your home with this unique and budget-friendly craft!
Wreaths have long been a cherished symbol of welcome, celebration, and seasonality. The joy of creating your own custom home decor is immensely rewarding, and this particular project stands out for its ingenuity and visual appeal. By utilizing readily available and often inexpensive bandanas, we’re able to craft lush, colorful petals that mimic the radiant beauty of a sunflower. The result is a vibrant, textured wreath that is both eye-catching and surprisingly straightforward to construct. Whether you’re an experienced crafter looking for a fresh idea or a beginner eager to try your hand at DIY home decor, this comprehensive tutorial is designed for success. We’ll walk you through each step with clear instructions and helpful tips, ensuring your sunflower wreath blooms beautifully and brings lasting cheer to your space. So, gather your materials, embrace your inner artist, and prepare to craft a piece that perfectly celebrates the warmth and joy of the warmer seasons!
Why Choose a DIY Sunflower Bandana Wreath for Your Home?
Beyond its aesthetic appeal, this specific DIY project offers several compelling benefits:
- **Uniquely Vibrant Aesthetic:** Bandanas come in an incredible array of colors and patterns, allowing you to create a sunflower wreath that truly pops with personality and warmth. You can stick to traditional sunflower colors or experiment with unique combinations.
- **Budget-Friendly Crafting:** Utilizing inexpensive materials like bandanas, zip ties, and a basic wreath frame makes this an accessible project for almost any budget. It’s a fantastic way to create high-impact decor without a high cost.
- **Personalized Home Decor:** Every step of this project allows for customization. From choosing your bandana colors to selecting embellishments, you can ensure your finished wreath perfectly reflects your personal style and complements your existing home decor.
- **Engaging & Relaxing Activity:** The methodical process of cutting, folding, and assembling the petals can be a wonderfully therapeutic and mindful activity. It’s a great way to unwind and unleash your creativity.
- **Perfect for Spring & Summer:** Sunflowers are iconic symbols of these seasons, representing warmth, happiness, and vitality. A sunflower wreath is an ideal decorative accent to welcome spring and carry through the vibrant energy of summer.
- **Gift-Giving Potential:** A handmade sunflower bandana wreath makes a thoughtful and personal gift for housewarmings, birthdays, or just to show appreciation to a loved one.
Materials You’ll Need for Your Sunflower Masterpiece:
Before you begin the exciting crafting process, it’s essential to have all your materials neatly organized and ready. This preparation will ensure a smooth and enjoyable crafting experience. Here’s a detailed list of what you’ll need, along with insights into why each item is important:
- **12-inch Wire Wreath Frame:** This sturdy metal ring forms the foundational structure of your entire wreath. The 12-inch size is versatile, creating a noticeable but not overwhelming decor piece. You can find these at most craft stores or dollar stores.
- **4-inch Zip Ties (approximately 100-150 count):** These small but mighty fasteners are indispensable for securely attaching both the plastic canvas mesh and, more importantly, each individual bandana petal to the wreath frame. Opt for a neutral color like white or clear, as they will be mostly concealed.
- **7-Count Plastic Canvas Mesh (one 12×18 inch sheet):** This rigid plastic grid provides a flat, stable surface for attaching the inner rows of your bandana petals. It helps the petals stand out uniformly and gives the sunflower a more defined, fuller shape. You’ll cut a circle from this sheet.
- **6 Standard Bandanas:** The star of the show! Choose bandanas primarily in vibrant yellow, deep orange, or a sunny multi-color pattern to truly capture the essence of a sunflower. The quantity can be adjusted if you desire an extra-full wreath. Ensure they are clean and free of wrinkles for precise folding and cutting.
- **5.8-inch Foam Half-Sphere:** This semi-circular foam shape will serve as the core of your sunflower, replicating its distinctive domed center where the seeds would typically be. Its pre-formed shape saves you time and effort.
- **1 Skein of Bernat Blanket EZ Yarn (or similar chenille yarn):** Select a dark brown or black color to simulate the sunflower’s seed-filled center. This particular yarn is favored for its plush texture and ease of wrapping, creating a soft, realistic, and tactile finish.
- **Metal Bee Garden Stake (from Dollar Tree or similar store):** This charming embellishment adds a whimsical, natural touch to your finished wreath. You’ll be utilizing the bee figurine itself, so be prepared to snip off the stake portion.
- **Hot Glue Gun and Plenty of Glue Sticks:** An essential tool for quick, strong bonds, particularly for securing the yarn to the foam sphere and attaching the finished center to the wreath. Always use caution when operating a hot glue gun.
- **E6000 Adhesive (or other strong, clear craft adhesive):** While hot glue is great for speed, E6000 provides a more durable, long-lasting, and weather-resistant bond, ideal for securing the bee or any other heavier embellishments, especially if the wreath might encounter slight variations in temperature.
- **Sharp Scissors or a Rotary Cutter with Cutting Mat:** Crucial for achieving clean, precise cuts on your bandana fabric. A rotary cutter is highly recommended if you have one, as it allows for efficient and accurate cutting through multiple fabric layers simultaneously.
- **Ruler or Straight Edge:** Indispensable for drawing accurate diagonal lines on your bandanas, ensuring your petals are uniform in size and shape.
- **Pencil or Fabric Marker:** For lightly marking your cutting lines on the bandanas.
- **Wire Cutters (optional, but recommended):** Handy for cleanly trimming the metal stake off your bee embellishment.
Step-by-Step Guide to Crafting Your DIY Sunflower Bandana Wreath:
Embark on this creative journey by following these detailed instructions. Each step is broken down to ensure clarity and success, even for beginner crafters. Take your time, enjoy the process, and watch your beautiful sunflower wreath come to life!
Step 1: Preparing the Wreath Base and Bandanas for Petal Creation
The foundation of your wreath is critical for its overall stability, shape, and how gracefully the petals will lay. This initial phase focuses on preparing both the frame and your fabric.
- **Construct the Mesh Base:** Begin by placing your 12-inch wire wreath frame flat on a clean surface, directly on top of your plastic canvas mesh. Using a pencil or a fabric marker, carefully trace the inner circumference of the wreath frame onto the mesh. This traced circle will define the area where your primary bandana petals will be attached. Once traced, use your sharp scissors or rotary cutter to meticulously cut out this circular mesh shape. This mesh piece will provide a robust, flat surface for attaching your petals, ensuring they protrude uniformly and give your sunflower a fuller, more professional appearance.
- **Secure the Mesh to the Wreath Frame:** Gently flip your wire wreath frame over so that the flatter side is facing upwards. Carefully position the newly cut plastic canvas mesh circle precisely in the center of the wreath frame, ensuring it’s well-aligned with the inner wire ring. Using your 4-inch zip ties, begin securing the outer edges of the mesh to the inner wire of the wreath frame. Work systematically around the entire circumference, placing zip ties approximately every 1 to 2 inches for maximum stability. Pull each zip tie as tight as possible to ensure the mesh is taut and does not shift. After fastening each tie, use your scissors to neatly trim off any excess tail, creating a clean and unobtrusive finish.
- **Prepare Your Bandanas for Cutting:** Take one bandana and fully unfold it. Lay it flat on your workspace. Now, fold the bandana precisely in half lengthwise (often referred to as ‘hotdog style’), making sure all edges and corners are perfectly aligned. Next, fold it in half crosswise (‘hamburger style’), again ensuring neat alignment of all four corners and edges. This will result in a perfect square. Gently press and crease the midpoint along the *long folded side* of this square. This crease will serve as a crucial reference point for drawing your petal cutting lines. Carefully unfold the bandana once, so it’s now folded in half lengthwise with the midpoint crease clearly visible. Repeat this precise folding and creasing preparation for all six of your bandanas to ensure consistency and streamline the subsequent cutting process.
Step 2: Crafting the Individual Bandana Petals
This is where the magic truly begins as your simple bandanas start to transform into the vibrant, ruffled petals of a sunflower. Accuracy in marking and cutting is key to achieving uniform and attractive results.
- **Mark the Petal Guidelines:** With the bandana still folded lengthwise and the *folded edge* positioned closest to you, locate the midpoint crease you created in the previous step. Using a ruler or a straight edge and a pencil or fabric marker, draw a diagonal line that extends from this midpoint directly towards the opposite top corner of the bandana. This line will form one side of your petal. Repeat this process for the other side, drawing another diagonal line from the midpoint towards the other opposite top corner. Finally, draw a straight line directly through the center, connecting the two diagonal lines at their top points. These three lines collectively define the precise shape of one set of petals.
- **Cut the Petal Shapes with Precision:** Carefully and steadily cut along the lines you’ve just drawn. It is absolutely crucial to cut through all layers of the folded bandana simultaneously to ensure that all pieces within that set are perfectly identical. An important aspect of this method is to *keep the pieces connected* at the folded edge where the midpoint was initially located. This technique effectively creates multiple individual petals from a single bandana fold. Repeat this meticulous marking and cutting process for all of your previously prepared bandanas, aiming for utmost consistency across all petal sets.
- **Mastering the Petal Gathering Technique:** Take one complete set of petals (these are the multiple fabric pieces still connected at their base). Hold the center tip of one individual petal firmly with one hand. With your other hand, begin to gently but firmly gather the long side of the fabric together at the center, working your way downwards towards the folded base. The objective here is to create a beautiful ruffled, fan-like shape, reminiscent of a delicate petal. For an excellent visual aid, refer to the video tutorial provided by “This Southern Girl Can,” as seeing this technique in action can be very helpful. Once you’ve achieved the desired gathered petal shape, firmly hold the now-compressed base of the petal.
- **Trim Excess Fabric for a Neat Finish:** Once the petal is gathered and you’re satisfied with its shape, you will notice some excess fabric protruding from the very ends of the gathered base. Using your scissors, carefully and precisely trim off this excess material. This seemingly small step is vital for two reasons: it reduces unnecessary bulk, allowing your petals to lay flatter and integrate more seamlessly into the wreath, and it makes them significantly easier to attach securely to the wreath frame. Repeat this gathering and trimming process diligently for all your bandana petal sets, striving for uniformity in both shape and trimmed size.
Step 3: Assembling the Wreath and Adding the Finishing Touches
With your petals meticulously prepared, it’s now time to bring all the elements together. This final stage involves assembling the petals, creating the sunflower’s distinctive center, and adding delightful embellishments.
- **Attach the Bandana Petals to the Base:** Take your gathered and trimmed bandana petals. Begin by positioning the first petal set on top of the plastic canvas mesh, ensuring its gathered base sits flat against the mesh. Start near the outer edge of the traced circle you defined earlier. Secure it firmly in place using a 4-inch zip tie. Thread the zip tie through the mesh and around the gathered base of the petal, pulling it as tight as possible to ensure no movement. Continue this process, working your way systematically around the entire circumference of the mesh. To achieve a lush, natural sunflower appearance, slightly overlap each subsequent petal set over the previous one. For extra volume and a truly grand sunflower, consider creating two or even three layers of petals: an initial outer layer, followed by an inner layer positioned closer to the center, and perhaps a third smaller layer if desired. As always, ensure all zip tie tails are trimmed flush against the knot for a clean, professional finish that won’t snag.
- **Create the Textured Sunflower Center:** Now, retrieve your 5.8-inch foam half-sphere. Starting from the very center of the flat side of the sphere, apply a small but firm dab of hot glue. Secure one end of your Bernat Blanket EZ yarn into this glue. Begin meticulously wrapping the yarn tightly and evenly around the entire half-sphere, working outwards in a neat, concentric spiral. As you wrap, apply small dabs of hot glue periodically (every few wraps) to keep the yarn firmly secured and prevent any unraveling or shifting. Continue this process until the entire foam sphere is completely covered, creating a beautifully textured surface that convincingly resembles the dense, seed-filled center of a sunflower. Once fully covered, secure the final end of the yarn with another firm dab of hot glue.
- **Attach the Center to the Wreath:** Once your yarn-covered foam sphere is complete and the glue has set, it’s time to integrate it into your wreath. Apply a generous and even amount of hot glue to the entire flat back of the foam sphere. Carefully position and press the sphere firmly onto the exact center of your wreath, ensuring it covers the exposed plastic canvas mesh and the inner edges of your bandana petals. Hold it in place for several moments to allow the hot glue to cool and set. Alternatively, for a more robust and permanent attachment, especially for wreaths that might experience slight handling, you can use pipe cleaners. Push two or three sturdy pipe cleaners directly through the foam sphere, then thread their ends through the plastic canvas mesh, and finally twist them tightly around the wire wreath frame at the back. Trim any excess pipe cleaner.
- **Add Your Charming Bee Embellishment:** Take your metal bee garden stake. Using a pair of sturdy wire cutters, carefully snip off any excess metal stake wire, leaving just the delightful bee figurine itself. Now, consider the perfect placement for your bee – perhaps nestled charmingly among the vibrant petals, or gently resting on the textured sunflower center, as if it just landed. Once you’ve decided on its spot, secure the bee in place. For maximum permanence and durability, especially for outdoor (sheltered) display, use a strong adhesive like E6000. For a quicker bond, hot glue can be used, but E6000 offers superior longevity. You can even apply a combination of both for an exceptionally secure attachment. Allow all adhesives ample time to dry and cure completely according to the manufacturer’s instructions before moving or hanging your wreath.
- **Display Your Handmade Masterpiece:** Congratulations! Your vibrant DIY sunflower bandana wreath is now complete and ready to adorn your home. Choose a prominent and welcoming spot – your front door, a blank wall in your living room, or as a striking element within a larger seasonal display. To hang your wreath, a simple picture hanger, a robust suction cup hook (for glass doors), or a decorative loop of ribbon securely tied to the wreath frame will suffice. Step back and admire your beautiful, handcrafted creation!
Expert Tips for a Perfectly Crafted Sunflower Wreath
To elevate your DIY sunflower bandana wreath from good to absolutely stunning, consider these expert tips:
- **Creative Color Coordination:** While traditional sunflowers are brilliant yellow, don’t limit your imagination! Experiment with different bandana colors like bright orange, deep red, or even a mix to create a unique ombre effect or a custom color scheme that perfectly matches your home decor.
- **Achieving Optimal Fullness:** The key to a lush, realistic sunflower wreath lies in its fullness. Don’t hesitate to use more bandanas than the recommended six if you desire a truly abundant and dense petal display. Adding extra layers of petals can also dramatically increase volume.
- **Ensuring Secure Attachments:** Always pull zip ties as taut as possible for maximum hold. When using hot glue, ensure both surfaces are clean, dry, and free of dust for the best adhesion. For heavier embellishments or elements that require a more robust bond, E6000 or a similar strong craft adhesive provides superior, long-lasting security.
- **Prioritize Safety First:** When working with a hot glue gun, exercise extreme caution to avoid burns. If you’re using a rotary cutter, always place a self-healing cutting mat underneath your fabric and keep your fingers well clear of the sharp blade.
- **Customize Your Embellishments:** The metal bee is a charming addition, but feel free to personalize your wreath further! Consider adding small wooden letters to spell “Welcome” or “Home,” miniature ladybugs, colorful butterflies, or even tiny faux flowers nestled among the petals. A rustic burlap bow or a contrasting ribbon bow would also add a lovely finishing touch.
- **Pre-Wash Bandanas (Optional):** If you’re concerned about possible dye bleeding, especially if combining very dark and very light bandanas, consider pre-washing and ironing them before you start the project.
Caring for Your Handmade Bandana Wreath
To ensure your beautiful DIY sunflower wreath remains vibrant and continues to brighten your home for many seasons to come, a little care and attention will go a long way:
- **Indoor or Sheltered Outdoor Use:** While bandanas are fabric, prolonged exposure to direct, harsh sunlight can cause their vibrant colors to fade over time. Similarly, heavy rain or strong winds can degrade the fabric and compromise the adhesives used. This wreath is best suited for indoor display or a sheltered outdoor location, such as a covered porch, an overhang, or a protected entryway.
- **Occasional Dusting:** Over time, dust may accumulate on your wreath. To clean it, gently use a soft brush (like a clean makeup brush) or a handheld vacuum cleaner on its lowest setting with a brush attachment. Alternatively, a hairdryer on a cool, low setting can effectively blow away accumulated dust.
- **Proper Storage:** When the season changes and you’re ready to put your wreath away, store it in a cool, dry place. Ideally, place it in a dedicated wreath storage box or a large plastic tote to protect it from dust, potential crushing, and environmental damage. Stuffing the center with tissue paper can help maintain its shape.
Frequently Asked Questions (FAQs) About DIY Bandana Wreaths
We’ve compiled answers to some common questions you might have as you embark on this crafting adventure:
- Can I use fabric other than bandanas for this wreath?
- Absolutely! While bandanas are fantastic for their vibrant colors, pre-hemmed edges, and consistent size, you can certainly experiment with other types of fabric. Cotton squares, scrap fabric from old garments, or even polyester fabric could work. Just ensure the fabric isn’t too thick, as it needs to be gathered effectively, and consider hemming any raw edges if fraying is a concern with your chosen material.
- How can I make my wreath appear even fuller and more luxurious?
- To achieve an even fuller wreath, there are a few techniques. Firstly, you can simply use more bandanas (e.g., 7-8 instead of 6) to create denser layers. Secondly, instead of just one layer of petals around the mesh, consider creating a second, slightly smaller layer of petals positioned closer to the center. For a truly voluminous look, you could even add a third, innermost layer of even smaller petals around the central circumference of the mesh before attaching the foam sphere.
- What if I don’t have plastic canvas mesh for the base?
- The plastic canvas mesh provides an excellent, stable, and flat base that makes attaching petals evenly much easier. If you don’t have it, you could potentially attach petals directly to the wires of the wreath frame, though it might be harder to achieve a uniform, full shape and the petals might sag more. Another alternative might be to use a circular piece of stiff cardboard or foam board as a base, but you would need to use a strong adhesive to attach petals, rather than zip ties.
- Can this sunflower bandana wreath be displayed outdoors?
- As advised in the care section, this wreath is best suited for indoor display or a sheltered outdoor area, such as a covered porch, a patio with an overhang, or a protected entryway. Direct sunlight can cause the bandana fabric to fade over time, and exposure to rain or harsh weather can damage the fabric and weaken the adhesives used, significantly shortening the lifespan of your beautiful creation.
- Are there other embellishments or decorative elements I can add to customize my wreath?
- Definitely! Feel free to let your creativity run wild with embellishments. Beyond the bee, you could add small wooden letters to spell a word like “Welcome” or “Sunshine,” tiny faux ladybugs, delicate butterflies, or even small artificial flowers that complement the sunflower theme. A rustic burlap bow or a colorful ribbon bow tied at the top or bottom of the wreath would also make a lovely and personalized addition.
Unleash Your Creativity and Enjoy Your Handmade Decor!
Creating this DIY Sunflower Bandana Wreath is more than just a craft project; it’s an opportunity to express your personal style and add a warm, inviting touch to your living space. The vibrant colors and charming design are sure to bring a smile to anyone who sees it, making it a perfect accent for welcoming guests or simply brightening your own day. This project offers a wonderful blend of simplicity and stunning visual impact, making it accessible for crafters of all skill levels.
We sincerely hope this detailed guide has inspired and empowered you to embark on this delightful crafting adventure. Remember, there are no strict rules in creativity, so don’t be afraid to personalize your wreath with your favorite colors, unique embellishments, or even different fabric patterns. The true joy of DIY lies in the process of creation and the satisfaction of seeing your vision come to life!
A huge thank you and appreciation goes out to This Southern Girl Can on YouTube for sharing such a wonderful and inspiring project. If you loved this tutorial and are looking for more amazing DIY ideas and crafting inspiration, be sure to visit and subscribe to her channel. Happy crafting, and enjoy your beautiful, handmade sunflower wreath!