
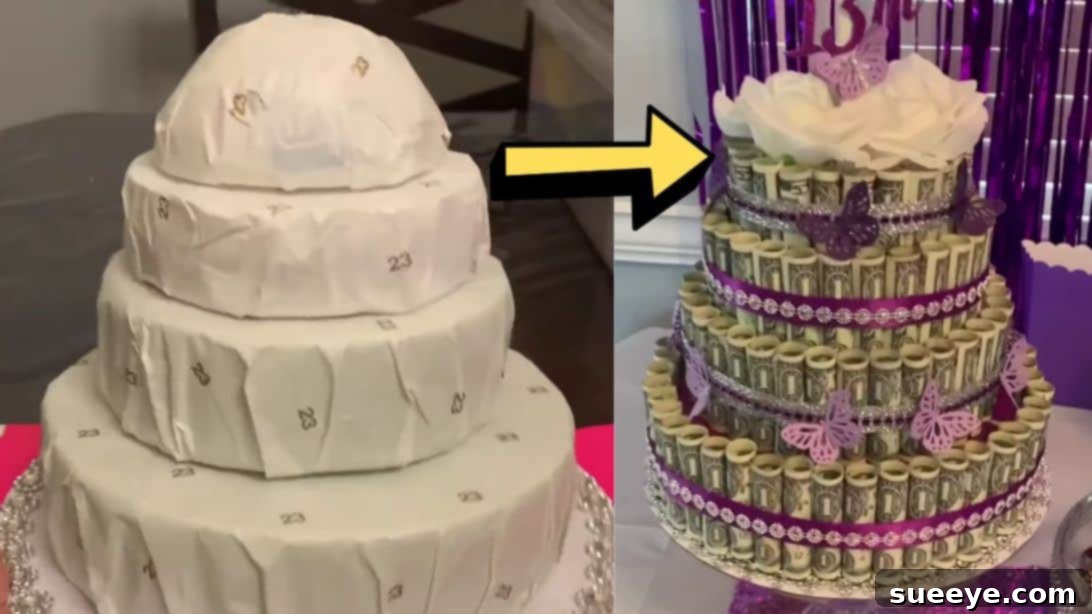
Craft the Perfect Gift: An Easy DIY Money Cake Tutorial
Are you searching for a truly unique and memorable gift that will stand out from the crowd? Look no further than the delightful DIY money cake! Instead of a traditional edible cake, imagine presenting a beautiful, multi-tiered creation adorned with crisp dollar bills. This innovative gift idea offers both practicality and a touch of celebratory whimsy, making it perfect for birthdays, graduations, weddings, or any special occasion where cash is king but presentation is paramount.
This comprehensive guide will walk you through crafting your very own money cake with simple materials and straightforward steps. You’ll learn how to transform ordinary currency into an extraordinary centerpiece that will surely bring a smile to your loved one’s face. We’ll cover everything from preparing your Styrofoam tiers to artfully arranging the bills and adding decorative flair. Get ready to unleash your creativity and make a gift that’s as exciting to give as it is to receive!
For a visual walkthrough of the process, be sure to check out the excellent video tutorial by Miss Regi on YouTube. Her clear instructions complement this written guide perfectly, ensuring you have all the resources you need to succeed.
Why a Money Cake is the Ultimate Gift
In a world of countless gift options, the money cake holds a special place. It’s more than just giving cash; it’s an experience. Here’s why this creative gift concept is a brilliant choice for virtually any recipient:
- Practicality Meets Panache: While some may consider giving money impersonal, a money cake elevates it into a thoughtful, creative gesture. The recipient gets the freedom to choose exactly what they need or want, beautifully presented.
- Memorable and Unique: Unlike a gift card or cash in an envelope, a money cake creates a stunning visual impact. It’s a centerpiece, a conversation starter, and a gift that truly stands out.
- Suitable for All Ages and Occasions: From a sweet sixteen birthday to a retirement party, a college graduation, or a wedding, a money cake is universally appreciated. It’s adaptable to any theme or personal preference.
- Easy to Customize: You can tailor your money cake to reflect the recipient’s personality, favorite colors, or the occasion’s theme. The decorative possibilities are endless!
- Fun to Make: The process of assembling a money cake is a rewarding craft project in itself, allowing you to put love and effort into every detail.
Essential Materials for Your DIY Money Cake
Before you begin, gather all your supplies. Having everything at hand will make the crafting process smooth and enjoyable. You’ll find most of these items at your local craft store or even around your house.
- Styrofoam Dummy Cake: These come in various sizes and tiers. You can choose a single tier or multiple tiers to create a grander cake. Ensure they are clean and sturdy.
- Any Paper for Wrapping: Select wrapping paper that matches your desired aesthetic or the occasion’s theme. Consider patterns, colors, or textures that add visual appeal.
- Cake Board: A sturdy base is crucial for stability and presentation. Choose one that is slightly larger than your bottom Styrofoam tier.
- Plastic Wrap or Cellophane: This is vital for protecting the dollar bills and ensuring they remain undamaged and easy to remove.
- Tape: Clear scotch tape works best for securing the rolled bills. Choose a tape that holds well but is also easy to remove without tearing.
- Hot Glue Gun and Glue Sticks: Essential for adhering the Styrofoam tiers, securing ribbons, and attaching decorations. Use it carefully and sparingly.
- Ribbon: Decorative ribbons of various widths and colors will be used to encircle the money and add elegance. Satin, grosgrain, or even wired ribbons are good choices.
- Ribbon Bling or Embellishments: Add some sparkle with self-adhesive rhinestone ribbons, glitter, or other small decorative elements to enhance the cake’s appearance.
- Decorations and Embellishments: This is where your creativity shines! Think artificial flowers, bows, small figurines, glitter, personalized toppers, or even small, lightweight gifts.
- Dollar Bills: The star of the show! Decide on the denomination and total amount you wish to gift. Ensure the bills are relatively new and crisp for the best visual effect.
Step-by-Step Guide to Crafting Your Money Cake
Follow these detailed instructions to create a stunning money cake that will leave a lasting impression. Take your time with each step for a polished, professional finish.
Step 1: Prepare Your Cake Tiers and Base
Begin by setting up the foundation of your money cake. This initial phase ensures stability and sets the stage for your decorative efforts.
- Wrap Each Styrofoam Dummy Cake: Carefully wrap each individual Styrofoam tier with your chosen paper. Ensure the paper is taut and smoothly applied, covering the entire surface of each “cake.” Secure the wrapping paper with regular tape or a thin line of hot glue along the seams on the underside to keep it neat.
- Stack and Adhere the Tiers: Once each tier is wrapped, stack them to achieve your desired height and design. Use your hot glue gun to securely adhere the tiers together. Apply a generous bead of hot glue to the center of the bottom of the upper tier before carefully placing it onto the center of the lower tier. Hold firmly until the glue sets.
- Attach to a Cake Board: Carefully center your stacked Styrofoam tiers onto the cake board. Apply hot glue to the bottom of the lowest tier or directly to the cake board, then press the tiers down firmly. This creates a stable and easy-to-transport base for your creation.
- Initial Decorations: As an optional first decorative touch, you can immediately embellish the outer edge of the cake board with some ribbon bling or a thin decorative ribbon. This provides a nice finish to the base.
Step 2: Prepare and Arrange Your Dollar Bills
This is where the “money” aspect of your cake comes to life. Careful preparation ensures the bills are protected and presented beautifully.
- Roll Each Dollar Bill: Take each dollar bill and roll it tightly and neatly from end to end. Aim for a consistent tightness and diameter for all your rolls. This neatness contributes significantly to the final aesthetic of the cake.
- Wrap with Plastic: Once rolled, wrap each bill with a small piece of plastic wrap or cellophane. This is a crucial step as it protects the money from glue, tape residue, and tearing, making it easy for the recipient to retrieve their gift without damage.
- Secure with Tape: After wrapping in plastic, secure the rolled bill with a small piece of clear tape. Place the tape on the plastic wrap, not directly on the bill, to ensure easy removal.
- Place Rolled Bills Around Each Tier: Begin arranging the prepared rolled bills around the perimeter of each Styrofoam tier. Stand them upright, side by side, ensuring they are evenly spaced and form a neat circle around the base of each tier. You can use a tiny dab of hot glue (applied only to the plastic wrap covering the bill) to temporarily secure them to the Styrofoam if they are not standing independently, but ensure it’s easily peelable.
Step 3: Secure with Ribbons and Add Bling
Now, let’s add the decorative elements that hold everything together and enhance the cake’s visual appeal.
- Wrap Ribbon Around the Bills: Take your chosen decorative ribbon and carefully wrap it around the cluster of rolled bills on each tier. This ribbon serves a dual purpose: it secures the money in place and adds a beautiful decorative band.
- Secure Ribbon Ends: Once the ribbon is wrapped snugly around the bills, cut it to the appropriate length. Use a small amount of hot glue to adhere the ends of the ribbon together discreetly at the back of the cake.
- Add Bling and Alternate Designs: For extra sparkle and sophistication, you can add a strip of ribbon bling around the middle of your main ribbon. Feel free to alternate the design, color, or texture of the ribbons used for each tier to create a more dynamic and visually interesting cake.
Step 4: The Grand Finale – Decorations and Toppers
This final step is where you bring your money cake to life with personalized touches and finishing details.
- Decorate the Top Dome: The top of your money cake is a prime spot for embellishment. Conceal any exposed Styrofoam by arranging artificial flowers, elegant bows, decorative sprigs, or other chosen decorations.
- Insert a Cake Topper: To personalize your gift further, insert a cake topper. This could be a “Happy Birthday” sign, a graduation cap, a wedding couple, or any themed topper relevant to the occasion and recipient.
- Add Small Embellishments: Consider scattering some glitter, attaching small themed charms, or even tucking in a few small, lightweight gift cards or candies strategically among the top decorations. Ensure any added items are securely attached but easily removable.
Tips for a Flawless Money Cake
To ensure your money cake looks its best and is a joy to give, keep these handy tips in mind:
- Plan Your Design: Before you start, have a clear vision of your color scheme, ribbon choices, and overall theme. Sketching it out can help.
- Pre-Cut and Organize: Cut all your wrapping paper, plastic wrap, and ribbons to size before you begin assembly. This streamlines the process.
- Hot Glue Prudence: Use hot glue sparingly. A little goes a long way, and too much can create a messy look or make decorations hard to remove. Always test on a scrap piece first.
- Handle Money with Care: Be gentle when rolling and handling the dollar bills to keep them crisp and pristine.
- Ensure Easy Removal: Design the cake so the recipient can easily remove the money without tearing bills or struggling with sticky glue. The plastic wrap is key here.
- Stability is Key: Make sure your tiers are securely glued and centered on the cake board for safe transport and display.
Creative Variations and Customization Ideas
The beauty of a DIY money cake lies in its versatility. Here are some ideas to make your creation truly unique:
- Themed Cakes: Create a cake based on a specific theme, such as a “travel fund” cake with miniature suitcases, a “new home” cake with small house charms, or a “sports fan” cake with team colors and memorabilia.
- Different Shapes: While round tiers are common, consider square or even heart-shaped Styrofoam forms for a different look.
- Color Coordination: Match the wrapping paper, ribbons, and decorations to the recipient’s favorite colors or the party’s theme.
- Incorporating Small Gifts: Instead of just money, tuck in small, flat gifts like lottery tickets, gift cards, or even tiny pieces of jewelry (in a protective pouch) among the rolled bills or within the top decorations.
- LED Lights: For an extra magical touch, weave small battery-operated LED fairy lights around the tiers or among the top decorations.
- Personalized Toppers: Custom-made cake toppers with the recipient’s name or a special message add a very personal touch.
Perfect Occasions for a Money Cake
A money cake is a thoughtful and impressive gift for a wide array of life’s special moments. Here are just a few:
- Birthdays: From milestone birthdays to any age, it’s a guaranteed hit.
- Graduations: A fantastic gift to help new graduates start their next chapter.
- Weddings & Anniversaries: A creative way to contribute to a honeymoon fund or future together.
- Baby Showers: Help new parents with essential baby supplies.
- Retirements: A generous gesture for someone entering a new phase of life.
- Holidays: An unexpected and delightful surprise for Christmas, Hanukkah, or other festive occasions.
- Housewarmings: A practical gift for new homeowners.
Frequently Asked Questions (FAQ)
How much money should I use for a DIY money cake?
The amount is entirely up to your budget and generosity! There’s no fixed rule. You can use smaller denominations to create a fuller-looking cake or larger bills for a more substantial gift. Consider how many bills you’ll need to cover the tiers; typically, 30-50 bills are a good starting point for a multi-tiered cake, but this can vary.
Can I use a real cake instead of Styrofoam?
While theoretically possible, it’s highly advised to use Styrofoam. A real cake would be difficult to attach money to without damaging the bills or the cake itself, and the moisture from the cake could ruin the currency. Styrofoam provides a stable, clean, and reusable base.
How do I make sure the money isn’t damaged when taking it off the cake?
The key is the plastic wrap. By wrapping each bill in plastic and securing the plastic with tape (not the bill itself), the money remains untouched by adhesive. The recipient can simply unwrap the plastic to retrieve their undamaged funds.
What if I don’t have a hot glue gun?
A hot glue gun is highly recommended for its strong, quick-drying bond. However, for some steps (like attaching ribbons), strong double-sided tape or craft glue might work, though they may take longer to dry and might not be as secure for structural elements like adhering tiers.
How long does it typically take to make a DIY money cake?
The time can vary depending on the complexity of your design and your crafting speed. A simple two-tier cake might take 1-2 hours, while a more intricate, multi-tiered design with extensive decorations could take 3-4 hours or more. Breaking it down into stages (e.g., preparing tiers one day, rolling money another) can make it more manageable.
Conclusion: A Gift That Keeps on Giving
Crafting a DIY money cake is an incredibly rewarding project that results in a truly spectacular and deeply appreciated gift. It’s a testament to your creativity and thoughtfulness, transforming a simple monetary present into a lavish display of affection. Whether for a birthday, graduation, or any celebration, this unique idea is sure to be remembered long after the last dollar bill has been unwrapped.
So, gather your materials, follow these steps, and prepare to delight your loved ones with a gift that’s both practical and profoundly personal. We hope you enjoy making this craft project as much as we know the recipient will enjoy receiving it!
A special thank you to Miss Regi via YouTube for her inspiring video tutorial and for the images used in this guide. If you found this tutorial helpful, we highly recommend visiting her channel for more fantastic DIY projects and subscribing for endless creative inspiration!