
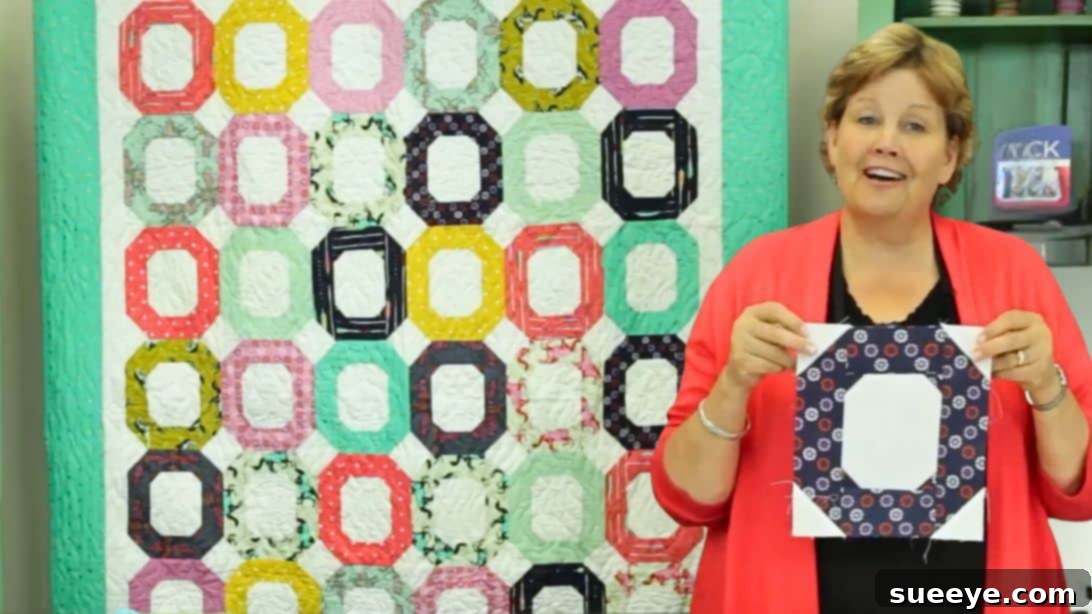
Mastering the Easy Jump Ring Quilt: A Beginner-Friendly Jelly Roll Project with Jenny Doan
Are you searching for a delightful and accessible quilting project that promises quick results and endless charm? Look no further than the captivating Jump Ring Quilt by Missouri Star Quilt Company! This ingenious design is perfect for quilters of all skill levels, especially beginners eager to dive into the world of fabric artistry. Utilizing convenient pre-cut jelly rolls, this project comes together with remarkable speed and simplicity, guided by the expert step-by-step instructions of quilting icon Jenny Doan.
The Jump Ring Quilt pattern stands out for its unique visual appeal and straightforward construction. It centers around an innovative block design that begins with a simple rectangle, expertly “snowballed” on all four corners to transform it into a striking octagonal shape. This initial transformation creates the distinctive foundation of the “jump ring” effect. Following this, carefully cut strip units are sewn onto each side, forming a neat border that frames the central octagon. The block is then completed by “snowballing” the outer corners once more, creating a polished and cohesive look that truly pops. The simplicity of repeating this process for multiple blocks means you can watch your quilt top grow rapidly, making it an incredibly rewarding endeavor.
If you’re new to quilting terminology, “jelly rolls” are a quilter’s best friend! These are professionally pre-cut fabric bundles, typically consisting of 40 strips, each measuring 2 1/2 inches wide by the full width of the fabric (usually 42-44 inches). They offer an instant assortment of coordinated prints and colors, eliminating the tedious task of cutting and ensuring a harmonious fabric selection. This convenience alone makes the Jump Ring Quilt an ideal choice for those who want to jump straight into sewing without the initial hurdle of extensive fabric preparation. Jenny Doan’s clear, concise guidance ensures that every step is easy to follow, allowing you to complete this beautiful sewing project quickly and with confidence.
RELATED: Explore More Beginner-Friendly Quilts Like the Country Roads Quilt With Jenny Doan
Why Choose the Jump Ring Quilt? Benefits for Every Quilter
The Jump Ring Quilt is more than just a pretty pattern; it offers numerous advantages that make it a favorite among the quilting community:
- Beginner-Friendly: The core techniques involved, such as straight-line sewing, precise cutting, and the “snowball” method, are fundamental skills easily mastered by newcomers. Jenny Doan breaks down each step into digestible, actionable instructions, making it an excellent learning project.
- Speedy Construction: Thanks to the use of pre-cut jelly rolls and the repetitive nature of the block construction, this quilt top comes together surprisingly fast. It’s perfect for last-minute gifts or when you need a quick burst of creative satisfaction.
- Utilizes Pre-Cuts (Jelly Rolls): Say goodbye to hours of fabric cutting! Jelly rolls provide a curated collection of coordinating fabrics, saving you time and ensuring your quilt has a cohesive and professional appearance without the guesswork.
- Versatile Design: While the instructions typically create a throw-sized quilt, the block can be easily scaled or multiplied to create larger quilts like twin, queen, or even king sizes. Experiment with different color palettes—from vibrant and playful to subtle and sophisticated—to match any decor.
- Visually Striking: The “jump ring” effect creates a captivating interlocking design that adds depth and movement to the quilt. It’s a design that looks far more intricate than it is to construct, impressing friends and family.
- A Gateway to More Complex Projects: Mastering the Jump Ring Quilt will build your confidence and fundamental quilting skills, preparing you for more challenging patterns in the future.
Jenny Doan, the heart and soul behind many of Missouri Star Quilt Company’s beloved tutorials, has a knack for making complex techniques simple and accessible. Her teaching style is encouraging and clear, ensuring that every quilter, regardless of their experience level, can achieve beautiful results. With her guidance, you’re not just making a quilt; you’re gaining invaluable skills and confidence in your quilting journey.
Essential Materials for Your Easy Jump Ring Quilt
Gathering your materials is the first exciting step in any quilting adventure. For the Jump Ring Quilt, the key is the jelly roll, which brings a fantastic assortment of fabrics to your project. Here’s what you’ll need to get started:
- One Pack of Jelly Roll: This will be the vibrant heart of your quilt. A standard jelly roll contains approximately 40 strips, 2 1/2″ x 42″. Consider choosing a jelly roll with a good mix of light, medium, and dark values for a dynamic final look.
- 2 Yards of Background Fabric: This fabric provides contrast and makes your “jump ring” blocks pop. A solid, tone-on-tone, or subtly patterned fabric in a neutral color (like white, cream, light gray, or black) often works best to highlight the jelly roll prints.
- 1 1/2 Yards of Fabric for the Outer Border: This fabric will frame your quilt top, giving it a finished and polished appearance. Choose a color that complements your jelly roll and background fabric, either by contrasting boldly or by providing a harmonious transition.
- Basic Quilting Supplies (Recommended): While not listed in the original, these are crucial for a smooth process: a sewing machine, rotary cutter, cutting mat, quilting ruler (at least 6″ x 24″), thread (coordinating with your fabrics), pins or fabric clips, iron and ironing board.
How to Make a Jump Ring Quilt: Step-by-Step Instructions
Let’s dive into the creation of the beautiful Jump Ring Quilt block. Remember that precision in cutting and consistent seam allowances are key to a successful outcome.
Step 1: Preparing Your Background Fabric
Begin by taking your chosen background fabric. From this, carefully cut a rectangle measuring 5 inches by 6 inches. This will serve as the central piece of your quilt block. Additionally, cut four pieces of 2 1/2-inch squares from the same background fabric. These smaller squares will be used later for the final “snowball” corners of the block, creating the illusion of the ring.
Step 2: Cutting Your Jelly Roll Strips
Select one strip from your jelly roll. From this single strip, you will create several essential components for your block. Cut two pieces that are 5 inches long each. Next, cut two pieces that are 10 inches long each. Finally, cut four pieces that are 1 1/2 inches long. Take these four 1 1/2-inch units, stack them neatly, and then cut them in the middle of their width to create eight 1 1/2-inch squares. For a quick recap of the pieces for one block: From your background fabric, you need one 5″ x 6″ rectangle (for the center) and four 2 1/2″ squares. From one jelly roll strip, you need two 5″ units, two 10″ units, and four 1 1/2″ squares. Store these pieces carefully, perhaps in small labeled bags, if you are cutting multiple blocks at once.
Step 3: Creating the First Octagon (Snowballing the Center)
Take your 5″ x 6″ centerpiece rectangle from the background fabric. Now, retrieve the four 1 1/2″ squares cut from the jelly roll strip. Place one 1 1/2″ square on each corner of the 5″ x 6″ rectangle. Align the raw edges precisely. To prepare for “snowballing,” you need to mark a diagonal line from corner to corner on the wrong side of each small square. A simple trick is to fold each small square in half diagonally and press lightly to create a crease, or use a fabric marker or pencil to draw the line. Sew directly along these marked diagonal lines. After sewing, trim off the excess fabric from the corners, leaving a 1/4-inch seam allowance. Press the seams open or towards the darker fabric (in this case, typically towards the jelly roll squares) to ensure a flat, crisp finish. This step transforms your rectangle into an octagon with vibrant corners, forming the initial “jump ring” element.
Step 4: Attaching the Short Side Strips
Now, take the two 5″ long jelly roll strips you cut earlier. Position one 5″ strip along each of the shorter sides of your newly octagonal block. Ensure the raw edges are aligned. Using a consistent 1/4-inch seam allowance, sew these strips in place. Press your seams open or towards the newly added strips, ensuring the block remains flat and free of bulky seams. This step extends the short sides of your block, adding more of the colorful jelly roll fabric.
Step 5: Attaching the Long Side Strips
Next, retrieve the two 10″ long jelly roll strips. These will be sewn onto the longer, top and bottom sides of the block you just worked on. Again, align the raw edges carefully and sew them in place using that precise 1/4-inch seam allowance. Press these seams open or towards the newly attached strips. At this point, your block will be significantly larger and will start to clearly show the framed octagonal center, resembling the “jump ring” design.
Step 6: Completing the Block with Final Snowball Corners
For the final touch on your block, take the four 2 1/2″ squares cut from your background fabric. Similar to Step 3, you will use these squares to “snowball” the outer corners of your block. Place one 2 1/2″ square on each corner of the current larger block. Mark a diagonal line from corner to corner on the wrong side of each square (either by folding and pressing a crease or drawing a line). Sew directly along these marked diagonal lines. Once sewn, trim off the excess fabric, leaving a 1/4-inch seam allowance, and press the seams open or towards the background fabric. This final snowballing action completes one stunning Jump Ring Quilt block, giving it its characteristic shape and defining the “ring.”
Assembling Your Jump Ring Quilt Top
Once you’ve mastered making a single Jump Ring block, the next exciting phase is to create enough blocks for your desired quilt size and then assemble them into a beautiful quilt top. For a standard throw quilt, you might need anywhere from 12 to 20 blocks, depending on the finished block size.
Making Multiple Blocks
Repeat Steps 1 through 6 for each additional block you wish to make. If you plan to use multiple jelly roll strips, you can vary the prints for each block or create a controlled color scheme. Many quilters find it efficient to “chain piece” the smaller components, sewing several units consecutively without cutting the thread between them, then snipping them apart later.
Arranging and Laying Out Your Blocks
Once you have all your blocks, the fun of design truly begins. Lay them out on a design wall, floor, or large table. Experiment with different arrangements, rotating blocks to see how the “rings” interact and how the colors flow. Consider creating a diagonal pattern, a random mix, or a more structured grid. This step allows you to visualize your finished quilt and make any adjustments before sewing.
Sewing Blocks into Rows
When you’re happy with your layout, begin sewing the blocks together into horizontal rows. Take two adjacent blocks, align them with right sides together, and sew them with a consistent 1/4-inch seam allowance. Press the seams in alternating directions for each row. For example, press seams to the right for the first row, to the left for the second, and so on. This technique, known as “nesting seams,” helps the seams butt up against each other perfectly when joining rows, reducing bulk and ensuring accurate intersections.
Joining Rows Together
Once all your rows are sewn, it’s time to join them to form the full quilt top. With right sides together, align the first two rows, carefully matching all the seam intersections. Pin generously at these intersections. Sew the rows together using a 1/4-inch seam. Press this long seam open or to one side, ensuring it lies flat. Continue adding rows until your entire quilt top is assembled. Take your time to match seams precisely; it makes a huge difference in the final appearance of your quilt.
Adding the Outer Border
The 1 1/2 yards of outer border fabric you prepared will now frame your quilt top. First, measure the exact length of your quilt top down the center, and cut two border strips to this measurement (accounting for seam allowances). Attach these to the left and right sides of your quilt top. Press the seams towards the border. Next, measure the exact width of your quilt top (including the newly added side borders), and cut two more border strips to this measurement. Attach these to the top and bottom of your quilt. Press these seams towards the border. This final frame will give your quilt a neat, professional finish and help it hang beautifully.
Finishing Your Quilt: Basting, Quilting, and Binding
Completing a quilt involves three crucial steps after the top is assembled: basting, quilting, and binding. These steps transform your pieced top into a durable, functional, and beautiful textile.
Basting
Basting is the process of temporarily securing the three layers of your quilt: the quilt top, the batting (the middle insulating layer), and the backing fabric. This prevents shifting during quilting. Common basting methods include:
- Pin Basting: Using curved safety pins to secure the layers together, placed every 3-4 inches across the quilt.
- Spray Basting: Using a temporary adhesive spray to glue the layers together. This method offers a smooth, pin-free surface for quilting.
- Thread Basting: Using long, loose stitches to hold the layers in place, often favored for hand quilting.
Ensure your backing fabric is at least 4-6 inches larger on all sides than your quilt top to allow for shrinkage and movement during quilting.
Quilting
Quilting is the process of stitching through all three layers to hold them together and add texture and design. For a beginner, simple straight-line quilting is often the easiest and most effective. You can quilt straight lines parallel to your seams, diagonally across blocks, or in a grid pattern. Alternatively, you can try free-motion quilting for more intricate designs, though this requires practice. Start with simple designs on practice sandwiches before tackling your full quilt.
Binding
Binding is the final step that finishes the raw edges of your quilt and provides a protective border. It typically involves cutting 2 1/2-inch wide strips of fabric, joining them together to create one long strip, folding it in half lengthwise, and then sewing it to the front of the quilt, wrapping it around to the back, and hand-stitching or machine-stitching it down. Jenny Doan has excellent tutorials on various binding methods, ensuring a crisp and durable edge for your Jump Ring Quilt.
Tips for Success and Customization
To ensure your Jump Ring Quilt project is a resounding success, consider these helpful tips and ideas for customization:
- Accurate Cutting is Key: Invest in a good quality rotary cutter, self-healing mat, and acrylic rulers. Precision in your initial cuts will lead to perfectly matched seams and a square quilt.
- Consistent Seam Allowance: The 1/4-inch seam allowance is standard in quilting. Practice maintaining it by using a quarter-inch foot on your sewing machine or by placing a guide tape on your machine bed.
- Press, Don’t Iron: When quilting, “pressing” involves lifting and placing the iron down, rather than sliding it across the fabric. This prevents stretching and distortion. Press seams open or to one side consistently.
- Chain Piecing for Efficiency: When sewing multiple identical units (like the snowball corners), feed them one after another through your machine without cutting the thread in between. This saves time and thread.
- Watch the Video Tutorial: While these instructions are comprehensive, seeing Jenny Doan demonstrate the steps visually (via the linked Missouri Star video) can clarify any ambiguities and provide invaluable tips.
- Experiment with Color Placement: Play with your jelly roll strips. Use lighter prints for the center “ring” and darker for the outer frame, or vice-versa, to create different visual effects.
- Vary Quilt Sizes: To make a larger quilt, simply make more blocks. For a smaller project like a table runner or placemat, you could make just a few blocks and add wider borders.
- Consider Sashing: If you want to add more separation between your blocks, you can add sashing strips between them. This is an optional step that can dramatically change the look of your quilt.
Frequently Asked Questions About the Jump Ring Quilt
What exactly is a jelly roll?
A jelly roll is a collection of pre-cut fabric strips, typically 2 1/2 inches wide and about 42-44 inches long (the width of the fabric). A standard jelly roll pack usually contains around 40 strips of coordinating fabrics, making it super convenient for projects that require many strips, like this Jump Ring Quilt.
Can I make this quilt without jelly rolls?
Absolutely! While jelly rolls make the process incredibly easy, you can certainly cut your own 2 1/2-inch strips from yardage or fat quarters. Just ensure you have a good selection of coordinating fabrics to achieve the same vibrant effect. You’ll need to cut enough 2 1/2-inch strips to equal the length provided by a standard jelly roll (approximately 40 strips x 42 inches = 1680 inches or roughly 47 yards of strip length).
What size will my quilt be?
The finished size of your quilt depends on the number of blocks you make and the final size of each block. The instructions here typically yield a throw-sized quilt. You can calculate your desired quilt size by determining the finished dimensions of one block and then multiplying by the number of blocks you plan for width and height, plus any borders.
How do I choose the right background fabric?
The background fabric plays a crucial role in making your jelly roll prints pop. A solid or subtle print in a neutral color (white, cream, light gray, black) is often recommended as it provides contrast without competing with the colorful jelly roll fabrics. Consider the overall mood you want for your quilt; a light background will create a bright, airy feel, while a dark background can create a dramatic, rich effect.
Is this pattern suitable for someone who has never quilted before?
Yes, absolutely! The Jump Ring Quilt is an excellent choice for first-time quilters. The techniques involved—straight seams, accurate cutting, and the snowball method—are fundamental quilting skills that are easy to learn. Jenny Doan’s teaching style is specifically designed to guide beginners through each step with confidence.
How long does this quilt typically take to make?
The construction speed can vary depending on your experience level and how much time you dedicate to it. However, because it uses pre-cuts and has a repetitive block design, many quilters find they can complete the quilt top in a weekend or over a few evenings. The entire process, including basting, quilting, and binding, might take anywhere from a few days to a couple of weeks of dedicated effort.
Start Your Quilting Journey Today!
The Jump Ring Quilt, with its playful design and straightforward construction, is a true gem in the world of quilting. It offers a perfect blend of simplicity and stunning visual impact, making it an ideal project for anyone looking to create something beautiful and handmade. Whether you’re a seasoned quilter seeking a quick and satisfying project or a complete beginner eager to sew your first quilt, Jenny Doan’s expert guidance ensures a smooth and enjoyable experience.
So, gather your favorite jelly roll, select your contrasting background and border fabrics, and get ready to create a masterpiece that will be cherished for years to come. Happy sewing!