
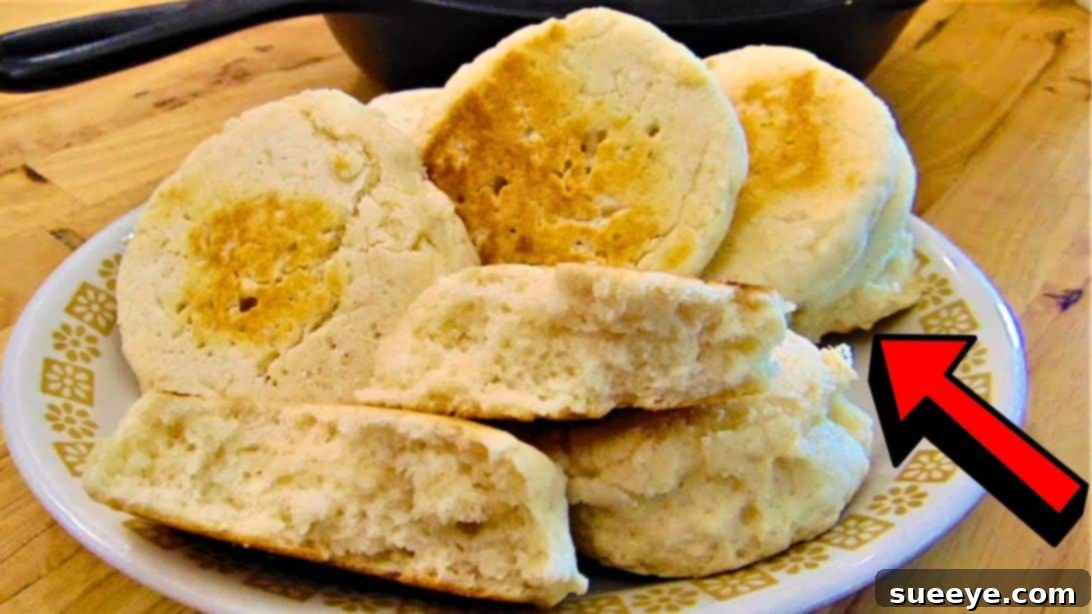
Welcome to the ultimate guide for creating incredibly delicious, homemade bread with unprecedented ease! Forget the complexities of traditional baking, the long hours of kneading, and the need for a specialized oven. Today, we’re diving into a revolutionary recipe by the beloved The Hillbilly Kitchen – Down Home Country Cooking on YouTube. This isn’t just a recipe; it’s a revelation for anyone who thought baking bread was too daunting or time-consuming. Imagine serving warm, fluffy bread to your family in under 10 minutes, using only three basic ingredients you likely already have in your pantry. This no-bake, no-knead bread is not just fast; it’s genuinely delightful and guaranteed to become a staple in your kitchen. Whether you’re a seasoned baker looking for a quick fix or a complete novice eager to impress, this simple skillet bread promises a perfect loaf every time. Get ready to transform your understanding of homemade bread and discover your new all-time favorite recipe!
Why This No-Bake Bread Is a Game-Changer
In a world where time is a precious commodity, the idea of baking fresh bread often feels like an unattainable luxury. Traditional bread-making involves multiple steps: proofing yeast, extensive kneading, bulk fermentation, shaping, and a final proof, all before it even sees the inside of an oven. For many, this process is intimidating and time-consuming, pushing homemade bread into the realm of special occasion treats rather than everyday indulgence.
However, this recipe from The Hillbilly Kitchen shatters those preconceptions. It champions simplicity without compromising on flavor or texture. Here’s why this 3-ingredient no-bake skillet bread is an absolute game-changer for home cooks everywhere:
- Unbelievable Speed: From mixing bowl to table in just about 10 minutes. That’s faster than driving to the store and buying a loaf! This rapid turnaround makes it perfect for last-minute meal additions, unexpected guests, or simply satisfying a sudden bread craving.
- Minimal Ingredients: You only need self-rising flour, buttermilk, and oil. These are common staples, eliminating the need for special trips to the grocery store or stocking up on niche baking supplies.
- No Oven Required: This is perhaps the most revolutionary aspect. The bread cooks entirely on the stovetop in a cast-iron skillet. This is a huge advantage for those without an oven, during power outages, in RVs or camping, or simply when you want to keep your kitchen cool on a hot day.
- No Kneading: Say goodbye to sticky hands and strenuous effort. The recipe requires only a quick stir to combine ingredients, making it accessible for everyone, regardless of physical ability or baking experience. The self-rising flour and buttermilk work together to create a tender crumb without the need for gluten development through kneading.
- Deliciously Simple Flavor: Despite its simplicity, the bread boasts a comforting, slightly tangy flavor and a soft, inviting texture. It’s wonderfully versatile, perfect on its own, slathered with butter, or accompanying a wide array of dishes.
- Beginner-Friendly: If you’ve ever wanted to bake bread but felt overwhelmed, this recipe is your perfect starting point. The steps are straightforward, and the forgiving nature of the dough ensures success even for first-timers.
This recipe isn’t just about making bread; it’s about empowering you to create wholesome, delicious food with minimal fuss. It brings the joy of freshly baked bread back into the everyday kitchen, proving that exceptional results don’t always require exceptional effort.
The Simple Truth About Ingredients
The magic of this 10-minute no-bake bread lies in its incredibly simple ingredient list. Each component plays a crucial role in achieving the desired texture and flavor, proving that sometimes, less truly is more. Understanding why these three ingredients are so effective will give you a deeper appreciation for this ingenious recipe.
Self-Rising Flour
Self-rising flour is the unsung hero of many quick bread recipes, and it’s absolutely essential here. It’s a pre-mixed blend of all-purpose flour, baking powder, and a pinch of salt. This clever combination eliminates the need to measure out separate leavening agents, streamlining the baking process and reducing the margin for error. The baking powder acts as a chemical leavener, reacting with the liquid (buttermilk) and heat to produce carbon dioxide bubbles, which cause the bread to rise and become light and fluffy. The salt enhances the flavor of the bread. If you don’t have self-rising flour, you can easily make your own by combining 2 cups of all-purpose flour with 3 teaspoons of baking powder and 1/2 teaspoon of salt. However, for maximum convenience and consistent results, the pre-mixed variety is highly recommended.
Buttermilk
Buttermilk is the second star of this simple recipe, contributing significantly to both the texture and flavor of the bread. Traditionally, buttermilk was the liquid left behind after churning butter. Today, most commercially available buttermilk is cultured buttermilk, made by adding a bacterial culture to low-fat milk, which ferments the milk sugars and produces lactic acid. This acidity is key. In this recipe, the acid in the buttermilk reacts with the baking powder in the self-rising flour, creating an extra boost of leavening and tenderness. This reaction also contributes to a wonderfully soft crumb and a slightly tangy flavor that elevates the bread beyond ordinary. If you don’t have buttermilk on hand, a simple substitute can be made by adding 1 tablespoon of white vinegar or lemon juice to a measuring cup, then filling the rest of the cup with regular milk (dairy or non-dairy) and letting it sit for 5-10 minutes until it slightly curdles.
Oil
The final ingredient, oil, plays a vital role in keeping the bread moist and helping achieve a beautiful golden crust when cooked on the skillet. A neutral-flavored oil like vegetable oil, canola oil, or light olive oil is generally preferred, as it won’t overpower the subtle flavors of the bread. The oil coats the flour particles, inhibiting excessive gluten development (which isn’t desired in a no-knead bread) and ensuring a tender, soft texture. It also helps conduct heat, promoting even cooking and browning on the stovetop. Just a quarter cup is all it takes to make a noticeable difference in the bread’s overall quality and mouthfeel.
With these three humble ingredients working in harmony, you’re set to create a bread that is not only quick and easy but also genuinely delicious and satisfying.
Gathering Your Essentials: Ingredients for 10-Minute Skillet Bread
As promised, the ingredient list for this extraordinary bread is wonderfully concise. Before you begin, ensure you have these three simple items ready. Opting for good quality ingredients will always enhance the final product, but even standard pantry items will yield fantastic results.
- 2 cups of self-rising flour
- 1 cup of buttermilk
- ¼ cup of oil (such as vegetable, canola, or light olive oil)
That’s it! No yeast, no sugar, no eggs, and certainly no complex additions. This minimal list is a testament to the recipe’s efficiency and the clever combination of these specific components.
Step-by-Step Guide: Crafting Your Easy Skillet Bread
Now that you have your ingredients ready, let’s walk through the simple steps to create this incredible 3-ingredient bread. The process is designed for speed and simplicity, ensuring a successful bake every time.
Step 1: Preparing the Dough with Ease
Begin by taking a large mixing bowl – one that gives you plenty of room to work. Into this bowl, add your 2 cups of self-rising flour, followed by 1 cup of buttermilk, and ¼ cup of your chosen oil. With a sturdy spoon or spatula, start to stir these three ingredients together. The key here is to mix until they are just combined. Avoid overmixing; since this is a no-knead bread, you want to bring the ingredients together into a shaggy, cohesive dough, but you don’t need to develop the gluten like in traditional bread. Overmixing can lead to a tough bread, and we’re aiming for tender and soft. Once the dough forms a ball and there are no dry pockets of flour, it’s ready for the next stage.
Next, prepare your workspace. Lightly dust your clean kitchen counter or a large cutting board with a small amount of self-rising flour. This dusting will prevent the dough from sticking. Carefully transfer your newly formed dough from the mixing bowl onto the floured surface. Now, gently dust a bit more flour on top of the dough ball. This light coating will make it easier to handle. Using a sharp knife or a dough scraper, divide the large dough ball into 8 equal pieces. Precision isn’t strictly necessary, but try to make them roughly the same size for even cooking. Take each piece and gently shape it into a smooth, round ball. You can do this by gently cupping it in your hands and rolling it against the counter or between your palms until it forms a neat sphere.
With your dough balls prepared, it’s time to get the cooking vessel ready. Place a cast-iron skillet pan on your stove burner. Turn the heat to low. Cast iron is excellent for retaining and distributing heat evenly, which is crucial for this no-bake method. Allow the pan to preheat gently while your dough balls sit on the counter. This brief resting period of a few minutes allows the leavening agents in the self-rising flour to begin activating and for the dough to relax slightly, contributing to a softer texture.
Step 2: Pan-Frying to Golden Perfection
Once your dough balls have had their brief rest and your cast-iron skillet is gently preheated on low heat, it’s time to start cooking. Carefully place 4 of the dough balls around the sides of the skillet pan. It’s important not to overcrowd the pan; cooking in batches ensures each piece gets adequate heat and space to brown properly. Crucially, avoid placing the dough balls directly in the very center of the skillet. The center of the pan often gets the most direct and intense heat, which could cause the bread to burn on the outside before cooking through on the inside. By placing them around the perimeter, you ensure more even and gentle cooking. Allow these first 4 pieces to cook undisturbed for approximately 5 minutes. During this time, the bottom will start to develop a beautiful golden-brown crust.
After 5 minutes, carefully use a spatula to flip each bread over. You should see a lovely, even golden-brown color. Now, let the other side cook for another 5 minutes, or until it achieves a similar appealing golden hue and feels cooked through. The internal temperature of fully cooked bread is typically around 200-210°F (93-99°C), but for such small pieces, a visual check and a gentle press (it should feel firm yet springy) are usually sufficient. Once these first 4 pieces are done, remove them from the skillet and set them aside on a plate or a wire rack. Repeat the process with the remaining 4 dough balls, cooking them in the same manner until they are beautifully golden brown on both sides. Remember to maintain that low heat throughout the cooking process to prevent burning and ensure thorough cooking.
And there you have it! In just about 10 minutes, you’ve transformed three simple ingredients into a batch of warm, inviting, and utterly delicious homemade bread. Serve them immediately while they are still warm, and prepare to enjoy the simple pleasure of fresh bread made with almost no effort. Enjoy every bite!
Pro Tips for Perfect Skillet Bread Every Time
While this 3-ingredient bread recipe is incredibly forgiving, a few expert tips can elevate your skillet bread from good to truly exceptional. These minor adjustments can make a significant difference in texture, flavor, and overall enjoyment.
- Maintain Low Heat: This cannot be stressed enough. A common mistake is to cook on medium or high heat, which will quickly burn the outside of the bread while leaving the inside raw. Low heat allows the bread to cook through evenly and develop a beautiful, deep golden crust without scorching. Patience is key here.
- Use a Good Quality Skillet: A cast-iron skillet is highly recommended for its superior heat retention and even distribution. If you don’t have cast iron, a heavy-bottomed non-stick pan can work, but you might need to adjust the heat slightly and monitor it more closely.
- Don’t Overcrowd the Pan: Stick to cooking 4 pieces at a time. Overcrowding lowers the pan’s temperature and traps steam, preventing proper browning and resulting in a less desirable texture.
- Adjust Dough Consistency: Depending on the humidity and brand of flour, you might find your dough a little too sticky or too dry. If it’s too sticky to handle, add a tiny bit more self-rising flour, a teaspoon at a time. If it’s too dry and crumbly, add a tiny splash more buttermilk. The dough should be soft but manageable.
- Resting Time Matters: Even the few minutes of rest while the skillet preheats makes a difference. It allows the flour to fully absorb the liquids and the leavening agents to start their work, leading to a more tender and airy crumb.
- Storage: This bread is best enjoyed fresh and warm. However, if you have leftovers, store them in an airtight container at room temperature for up to 1-2 days. To reheat, you can briefly warm them in the same skillet over low heat, or even pop them in a toaster oven for a few minutes.
Serving Suggestions & Flavor Variations
This simple skillet bread is a versatile canvas, perfect for both sweet and savory applications. Here are some ideas to help you enjoy your freshly made bread even more:
- Classic Butter & Jam: There’s nothing quite like warm bread slathered with softened butter and your favorite fruit jam or preserves. It’s comfort food at its finest.
- Honey Drizzle: A drizzle of local honey adds a touch of natural sweetness that complements the subtle tang of the buttermilk.
- Garlic & Herb Butter: For a savory twist, mix finely chopped garlic and fresh herbs (like parsley, chives, or rosemary) into softened butter, then spread it generously on the warm bread.
- Cheese Delight: Sprinkle some shredded cheddar, mozzarella, or a blend of your favorite cheeses on top of the bread immediately after flipping it for the second side, allowing the cheese to melt and get delightfully gooey.
- Cinnamon Sugar: Before shaping the dough, you could knead in a pinch of cinnamon and a teaspoon of sugar, or simply brush the cooked bread with melted butter and sprinkle with cinnamon sugar for a sweet treat.
- Alongside Soups & Stews: These small, fluffy breads are perfect for soaking up rich broths and gravies from hearty soups, stews, or chili.
- Mini Sandwiches: Slice them horizontally and fill with deli meats and cheese for quick, delightful sliders.
- Breakfast Companion: Serve them with scrambled eggs, bacon, or sausage for a complete and satisfying breakfast.
Don’t be afraid to experiment! The beauty of this straightforward recipe is its adaptability. It encourages creativity and personal touches, making it truly your own.
The Legacy of Down-Home Country Cooking
This brilliant 3-ingredient bread recipe is a shining example of the practical and delicious philosophy championed by The Hillbilly Kitchen – Down Home Country Cooking. Their YouTube channel is a treasure trove of simple, authentic, and incredibly satisfying recipes that harken back to a time when food was made with love, resourcefulness, and a deep appreciation for hearty, wholesome meals. The Hillbilly Kitchen doesn’t just share recipes; they share a lifestyle, a commitment to accessible cooking, and the joy of feeding loved ones without unnecessary frills or complicated techniques.
Their approach resonates deeply with many because it focuses on what truly matters: good food made simply. This skillet bread perfectly encapsulates their ethos. It takes basic ingredients and transforms them into something comforting and extraordinary, proving that culinary excellence doesn’t require Michelin stars or elaborate preparations. It’s about making the most of what you have, bringing families together around the table, and savoring the simple pleasures of home-cooked meals.
By following their guidance, you’re not just baking bread; you’re participating in a rich tradition of practical, down-to-earth cooking that values flavor and ease above all else. This recipe, like many others from The Hillbilly Kitchen, is designed to empower you in the kitchen, making delicious results achievable for everyone. If you loved the simplicity and success of this bread, we highly encourage you to explore their channel further. You’ll find a wealth of inspiring video tutorials and recipes that will undoubtedly become cherished additions to your culinary repertoire.
In conclusion, this 3-ingredient no-bake skillet bread recipe from The Hillbilly Kitchen is an absolute triumph of simplicity and efficiency. It demolishes the traditional barriers to homemade bread, offering a quick, easy, and delicious solution for anyone craving warm, fresh-baked goodness without the fuss. With just self-rising flour, buttermilk, and oil, and a mere 10 minutes on your stovetop, you can achieve wonderfully tender and flavorful bread that will undoubtedly impress. This recipe isn’t just about baking; it’s about reclaiming your kitchen, embracing ease, and discovering the profound satisfaction of creating something wonderful from scratch. Give it a try, and prepare to be amazed by the magic of this down-home country cooking secret!
*Many thanks to The Hillbilly Kitchen – Down Home Country Cooking via YouTube for inspiring this fantastic recipe and for all images used here. Their dedication to simple, delicious cooking is truly admirable. If you’ve enjoyed this recipe and the ease it brings to your kitchen, we wholeheartedly encourage you to visit their channel and subscribe for more incredible culinary adventures!