
Craft an Adorable No-Sew Fall Pinecone Gnome: Your Ultimate DIY Guide
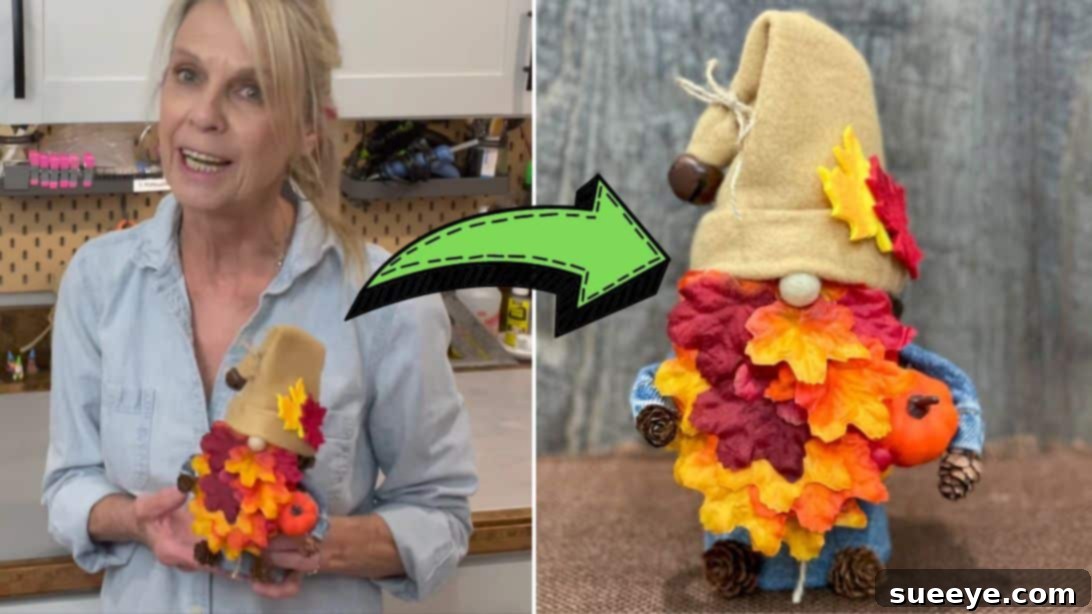
As the leaves begin to change and a crisp breeze fills the air, there’s no better time to infuse your home with the cozy spirit of autumn. What better way to do so than with a charming, handcrafted fall gnome? This delightful DIY project, inspired by the creative genius of Patti J. Good on YouTube, transforms humble pinecones and a handful of inexpensive materials into an irresistibly cute fall-themed decoration. The best part? It’s a no-sew project, making it accessible and enjoyable for crafters of all skill levels, even if you’ve never picked up a needle and thread!
Imagine a whimsical gnome, crafted from nature’s bounty and a touch of creativity, nestled among your autumn display. This tutorial will guide you step-by-step through creating your very own fall pinecone gnome, perfect for adding a rustic yet charming touch to your seasonal decor. From the sturdy base of a terra cotta pot to the whimsical hat and lush beard, every detail is designed to be simple, engaging, and incredibly satisfying to complete.
Why Make a Fall Pinecone Gnome?
- Budget-Friendly Decor: Most materials can be found at your local Dollar store or even collected from your backyard, making this an incredibly economical way to decorate for fall.
- Unique & Personal Touch: Store-bought decor can be generic, but a handmade gnome adds a unique, personal charm that reflects your creativity and effort.
- Relaxing Craft Project: Engaging in DIY crafts is a wonderful way to unwind and de-stress. The process of creating something beautiful with your own hands is immensely rewarding.
- Perfect for All Skill Levels: With no sewing required, this project is ideal for beginners, seasoned crafters, or even a fun activity to do with older children (with adult supervision for hot glue).
- Thoughtful Handmade Gifts: These charming gnomes make heartwarming gifts for friends, family, or teachers, showing them you’ve put thought and effort into their present.
- Sustainable & Natural Elements: Utilizing pinecones brings a piece of nature indoors, embracing the beauty of the autumn season.
Materials You’ll Need:
Gathering your materials is the first exciting step in bringing your fall gnome to life. Many of these items are versatile and can be used for other craft projects too!
- Fleece Fabric: A small piece (around 8×8 inches) of fleece in an autumn color like orange, red, brown, or cream will be perfect for the gnome’s hat. Its soft, slightly stretchy nature makes it easy to work with.
- Small Fall Leaves: You can use artificial decorative leaves from a craft store, or if you’re feeling adventurous, real dried leaves collected during a fall walk can add an authentic touch.
- Approx. 2″ Terra Cotta Pot: This forms the sturdy base and body of your gnome, providing stability. A small size works best for a tabletop decoration.
- Medium-Sized Pinecone: This will be the main body of your gnome, forming its core. Choose a clean, dry pinecone that stands relatively flat.
- Mini Pinecones: A few tiny pinecones will be used for the gnome’s arms and feet, adding intricate detail.
- Jute String: This rustic string will be used for decorative ties and accents, enhancing the natural, earthy feel of the gnome.
- Small Bell: A tiny jingle bell adds a whimsical touch to the gnome’s hat. You can find these in craft or holiday sections.
- Floral Foam: A small block of floral foam will provide an anchor inside the terra cotta pot, allowing you to secure the gnome’s body.
- Jean Material: A scrap piece of old denim (approximately 5×10 inches) works perfectly for the gnome’s “overalls” or clothing, giving it a charming, rustic appearance. Old jeans are perfect for upcycling!
- Craft Foam: A small piece of craft foam (e.g., a 2.5×3 inch rectangle) will serve as the base for the gnome’s beard, providing a stable surface for gluing leaves.
Tools for Assembly:
These simple tools will help you cut, glue, and assemble your gnome with ease and precision.
- Scissors: A good pair of sharp scissors is essential for cutting fabric and craft foam.
- Hot Glue Gun and Glue Sticks: Your primary tool for this no-sew project! Hot glue provides a strong, fast bond, crucial for assembling your gnome. Always exercise caution when using a hot glue gun.
Step-by-Step Directions: Crafting Your Fall Pinecone Gnome
Follow these detailed instructions to bring your charming fall gnome to life. Take your time with each step, and don’t be afraid to let your creativity shine!
Step 1: Preparing the Gnome’s Body and Hat Base
- Prepare the Pot’s Clothing: Begin by taking your piece of jean material. Measure and cut it to a size of approximately 5 inches by 10 inches. This size is generally suitable for a 2-inch terra cotta pot, but you can adjust slightly if your pot is a different size. Carefully hem one of the longer sides of the jean material by folding about a quarter-inch of the edge inwards and securing it neatly with a line of hot glue. This hem will be the bottom edge of your gnome’s “overalls.”
- Cover the Pot’s Base: Next, take your fleece fabric. Place the terra cotta pot upside down on the fleece and trace around its bottom circumference. Cut out this traced fleece circle. This piece will cover the bottom of your pot. Apply hot glue around the bottom rim of the pot and carefully adhere the fleece circle, ensuring a smooth finish.
- Dress the Pot: Now, wrap the prepared jean material around the body of the terra cotta pot. Position the hemmed side of the jean material at the bottom of the pot. Carefully apply hot glue only along the very top edge of the flower pot, securing the jean material in place. Once the top is glued, tuck any excess jean material inside the pot and secure it with additional hot glue, creating a neat interior finish. This forms the gnome’s pants.
- Add a Jute Belt: Take a length of jute string. Wrap it several times around the pot, just above where the jean material ends, creating a rustic belt. Tie a secure knot and trim the excess string, leaving two long, decorative tails that add to the gnome’s charm.
- Insert Floral Foam: Cut a piece of floral foam to fit snugly inside the pot. Press it down firmly until it is level with the top edge of the pot. This foam will be the foundation for securing the pinecone body later. Set the assembled pot aside for now.
- Fashion the Gnome’s Hat: Take your fleece fabric for the hat. Measure your pinecone to estimate the required hat size – you want the hat to comfortably sit over the top of the pinecone. Fold the fleece fabric in half. Starting from the opposite lower corner of the fold, cut a curved line all the way up to the folded top corner. This will create a cone-like shape when unfolded. The curve will give the hat a nice, natural droop.
- Assemble the Hat: With the fleece still folded (or refold it), apply a thin line of hot glue along the cut edge to seal the hat’s sides, forming a cone. Once the seam is secure, cuff the bottom edge of the hat by folding it up about half an inch and securing it with hot glue. This cuff will give the hat a finished look. Turn the hat right side out and gently poke out the corners or tip to ensure a good shape.
Step 2: Adding Facial Features and Final Touches
- Refine the Hat Cuff: Fold the cuff of the hat one more time, securing it with a small dab of hot glue if needed, to create a fuller, more defined brim. Set the hat aside.
- Create the Leafy Beard: Take your 2.5 x 3-inch piece of craft foam. Using scissors, cut it into a beard shape—a rounded bottom with slightly narrower top, resembling an inverted U or a teardrop. Now, take your small fall leaves and glue them generously all over the craft foam beard, overlapping them slightly to create a full, bushy effect.
- Attach the Beard to the Pinecone: Place the medium-sized pinecone (the gnome’s body) into the floral foam in the pot to stabilize it. Temporarily place the hat on top of the pinecone to visualize where the beard should sit—it should emerge from under the hat. Once you’ve determined the ideal placement, remove the hat and apply hot glue to the back of the leaf-covered craft foam beard. Firmly adhere the beard to the pinecone.
- Position the Hat and Nose: Now, carefully put the hat back onto the pinecone, pulling it down as far as it can comfortably go over the pinecone and the top edge of the beard. Secure the hat in place with a few dots of hot glue on the pinecone, making sure it’s stable. Take a small, round bead (or a tiny wooden ball for the nose) and glue it right at the center, slightly underneath the hat’s brim, peeking out just above the beard. This will be your gnome’s adorable little nose.
- Decorate the Hat: Cut another piece of jute string and tie a small bow near the top part of the hat. Secure it with a tiny dot of hot glue. Glue the small bell directly on top of the hat, perhaps where the bow is, for a charming jingling accent. Gently bend the top part of the hat over a bit to give it a whimsical, floppy appearance. For extra autumnal flair, glue a few more small fall leaves onto the hat itself, scattering them artistically.
- Add Arms and Feet: For the arms and feet, use your mini pinecones. Decide where the arms and feet would naturally extend from the gnome’s body (the medium pinecone and the pot). Apply hot glue to one side of each mini pinecone and carefully attach them to the gnome’s body and base, creating little limbs. You can have them slightly sticking out or resting against the body for different poses.
Tips for Success and Best Practices
- Hot Glue Safety: Always use caution when working with a hot glue gun. Keep your fingers clear of the hot nozzle and melted glue. Consider using silicone finger protectors if you find yourself frequently touching hot areas.
- Pinecone Selection: Choose clean, dry pinecones. If you collect them from outside, you might want to bake them on a low temperature for a short period (around 200°F for 30 minutes) to get rid of any potential bugs or sap, and ensure they are fully open.
- Material Substitutions: Don’t be afraid to experiment! If you don’t have jean material, burlap, felt, or even a plaid fabric scrap would look equally charming for the gnome’s body covering.
- Pre-Planning: Before gluing, dry-fit pieces together to ensure they fit correctly and you’re happy with the placement. This is especially true for the hat, beard, and nose.
- Layering Leaves: When creating the beard, layer the leaves carefully. Start with a base layer and then add smaller leaves on top to create depth and a fuller look.
- Secure Attachments: Ensure all components, especially the pinecone body to the floral foam and the hat to the pinecone, are securely glued for a durable gnome that will last throughout the season.
Variations and Customization Ideas
While the classic fall colors are wonderful, there are countless ways to personalize your pinecone gnome and make it truly unique:
- Seasonal Themes: Adapt your gnome for other seasons! Use white fleece and glitter for a winter gnome, pastel colors and tiny flowers for a spring gnome, or bright colors and seashells for a summer beach gnome.
- Different Fabrics: Experiment with different textures. Burlap gives a very rustic feel, felt offers a clean and smooth look, and plaid flannel can evoke a cozy cabin vibe.
- Embellishments: Add small acorns, miniature pumpkins, berries, dried flowers, or even tiny buttons to the hat or body for extra decorative flair. A tiny pair of glasses made from wire could also be a fun addition!
- Gnome Family: Create gnomes of varying sizes by using different sized terra cotta pots and pinecones. A whole family of gnomes would make an enchanting display.
- Scented Gnomes: Add a few drops of fall-scented essential oil (like cinnamon, clove, or pumpkin spice) to the floral foam for a subtle, inviting aroma.
- Personalized Accents: Use a permanent marker to add tiny details to the hat or beard, or attach a small tag with a personalized message if giving it as a gift.
Frequently Asked Questions (FAQs)
- Q: Can I use fabric glue instead of a hot glue gun?
- A: While fabric glue can work for some parts, a hot glue gun is highly recommended for this project. It provides a much stronger, faster bond, which is essential for securely attaching heavier elements like pinecones and ensuring the gnome holds its shape without needing to be held in place for long periods.
- Q: Where can I find small fall leaves?
- A: You can find artificial fall leaves in the floral or craft sections of most craft stores, dollar stores, or even discount retailers during the autumn season. Alternatively, you can collect and press real leaves from your yard or a local park, ensuring they are dry and clean before use.
- Q: My pinecone doesn’t sit straight in the pot. What should I do?
- A: If your pinecone is wobbly, you can add more hot glue around its base where it meets the floral foam to secure it more firmly. You could also try inserting a small wooden dowel or skewer into the floral foam first, and then pushing the pinecone onto the dowel for added stability before gluing.
- Q: What if I don’t have a terra cotta pot?
- A: You can get creative with alternatives! A small plastic cup, a tin can, or even a sturdy cardboard tube cut to size could work as the gnome’s body. Just be sure to cover it nicely with your chosen fabric to achieve the desired aesthetic.
Crafting this no-sew fall pinecone gnome is more than just a DIY project; it’s an opportunity to embrace the warmth and charm of the autumn season. With minimal materials and a little creativity, you can transform simple items into a captivating piece of home decor that will bring smiles and a touch of whimsy to any space. Whether you’re making it for yourself, as a thoughtful gift, or as a fun activity, the process is as rewarding as the finished product.
We extend our sincere thanks to Patti J. Good via YouTube for sharing her wonderful inspiration and tutorial. Her clear instructions make this enchanting craft accessible to everyone. Don’t forget to check out her other fantastic content and follow her channel for more creative ideas!
Happy crafting, and may your home be filled with the cozy magic of fall!