
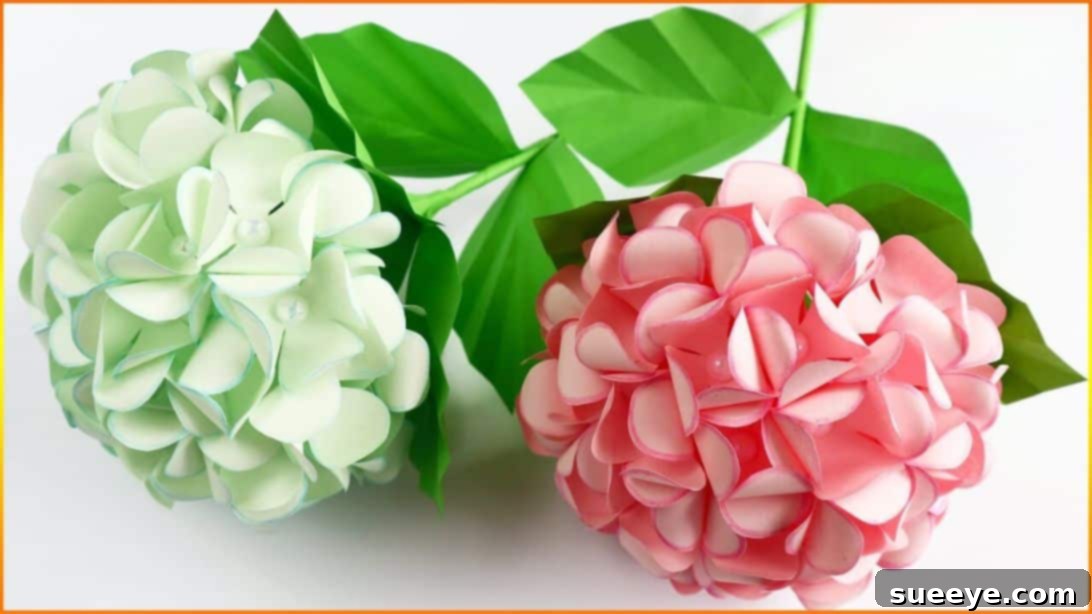
Welcome to a delightful journey into the world of paper crafting! If you’re looking for an enchanting DIY project that brings beauty and a touch of nature indoors, then creating a stunning paper hydrangea is the perfect endeavor. Inspired by the incredible tutorial from Amazing Super Craft, this guide will walk you through crafting exquisite paper hydrangeas that look remarkably realistic. These beautiful blooms are not only super fun to make but also serve as charming, long-lasting decorations for your home, events, or as thoughtful handmade gifts.
Imagine adorning your living space with vibrant bouquets of paper hydrangeas, placing them in elegant vases, or using them as centerpieces for special occasions. The best part? This project is incredibly versatile and straightforward, making it an excellent activity for crafters of all skill levels, including a wonderful opportunity to engage children in a creative and rewarding experience. Let’s gather our supplies and transform simple sheets of paper into magnificent floral artistry!
DIY Paper Hydrangea: Craft Exquisite Blooms for Lasting Beauty
Dive into the captivating art of paper flower making with this comprehensive guide to creating your very own DIY paper hydrangeas. Known for their lush, clustered blooms and vibrant colors, hydrangeas are a beloved garden favorite. Now, you can capture their timeless elegance in a form that never wilts, offering endless decorative possibilities. Our detailed tutorial, building upon the fantastic insights from Amazing Super Craft, ensures that even novice crafters can achieve professional-looking results.
Why Craft Paper Hydrangeas? The Benefits of DIY Floral Decor
- Everlasting Beauty: Unlike fresh flowers, paper hydrangeas retain their vibrant colors and perfect shape indefinitely, providing a constant source of beauty without the need for water or maintenance.
- Cost-Effective Elegance: Achieve stunning floral arrangements on a budget. Paper and basic craft supplies are far more economical than purchasing fresh cut flowers, especially for large displays or events.
- Creative Expression: Unleash your artistic flair! Paper hydrangeas offer endless customization options in terms of color, size, and embellishments, allowing you to match any decor or theme.
- Eco-Friendly Alternative: Reduce waste associated with fresh flower arrangements. Paper flowers are a sustainable choice that can be reused and enjoyed for years.
- Engaging Craft for All Ages: This project is perfect for family crafting sessions, helping children develop fine motor skills, creativity, and patience. It’s also a relaxing and therapeutic hobby for adults.
- Versatile Decoration: From elegant home decor and wedding centerpieces to charming party accents and unique gifts, paper hydrangeas seamlessly fit into any setting.
Materials You’ll Need
Before we embark on our floral crafting adventure, let’s ensure you have all the necessary supplies. Gathering everything beforehand will make the process smooth and enjoyable.
- Green Paper: Essential for crafting the realistic leaves and sturdy stems of your hydrangeas. Choose a shade of green that complements your chosen flower color.
- Pink Paper: This will be the primary color for your hydrangea petals. Feel free to experiment with different shades of pink, or even venture into blues, purples, or whites to create a diverse bouquet.
- Light Pink A4 Paper: Used for constructing the underlying structure that gives the hydrangea its iconic dome shape. A slightly lighter shade can add depth.
- Scissors: A sharp pair of craft scissors is crucial for precise cutting, especially for the intricate petal shapes.
- Craft Glue or White Glue: For general adhesion of paper pieces. A quick-drying formula is often preferred.
- Ruler: Indispensable for accurate measurements, ensuring your petals and base pieces are uniform in size.
- Red Colored Pencil: Used for subtly tracing the edges of your petals, adding a touch of realism and depth. You could also use pastels or ink pads for a different effect.
- Sticker Beads: These small adhesive embellishments will add a delicate sparkle to the center of each individual flower, mimicking pollen or dew drops.
- Hot Glue Gun and Hot Glue Sticks: For stronger, quicker bonds, especially when attaching the main flower structure to the stem and securing the leaves. Always exercise caution when using a hot glue gun.
- Skewer: A simple wooden skewer or a thin dowel is perfect for rolling the paper to create the stem and for gently curling the petals.
Having these materials ready will set you up for success. Don’t hesitate to substitute colors or embellishments to truly make these hydrangeas your own!
Step-by-Step Guide: Crafting Your Paper Hydrangea
Follow these detailed instructions carefully to bring your beautiful paper hydrangeas to life. We’ll guide you through each phase, from preparing the delicate petals to assembling the full bloom.
Step 1: Preparing Your Petal Squares
The foundation of our hydrangea petals begins with precise cutting. Take your chosen pink paper. Using your ruler and a pencil, carefully draw a grid of vertical and horizontal lines, ensuring each line is exactly 2 inches apart. This will create a series of perfect 2-inch squares. Accuracy here is key to achieving uniformly sized petals, which contributes to the overall neatness of your finished flower. Once your grid is complete, meticulously cut out each square. For a single hydrangea bloom, you will need approximately 45 of these squares. This number can vary slightly depending on how densely you wish to pack your petals, but 45 provides a full, lush appearance.
Step 2: Shaping the Individual Flower Bases
Now, let’s transform these squares into the basic shape of our hydrangea flowers. Take one of your 2-inch pink squares. Fold it in half, pressing firmly to create a crisp crease. Then, fold it in half again. You should now have a small square, one-quarter of the original size. This double-fold technique creates a symmetrical base for our petals. With the folded edges forming the pointed tip, carefully cut a curved shape, as demonstrated in the reference image. The curve should start from one folded edge and extend to the opposite folded edge, creating a distinct petal shape when unfolded. The precision of this cut will determine the ultimate look of your petals, so take your time. Repeat this folding and cutting process for all 45 of your pink squares.
Step 3: Adding Definition and Curve to Petals
Once all your individual flower bases are cut, it’s time to add character and dimension. Gently unfold each small paper cutout. You should now have a four-petaled flower shape. To give them a soft, realistic touch, take your red colored pencil and delicately trace the outer edges of each petal. This subtle outline adds depth and a natural blush, mimicking the gentle variations found in real flower petals. You can experiment with different shades or even a touch of white pastel for a different effect. After tracing, gently curve each petal towards the center. You can use your fingers, the edge of a ruler, or your skewer to achieve this soft curl. This step is crucial for giving your hydrangea its characteristic voluminous and lifelike appearance. Apply this technique to all your prepared flowers.
Step 4: Embellishing the Flower Centers
With the petals shaped and colored, let’s add a touch of sparkle to the heart of each flower. Take your sticker beads – these are often self-adhesive, making this step quick and easy. Carefully peel off a small bead and place it precisely in the very center of each four-petaled paper flower. The sticker bead acts as a charming embellishment, mimicking the tiny stamens or delicate dewdrops found in natural flowers, adding an exquisite detail that catches the light. If you don’t have sticker beads, a small dab of glitter glue or a tiny pearl bead secured with craft glue can also achieve a beautiful effect.
Step 5: Crafting the Lush Green Leaves
No hydrangea is complete without its iconic leaves! Take a sheet of your green paper. Measure and cut a perfect 3.15-inch square. Fold this square in half diagonally to form a triangle. Repeat this diagonal fold several times to create a smaller, denser triangle. This multiple-fold technique is essential for creating the veining pattern on the leaf. With your folded triangle, carefully cut a gentle curve from one corner to another. This cut will determine the overall shape of your leaf. Once unfolded, you’ll have a beautifully shaped leaf with natural-looking veins radiating from the center. Repeat this process to create four additional leaves, giving your hydrangea a total of five leaves for a full, natural look. Feel free to vary the size slightly for a more organic appearance.
Step 6: Constructing the Hydrangea’s Core Structure – Part 1
The voluminous dome of a hydrangea needs a robust internal structure. For this, we’ll use your light pink A4 paper. Fold the A4 paper in half lengthwise, ensuring the edges align perfectly. Then, fold it two more times in the same direction, creating three equal sections. This series of folds will give us the necessary layers for cutting multiple circles at once, ensuring consistency. On the folded paper, draw a precise 3.95-inch circle. Using sharp scissors, carefully cut out this circle. Due to the multiple folds, you should now have six identical circles. These circles will form the core of your hydrangea’s spherical shape.
Step 7: Preparing the Core Structure Segments – Part 2
Let’s continue preparing these foundational circular pieces. Take one of the 3.95-inch circles you just cut. Fold it precisely in half. Then, fold it in half again, and a third time. Each fold should be crisp and accurate, creating well-defined creases. This triple-fold technique is vital for establishing the segments that will eventually form the dome. Repeat this folding process with each of the remaining five circles, ensuring all six pieces are folded identically. These precisely folded segments are what will allow us to build the three-dimensional, rounded structure of the hydrangea.
Step 8: Assembling the Hydrangea’s Dome Structure
This is where the magic begins to take shape! Gently open each of your folded circles into a half-circle. You should see multiple creases radiating from the center. Take one of these half-circles. Apply a thin line of craft glue along the first crease on the top edge. Carefully fold the bottom half of the half-circle upwards, aligning it perfectly with the glued crease. This creates a distinct, three-dimensional segment. Repeat this gluing and folding process for all six half-circles.
Once all segments are prepared, we’ll stack them to form the dome. Take one of the prepared pieces. Apply glue along one of its straight edges (a crease). Carefully place a second prepared piece directly on top, aligning its corresponding straight edge perfectly. Press firmly to secure. Continue this process, stacking and gluing the remaining pieces one by one, until all six segments are stacked and adhered together. You are essentially building a fan-like structure that, when completed, will be carefully shaped into a sphere.
Step 9: Crafting the Sturdy Stem and Attaching the Dome
Every beautiful bloom needs a strong stem! Take your green paper and cut a rectangle measuring 3.15 inches by 7.9 inches. This size provides a good balance of thickness and length for our stem. Place a skewer at one end of the shorter side of the green rectangle. Tightly roll the paper around the skewer, ensuring a consistent and firm roll. Once fully rolled, apply glue to the loose edge and press firmly to secure the roll, forming a sturdy paper stem. Create a second piece of this stem, as we’ll be combining them for extra strength or potential variations.
Now, let’s attach our flower’s core. Take one of your paper stems. Apply a generous amount of hot glue to the very top part of the stem. Carefully and quickly attach the assembled dome structure from Step 8 onto the hot-glued stem. Hold it in place until the glue sets. Finally, apply glue to the first and last stacked pieces of your dome structure and gently bring them together, pressing firmly to close the structure and form a complete, rounded hydrangea base on top of the stem. This creates the full, voluminous head of the flower.
Step 10: Attaching the Delicate Petals to the Bloom
This is arguably the most rewarding step, as your hydrangea truly comes to life! Begin by selecting one of your decorated pink flowers (from Step 4). Apply a small dab of craft glue or hot glue to the back center of this flower. Carefully position and glue it directly onto the very top center of the pink half-circle dome you assembled in Step 9. This forms the apex of your hydrangea bloom.
Next, systematically glue the remaining individual flowers around the sides of the dome, working your way outwards and downwards. Refer to the provided image for guidance on placement and spacing. The goal is to cover the entire pink dome, creating a dense, clustered appearance characteristic of a real hydrangea. Ensure the flowers are glued close enough to each other to avoid gaps but not so close that they overlap excessively and lose their individual shape. Continue this process until the entire dome is covered with your beautiful paper flowers.
Step 11: Finalizing with Natural Foliage
With the bloom complete, the final touch is to add the leaves to the stem, giving your hydrangea a natural and finished look. Take the five green leaves you crafted in Step 5. Apply a small amount of hot glue to the base of each leaf. Carefully attach them around the stem, just beneath the pink flower head. Arrange them in a way that looks organic and balanced – some slightly higher, some lower, mimicking how leaves naturally grow on a plant. Ensure they are evenly distributed around the stem for aesthetic appeal. Once all leaves are securely glued, your magnificent DIY paper hydrangea is complete!
Tips for Crafting Flawless Paper Hydrangeas
- Precision is Key: Accurate measurements and neat cuts, especially in the initial steps, will significantly impact the final appearance of your hydrangea.
- Quality Paper Matters: Using slightly heavier cardstock (65-80lb) for the petals can give them more body and durability compared to standard printer paper.
- Experiment with Colors: Don’t limit yourself to pink! Hydrangeas come in a breathtaking array of colors, including blue, purple, white, and even multi-toned varieties.
- Curl with Care: When curving the petals, use gentle pressure to avoid tearing or creasing the paper. A skewer or even a pen can aid in achieving a consistent curl.
- Glue Wisely: Use just enough glue to secure pieces without causing excess to seep out, which can leave visible marks. Hot glue is great for quick adhesion on structural parts, while craft glue is fine for delicate petal work.
- Work in Batches: Prepare all your petal squares, then fold them all, then cut them all. This assembly-line approach can make the process more efficient.
- Safety First: If crafting with children, always supervise them when using scissors and especially when using a hot glue gun.
Customization and Display Ideas
The beauty of DIY projects lies in their potential for personalization. Here are some ideas to make your paper hydrangeas truly unique:
- Color Palette: Create a bouquet with various shades of a single color, or mix and match different colors like blues, purples, and whites for a vibrant display.
- Size Variation: Adjust the initial square size for your petals to create smaller or larger hydrangea blooms, perfect for different decorative needs.
- Embellishments: Beyond sticker beads, consider adding glitter, shimmer spray, or even small fabric paint dots to the flower centers for extra flair.
- Fragrance: Lightly mist your finished paper hydrangeas with a floral-scented spray for an added sensory experience.
- Versatile Decor:
- Vase Arrangements: Display several hydrangeas in a vase as a striking centerpiece or corner accent.
- Wall Decor: Create a stunning floral wall art piece by arranging multiple blooms on a canvas or directly on a wall.
- Event Decorations: Perfect for weddings, baby showers, birthdays, or any celebration where you want elegant, long-lasting floral touches.
- Gift Toppers: Attach a small paper hydrangea to a wrapped gift for a personalized and artistic touch.
- Wreaths: Incorporate them into seasonal wreaths for your front door.
Caring for Your Paper Hydrangeas
One of the greatest advantages of paper flowers is their low maintenance. To ensure your creations remain beautiful for years to come:
- Keep Dry: Paper and moisture don’t mix. Avoid placing your hydrangeas in high-humidity areas or near open windows where they might get wet.
- Dust Gently: Over time, dust may accumulate. Use a soft brush, a can of compressed air, or a hairdryer on a cool, low setting to gently remove dust.
- Avoid Direct Sunlight: Prolonged exposure to direct sunlight can fade paper colors. Display them in a spot with indirect light to preserve their vibrancy.
- Handle with Care: While durable, paper can still crease or tear if handled roughly. Treat your beautiful blooms with the care they deserve.
Conclusion: Embrace the Art of Paper Flower Making
Congratulations! You’ve successfully crafted a beautiful DIY paper hydrangea, bringing a piece of everlasting spring into your home. This project is a testament to how simple materials, combined with a little patience and creativity, can yield truly spectacular results. The joy of creating something beautiful with your own hands is immense, and these paper hydrangeas are sure to bring a smile to your face and admiration from anyone who sees them.
Whether you’ve made one bloom or an entire bouquet, we encourage you to continue exploring the world of paper crafting. Share your amazing creations with friends, family, or even online communities – your unique touch might just inspire someone else to embark on their own crafting adventure. Happy crafting!