
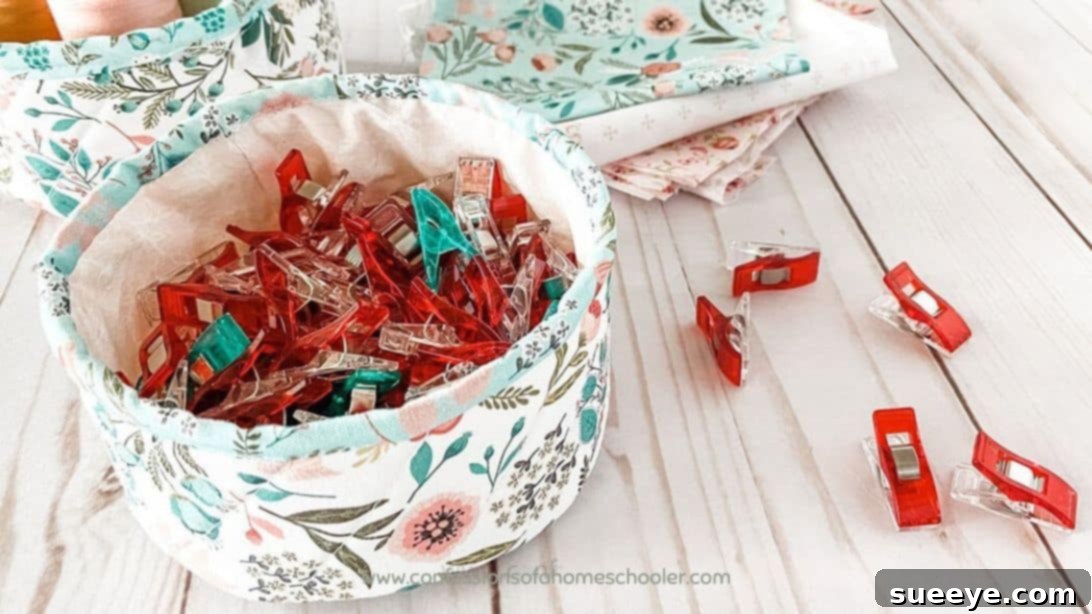
Craft Your Own Stylish Fabric Notions Bowl: A Perfect Sewing Project
Are you searching for a delightful and practical sewing project that’s both rewarding and easy to complete? Look no further! This comprehensive guide will walk you through creating your very own DIY fabric notions bowl, inspired by the wonderful craftsmanship of Erica Arndt. This charming little bowl is not just a decorative piece; it’s an incredibly versatile organizer that will bring order and a touch of handmade elegance to any space.
Whether you’re a seasoned sewer or just starting your journey into the world of fabric crafts, this project is designed to be accessible and fun. You’ll be amazed at how quickly you can transform a few pieces of fabric into a functional and beautiful receptacle perfect for storing an array of small items. Imagine a tidy sewing table with your pins and threads neatly gathered, a bedside table holding your favorite jewelry, or an entryway catching stray keys. The possibilities are endless!
Dive into this engaging tutorial and discover the joy of creating something truly unique. We’ll ensure you have all the details you need to successfully complete your fabric notions bowl, making it a proud addition to your home or a thoughtful, personalized gift for friends and loved ones who share a passion for sewing, crafting, or journaling.
RELATED: How To Sew Fabric Bowl Covers For Beginners
Why Every Crafter Needs a Fabric Notions Bowl
A well-organized workspace is key to a joyful crafting experience. Small items like pins, clips, buttons, beads, and thimbles often have a way of scattering themselves across surfaces, leading to frustration and lost time. A fabric notions bowl provides a dedicated, adorable home for these essentials, keeping them within easy reach and preventing clutter.
- Unmatched Versatility: While named a “notions” bowl, its utility extends far beyond sewing supplies. Use it for jewelry on your dresser, paperclips and staples on your desk, loose change, hair ties, or even as a charming catch-all for small trinkets.
- Personalized Style: With an endless array of fabric choices, you can create a bowl that perfectly matches your decor, expresses your personality, or suits the recipient’s taste. Coordinate with your craft room, or add a pop of color to any room.
- Eco-Friendly Crafting: This project is fantastic for using up fabric scraps that might otherwise go to waste. Transform those smaller, leftover pieces into something beautiful and functional, reducing fabric waste and giving new life to cherished remnants.
- Perfect Handmade Gift: A handmade fabric bowl makes an incredibly thoughtful and practical gift. Fill it with a few sewing essentials for a crafter, a small candle for a friend, or even a handful of candies for a teacher. The personal touch makes it truly special.
- Beginner-Friendly Project: This project is specifically chosen for its simplicity. It introduces fundamental sewing techniques like cutting accurately, sewing straight seams, working with curves, and finishing touches – all within a manageable scope.
Beyond its primary function, crafting this bowl helps you refine essential sewing skills and builds confidence for more complex projects. It’s a quick win that delivers lasting utility and aesthetic appeal.
For those looking to expand their fabric bowl repertoire, you might also enjoy learning How to Make a Fabric Rope Bowl, which offers a different texture and style!
Essential Materials for Your Fabric Notions Bowl
Before you begin, gather all your supplies. Having everything ready ensures a smooth and enjoyable crafting process. The beauty of this project lies in its minimal material requirements, making it an excellent stash-buster!
- 2 pieces of 5″ square fabric: You will need one for the exterior of your bowl and one for the lining. Quilting cotton is highly recommended due to its stability, ease of handling, and wide variety of patterns.
- 2 pieces of 3″ x 14.5″ fabric strips: Similar to the squares, one strip will be for the outer side panel and one for the inner lining side panel. These will form the main “walls” of your bowl.
- 1 piece of 1″ x 14.5″ accent strip: This smaller strip is purely decorative, adding a contrasting or complementary band to the top edge of your bowl, giving it a polished and professional look.
- 1 piece of 2.5″ x 14.5″ fusible foam: This is a crucial element for giving your bowl structure and body. Fusible foam (like Pellon Flex-Foam) has adhesive on one side that bonds to your fabric when ironed, creating a soft yet stable form.
- 1 piece of 5″ x 5″ fusible foam: This square piece of fusible foam will provide stability for the base of your bowl, ensuring it sits flat and holds its shape.
- Basic Sewing Supplies: You’ll also need a sewing machine, coordinating thread, scissors, pins or fabric clips, an iron and ironing board, and an erasable fabric marker or chalk. A rotary cutter and mat can greatly assist in precise fabric cutting.
Step-by-Step Guide: How to Make a Fabric Notions Bowl
Follow these detailed instructions carefully to construct your beautiful and functional fabric notions bowl. Remember to press your seams as you go for a neat and professional finish!
Step 1: Constructing the Side Panel with Accent Strip
Begin by assembling the decorative side panel. Take your 1″ x 14.5″ accent strip and place it right sides together with one of the 3″ x 14.5″ lining fabric strips. Align the long raw edges carefully. Next, place the other 3″ x 14.5″ outside fabric strip right sides together with the other long edge of the accent strip. Essentially, you’re creating a fabric “sandwich” with the accent strip in the middle. Sew both long seams with a precise 1/4″ seam allowance. Press the seams open or towards the darker fabric to reduce bulk, creating a clean, flat panel.
Step 2: Adding Structure with Fusible Foam to the Outer Strip
Now, it’s time to give your bowl its essential structure. Take the newly sewn outer fabric strip (the one you just made with the accent piece) and lay it wrong side up on your ironing board. Place the 2.5″ x 14.5″ fusible foam onto the wrong side of the fabric strip, ensuring the fusible side of the foam is facing down onto the fabric. Using a hot iron, gently press the foam into place according to the manufacturer’s instructions, usually for 10-15 seconds in sections, allowing it to fuse securely. Trim any excess foam that extends beyond the fabric edges. For an added touch of texture and stability, you can quilt this piece with straight lines or a simple crosshatch pattern using your sewing machine. This step is optional but highly recommended for a more robust finish.
Step 3: Forming the Bowl’s Body
With the outer side panel fused and potentially quilted, it’s time to create the cylindrical shape of your bowl. Fold this prepared strip in half lengthwise, bringing the two 14.5″ raw short ends together, right sides touching. Align these short raw edges perfectly, securing them with pins or fabric clips. Stitch down this side seam with a 1/4″ seam allowance, making sure to backstitch at the beginning and end for added durability. This will form a loop, which is the main body of your bowl. Press this seam open.
Step 4: Preparing the Bowl’s Base
Now, let’s create the stable bottom for your notions bowl. Take one of your 5″ square outer fabric pieces. Lay the 5″ x 5″ fusible foam onto the wrong side of this fabric square and fuse it in place with your iron, just as you did with the side panel. If desired, you can also quilt this base piece for extra texture and firmness. Next, find a circular object that is approximately 4 3/4″ in diameter (a small plate, lid, or template works well). Place this item on the right side of your foam-backed fabric square and carefully trace around it with an erasable fabric marker. Precisely cut out this circle. Then, take your remaining 5″ square lining fabric piece, place the freshly cut circle on top of it, and use it as a guide to cut out a matching circle from the lining fabric. This ensures both your outer base and lining base are the exact same size.
Step 5: Marking Quarter Points on the Bowl Body and Base
For accurate assembly, you’ll need to mark the quarter points on both the bowl body and the base circles. For the bowl body, first, locate the side seam you just sewed. This will be one quarter point. Fold the body flat, aligning the side seam in the center, and mark the opposite side. Then, fold it again, aligning these two marked points, and mark the two new fold points. This gives you four equally spaced marks on the circumference of your bowl body. Repeat this exact process for both your outer fabric circle and your lining fabric circle: fold it in half, mark the two ends, then fold it in half again, and mark the two new fold points. These quarter marks will serve as essential alignment guides.
Step 6: Attaching the Outer Base to the Bowl Body
This step requires careful pinning. Take your main bowl body (the loop you created in Step 3) and your outer fabric circle base (prepared in Step 4). With right sides together, align the quarter marks you made on the base circle with the quarter marks on the bottom raw edge of your bowl body. Start by pinning these four quarter points together securely. Then, gently work your way around the circle, adding more pins every half-inch or so, easing the curved base into the straight edge of the body. Take your time to distribute the fabric evenly, ensuring there are no puckers. Once securely pinned, slowly sew all around the base with a 1/4″ seam allowance. Go slowly, lifting your presser foot and pivoting slightly as needed to navigate the curve smoothly. Backstitch at the beginning and end.
Step 7: Assembling the Lining and Preparing for Turning
Now, construct the lining of your bowl. Take the remaining 3″ x 14.5″ lining fabric strip (not the one fused with foam or with the accent piece) and sew its short ends together with a 1/4″ seam allowance, just as you did for the outer body, forming a loop. Press the seam open. Then, take this lining loop and your lining fabric circle (prepared in Step 4). Similar to Step 6, align the quarter marks of the lining circle with the quarter marks on the bottom raw edge of the lining loop, right sides together. Pin securely all the way around. Sew this lining base to the lining body with a 1/4″ seam allowance. However, for the lining, remember to leave a 2-3 inch opening along one side of the circular seam. This opening is crucial for turning your bowl right side out later. Backstitch securely on either side of the opening.
Step 8: Finishing Touches: Turning, Closing, and Topstitching
You’re almost there! Place the outer bowl (right side out) inside the lining bowl (wrong side out). The right sides of the outer bowl and the lining bowl should now be touching along their top raw edges. Align the side seams of both the outer and lining bowls, and then align the raw top edges. Pin them all the way around. Sew this top seam with a 1/4″ seam allowance. Once sewn, reach into the opening you left in the lining and carefully pull the entire bowl right side out through this gap. Gently poke out all the curves and edges. Press the entire bowl, paying special attention to the top seam to make it crisp. Stitch the opening in the lining closed by hand using an invisible ladder stitch, or by machine with a small seam close to the edge. Finally, push the lining down into the bowl, ensuring the top edge is smooth and even. Press the top edge again, then topstitch all around the top circumference of the bowl, approximately 1/8″ from the edge. This not only gives a professional finish but also helps the bowl maintain its shape.
Your Beautiful DIY Fabric Notions Bowl is Complete!
Tips for Success and Customization
- Pressing is Key: Don’t skip ironing between steps! Pressing seams flat and crisp will make a huge difference in the overall neatness and professionalism of your finished bowl.
- Use Good Quality Thread: A strong, good-quality polyester thread will ensure your seams hold up well to use.
- Slow and Steady: Especially when sewing curves, take your time. Adjust your fabric frequently and use plenty of pins or clips to hold everything in place.
- Embellish Your Bowl: Consider adding a small patch, a bit of embroidery, or even some decorative stitching to the outer fabric before assembly for a truly unique touch.
- Experiment with Sizes: Once you master this basic bowl, try adjusting the fabric dimensions to create larger or smaller bowls for different organizational needs.
- Mixing and Matching Fabrics: Play with contrasting patterns and solid colors for both the outer fabric, lining, and accent strip to create different visual effects.
- Wash and Care: Most fabric notions bowls can be gently hand-washed or machine-washed on a delicate cycle with cold water, then air-dried and ironed to reshape.
The Enduring Charm of Handmade
Creating your own fabric notions bowl is more than just a sewing project; it’s an act of thoughtful organization and creative expression. Each stitch you make contributes to a functional piece that not only keeps your essentials in order but also reflects your personal style and craftsmanship. Whether it graces your sewing room, brightens a workspace, or serves as a heartfelt gift, your handmade fabric bowl is sure to be admired.
Embrace the satisfaction of making something with your own hands. This project is a fantastic stepping stone for new sewers and a quick, gratifying craft for experienced ones. We hope you’ve enjoyed this tutorial and are inspired to create many fabric notions bowls, bringing beauty and order to your world, one stitch at a time!