
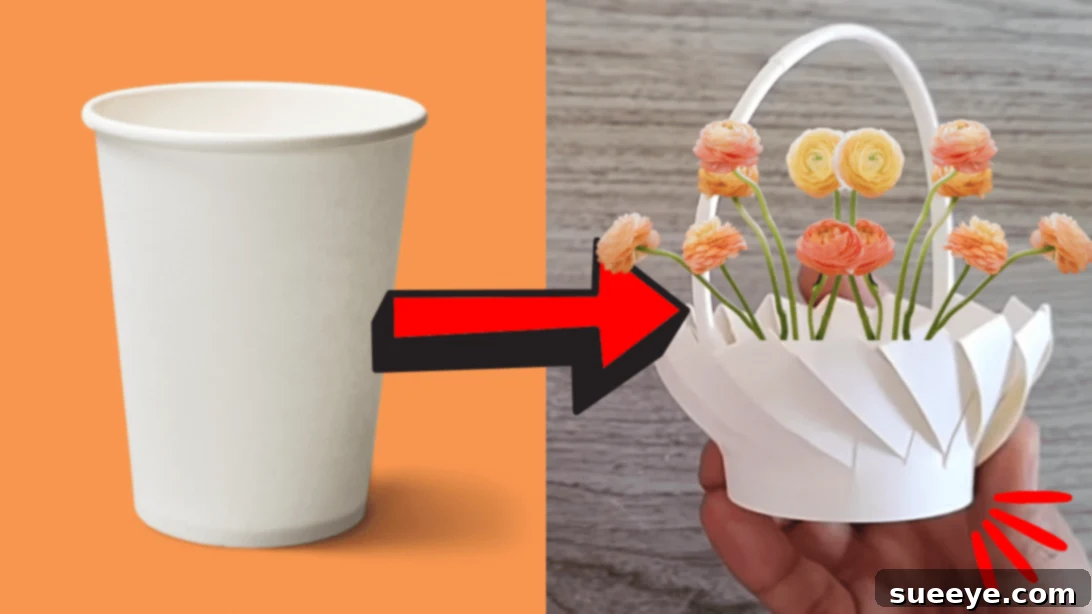
In a world increasingly focused on sustainability, the art of upcycling offers a brilliant way to transform everyday items into something new and useful. If you find yourself with a collection of disposable paper cups after a recent event or celebration, don’t let them go to waste. Instead, embark on a delightful crafting journey to repurpose them into charming small baskets. These versatile creations are not just eco-friendly; they’re incredibly functional and decorative, perfect for a myriad of uses around your home or as thoughtful handmade gifts. From elegant chocolate bowls and stylish jewelry storage to unique party giveaways and adorable decorative accents for any space, these DIY paper cup baskets add a touch of handmade charm wherever they go.
This project is a fantastic opportunity for a fun, simple, and creative session, whether you’re crafting solo or enjoying quality time with friends and family. It requires only a handful of readily available craft materials, making it accessible for crafters of all skill levels. We are inspired by the wonderfully clever and artistic idea from Tatzkreen Art on YouTube, whose ingenuity transforms a simple paper cup into a miniature masterpiece. These baskets are incredibly adaptable, making them suitable for any occasion, from rustic wedding favors and elegant birthday party decorations to festive holiday gifts and everyday home organization. Embrace the joy of sustainable crafting and discover how easy it is to create something truly special from something seemingly disposable.
Materials You’ll Need for Your Paper Cup Basket
Before diving into the creative process, ensure you have all your materials gathered in a clean, well-lit workspace. Having everything organized will make the crafting experience much smoother and more enjoyable. Here’s what you’ll need:
- Paper Cup: Opt for sturdy paper cups if possible, as they will hold their shape better during the weaving process and result in a more durable basket. Ensure they are thoroughly washed and dried if they were previously used.
- Pair of Scissors: A sharp pair of craft scissors will make precise cuts, which are crucial for the strips of your basket.
- Craft Knife or Cutter: This tool is essential for safely and accurately removing the top rim of the paper cup. Always exercise caution when using a craft knife and ensure you are cutting on a protected surface.
- Pen: A standard ballpoint pen will be used to help shape and twist the paper strips, adding a unique structural element to your basket.
- Glue: A good quality craft glue or hot glue gun (with adult supervision) will be needed to secure the handle to your finished basket. Make sure the glue is suitable for paper and dries clear.
Consider also having a ruler and a pencil handy for marking even strips, especially if you aim for high precision. A cutting mat is also highly recommended when using a craft knife to protect your work surface.
Step-by-Step Guide to Crafting Your Paper Cup Basket
Follow these detailed instructions carefully to transform your paper cup into a beautiful, handcrafted basket. Patience and precision are key to achieving a neat and charming final product.
Step 1: Preparing Your Paper Cup
The first step involves preparing the paper cup for transformation. Begin by carefully removing the top, rolled fold or rim of the paper cup using your craft knife. This rim typically adds rigidity to the cup’s opening and needs to be detached to allow for the creation of individual strips. Take your time with this step, ensuring a clean and even cut all around the circumference. After the rim is removed, use your pair of scissors to trim any remaining excess paper from the top edge, making sure the cup’s opening is perfectly leveled. This creates a clean base for your strips. Next, starting from the newly leveled top edge, cut the side of the cup downwards, creating 16 equally spaced vertical strips. It’s helpful to gently mark out 16 even sections around the cup with a pencil before cutting to ensure consistency. Crucially, stop your cuts approximately half an inch (about 1.25 cm) from the bottom of the cup, leaving this allowance intact. This uncut base section will form the solid foundation of your basket, holding all the strips together. Precision in cutting the strips ensures a symmetrical and aesthetically pleasing final basket.
Step 2: Shaping the Strips into a Floral Base
Once you have 16 even strips extending from the base, it’s time to give them shape. Take a pen and gently use its barrel to slightly twist or curl the top of each strip outwards. This action helps to open up the cup, causing the strips to fan out gracefully. The goal here is to give the cup a blossoming, flower-like appearance, which will serve as the initial structure for your basket. The gentle twisting adds a soft curve to each strip, making them more pliable and easier to work with in the subsequent weaving step. Be gentle to avoid tearing the paper, especially if your cup material is thin. This step is not just structural; it’s also aesthetic, as it begins to define the open, inviting shape of your future basket.
Step 3: Weaving the Basket Structure
This is where your basket truly takes form. The weaving process creates the side walls and defines the shape. Start by taking any one of the prepared strips. Fold it outward and then gently guide its tip diagonally to the left, tucking it securely into the second strip to its left. The idea is for each strip to interlock with another, creating a continuous, self-supporting structure. Continue this process around the entire cup: take the next available strip (the one immediately to the right of where you just tucked in the previous strip), fold it outwards, and tuck its tip into the second strip to its left. As you work your way around, you’ll notice the structure of the basket rising. Maintain a consistent tension with each fold and tuck to ensure the walls of your basket are even and sturdy. The final few strips will require a bit more finesse, as you’ll need to tuck them into the initial strips you started with, effectively closing the loop. Once all strips are securely interwoven, your basket’s body is complete. Gently press down on the woven edges to ensure they are firm and hold their shape.
Step 4: Adding the Handle and Personalizing Your Basket
Now it’s time to add the finishing touch – the handle – and unleash your creativity with decorations. Remember the top fold you removed in Step 1? This piece is perfect for creating a sturdy handle. Carefully flatten its ends using your pen or fingers to make them more pliable and easier to attach. Once flattened, apply a generous amount of glue to each end of the strip. Carefully attach these glued ends to opposite sides of your woven basket, creating an arching handle. Hold them firmly in place until the glue begins to set. For a stronger hold, you might want to reinforce the attachment points with an extra dab of glue or even a small piece of tape while the main adhesive dries completely.
Once the handle is secure and the glue has dried, the real fun begins: personalization! This is your opportunity to make the basket truly unique and reflective of its purpose or the occasion. You can paint your basket in any color imaginable – solid hues, elegant pastels, vibrant neons, or even gradient effects. Consider patterns like stripes, polka dots, or geometric designs. Beyond paint, a world of embellishments awaits:
- Glitters: Add a touch of sparkle for festive events or a glamorous look.
- Gems and Rhinestones: For a luxurious and eye-catching finish, perfect for jewelry storage or wedding favors.
- Stickers: Quick and easy, great for themed parties or children’s crafts.
- Ribbons: Tie bows around the handle or weave them through the basket for added texture and color. Satin, grosgrain, or even burlap ribbons can create different effects.
- Fabric Scraps: Glue small pieces of fabric for a textile accent or create a soft lining.
- Small Artificial Flowers or Leaves: Perfect for a spring theme, garden party, or a bridal shower.
- Stamping or Stenciling: Use craft stamps or stencils to add intricate patterns or personalized messages.
- Personalized Tags: Attach small tags with names, dates, or thank-you notes, especially if using the baskets as party favors.
Match your decorations to the theme of the occasion. For a wedding, think white, ivory, or pastel colors with pearls or delicate lace. For a birthday party, bright colors, fun stickers, and plenty of glitter would be ideal. For a rustic theme, twine and natural-toned paints would work wonderfully. The possibilities are endless, allowing each basket to tell its own story and serve its unique purpose with style.
Why Upcycle Paper Cups? The Benefits of Eco-Friendly Crafting
Choosing to upcycle paper cups into these charming baskets goes far beyond just creating a pretty object; it’s a conscious decision that brings numerous benefits. Environmentally, upcycling reduces waste destined for landfills, lessening our ecological footprint. It gives a second life to items that would otherwise be discarded, promoting a circular economy and responsible consumption. This project also encourages creativity and ingenuity, proving that valuable and beautiful items can be made from simple, inexpensive materials. It’s a cost-effective way to create personalized gifts or home decor without purchasing new, often more expensive, supplies. Moreover, crafting itself is a therapeutic activity, offering a sense of accomplishment and a wonderful way to relax and express yourself. Engaging in DIY projects like this can boost confidence, develop fine motor skills, and provide a fantastic bonding experience for families or friends.
Creative Uses for Your Finished DIY Paper Cup Basket
The versatility of these small, handcrafted baskets is truly remarkable. Once decorated, they can serve a multitude of purposes, adding a personalized touch to various aspects of your life:
- Party Favors and Giveaways: Fill them with candies, small chocolates, tea bags, or tiny trinkets for a memorable and eco-conscious party favor at birthdays, baby showers, or bridal parties.
- Gift Baskets for Small Treats: Perfect for presenting homemade cookies, truffles, or other small delicacies to friends, teachers, or neighbors.
- Jewelry Storage: Keep earrings, rings, or delicate necklaces organized on your dresser or nightstand.
- Desk Organizers: Tame the clutter on your desk by using them to hold paperclips, thumbtacks, rubber bands, or small stationery items.
- Decorative Accents: Place them on shelves, mantels, or coffee tables as charming decorative pieces, perhaps filled with potpourri or decorative pebbles.
- Children’s Room Storage: Ideal for organizing small toys, hair ties, beads, or craft supplies in a child’s room.
- Mini Plant Pot Covers: Use them as decorative sleeves for small succulents or air plants (ensure a separate waterproof liner if watering is involved).
- Wedding or Event Decor: Fill them with petals for flower girls, use them as small card holders, or as part of a centerpiece arrangement.
- Holiday Decor: Decorate them for specific holidays – red and green for Christmas ornaments, pastels for Easter egg holders, or orange and black for Halloween treats.
Each basket becomes a miniature testament to your creativity and commitment to sustainable living.
Tips for a Perfect Paper Cup Basket
To ensure your crafting experience is as smooth and successful as possible, keep these tips in mind:
- Safety First: Always use your craft knife and scissors with extreme care. If children are participating, ensure constant adult supervision, especially for cutting steps.
- Even Cuts are Key: The more uniform your strips are, the neater and more symmetrical your final basket will appear. Use a ruler and pencil to mark cuts if precision is a priority.
- Gentle Handling: Paper can tear easily. Handle the strips gently during twisting and weaving to prevent accidental rips.
- Consistent Tension: When weaving, try to maintain a consistent tension on each strip. This helps the basket walls rise evenly and gives the structure stability.
- Experiment with Cup Sizes: Different sized paper cups will yield different sized baskets. Try smaller cups for tiny trinket holders or larger cups for more substantial storage.
- Let Glue Dry Completely: Before decorating or using your basket, allow all glue to dry thoroughly to ensure stability and durability.
- Practice Makes Perfect: Don’t be discouraged if your first attempt isn’t flawless. Each basket you make will improve your technique and creativity.
Transforming the Ordinary into Extraordinary with a DIY Paper Cup Basket
The journey from a simple, discarded paper cup to a beautifully crafted basket is a testament to the power of imagination and the principles of upcycling. This DIY project, inspired by the innovative spirit of Tatzkreen Art, offers a tangible way to engage with sustainable practices while creating something truly personal and functional. Whether you’re looking for an eco-friendly way to organize your space, a unique gift idea, or simply a relaxing and rewarding craft activity, these paper cup baskets are an excellent choice. Embrace the process, personalize your creations, and enjoy the satisfaction of knowing you’ve given new life to an ordinary object, transforming it into an extraordinary piece of art and utility. Happy crafting!