
There’s nothing quite like the anticipation of enjoying a fine glass of wine, especially when sharing a moment with friends or celebrating a special occasion. However, that excitement can quickly turn to frustration when you realize there’s no corkscrew in sight. Whether you’re at a picnic, camping, or simply misplaced your trusty opener at home, a stubborn wine cork can feel like an insurmountable obstacle. But don’t let a missing tool spoil your plans!
Fortunately, resourcefulness is the key, and countless brilliant minds have devised ingenious methods to get that cork out and the wine flowing. In this comprehensive guide, inspired by the clever tricks demonstrated by Show Maker on YouTube, we’ll explore five practical, effective, and often surprising ways to open a wine bottle without a traditional corkscrew. Get ready to impress your guests and become the hero of any gathering with these essential wine hacks!
Uncorking Made Easy: 5 Ingenious Ways to Open a Wine Bottle Without a Corkscrew
Forget the stress and embarrassment of being unable to open a wine bottle. These innovative techniques range from surprisingly simple to a bit more unconventional, ensuring you’ll always have a backup plan. Before you dive in, remember that safety is paramount. Always exercise caution, use a stable surface, and be mindful of the glass bottle. With a little patience and the right technique, you’ll be enjoying your favorite vintage in no time.
Essential Tools for These Clever Hacks
You might be surprised by the common household items that can double as a makeshift corkscrew. Here’s what you might need, depending on the method you choose:
- Lighter (preferably a long-neck or utility lighter)
- Key (a sturdy, standard house key works best)
- Screw and a Screwdriver (choose a long, coarse-threaded screw)
- Fork (a dinner fork with sturdy tines)
- Shoe (a flat-soled shoe like a sneaker or boot)
- Drill Bit (a sturdy, non-sharp-ended drill bit)
The Ingenious Methods: Step-by-Step Directions
Method 1: The Lighter Method – Harnessing Thermal Expansion
This method might seem counterintuitive, but it leverages the science of thermal expansion to push the cork out. It’s an impressive trick that often elicits gasps of surprise when executed correctly.
How It Works: Wine bottles are typically sealed with a tight-fitting cork. By applying heat to the glass neck below the cork, the air trapped between the wine and the cork expands. This increased pressure gradually forces the cork upward and out of the bottle.
- Prepare the Bottle: First, carefully peel off any foil or seal covering the top of the wine bottle. Ensure the bottle is clean and dry.
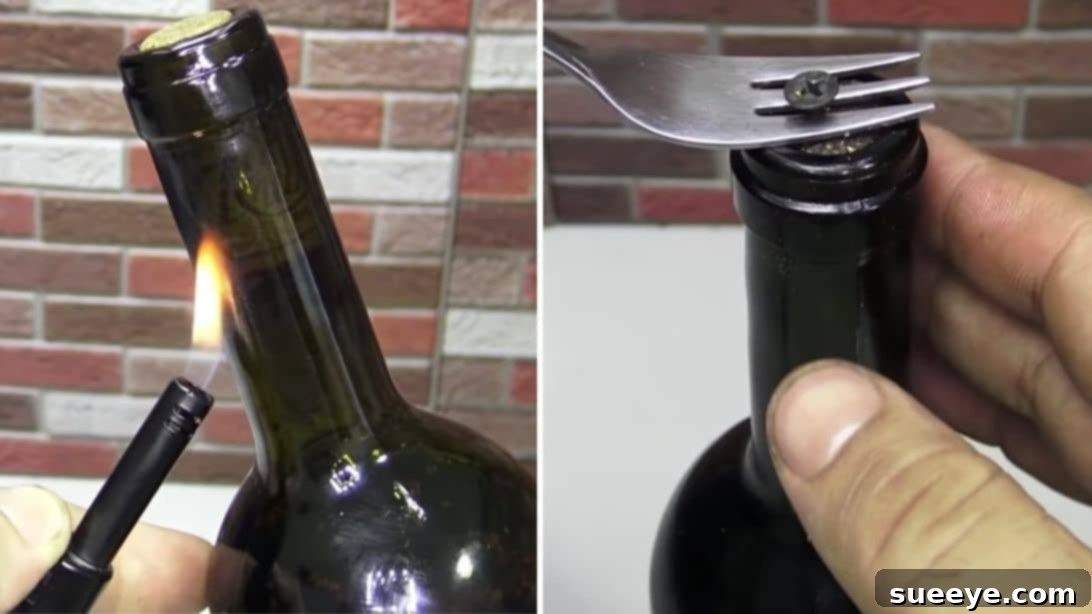
- Apply Heat: Hold the wine bottle firmly by the base. Using a lighter, direct the flame onto the glass neck of the bottle, just below where the cork is inserted. Move the flame back and forth around the entire circumference of the neck to distribute the heat evenly.
- Observe the Cork: Continue applying heat for several minutes. You’ll start to notice small bubbles forming in the wine and the cork slowly, almost magically, beginning to emerge from the bottle.
- The Pop: After a few minutes of consistent heating, the cork will eventually pop out on its own due to the internal pressure. Be ready to catch it!
Safety & Tips: Use a utility lighter for better control and to keep your fingers away from the flame. Hold the bottle at an angle away from your face and others. This method requires patience; rushing it can lead to uneven heating or, in rare cases, cracking the bottle. It’s best suited for bottles with standard corks, not synthetic ones which don’t allow for air expansion as effectively.
Method 2: The Key Method – A Simple Leveraging Technique
If the idea of using fire makes you uneasy, or if you’re looking for a quieter, more controlled approach, a common house key can come to your rescue. This method relies on leverage and gentle rotation to work the cork free.
- Insert the Key: Take a sturdy key and carefully insert its jagged edge into the cork at a slight angle. Don’t push it straight down; aim for a slanted entry, ideally towards the outer edge of the cork.
- Wedge and Rotate: Once the key is wedged firmly into the cork, push it further sideways, not directly downwards. The goal is to get the key deep enough to provide a good grip without breaking the cork.
- Pull and Twist: With the key securely embedded, slowly begin to rotate it while simultaneously pulling upward. Imagine you’re trying to spiral the cork out, much like a corkscrew. The key acts as a lever, creating friction and gradually lifting the cork.
- Maintain Steady Pressure: Continue this twisting and pulling motion, maintaining a steady and firm pressure. The cork should slowly start to emerge.
Tips for Success: A key with a good grip and a slightly sharp edge works best. This method requires patience and a gentle but consistent force. Avoid jerky movements, which could break the cork and make the situation worse.
Method 3: The Screw and Fork Method – The DIY Corkscrew
If you have access to a basic toolkit, this method effectively creates a makeshift corkscrew. It’s remarkably similar in principle to how a traditional opener works, using a screw for grip and a fork for leverage.
- Insert the Screw: Select a long, coarse-threaded wood screw or similar type. Carefully insert the tip of the screw straight down into the center of the cork.
- Drive the Screw: Use a screwdriver to turn and tighten the screw into the cork. Drive it down until most of the screw is embedded, leaving about half an inch to an inch of the screw head exposed. This exposed portion is where your fork will get its grip.
- Apply Leverage with a Fork: Take a sturdy dinner fork. Position the tines of the fork around the head of the screw, using the edge of the bottle’s neck as a fulcrum.
- Pull the Cork: Gently but firmly pry the screw upwards using the fork. You might need to adjust your grip on the fork or reposition it to get the best leverage. Work your way around the screw, applying upward pressure, and the cork should gradually lift out.
Why It Works: The screw acts as the spiral of a corkscrew, providing a strong anchor point within the cork. The fork then serves as the leverage arm, allowing you to pull the cork out with less effort than trying to pull the screw by hand.
Method 4: The Shoe Method – The Unexpected Cork Extractor
This method is perhaps the most famous and visually dramatic of all emergency wine-opening hacks. It relies on inertia and a bit of controlled force. It’s often seen in movies and, yes, it actually works!
- Prepare Your Shoe: Grab a sturdy, flat-soled shoe – a sneaker, boot, or even a dress shoe with a thick sole will do. Avoid high heels or delicate footwear.
- Position the Bottle: Invert the wine bottle and insert its base snugly into the opening of the shoe. The shoe will act as a protective cushion, absorbing the impact and protecting the glass.
- Find a Sturdy Surface: Locate a solid, vertical surface, such as a sturdy wall or a tree trunk. Ensure the surface is robust enough to withstand repeated impacts without damage.
- Tap and Watch: Holding the shoe firmly with one hand and the bottle with the other, gently but firmly tap the bottom of the shoe (where the bottle is) against the hard, vertical surface. The goal is to create a series of consistent, controlled impacts.
- The Cork Emerges: With each tap, the inertia will cause the wine inside the bottle to push against the cork, gradually forcing it outward. Continue tapping until the cork emerges enough for you to grab and pull it out by hand.
Important Considerations: Use moderate force; don’t slam the bottle violently, as this could shatter the glass. Ensure a good grip on both the shoe and the bottle. This method works best for full bottles, as the weight of the wine creates more inertia.
Method 5: The Drill Bit Method – A Variation of the Key Technique
Similar in principle to the key method, this hack utilizes a drill bit (without the drill, of course!) to provide the necessary grip and leverage to extract the cork. It’s particularly useful if you have a variety of tools available.
- Select a Bit: Choose a sturdy drill bit that’s long enough to embed deeply into the cork and has some texture or fluting to provide grip. Avoid very small or extremely sharp bits that could easily break or damage the cork excessively.
- Insert and Angle: Carefully insert the blunt end of the drill bit into the cork at a slight angle, similar to how you would with a key. Push it sideways into the cork, not straight down.
- Rotate and Pull: Once the drill bit is firmly embedded, begin to rotate it slowly while simultaneously pulling upward with consistent force. The aim is to create a spiraling motion that will gradually lift the cork out of the bottle neck.
- Apply Steady Pressure: Maintain a firm, upward pull as you rotate. The cork should begin to come out. If the cork is particularly stubborn, you might need to adjust the angle or depth of the drill bit.
Safety Reminder: While not using a power drill, drill bits can still be sharp. Handle with care, and consider wearing gloves for better grip and protection. This method requires a good feel for the cork and careful application of force to prevent the cork from crumbling.
General Safety Tips for Uncorking Without a Corkscrew
While these hacks are effective, always prioritize safety. Working with glass bottles, pressure, and various tools carries inherent risks. Here are some essential guidelines to keep in mind:
- Protect Your Hands: Consider wearing gloves, especially when using tools like screws, keys, or drill bits, to prevent scrapes or slips.
- Use a Stable Surface: Always work on a flat, stable surface to prevent the bottle from tipping or falling.
- Mind the Glass: Be gentle with the bottle. Excessive force, sudden impacts, or extreme temperature changes (like with the lighter method) can potentially crack or shatter the glass.
- Control the Cork: When the cork is about to pop, especially with the lighter or shoe method, be prepared to catch it to prevent it from flying and causing injury or knocking over other items.
- Avoid Old, Fragile Bottles: If you’re unsure about the integrity of an old bottle, it might be safer to avoid aggressive methods like the shoe tap.
- Patience is Key: Rushing any of these methods can lead to broken corks, spilled wine, or accidents. Take your time and apply steady, controlled force.
- Have a Backup: If one method isn’t working or feels unsafe, don’t force it. Move on to another technique or seek assistance.
Why These Wine Hacks Are Absolute Game-Changers
Mastering these emergency wine-opening techniques isn’t just about showing off; it’s about preparedness and ensuring a good time doesn’t get derailed by a minor inconvenience. Imagine being on a camping trip, surrounded by nature, with a delicious bottle of wine – only to discover your corkscrew is still at home. These hacks save the day, allowing you to salvage the moment and enjoy your beverage as intended.
They foster resourcefulness and prove that with a little creativity, common household items can become powerful tools. Whether you’re a seasoned wine connoisseur or an occasional drinker, knowing these tricks gives you confidence and a sense of accomplishment. Plus, successfully opening a bottle with an unusual method is always a great conversation starter!
So, the next time you find yourself staring down a cork with no corkscrew in sight, remember these ingenious methods. From the scientific precision of the lighter to the brute force (with caution!) of the shoe, there’s a solution for almost every scenario. Practice them responsibly, and you’ll always be ready to uncork and celebrate!
*These amazing images and original video inspiration are all credited to Show Maker via YouTube. Check his other content and follow for more clever hacks!