
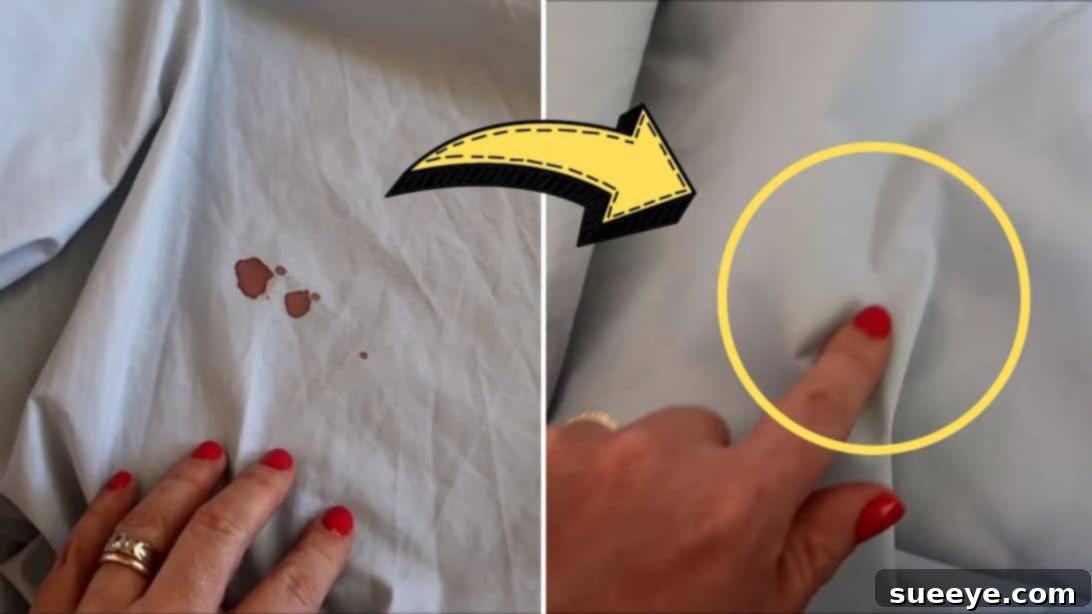
Effortless Blood Stain Removal: The Ultimate Guide to Eradicating Dried Stains from Cotton Fabrics
There are few things as frustrating as discovering a stubborn, dried blood stain on your favorite cotton bedding, clothing, or other precious fabrics. Whether it’s from an unexpected nosebleed, a minor cut, or a monthly cycle mishap, these crimson marks often seem to be permanent fixtures, clinging desperately to the fibers even after multiple washes. The common perception is that once blood dries and sets into fabric, it’s virtually impossible to remove, leading many to reluctantly discard otherwise perfectly good items. However, what if we told you there’s a remarkably simple, highly effective, and quick method to restore your cotton textiles to their original pristine condition?
This comprehensive guide will unveil an ingenious cleaning hack that promises to banish even the most entrenched dried blood stains with minimal effort. Inspired by the brilliant and accessible tips shared by A Thousand Words on YouTube, this technique requires just four everyday household materials. Forget the stress and embarrassment of unsightly blood marks; this tutorial will empower you with the knowledge to tackle them head-on, ensuring your linens, garments, and other cotton items look as good as new. Prepare to be amazed by the simplicity and efficacy of this method, transforming what was once a cleaning nightmare into a simple, manageable task.
Essential Materials for Blood Stain Removal
The beauty of this stain removal method lies in its accessibility. You won’t need specialized, expensive cleaning products. Instead, you’ll utilize common household items, each playing a crucial role in breaking down and lifting the blood stain. Gather these four essential materials before you begin:
- Water: Simple tap water is all you need. Its primary role here is to rehydrate the dried blood, softening it and making it more receptive to the subsequent cleaning agents.
- Hydrogen Peroxide (3% Solution): This is the superstar of our stain-fighting arsenal. Hydrogen peroxide is a mild antiseptic and a powerful oxidizing agent. When it comes into contact with blood, it reacts with the hemoglobin, causing an effervescent (fizzing) action that breaks down the stain’s color and protein structure. This effectively lifts the stain from the fabric fibers. Always use a standard 3% solution, readily available in most pharmacies and supermarkets.
- Cotton Swabs (or a Clean Cloth): These are indispensable for precise application of the hydrogen peroxide and for gently agitating the stained area. For larger stains, a clean, white cloth (to avoid color transfer) or even an old, soft-bristled toothbrush can be used, but cotton swabs offer superior control for targeted treatment.
- Iron (and an Ironing Board): The application of controlled heat from an iron is a critical, often overlooked step in this method. Heat helps to accelerate the chemical reaction of the hydrogen peroxide and aids in lifting the dissolved stain particles out of the fabric. Ensure your iron is clean and set to a moderate temperature appropriate for cotton.
Step-by-Step Guide to Removing Dried Blood Stains
Follow these precise, easy-to-understand instructions to effectively remove dried blood stains from your cotton fabrics. While the process is straightforward, a little attention to detail will yield the best results.
Step 1: Prepare the Stain and Apply Hydrogen Peroxide
The initial phase focuses on rehydrating the dried blood and beginning the chemical breakdown process. This step is crucial for loosening the stain’s grip on the fabric fibers.
- Moisten the Stain: Start by lightly moistening the entire dried blood stain with a small amount of plain water. The goal is to rehydrate the hardened blood, making it soft and more permeable to the hydrogen peroxide. You can achieve this by dabbing with a damp cotton swab, a clean cloth, or by gently misting with a spray bottle. Avoid overly saturating the fabric; just enough to make the stained area visibly wet. This rehydration softens the blood’s proteins, which are often the toughest part of the stain.
- Apply Hydrogen Peroxide: Once the stain is adequately moistened, apply a generous amount of 3% hydrogen peroxide directly onto the discolored area. You can carefully pour a small stream directly onto the stain or use a saturated cotton swab to dab it on. Ensure the entire stained area is covered with the peroxide.
- Gentle Rubbing and Soaking: Immediately after applying the hydrogen peroxide, take a fresh, clean cotton swab or a corner of a clean white cloth. Gently begin to rub the stained area. You’ll likely observe a distinct fizzing action – this is perfectly normal and indicates the hydrogen peroxide reacting with the blood’s components. Continue rubbing with gentle pressure, working from the outer edges of the stain towards the center to prevent spreading. As you rub, you may notice the blood color transferring onto your cotton swab; always switch to a clean part of the swab or a new swab as it becomes soiled to avoid re-depositing the stain.
- Allow to Soak: After the initial rubbing, let the hydrogen peroxide remain on the stain and soak for approximately 5 minutes. This soaking period allows the oxidizing agents in the peroxide to continue their work, breaking down the blood stain at a molecular level and further loosening its hold on the cotton fibers. For particularly old or stubborn stains, you might extend this soaking time to 10-15 minutes, but always monitor the fabric, especially if it’s colored, to ensure there’s no unintended lightening or damage.
Step 2: Iron for Enhanced Stain Removal and Repetition
The application of heat is a crucial accelerator for this method, effectively lifting the dissolved stain. This step, combined with potential repetitions, ensures thorough removal.
- Prepare Your Iron: Set your iron to a moderate heat setting, specifically tailored for cotton fabric. It’s important to ensure your iron is clean and that, if it’s a steam iron, the steam function is turned off and the water reservoir is empty. We are aiming for dry heat. Place a clean, dry, white cloth or several layers of paper towel underneath the stained section of your bedding or fabric. This underlayer will absorb any lifted stain residue during the ironing process, preventing it from transferring to other parts of your ironing board or item.
- Apply Heat: Once the hydrogen peroxide has had ample time to soak and react, carefully place the preheated iron directly over the treated, stained area. Apply gentle, consistent pressure. As you press, you will often witness the stain beginning to visibly fade, almost magically disappearing as it is absorbed by the underlying cloth or further broken down and evaporated. The heat from the iron serves multiple purposes: it accelerates the chemical oxidation process of the hydrogen peroxide and helps to draw the now-dissolved stain particles out of the fabric fibers. Move the iron slowly over the area for maximum effectiveness.
- Inspect and Repeat if Necessary: Lift the iron and carefully inspect the area. For many stains, particularly those that are relatively fresh, you will be astonished at how much the stain has faded or completely vanished. If a faint trace of the stain remains, do not be discouraged. This is common for older or more deeply set blood stains. Simply repeat the entire process: re-moisten the area, apply fresh hydrogen peroxide, gently rub, let it soak for 5 minutes, and then iron again. Continue to repeat these steps until the stain is barely noticeable or entirely gone. Persistence and patience are your allies, and multiple repetitions might be necessary for the toughest stains to achieve optimal, pristine results.
The Science Behind This Effective Method
Understanding *why* this method works can help you appreciate its efficacy and apply it more confidently. Blood stains are primarily composed of hemoglobin, a protein rich in iron, which gives blood its characteristic red color. When blood dries, these proteins coagulate and bond firmly with fabric fibers, making them notoriously difficult to remove with just regular washing.
- Hydrogen Peroxide’s Oxidizing Power: Hydrogen peroxide (H2O2) is a powerful oxidizing agent. When it comes into contact with blood, an enzyme called catalase (present in blood) breaks down the hydrogen peroxide into water and oxygen gas. This reaction is visible as the fizzing or bubbling you observe. More importantly, the oxygen released acts as a strong bleaching agent, breaking down the chromophores (color-producing molecules) in the hemoglobin. This effectively decolorizes the stain and helps to break down the protein bonds that cling to the fabric.
- The Role of Heat: The heat from the iron plays a crucial secondary role. While typically, hot water is avoided for blood stains because it can “cook” and set the proteins, dry heat applied after the hydrogen peroxide treatment is different. The heat accelerates the chemical reaction of the peroxide, making it work faster and more efficiently. Furthermore, as the treated area heats up and dries, the moisture containing the dissolved stain particles evaporates, helping to draw the residual stain away from the fabric and into the absorbent cloth beneath. It’s a targeted application of heat after the primary stain-breaking action has occurred, rather than using heat to wash the initial stain.
Crucial Tips for Optimal Blood Stain Removal
While the method is simple, incorporating these expert tips can significantly enhance your success rate and protect your fabrics:
- Act Quickly (When Possible): The golden rule of stain removal is to treat stains as soon as possible. Fresh blood is much easier to remove than dried blood. However, this method is specifically designed for dried stains, offering a powerful solution even when immediate action wasn’t possible.
- Always Use Cold Water Initially: For fresh blood stains, always rinse with cold water first. Hot water can cause blood proteins to coagulate and bind more tightly to fabric fibers, essentially “setting” the stain. For dried stains, a light moistening with water (cold or lukewarm) is fine to rehydrate, as the peroxide will do the heavy lifting.
- Patch Test First: Before applying any stain remover to a visible area, always perform a patch test on an inconspicuous part of the fabric (e.g., an inside seam or hem). This is especially important for colored fabrics, as hydrogen peroxide can sometimes lighten dyes. Observe for any discoloration or damage before proceeding.
- Avoid Harsh Rubbing: While gentle rubbing with a cotton swab is recommended to help the peroxide penetrate, avoid aggressive scrubbing. Excessive force can damage fabric fibers, especially delicate ones, or spread the stain further.
- Rinse Thoroughly After Treatment: Once the stain is completely gone, rinse the treated area thoroughly with clean water to remove any residual hydrogen peroxide. Then, wash the item as usual according to its care label. This ensures no residue remains that could potentially weaken fibers over time or attract dirt.
- Steer Clear of Chlorine Bleach: While bleach is a powerful stain remover, it’s generally not recommended for blood stains on cotton. It can react with the iron in blood to create a permanent yellowish stain and can also weaken or damage cotton fibers, especially with repeated use. Hydrogen peroxide is a much gentler and more effective alternative for blood.
- Consider Fabric Type: This method is highly effective for cotton and cotton blends. For other fabric types like silk, wool, or delicate synthetics, hydrogen peroxide might be too harsh. Always check care labels and perform a patch test meticulously, or consult professional cleaners for delicate items.
Beyond Blood Stains: Versatility and Final Thoughts
Hydrogen peroxide isn’t just a miracle worker for blood stains; it’s a versatile household staple. It can also be effective on other organic stains like grass, wine, and certain food stains, making it a valuable addition to your cleaning arsenal. However, remember its oxidizing properties and always perform a patch test.
With this simple yet powerful method, the days of stressing over dried blood stains on your cherished cotton fabrics are officially over. You now possess the knowledge and technique to restore your items to their original glory with confidence. No longer will you need to live with unsightly marks or prematurely discard stained textiles. Embrace the simplicity of this hack and enjoy the satisfaction of pristine, stain-free fabrics once again. Give it a try, and prepare to be impressed!
*Thanks to A Thousand Words via YouTube for all images used here and for inspiring this effective tutorial. If you found this video tutorial helpful, you’ll surely love her other content too, so give her channel a visit and consider subscribing for more fantastic cleaning and DIY hacks!