
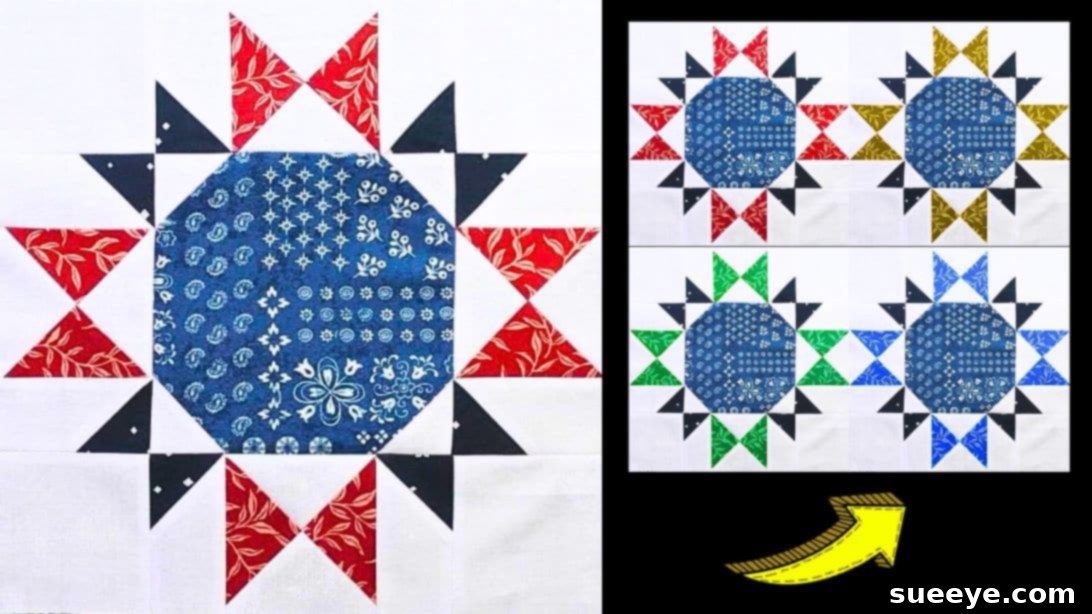
Mastering the “Just Call Me Diva” Quilt Block: An Easy Guide for Beginners
Embarking on a quilting journey can be incredibly rewarding, and finding patterns that are both beautiful and achievable for beginners is key to building confidence. When it comes to delightful and straightforward quilting projects, the creations from renowned quilter Carol Thelen consistently stand out. This guide focuses on her charming “Just Call Me Diva” quilt block, a design so elegantly simple that even novices can achieve stunning results on their very first attempt.
Quilting is an art form that combines creativity with precision, allowing you to transform simple fabric pieces into intricate and cozy works of art. Whether you’re aiming to create a full-sized quilt, a decorative wall hanging, or a set of charming placemats, mastering individual quilt blocks is the foundational step. The “Just Call Me Diva” block, with its distinctive star points and clever construction, offers a fantastic opportunity to learn essential piecing techniques while producing a visually impressive design.
This comprehensive tutorial will walk you through each step, from gathering your materials to stitching together the final block. We’ll ensure that every instruction is clear, concise, and easy to follow, making your quilting experience enjoyable and successful. Get ready to dive into the world of fabric, thread, and imagination, as we create a quilt block that truly earns its “Diva” moniker!
Why Choose the “Just Call Me Diva” Quilt Block?
There are countless quilt block patterns available, but the “Just Call Me Diva” design holds a special appeal for several reasons:
- Beginner-Friendly: Its construction relies on fundamental quilting techniques that are easy to grasp, making it perfect for those new to sewing and quilting.
- Stunning Visual Impact: Despite its simplicity, the finished block features a captivating star-like design that adds elegance and interest to any project.
- Excellent Scrap Buster: This pattern is ideal for utilizing smaller fabric pieces from your stash, helping you clear out scraps while creating something beautiful and reducing waste.
- Versatile Design: The “Diva” block can be adapted into various projects, from individual blocks for smaller items to multiple blocks combined for larger quilts.
- Teaches Core Skills: You’ll learn important skills such as accurate cutting, precise piecing, and effective pressing, which are crucial for all future quilting endeavors.
Materials You’ll Need
Before you begin sewing, gathering all your materials will ensure a smooth and uninterrupted creative flow. Here’s a detailed list of what you’ll need to create your “Just Call Me Diva” quilt block:
- Print Fabric: Designated for the central square of your block. Choose a fabric that you love, as it will be the focal point.
- Coordinating Print Fabric: Essential for the distinct star point elements. Select a print that complements or contrasts beautifully with your center fabric.
- Dark Print Accent Fabric: Used to create subtle definition and contrast within the block, adding depth to the design.
- Background Fabric: Typically a solid or tone-on-tone fabric that allows your chosen prints to truly shine. White, cream, or a light gray are popular choices.
- Marking Pen, Pencil, or Chalk: For drawing precise diagonal lines on your fabric, essential for accurate piecing.
- Quilter’s Ruler: A clear acrylic ruler with ¼-inch markings is invaluable for accurate cutting and measuring.
- Sharp Rotary Cutter: Paired with a self-healing mat, this will provide clean, precise cuts.
- Needle and Thread: High-quality polyester or cotton thread in a neutral color (like white or gray) is recommended for piecing.
- Iron and Ironing Board: Crucial for pressing seams open or to the side, ensuring your block lays flat and square.
- Sewing Machine: A reliable machine with a ¼-inch presser foot will make piecing accurate and enjoyable.
- Official Pattern Download: While this guide provides detailed instructions, having the original pattern with exact measurements is highly recommended. Click here to download the pattern.
Step-by-Step Directions to Sew Your Quilt Block
Follow these detailed instructions carefully to construct your “Just Call Me Diva” quilt block. Remember, precision is your best friend in quilting!
Step 1: Preparing Your First Units (Snowball Corners)
Take a small square of your dark accent fabric. On its wrong side, draw a diagonal line from one corner to the opposite corner using your marking tool. Next, take a white background strip. Position the marked dark square onto one end of the background strip, aligning their right sides together and ensuring all edges are perfectly matched. Stitch precisely along the diagonal line you drew. Once stitched, carefully cut off the excess fabric, leaving a ¼-inch seam allowance beyond your stitched line. Flip the accent fabric open, pressing the seam toward the darker fabric. Repeat this process with the remaining small dark squares and background strips until you have a set of identical units. This technique creates what quilters often call a “snowball” corner or “flying geese” corner without the points.
Step 2: Constructing the Center Block with Accent Squares
Lay your large center square right side up on your work surface. Now, take the small background squares. On the wrong side of each background square, draw a diagonal line from corner to corner. Place these marked background squares onto each corner of your large center square, right sides facing. Ensure the diagonal line is positioned so that when you stitch, the resulting fold will create a neat corner. Stitch directly along the drawn line on each corner. After stitching, trim away the excess fabric, leaving a ¼-inch seam allowance. Carefully press these newly formed corners open, pressing the seams outwards towards the background fabric. This method will transform your central square into a foundation for the star points.
Step 3: Creating Half-Square Triangle Units (HSTs)
Take one of your large background squares and draw a diagonal line from corner to corner on its wrong side. Pair this background square with a coordinating print square, placing them right sides together and aligning all edges perfectly. Stitch along both sides of the drawn diagonal line, ensuring your stitching is exactly ¼ inch away from the line on both sides. This technique creates two seam lines parallel to your drawn line. It’s crucial to maintain an accurate ¼-inch seam allowance for precise results. These units, when cut, will form two half-square triangles.
Step 4: Cutting and Pressing HSTs for Assembly
After stitching, carefully cut the block in half directly along the original diagonal line you drew. You will now have two separate units. Take each unit to your ironing board and press the seams open. Pressing seams open helps to reduce bulk and ensures a flatter finished block. Now, place these two units right sides facing, aligning their seams perfectly. It’s important to ensure that the fabric colors are opposite each other – meaning a background fabric from one unit is next to a coordinating print from the other. Stitch these two units together diagonally across the matching seams. This might sound intricate, but it’s a clever way to create a specific element within the star point structure.
Step 5: Final Assembly and Pressing
With your stitched units from Step 4, cut them in half once more, following the stitched diagonal line if applicable, or as indicated in the pattern diagram. Press the newly formed seams open to ensure your units are as flat as possible. Trim off any small “nubs” or dog ears that extend beyond the seam allowance for a clean finish. Now, lay out all your constructed block and strip units according to the visual guide provided in the video tutorial by Carol Thelen or the downloaded pattern diagram. Assemble the units row by row, stitching each piece within a row together. After completing each row, carefully press the seams. Finally, stitch the rows to each other, making sure to align all seams and intersections meticulously. Press the entire block one last time to set the seams and ensure a crisp, flat finish.
Tips for Quilting Success
To ensure your “Just Call Me Diva” quilt block turns out beautifully, keep these valuable quilting tips in mind:
- Accurate Cutting is Key: “Measure twice, cut once” is the quilter’s mantra. Even a slight inaccuracy in cutting can throw off your entire block. Use a sharp rotary cutter and a reliable ruler.
- Consistent ¼-inch Seam Allowance: This is fundamental in quilting. Practice on scraps to ensure your machine consistently stitches a perfect ¼-inch seam. Consider investing in a ¼-inch presser foot.
- Pressing Matters: Pressing is not ironing. Gently lift and set your iron down to fuse the fabrics and flatten seams, rather than dragging it. Pressing seams open or to the side, as directed, helps reduce bulk and keeps your block flat and square.
- Chain Piecing: For multiple identical units, chain piecing can save time. Stitch one unit, then feed the next unit under the needle without lifting the presser foot or cutting the thread in between.
- Trim Your Threads: Trim loose threads as you go to prevent them from getting caught in later seams or showing through lighter fabrics.
- Watch the Tutorial: While these instructions are detailed, watching Carol Thelen’s original video (available here) can provide invaluable visual guidance, especially for tricky steps.
Customizing Your “Just Call Me Diva” Quilt Block
One of the joys of quilting is the ability to personalize your creations. Here are a few ideas to customize your “Just Call Me Diva” block:
- Color Palette Exploration: Experiment with different color combinations. A monochromatic scheme can create subtle elegance, while high-contrast colors will make the star points pop. Consider seasonal themes or fabrics that match your home decor.
- Fabric Play: Don’t be afraid to mix prints and solids. The “Diva” block is an excellent opportunity to play with fussy cutting a favorite motif for the center square.
- Block Size Variation: While the pattern provides specific measurements, experienced quilters might adapt the scaling to create larger or smaller versions of the block, requiring careful recalculation of all cutting dimensions.
- Project Integration: Once you’ve mastered one block, consider making multiple blocks to assemble into a larger quilt. Alternatively, turn a single block into a cushion cover, a tote bag panel, or a unique table runner.
Conclusion: Your Quilting Adventure Awaits
Congratulations on taking the steps to create your very own “Just Call Me Diva” quilt block! This pattern, championed by Carol Thelen, is a testament to how simple techniques can yield spectacularly beautiful results. Whether this is your first quilt block or one of many, the sense of accomplishment that comes from seeing your fabric pieces transform into a cohesive and intricate design is truly unmatched.
Quilting is a journey of continuous learning and creativity. Don’t be discouraged by initial challenges; every stitch is a step toward mastery. With practice, patience, and these clear instructions, you’ll soon be confidently tackling more complex projects. We encourage you to share your creations and inspire others in the vibrant quilting community!
For more inspiring projects and tutorials, remember to check out and subscribe to Carol Thelen’s YouTube channel. Happy quilting!
*All image credit belongs to Carol Thelen via YouTube. Follow and subscribe to her channel for more amazing quilting content!