
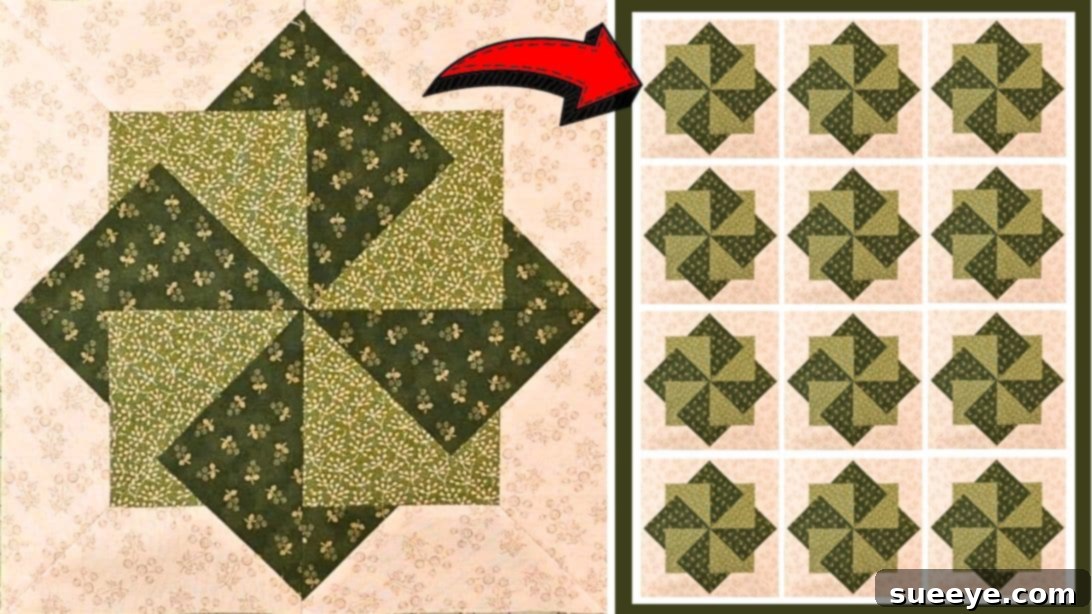
Mastering the Easy “Wings of Eagles” Quilt Block: A Step-by-Step Tutorial for Stunning Quilts
The “Wings of Eagles” quilt block is a classic design renowned for its striking visual impact, often intimidating quilters with its intricate appearance. Many glance at its sophisticated lines and immediately assume it’s a project reserved for advanced sewers. However, we’re here to change that perception! With the right guidance, this beautiful block is surprisingly straightforward to create, even for beginners. This comprehensive tutorial will walk you through every stage, drawing inspiration from the incredibly clear video instructions by master quilter Carol Thelen on YouTube. Prepare to transform simple fabric pieces into a dazzling quilt block that will elevate your next quilting project. Get ready to embark on a fun and rewarding quilting journey!
This project is designed for quilters who appreciate both beauty and simplicity. You’ll discover that piecing together the “Wings of Eagles” block requires only a few basic quilting tools and a trio of carefully selected fabrics. The beauty of this pattern lies in its versatility, allowing you to play with an endless array of colors and patterns to create a block that perfectly reflects your personal style. Whether you’re aiming for a vibrant, modern look or a more traditional, subdued aesthetic, the choice is entirely yours. Dive into the world of quilting with confidence and creativity and learn to make this stunning block with ease!
Why the “Wings of Eagles” Quilt Block is a Must-Try for Every Quilter
The “Wings of Eagles” quilt block stands out as a timeless design for several compelling reasons. Its name evokes images of majestic flight, and indeed, the finished block often presents a dynamic, soaring quality with its precise points and contrasting shapes. Despite its complex appearance, the construction relies on fundamental piecing techniques, making it an excellent learning opportunity for those looking to expand their quilting skills without feeling overwhelmed. It’s a design that truly showcases the magic of how simple shapes can combine to form something far grander and more intricate.
Furthermore, this block offers incredible adaptability. A single “Wings of Eagles” block can serve as a stunning centerpiece for a decorative pillow or a stylish tote bag. When multiple blocks are sewn together, they create breathtaking quilts of any size – from cozy baby quilts and practical lap quilts to expansive bedspreads. The repeating pattern, especially when combined with careful fabric placement, can generate secondary designs and illusions that add depth and intrigue to your finished quilt. It’s a fantastic way to utilize your fabric stash, bringing new life to those cherished prints you’ve been saving for the perfect project, while also honing your precision piecing skills.
Before You Begin: Essential Tips for Quilting Success
Achieving crisp, accurate quilt blocks starts long before the first stitch is sewn. Proper preparation and attention to detail are paramount to ensuring your “Wings of Eagles” block turns out beautifully. Follow these essential tips for a smooth and successful quilting experience:
- Thoughtful Fabric Selection: Choose three distinct fabrics for maximum visual impact: a main fabric that will be the focal point, an accent fabric to complement or contrast, and a background fabric that allows the other two to shine. Consider how they interact with each other in terms of color value (lightness/darkness) and pattern scale. For best results and to prevent unexpected shrinkage or color bleeding later, pre-washing your fabrics is often recommended, especially if you’re mixing different fiber contents or dye types.
- Ensure Sharp Tools: A sharp rotary cutter is absolutely crucial for achieving precise, straight cuts. Dull blades lead to frayed edges and inaccurate pieces, which will inevitably affect the final fit and squareness of your block. Ensure your cutting mat is in good condition, providing a stable and self-healing surface for accurate measurements and safe cutting.
- Prioritize Accurate Cutting: Measure twice, cut once! Take your time with every cut. Even a slight inaccuracy in cutting, whether it’s off by an eighth of an inch or less, can lead to points that don’t match up perfectly or blocks that don’t square properly. Always use a clear quilting ruler with easy-to-read markings and keep your rotary cutter blade perpendicular to the mat for clean, straight edges.
- Maintain a Consistent Seam Allowance: The standard ¼-inch seam allowance is non-negotiable in quilting. Practice sewing a consistent ¼-inch seam on scrap fabric until it becomes second nature. A perfectly consistent seam allowance throughout your entire project will ensure your individual units and blocks fit together seamlessly and achieve their intended finished size.
- Master the Art of Pressing: In quilting, we “press” seams, rather than “ironing” them. Pressing involves lifting and placing the iron onto the fabric, which prevents stretching and distorting your fabric pieces. For this “Wings of Eagles” block, you’ll be pressing seams open to reduce bulk, ensuring a flatter, crisper, and more precise finish, especially at intersections.
- Organize Your Pieces Methodically: As you cut your fabric, it’s highly recommended to organize your pieces into labeled piles (A, B, C, D, E as per the pattern). This systematic approach prevents confusion and keeps your workspace tidy, making the subsequent assembly process much smoother and more enjoyable.
Materials You’ll Need for Your “Wings of Eagles” Quilt Block
Gathering all your supplies before you start will streamline your quilting process and allow you to focus purely on the creative aspects. For this particular “Wings of Eagles” block, you’ll need the following:
- Main Fabric: This fabric will typically form the central, more prominent “wing” elements of your block. Choose a print or solid that you particularly love and wish to highlight as a focal point.
- Accent Fabric: Used to create contrasting elements and add significant visual interest, often appearing as the “feathers” or complementary shapes within the block.
- Background Fabric: A crucial component that provides strong contrast and allows the main and accent fabrics to stand out vibrantly. Often a solid or a subtle tone-on-tone print that doesn’t compete with the other two.
- Fabric Pins or Clips: Essential tools for holding fabric pieces together securely before and during sewing, preventing any shifting and ensuring precise alignment.
- Sharp Scissors or Rotary Cutter and a Cutting Mat: For precise and efficient fabric cutting. A rotary cutter paired with a good quality quilting ruler is highly recommended for accuracy and speed in quilting.
- Needle and Thread: Select a high-quality polyester or cotton thread that either matches your fabric colors subtly or opt for a neutral thread color like light grey or ecru, which blends well with most fabrics.
- Iron and Ironing Board: Absolutely vital for pressing seams open and ensuring flat, crisp, and beautifully finished blocks. A good quality steam iron can make a significant difference.
- Sewing Machine: A reliable sewing machine equipped with a ¼-inch presser foot will make the piecing process much easier, more consistent, and ultimately more accurate.
- Wings of Eagles Quilt Block Pattern: This is essential! Make sure to click here to download the free pattern. This downloadable PDF contains all the precise cutting dimensions, detailed diagrams, and layout instructions you’ll need for this project.
Step-by-Step Directions to Piece Your “Wings of Eagles” Quilt Block
Now that you have all your materials ready and understand the importance of precision, let’s dive into the exciting construction of this stunning quilt block. Remember to refer back to the downloadable pattern and Carol Thelen’s video tutorial as often as needed; visual guidance can be incredibly helpful for new techniques!
Step 1: Preparing Your Fabric and Constructing the Initial Units (ADE Unit)
Begin by carefully cutting all your fabric pieces according to the specific dimensions provided in the downloadable “Wings of Eagles” pattern. Accuracy here is paramount, so take your time with your rotary cutter and ruler, ensuring every cut is precise. Once cut, organize these pieces into five distinct groups, labeling them A, B, C, D, and E as indicated in the pattern. This systematic approach will prevent any confusion during the assembly process.
Next, take one piece from fabric E and one piece from fabric A. Place these two fabric pieces together with their right sides facing each other, ensuring all raw edges are perfectly aligned. Using your sewing machine, stitch along one designated edge (typically the top edge, as per the pattern diagram) with a consistent ¼-inch seam allowance. This precise seam allowance is absolutely critical for the block to square up correctly later on.
After sewing this first seam, carefully press the seam open using your iron. Pressing seams open helps to significantly reduce bulk, resulting in a flatter and crisper finish for your block. Once pressed, you may notice small triangles of excess fabric, often called “dog ears,” at the corners of your seam. Trim these off neatly to further reduce bulk and create a cleaner edge. Now, take a piece of fabric D and lay it on top of your newly created AE unit, again with their right sides facing and edges aligned. Pin if necessary, then sew these together with the same consistent ¼-inch seam allowance. Press this new seam open and trim any remaining dog ears. This completed piece forms one of your foundational ADE units. Set this aside and prepare to construct the next symmetrical unit, as you will likely need more than one for the full block.
Step 2: Building the Central Block Components (ABC Unit and Joining Units)
For the next segment of our “Wings of Eagles” block, retrieve one piece of fabric B and one piece of fabric A. Align these two fabric pieces with their right sides together and sew them along the designated edge, maintaining that crucial ¼-inch seam allowance. Once sewn, press the seam open just as you did in Step 1. This step creates your first AB unit.
Now, take a piece of fabric C. Lay it over your freshly assembled AB unit, ensuring the right sides are facing and the edges are aligned precisely. Pin these components together securely if needed, then stitch them together with your consistent ¼-inch seam allowance. After sewing, press this seam open for a clean, flat finish. This completes your ABC unit, another key component of the block.
With both your ABC unit and your previously prepared ADE unit (from Step 1) now constructed, it’s time to bring these two significant sections together. Carefully align the ABC unit and the ADE unit with their right sides facing each other. Pay close attention to how they are oriented, ensuring the points and seams will match up correctly when sewn. It can be helpful to ‘nest’ the seams where they meet to ensure perfect alignment. Pin them securely in place if necessary to prevent any shifting during sewing. Sew these two larger units together with your consistent ¼-inch seam allowance. This step is pivotal as it begins to clearly reveal the distinct “Wings of Eagles” design. Press the final seam open, and take a moment to admire the burgeoning beauty and precision of your block!
Step 3: Assembling the Full Quilt Block and Final Touches
The “Wings of Eagles” block is often constructed from several smaller, identical or mirrored units that come together to form the final design. You’ve just completed one such unit or a significant section of it. Now, you will need to repeat the processes described in Step 1 and Step 2 to create the remaining units required for your complete “Wings of Eagles” block. The pattern will explicitly specify exactly how many of these sub-units you need and how they should be oriented (some may be mirror images of others). Take your time to ensure each unit is as precise and accurate as the last, as consistency is key to a beautiful finished block.
Once all your individual units are constructed and pressed, it’s time for the exciting part: assembling them into the full “Wings of Eagles” block. Lay all your completed units out on your cutting mat or a design wall according to the layout diagram provided in the pattern and clearly demonstrated in Carol Thelen’s video. This visual arrangement helps to ensure correct placement and orientation of each piece before you commit to sewing.
Typically, a larger quilt block is assembled in rows, much like a jigsaw puzzle. Begin by stitching the units for the top row together, aligning seams carefully and pinning them to prevent any shifting. Use your consistent ¼-inch seam allowance. Press these row seams open once completed. Then, proceed to sew the units for the bottom row (or subsequent rows, depending on the block’s complexity and how many sub-units it comprises). Once again, press all seams open.
Finally, with your top and bottom rows (or block sections) completely assembled and pressed, you will sew these two larger pieced units together to form the complete “Wings of Eagles” block. Align the central seams and outer edges precisely, pin liberally to maintain alignment, and sew with a consistent ¼-inch seam allowance. The accuracy of your earlier seams and cuts will truly pay off here, resulting in beautifully matched points and perfectly straight lines. Give your finished block a final, thorough press to set all the seams, and optionally, square it up using your ruler and rotary cutter. Congratulations, you’ve successfully pieced together a stunning “Wings of Eagles” quilt block!
Troubleshooting Common Quilting Issues for Your “Wings of Eagles” Block
Even with careful preparation and diligent sewing, quilters sometimes encounter small challenges. Don’t be discouraged! These are learning opportunities. Here are a few common issues you might face when making your “Wings of Eagles” block and practical advice on how to address them:
- Uneven Seams or Points Not Matching: This is a very common issue, often due to slight inconsistencies in your ¼-inch seam allowance or inaccurate initial cutting. The best prevention is practice and precision. Double-check your cutting technique, ensuring your ruler and rotary cutter are properly aligned. Practice sewing your ¼-inch seam allowance on scrap fabric until it’s perfectly consistent. When joining units, try ‘nesting’ your seams (pushing seams in opposite directions where they meet) and pinning directly at the intersection to help them align perfectly. If a seam is significantly off, don’t hesitate to unpick and resew for a better result.
- Blocks Not Squaring Up: If your finished block isn’t perfectly square to the dimensions specified in the pattern, it usually points back to cutting inaccuracies, inconsistent seam allowances, or fabric stretching during handling. While gentle blocking (spraying with water or starch and pinning to shape) can sometimes help to correct minor discrepancies, prevention through precision in cutting and sewing is always the best approach. After finishing your block, use a large square ruler to carefully trim it to the correct size, ensuring all corners are 90 degrees.
- Fabric Stretching During Sewing or Pressing: Handling fabric too much, especially on the bias (the diagonal direction of the fabric), can cause stretching and distortion. Try to handle your cut pieces as little as possible. When pressing, always lift and place the iron onto the fabric instead of pushing it back and forth, which can easily stretch the fabric out of shape. Consider using a light starch spray before cutting to add stability to your fabric.
- Excessive Bulk at Seam Intersections: While pressing seams open, as recommended for this block, significantly reduces bulk compared to pressing to one side, you might still find areas that feel thick. If this occurs, gently finger-press the area to flatten it further, or use a tailor’s clapper after pressing with an iron. The weight of the clapper helps to flatten and set the seams even more effectively.
Taking Your “Wings of Eagles” Block Further: Inspiring Project Ideas
Now that you’ve mastered the beautiful “Wings of Eagles” quilt block, the possibilities for incorporating it into various projects are truly endless! This versatile block can be the foundation for numerous stunning and personalized creations. Here are some inspiring ideas to get your creative juices flowing and extend your quilting journey:
- Full-Size Quilts: The most obvious and rewarding project! Combine multiple “Wings of Eagles” blocks to create breathtaking bedspreads or cozy lap quilts. Experiment with different layouts – perhaps rotating some blocks for a dynamic effect, alternating them with solid or complementary blocks, or adding sashing strips between them for a truly unique and intricate design. The dynamic nature of this block lends itself beautifully to both repeating patterns and more complex medallion quilt designs.
- Decorative Pillows: A single, perfectly pieced “Wings of Eagles” block makes an incredibly eye-catching front for a throw pillow. This is a fantastic way to showcase a special fabric combination, add a handmade touch to your home decor, and practice your quilting skills on a smaller scale. Add a simple coordinating border to frame the block and complete your pillow cover.
- Elegant Table Runners or Placemats: Create a striking centerpiece for your dining table by sewing together two or three “Wings of Eagles” blocks into an elegant table runner. Alternatively, make individual placemats using a single block, perhaps adding a coordinating border and a sturdy backing. These make wonderful gifts too!
- Stylish Tote Bags or Project Bags: Elevate a plain tote bag by featuring one or more “Wings of Eagles” blocks on its exterior. This adds a personalized, sophisticated, and handcrafted touch to a functional item, making it perfect for carrying your quilting supplies, books, or everyday essentials.
- Captivating Wall Hangings: Frame a beautifully pieced “Wings of Eagles” block with borders and intricate quilting to create a captivating wall hanging. This allows the intricate design and your careful work to be admired as a piece of art, adding warmth, texture, and character to any room in your home or studio.
- Unique Quilted Accessories: Think beyond the square! Integrate smaller versions of this block into items like decorative pot holders, hot pads, or even as a unique, quilted detail on a garment or a journal cover. These smaller projects are great for using up scraps and trying new quilting ideas.
Don’t be afraid to experiment with different fabric choices, adjust the scale of the block (if the pattern allows), and play with various layout configurations to make each project uniquely yours. The true beauty and joy of quilting lies in personal expression and bringing your creative visions to life!
Embark on Your Quilting Adventure Today!
We hope this detailed tutorial has successfully demystified the “Wings of Eagles” quilt block and inspired you to try your hand at creating this beautiful and classic design. What once seemed complicated is now well within your reach, thanks to clear, step-by-step instructions and a little patience and precision. Remember, every stitch you make brings you closer to a stunning finished piece, and the joy of creating something beautiful and functional by hand is truly immeasurable.
The “Wings of Eagles” block is a testament to how simple geometric shapes, when combined with precision and thoughtful fabric choices, can yield truly spectacular results. It’s an excellent project for honing your piecing skills, practicing accurate seam allowances, and exploring the endless possibilities of fabric combinations. Plus, the compliments you’ll receive on your finished projects will be an added bonus!
Don’t forget to download the official pattern to get started with all the exact measurements and detailed diagrams. We highly recommend watching Carol Thelen’s video tutorial alongside these instructions for the best possible visual guidance and tips directly from an expert. Grab your fabrics, fire up your sewing machine, and let your quilting creativity take flight with the magnificent “Wings of Eagles” quilt block!
*All image credit belongs to Carol Thelen via YouTube. Follow and subscribe to her channel for more amazing quilting tutorials and inspiration!