
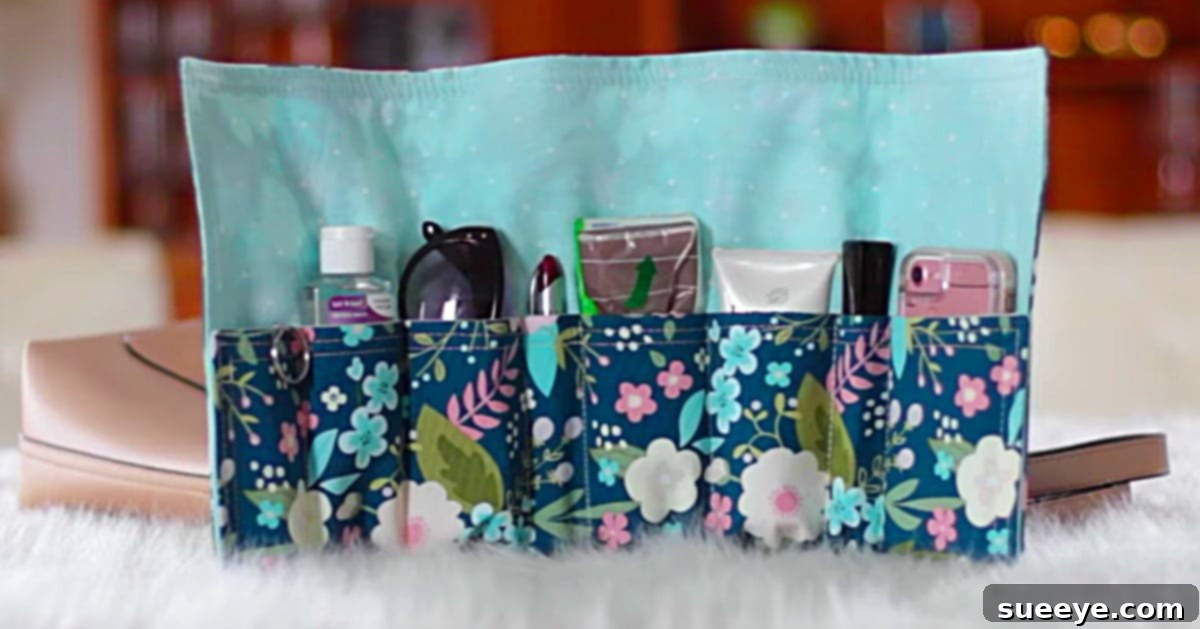
DIY Placemat Bag Organizer Insert: Craft Your Own Stylish Handbag Solution
Do you ever find yourself rummaging through a cluttered handbag, desperately searching for your keys, phone, or favorite lipstick? If so, you’re not alone! A disorganized purse can be a major source of daily frustration, wasting precious time and sometimes even leading to damaged items. Fortunately, there’s a brilliant, budget-friendly, and incredibly easy DIY solution that can transform your chaotic carry-all into a haven of order: the homemade placemat bag organizer insert.
My journey to a perfectly organized handbag began much like many others’ – with a new bag for Christmas and a strong desire to keep it pristine and functional, all while sticking to a tight budget. Just when I thought I’d have to splurge on an expensive store-bought organizer, I stumbled upon an ingenious project on YouTube. The timing couldn’t have been more perfect, especially since I had recently discovered a treasure trove of six unused, brightly colored paisley print placemats at a garage sale. They were practically begging to be repurposed into something fabulous!
The beauty of this project lies in its simplicity and the ability to customize it completely to your needs. Those vibrant placemats, with their appealing design, weren’t just decorative; they were the perfect foundation for a sturdy, attractive, and highly practical bag insert. I knew instantly that this DIY placemat bag organizer would not only solve my organizational woes but also become a beloved item, perhaps even inspiring others with its charm and clever functionality. The initial steps were refreshingly straightforward: envisioning the items I needed to store, folding a flap, arranging my essentials, and marking the measurements for individual compartments.
Why Choose Placemats for Your DIY Bag Organizer?
You might be wondering, “Why placemats?” The answer is simple: they are an absolute game-changer for DIY bag organizers! Placemats offer a unique combination of qualities that make them ideal for this project, far surpassing what you might achieve with raw fabric alone. First and foremost, their pre-finished edges are a significant time-saver. No need to hem or serge, which immediately reduces the complexity and duration of the sewing process. This feature alone makes the project accessible even to beginner sewers.
Furthermore, placemats are inherently durable. Designed to withstand spills, heat, and frequent cleaning, their sturdy construction means your bag organizer will hold its shape and stand up to daily wear and tear inside your purse. This durability ensures that your carefully organized items remain protected and neatly separated, preventing them from shifting around or getting lost in the depths of your bag.
Beyond practicality, placemats come in an astounding array of colors, patterns, and textures. Whether you prefer a bold paisley print, as I did, or something more subtle like a solid linen or a modern geometric design, you can easily find placemats that perfectly match your style or the interior of your handbag. This variety allows for endless customization possibilities, transforming a simple utility item into a chic accessory that reflects your personality. Plus, they are incredibly cost-effective, especially when found on sale or at thrift stores, making this project an excellent choice for anyone on a budget who still desires a high-quality, professional-looking result.
The Unbeatable Benefits of a Handbag Organizer Insert
Investing a little time in creating a DIY placemat bag organizer yields a multitude of benefits that extend far beyond simply tidying up your purse. A well-designed organizer is more than just a collection of pockets; it’s a strategic tool for enhancing your daily efficiency and protecting your valuable belongings.
Streamlined Organization and Time-Saving
- Instant Access: No more endless digging! With dedicated pockets for your phone, wallet, keys, cosmetics, and other essentials, everything has its place. You’ll know exactly where to reach for any item, saving you precious minutes throughout your day.
- Effortless Bag Switching: Changing handbags used to be a tedious chore, requiring you to painstakingly transfer every single item. With a removable organizer insert, you can simply lift it out of one bag and drop it into another, making the swap seamless and quick.
- Reduced Clutter: By assigning a home to each item, you naturally reduce the accumulation of unnecessary clutter. This encourages a minimalist approach to what you carry, leading to a lighter, more manageable bag.
Protection and Longevity for Your Belongings
- Prevent Damage: Delicate items like sunglasses, makeup compacts, and electronic devices are less likely to get scratched, cracked, or squashed when nestled in their own padded pockets within the organizer.
- Contain Spills: Should a pen leak or a lotion bottle open, the organizer can help contain the mess, protecting the lining of your actual handbag from stains and damage.
- Preserve Bag Interior: Sharp objects or heavy items carried loosely can wear down or tear your bag’s lining over time. The organizer acts as a protective layer, extending the lifespan of your cherished handbags.
Customization and Personal Style
Unlike generic store-bought organizers, a DIY placemat insert allows for complete customization. You dictate the size, number, and depth of the pockets, tailoring it precisely to the items you carry most. Plus, with the vast selection of placemat designs available, your organizer becomes a true reflection of your personal style, adding a pop of color or a touch of elegance every time you open your bag. It’s a functional accessory that also brings joy and a sense of accomplishment.
Creating Your Own DIY Placemat Bag Organizer: A Step-by-Step Guide
Ready to transform your placemats into a functional masterpiece? This simple sewing project is perfect for crafters of all skill levels. Follow these detailed steps to create your personalized handbag organizer insert.
Materials You’ll Need:
- 1-2 Sturdy Placemats (depending on the desired size of your organizer – choose durable, washable ones)
- Sewing Machine (or needle and thread for hand-sewing)
- Matching Thread
- Fabric Chalk or Washable Marker
- Ruler or Measuring Tape
- Scissors
- Pins or Fabric Clips
- The items you wish to organize (e.g., wallet, phone, keys, lipstick, pens)
Detailed Instructions:
- Prepare Your Placemat:
Start by laying your chosen placemat flat on a clean, clear work surface. Decide which side will be the exterior of your organizer. If your placemat is reversible, this might not matter as much. Ensure it’s free of wrinkles for accurate measurements.
- Determine the Base Flap:
The “flap” mentioned in the original instruction refers to creating the base and the initial height of your pockets. Carefully fold up the bottom edge of the placemat towards the center. The height of this fold will largely determine the depth of your pockets. For a standard organizer, a fold of about 4-6 inches (10-15 cm) is usually sufficient, but you can adjust this based on the height of the tallest items you plan to store (e.g., a water bottle, a small notebook). Pin this fold in place temporarily.
- Arrange and Measure Your Items:
This is where the customization truly begins! Place the actual items you intend to store on the folded placemat, arranging them side-by-side on the bottom flap. Think about logical groupings: phone and keys together, wallet in its own slot, cosmetics in another. Leave a small gap (about half an inch to an inch or 1-2.5 cm) between each item to allow for seam allowances and easy retrieval. This step is crucial for ensuring your pockets are perfectly sized for your needs.
- Mark Your Channels:
Once you’re satisfied with the arrangement, use your fabric chalk or washable marker and a ruler to draw vertical lines on the placemat. These lines should extend from the top edge of the folded flap down to the bottom crease, effectively marking where each pocket division will be. Ensure your lines are straight and parallel. Don’t forget to mark a line at the very end of your last item if you want that to be a defined pocket, and consider leaving a larger “open” section for bulkier items.
- Sew the Channels:
With your lines clearly marked and the bottom flap still pinned, head to your sewing machine. Stitch directly along each chalk line, creating the individual channels or pockets. Make sure to backstitch at the beginning and end of each seam to secure the stitches and prevent unraveling. Use a thread color that either matches your placemat for a discreet look or contrasts for a decorative touch. Ensure your stitches are straight and even for a professional finish.
- Reinforce the Top Edge (Optional but Recommended):
To give your organizer even more durability and a polished look, you can add a topstitch along the folded edge of the pockets (the top edge of the flap you initially created). This will help the pockets maintain their shape and prevent the fabric from sagging over time. You could also add a strip of elastic here if you want to keep items more snugly secured.
- Trim and Finish:
Once all your channels are sewn, remove any pins and brush off the chalk marks. Trim any loose threads. Your DIY placemat bag organizer insert is now complete! You can place it directly into your handbag, arranging your essentials into their new, perfectly sized homes.
Customization, Gifting, and Beyond: Making the Most of Your Placemat Organizer
The moment I saw my first DIY placemat bag organizer completed, I was absolutely thrilled. The results were far beyond my expectations – each one looked incredibly professional, defying the typical “homemade” aesthetic in the best possible way. While there’s undeniable charm in handmade items, the inherent structure and finished edges of the placemats give these organizers a polished, almost store-bought quality. Yet, they retain that wonderful touch of personal effort and unique design, making them truly special.
Unleash Your Creativity: Customization Ideas
The basic design is just a starting point. Feel free to adapt and expand upon it:
- Varying Pocket Sizes: Don’t feel limited to uniform pockets. Create wider sections for notebooks or tablets, and narrower ones for pens or lip balms.
- Add a Zippered Pouch: For extra security, sew a small zippered pouch onto one of the sections to hold coins, keys, or other valuables.
- Elastic Loops: Incorporate elastic loops along the top edge of some pockets to keep bottles upright or pens easily accessible.
- Key Clip: Sew a small loop of ribbon with a D-ring or carabiner inside a pocket for easy key attachment.
- Double-Sided Organizer: For larger bags, you can sew two placemat organizers back-to-back, or create an organizer that wraps around the interior, effectively doubling your storage capacity.
- Different Placemat Textures: Experiment with quilted placemats for extra padding or woven ones for a rustic look.
The Perfect Gift: Thoughtful and Practical
This placemat organizer isn’t just for personal use; it makes an incredibly thoughtful and practical gift. My initial idea was to create several for my colleagues, filling each with small goodies as a token of appreciation for our office party. Imagine their delight at receiving a stylish, handmade gift that genuinely helps them in their daily lives! People often admire handmade sewing projects, and this is one that truly combines beauty with utility, making it a guaranteed hit.
Beyond office parties, these organizers are fantastic for:
- Teacher Appreciation: Fill it with stationery or a gift card.
- Bridal Shower Favors: A practical gift for new brides to organize their essentials.
- Mother’s Day: A personal touch for any mom on the go.
- Graduation Gifts: Perfect for organizing new student essentials or professional gear.
- Birthdays or Just Because: A thoughtful gesture for anyone who appreciates organization.
A Life-Changer for Daily Organization
For me, this DIY placemat bag organizer has truly been a “life-changer.” It’s more than just an insert; it’s a system for organizing my entire life, because, let’s face it, a significant part of my life resides within my purse! Knowing exactly where everything is, from my charging cable to my emergency lip balm, reduces stress and increases efficiency. It brings a sense of calm to my daily routine, ensuring I’m always prepared and never fumbling. The joy of creating something so useful, and the happiness it brings both to me and to those I share it with, makes this project incredibly rewarding. It’s a testament to how a simple idea and a few basic materials can create something truly impactful.