
Mastering the Prairie Quilt: A Beginner-Friendly Guide to Combining Classic Blocks
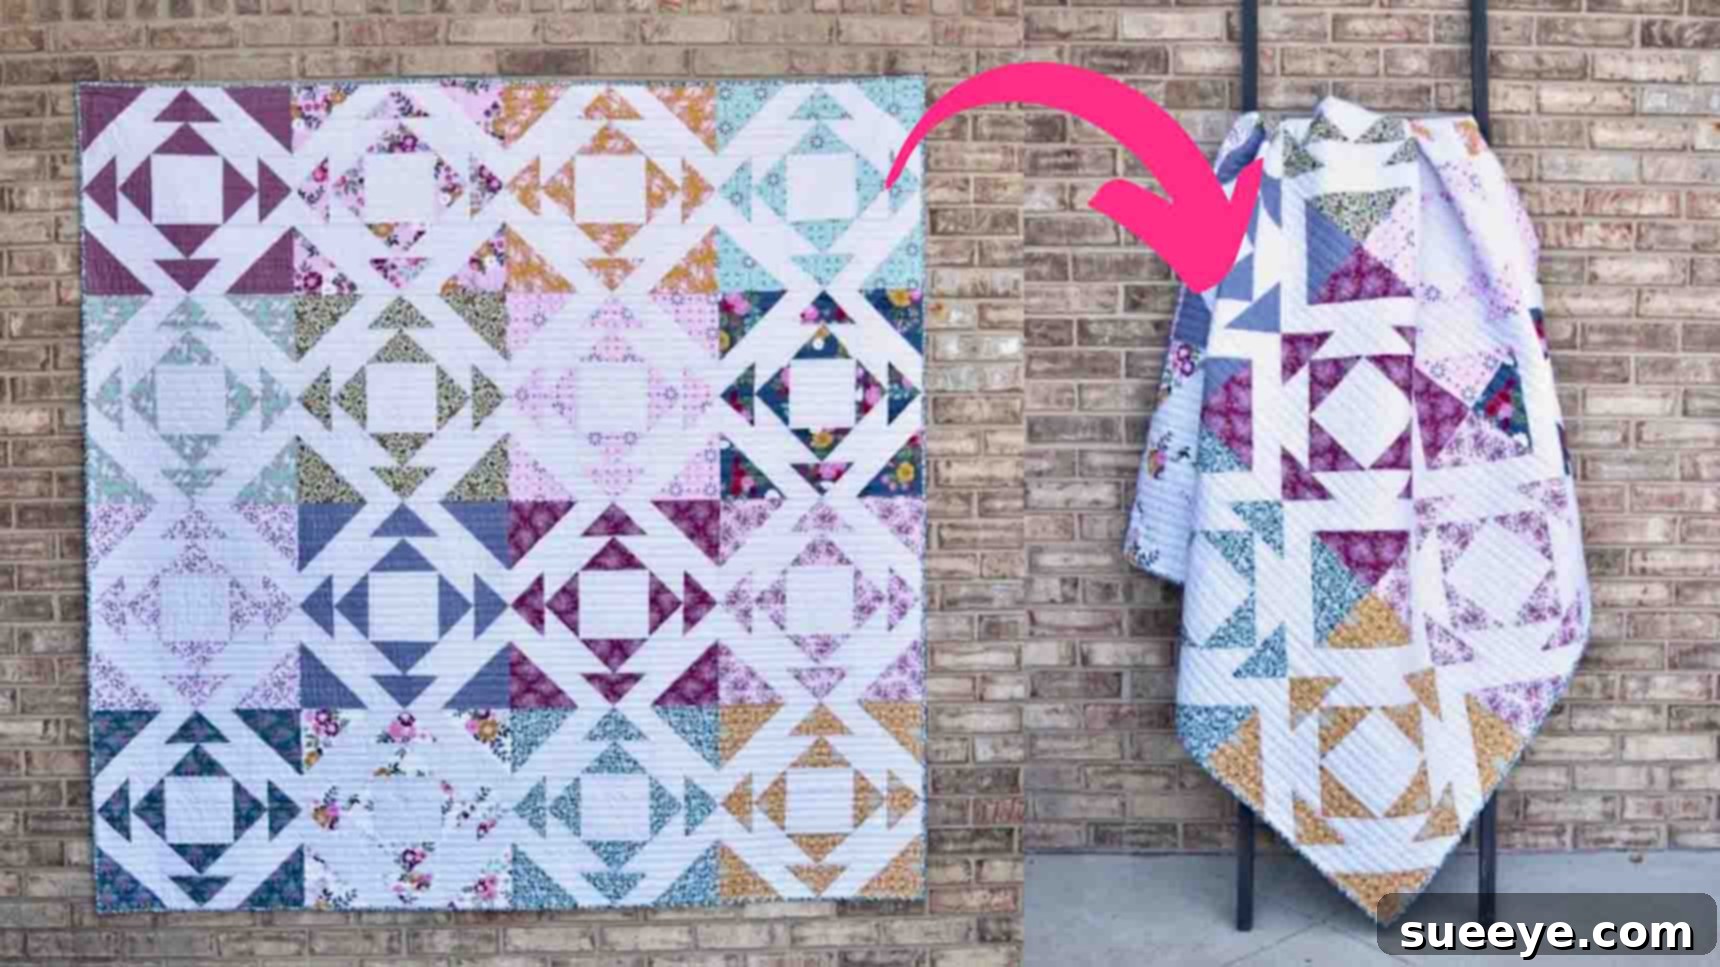
If you’re captivated by the timeless appeal of traditional quilt patterns and eager to create something both beautiful and achievable, then the Prairie Quilt is an excellent project for you. This design elegantly combines two beloved quilting staples: the Flying Geese block and the Half-Square Triangle (HST). What makes this particular Prairie Quilt tutorial, brought to you by the talented team at Material Girl Quilts on YouTube, truly special is its accessibility. It’s designed to be straightforward enough for beginners to confidently tackle, yet it yields a stunning result that seasoned quilters will also appreciate. Prepare to embark on a delightful quilting journey that will not only hone your skills but also leave you with a cherished handmade item. Dive into the detailed, step-by-step instructions below and discover the joy of piecing together your very own Prairie Quilt.
The allure of the Prairie Quilt lies in its harmonious blend of simplicity and visual impact. By strategically arranging HSTs and Flying Geese, a dynamic pattern emerges that evokes the vast, open landscapes and rustic charm of the prairies. This quilt isn’t just a collection of fabric squares; it’s a piece of art that tells a story, perfect for cozying up on the couch, decorating a bedroom, or gifting to a loved one. Even if you’re new to the world of quilting, with a little patience and attention to detail, you’ll be amazed at what you can create. Let’s gather our supplies and get ready to transform fabric into a masterpiece!
Essential Materials for Your Prairie Quilt Project
Before we begin piecing together our beautiful Prairie Quilt, it’s crucial to have all your materials and tools ready. High-quality fabrics and precise tools will make your quilting experience much more enjoyable and ensure a professional-looking finish. Here’s what you’ll need:
- 16 Fat Quarters: These pre-cut fabric bundles are perfect for providing a diverse range of prints and colors, adding depth and interest to your quilt.
- 3 ½ Yards of Background Fabric: Choose a solid or subtly patterned fabric that will allow your chosen fat quarters to truly pop. This fabric will form the foundation and provide contrast to your pieced blocks.
- 4 ½ Yards of Backing Fabric: This will be the underside of your quilt. While it won’t be seen as much, selecting a soft, coordinating fabric can enhance the overall comfort and aesthetic.
- ¾ Yard of Binding Fabric: The binding provides a neat and durable edge to your finished quilt. It can either match your background fabric for a cohesive look or provide a contrasting pop of color.
- Quilter’s Ruler: Essential for accurate cutting and measuring. A clear acrylic ruler with visible markings is highly recommended.
- Rotary Cutter: This tool, used with a self-healing mat, allows for incredibly precise and efficient cutting of fabric pieces, far superior to scissors for quilting.
- Fabric Pins or Clips: Used to hold fabric pieces together securely before sewing, ensuring accurate alignment.
- Sewing Machine: A reliable sewing machine is paramount for quilting, capable of handling multiple layers of fabric.
- Iron and Ironing Board: Crucial for pressing seams, which helps your blocks lie flat and keeps your quilt square.
- Thread: High-quality polyester or cotton thread that matches or blends with your fabrics.
Having these items on hand will streamline your process and prevent interruptions. Remember, proper preparation is the first step toward a successful and enjoyable quilting project.
Detailed Directions: Step-by-Step Prairie Quilt Construction
Now that you have all your materials, let’s dive into the exciting part: constructing your Prairie Quilt blocks. We’ll start by preparing the individual components – the Half-Square Triangles and Flying Geese – which are the building blocks of this charming design. Precision in cutting and sewing at each stage will contribute significantly to the overall beauty and integrity of your finished quilt.
Step 1: Preparing Your Fabric and Crafting Half-Square Triangles and Flying Geese Bases
The first step involves meticulous fabric cutting and the initial assembly of your Half-Square Triangles (HSTs) and the first stage of your Flying Geese units. For each quilt block, you’ll be cutting specific sizes from your fat quarters (print fabric) and background fabric.
- From your print fabric (fat quarters):
- Cut two pieces of 7 ¼-inch squares. These will be used for your Flying Geese units.
- Cut two pieces of 7-inch squares. These will be for your Half-Square Triangles.
- From your background fabric:
- Cut two pieces of 7-inch squares. These will also be used for your Half-Square Triangles.
- Cut one piece of 6 ½-inch square. This will be the central square of your quilt block.
- Cut eight pieces of 3 ⅞-inch squares. These smaller squares are critical for forming your Flying Geese units.
Creating Your Half-Square Triangles (HSTs):
The HSTs are key corner elements of your quilt blocks. To make these, take one of your 7-inch print squares and one of your 7-inch background squares. Place them right sides together, ensuring all edges are perfectly aligned. Using a fabric marker or pencil, draw a diagonal line from one corner to the opposite corner across the lighter fabric. This line will serve as your cutting guide later. Next, sew a seam ¼-inch on either side of this drawn diagonal line. Maintaining an accurate ¼-inch seam allowance is vital for block consistency. Once both seams are sewn, carefully cut directly along your drawn diagonal line. This will yield two individual triangle units. Press these units open, always pressing the seam allowance towards the darker fabric (or the background fabric in this case) to reduce bulk and help the block lie flatter. Repeat this process until you have a total of four Half-Square Triangles for the corners of your block. These should measure 6 ½ inches square once trimmed, though trimming will occur later.
Beginning Your Flying Geese Units:
Now, let’s start on the Flying Geese, which will frame the central part of your block. Take one of your 7 ¼-inch print fabric squares. This will be the “goose” portion. Then, take two of your 3 ⅞-inch background squares. Lay one of these smaller background squares right sides together onto one corner of the larger 7 ¼-inch print square. Repeat this with the second 3 ⅞-inch background square on the *opposite* corner of the larger print square. The small background squares should overlap the larger square, creating a sort of diagonal overlap. Draw a diagonal line across each of these smaller background squares, from the outer corner to the inner corner where it meets the larger square. Sew a seam ¼-inch on either side of these drawn diagonal lines. This technique allows you to create two flying geese units from a single starting square, saving time and increasing efficiency.
The precise cutting and careful sewing at this stage are foundational. Take your time to ensure your lines are straight and your seam allowances are consistent. This dedication to detail will pay off when your blocks come together beautifully.
Step 2: Completing Flying Geese and Assembling Your Quilt Block
With the initial cuts and seams made, we’re now ready to finalize our Flying Geese units and then bring all the components together to form a complete Prairie Quilt block. This step requires careful pressing and precise arrangement to achieve the distinctive look of the pattern.
Finalizing Your Flying Geese Units:
Once you’ve sewn ¼-inch on either side of the diagonal lines on your 7 ¼-inch print square (from Step 1), you will now cut directly on those drawn diagonal lines. This will separate the larger unit into two pieces. Carefully press these newly formed units open. It’s important to press the seam allowances towards the background fabric. This technique helps to “nest” seams later, reducing bulk when joining units. After these are pressed, you will notice that you have two incomplete Flying Geese units. To complete them, take another of your 3 ⅞-inch background squares (from your initial cut list). Place this small square right sides together onto the remaining open corner of each unit. Again, draw a diagonal line across the small background square, from the outer corner to the inner corner. Sew ¼-inch on either side of this newly drawn line. Once sewn, cut along the drawn line and press the seam open, once more pressing towards the background fabric. Voila! You have now successfully created two perfect Flying Geese units from one side of your starting 7 ¼-inch square. When starting with one 7 ¼-inch square and the four 3 ⅞-inch squares used in total, you will actually yield four complete Flying Geese units. To ensure you have enough for your block, you’ll need to create a total of eight Flying Geese units for each block, meaning you’ll repeat this entire process with two of your 7 ¼-inch print squares and eight 3 ⅞-inch background squares.
After creating all your Flying Geese, it is crucial to trim and square them up if necessary. Each finished Flying Geese unit should measure 3 ½ inches by 6 ½ inches. Use your ruler and rotary cutter to carefully trim any excess fabric, ensuring all units are consistent in size. This step is critical for accurate block assembly.
Assembling the Prairie Quilt Block:
With your Half-Square Triangles and Flying Geese units ready and trimmed, it’s time to arrange them into your final quilt block. This block will be constructed in a 3×3 grid layout, similar to a nine-patch, with a central square, corner units, and side units.
- Pairing the Flying Geese: You will have eight Flying Geese units per block. Sew these into four different pairs. For example, if your geese are pointing right, sew two together side-by-side to create a longer rectangular unit.
- Laying Out Your Block: Begin by placing your 6 ½-inch background square in the very center of your work surface. This is the heart of your block.
- Positioning the Half-Square Triangles: Take the four Half-Square Triangles you pieced earlier. These will go into the four outside corners of your block. Arrange them so that the “points” of the triangles are directed towards the center background square or towards the outside, depending on the desired visual flow of the prairie pattern. For this specific pattern, ensure the print fabric triangle points towards the outside of the block. Remember, your HSTs should be trimmed to 6 ½-inch squares.
- Adding the Flying Geese Pairs: The remaining four spots in your 3×3 grid will be filled by the four pairs of Flying Geese you created. Arrange these pairs so that the “geese” are pointing outwards, away from the center of the block. This outward direction is characteristic of the Prairie Quilt design and creates a sense of movement. Each paired Flying Geese unit should measure 6 ½ inches by 6 ½ inches after trimming and joining.
- Sewing into Rows: Once your layout is satisfactory, begin sewing the units together into three horizontal rows. First, sew the three units in the top row together, then the three units in the middle row, and finally the three units in the bottom row. Press your seams after each row is completed, alternating the direction of the seam allowances for easier nesting when joining rows.
- Joining the Rows: Finally, sew the three completed rows together. Carefully align the seams where the rows meet, using pins to hold them securely. Sew the top row to the middle row, press the seam, and then sew this combined unit to the bottom row. Press the final seam.
Congratulations! You have now completed one Prairie Quilt block. Take a moment to admire your work. Each block should now measure 18 ½ inches square (or desired finished size, usually 18 inches finished). The combination of HSTs and Flying Geese creates a beautiful, intricate design that looks far more complex than the individual steps suggest. Repeat these steps for all the blocks required for your desired quilt size. For a throw quilt, approximately 9-12 blocks might be sufficient, but adjust based on your personal preference and fabric availability.
Why Choose the Prairie Quilt Pattern?
The Prairie Quilt pattern is more than just a sequence of steps; it’s a journey into the heart of traditional American quilting with a timeless appeal. This pattern’s beauty lies in its elegant simplicity and the captivating movement created by the arrangement of its core components. Historically, patterns like the Prairie Quilt evoke a sense of heritage and connection to past generations of quilters who crafted warmth and beauty out of necessity and creativity. For modern quilters, it offers a perfect balance: enough complexity to be engaging, but not so overwhelming that it deters beginners. It’s a fantastic way to experiment with color theory, playing with contrasting prints and solids, and watching how different fabrics interact within the same block. Moreover, the modular nature of this design means you can easily adjust the overall size of your quilt by making more or fewer blocks, making it incredibly versatile for anything from a small wall hanging to a large bedspread.
Tips for Quilting Success and Customization
To ensure your Prairie Quilt project is a resounding success, consider these essential tips:
- Accuracy is Key: In quilting, a small error in cutting or seam allowance on one block can compound into significant issues when joining multiple blocks. Invest in good quality rulers and a sharp rotary cutter, and always double-check your measurements before cutting. Your ¼-inch seam allowance should be consistent throughout the project.
- Pressing Matters: Don’t underestimate the power of a good press. Pressing seams correctly (usually towards the darker fabric, or “open” for flatter results when joining many seams) helps your blocks lie flat and square, making assembly much easier and more precise.
- Chain Piecing: To save time and thread, especially when making multiple identical units like HSTs or Flying Geese, try chain piecing. Sew units one after another without lifting the presser foot or cutting the thread between them.
- Fabric Selection: While fat quarters offer variety, think about the overall palette. A consistent background fabric helps to unify disparate prints. Consider the contrast between your print fabrics and background fabric – good contrast makes the pattern pop!
- Customization: Feel free to personalize your quilt! Experiment with different color schemes (e.g., monochromatic, rainbow, seasonal). You could also incorporate sashing (strips of fabric between blocks) to give your quilt a different look and potentially a larger size.
Bringing Your Prairie Quilt to Life: Finishing Touches
Once all your blocks are sewn together and form the quilt top, your journey isn’t quite over. The next steps involve layering, quilting, and binding, which truly transform your quilt top into a finished, functional masterpiece. You’ll need to create a “quilt sandwich” by layering your backing fabric (right side down), batting (a soft filler layer), and your quilt top (right side up). This sandwich is then basted together using pins, spray, or thread. Following this, the quilt is “quilted” – stitched through all three layers to hold them together and add texture. This can be done by hand or machine, with simple straight lines or intricate free-motion designs. Finally, the binding fabric is cut into strips and sewn around the entire perimeter of the quilt, neatly finishing the edges and providing durability. Each of these steps contributes to the comfort, longevity, and aesthetic appeal of your finished Prairie Quilt.
We hope this detailed guide empowers you to create a stunning Prairie Quilt that you’ll cherish for years to come. Remember, quilting is a rewarding journey, and every stitch tells a part of your story. Happy quilting!