
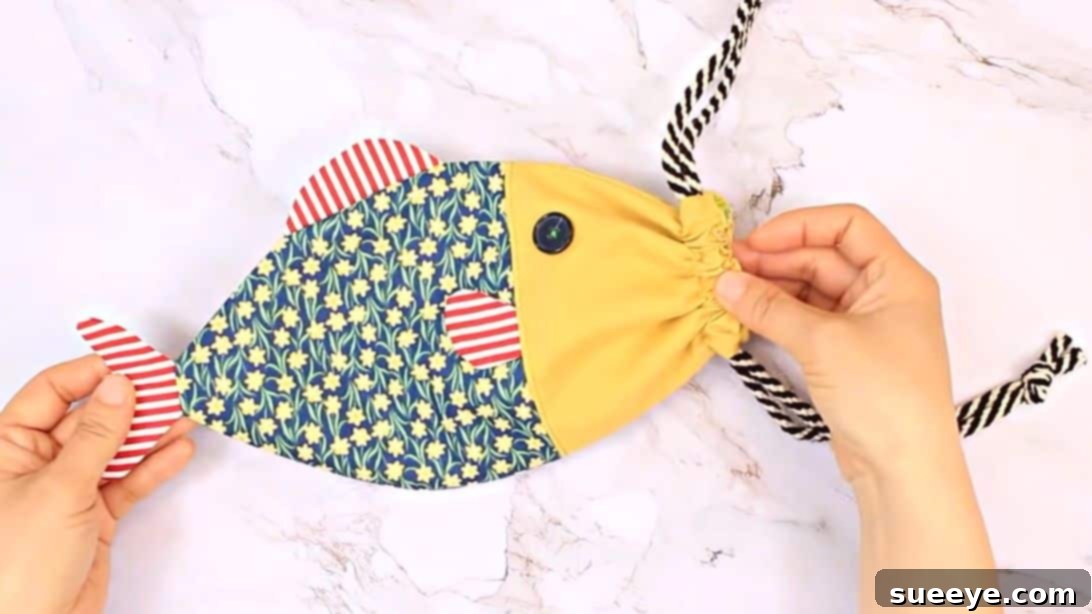
DIY Fish Drawstring Pouch: A Creative Way to Upcycle Fabric Scraps
Are you looking for a delightful way to utilize those beautiful fabric remnants from your previous sewing adventures? Look no further! This comprehensive tutorial will guide you through creating an irresistibly cute and incredibly functional DIY fish drawstring pouch. It’s a brilliant idea originally shared by sewingtimes on YouTube, and we’ve expanded it to provide an even more detailed, beginner-friendly experience for all crafting enthusiasts.
This project isn’t just about crafting; it’s about sustainable creativity, transforming what might be considered waste into charming, practical items. Whether you’re a seasoned sewer or just starting your crafting journey, this simple yet rewarding project is perfect for honing your skills, creating unique gifts for friends and family, or even launching your own line of handmade goods. Imagine these adorable pouches filled with small treasures, used as eco-friendly gift wrapping, or simply as a charming way to organize your essentials. Dive in and discover how easy it is to sew your very own fish-shaped drawstring bag!
This tutorial is designed to be clear, concise, and inspiring, ensuring that every stitch brings you closer to a beautiful finished product. We’ll cover everything from selecting your fabrics to adding those final, charming details. Get ready to give your fabric scraps a second life and bring a touch of aquatic whimsy to your everyday!
Essential Materials for Your Fish Drawstring Pouch
Before you begin this exciting sewing journey, gather all your materials. High-quality cotton fabrics are recommended for durability and ease of handling, especially for beginners. Remember, this is a fantastic opportunity to use up smaller pieces from your stash!
- Cotton Cord: You will need one piece of cotton cord, approximately 47-1/2 inches long (which is about 120 cm). The ideal diameter is around 0.2 inches (5mm). Choose a color that beautifully complements your selected fabric choices, as this will form the functional and visible drawstring of your pouch.
- Buttons: Select two small buttons, roughly 0.4-0.6 inches (1-1.5 cm) in diameter, to serve as the charming eyes of your fish. Classic black or dark brown buttons often provide a timeless look, but feel free to experiment with brightly colored buttons for added personality and whimsy.
- Basic Sewing Kit: Ensure you have your essential sewing tools: a reliable sewing machine (or a needle and thread if you prefer hand sewing), sharp fabric scissors, plenty of pins or fabric clips to hold pieces in place, a hot iron for pressing seams, a fabric marker or chalk for precise markings, and a ruler or measuring tape for accurate dimensions.
Fabric Pieces for the Outer Layer (Main Fish Body)
These precisely cut fabric pieces will form the visible, decorative exterior of your adorable fish pouch. Consider using coordinating patterns, contrasting solid colors, or a mix of textures for a truly dynamic and eye-catching look.
- 2 pieces – 4-7/8″ x 6-3/4″ (A): These two rectangular pieces will form the central upper part of the fish’s body, seamlessly connecting to the head and the area where the dorsal fin will be attached.
- 2 pieces – 6-3/4″ x 6-3/4″ (B): These two square pieces make up the main body sections of the fish, specifically where the pectoral fins are designed to be attached.
- 2 pieces – 4-5/8″ x 1-3/4″ (C): These narrower, elongated pieces are specifically designed for crafting the dorsal fin, which is the prominent fin located on the fish’s back.
- 2 pieces – 3-3/4″ x 2-1/4″ (D): These pieces will be meticulously shaped and used to create the charming and characteristic tail fin of your fish.
- 4 pieces – 2-1/4″ x 2″ (E): These four smaller square pieces are designated for crafting the pectoral fins, which are the middle fins situated on the sides of the fish’s body. You’ll create two for each side of the pouch.
Fabric Pieces for the Lining (Inner Pouch)
The lining gives your pouch a professional, neat finish, adds extra durability, and helps the pouch hold its shape. A solid, lighter-colored fabric often works best for the lining, making it easier to see contents inside and providing a clean contrast.
- 2 pieces – 10-7/8″ x 6-3/4″ (F): These two larger rectangular pieces will form the complete inner lining of your fish pouch, providing a clean interior for your belongings.
Detailed Step-by-Step Instructions: Crafting Your Fish Drawstring Pouch
Follow these instructions carefully, taking your time with each step for the best results. Unless specified otherwise, a consistent 1/4 inch (approximately 0.6 cm) seam allowance is generally used throughout this project to maintain uniformity and neatness.
Step 1: Preparing the Fins – Dorsal, Tail, and Pectoral
The first step involves shaping the various fins that will bring your fish to life. Precision here ensures a symmetrical and appealing final shape, so take your time with the drawing and cutting.
- Dorsal Fin (C pieces): Get one piece of fabric labeled ‘C’. Using your fabric marker or chalk, carefully draw the desired shape of the dorsal fin onto one side. This is the upper fin of the fish, so imagine a gentle, elegant curve that tapers slightly.
- Tail Fin (D pieces): Next, retrieve one piece of fabric labeled ‘D’. Measure 1-1/2 inches (approximately 3.8 cm) from the top edge along the *middle* of the fabric and make a small mark. From this central mark, draw lines extending neatly to both bottom corners of the fabric. This will form the distinct ‘V’ or gentle curved shape characteristic of a fish’s tail.
- Pectoral Fins (E pieces): Retrieve two pieces of fabric labeled ‘E’. On each piece, draw the shape for one pectoral fin (these are the middle fins located on the fish’s sides). These shapes are typically a gentle teardrop or a slight, elongated curve.
- Cutting and Sewing Fins: Once your fin shapes are meticulously drawn on one piece of each corresponding fabric (one C, one D, and two E pieces), take the *remaining* piece(s) for each fin (one C, one D, and two E pieces). Place the drawn pieces directly on top of their respective remaining pieces, ensuring their “right sides” (the decorative or intended outer side of the fabric) are facing each other. Secure these stacked layers firmly with pins or fabric clips to prevent any shifting during cutting.
- Carefully cut out each fin shape using sharp fabric scissors, cutting through both layers simultaneously. This crucial step ensures that you have two perfectly identical, mirrored pieces for each fin, which is essential for a symmetrical fish.
- Now, take each pair of cut fin pieces (dorsal, tail, and pectoral). With right sides still together, sew along the curved or drawn edge with a 1/4 inch (0.6 cm) seam allowance, leaving the straight edge open. This open edge will be used for attaching the fin to the main body.
- Once sewn, carefully trim the seam allowance slightly, especially around any curves, to reduce bulk and allow for a smoother turn. Carefully flip each fin piece right side out through its open end. Use a point turner or a blunt object (like a chopstick) to gently push out the curves and corners for a crisp, well-defined shape.
- Finally, press each fin flat with a warm iron. This gives them a professional, finished look and helps them maintain their shape. You now have all your various fins ready for attachment to the fish body!
Step 2: Attaching Pectoral Fins to the Main Body Sections
This step involves precisely placing the pectoral fins onto the ‘B’ fabric pieces, ensuring they mirror each other for a perfectly symmetrical fish body. Accuracy here is key for a balanced final look.
- First B Piece: Take one of your ‘B’ fabric pieces. Lay it flat with the right side facing up. Measure 3-5/8 inches (approximately 9.2 cm) down from the top edge, along the *left* side of the fabric. At this precisely marked point, carefully position one of your prepared pectoral fins. The straight, raw edge of the fin should align perfectly with the side edge of the ‘B’ fabric, and the graceful curved part of the fin should point inwards, away from the side. Pin or clip the fin firmly in place to secure it.
- Second B Piece: Now, take the *remaining* ‘B’ fabric piece. This time, measure 3-5/8 inches (approximately 9.2 cm) down from the top edge, along the *right* side of the fabric. Attach the second pectoral fin here, ensuring it is positioned to *mirror* the first fin you just placed. The curved edge should again face inwards. This mirroring is absolutely crucial for the fish to look correct and symmetrical when the pouch is fully sewn together.
- Secure Fins: To prevent any shifting in subsequent steps, briefly baste (sew with large, temporary stitches) or sew a small seam allowance (e.g., 1/8 inch or 0.3 cm) along the raw edge of each fin. This secures it temporarily to its respective ‘B’ fabric piece, keeping it perfectly aligned.
Step 3: Joining Body Sections (A and B Pieces)
Now we connect the upper ‘A’ pieces to the ‘B’ pieces, forming the main structure of the fish’s body and neatly encasing the pectoral fins within the seams.
- Align A and B: Take one ‘A’ fabric piece and place it directly on top of one ‘B’ fabric piece (the one with an attached pectoral fin). Ensure their right sides are facing each other, creating a sandwich effect. Carefully align the top raw edge of the ‘A’ piece with the corresponding top raw edge of the ‘B’ piece. The pectoral fin should be sandwiched neatly and securely in between these two layers.
- Pinning: Secure these layers firmly with pins along the seam line where they will be joined. Pay extra close attention around the fin area to ensure it doesn’t get caught incorrectly or shift out of place during sewing.
- Sewing: Using your sewing machine, sew them together along the aligned edge with a precise 3/8 inch (approximately 1 cm) seam allowance. Repeat this entire process for the other ‘A’ and ‘B’ fabric pair, creating two identical halves of your fish body.
- Pressing Seams: Once sewn, gently press the seam allowance *open* with your fingers or a seam roller. Then, press the entire seam allowance towards the ‘A’ fabric (often referred to as the “yellow fabric” in the original context, implying a specific color choice for the ‘A’ pieces). This helps the seam lie flat and creates a clean line.
- Topstitching: To further secure and neaten the seam, sew a topstitch along the seam line on the ‘A’ fabric side, positioned approximately 1/8 inch (0.3 cm) from the original seam. This topstitching adds a professional, decorative finish and helps the seam to lie perfectly flat, preventing it from flipping up.
Step 4: Shaping the Fish’s Head and Preparing the Lining
This step involves creating the distinctive curved head of the fish and then cutting the lining pieces to precisely match the outer body shape. Accuracy here is vital for a well-formed pouch.
- Fold and Mark: Take one of the sewn ‘A’ and ‘B’ composite pieces (which now forms one half of your fish body). Fold it neatly in half lengthwise, with the right sides of the fabric together. Lay it flat on your cutting surface. From the folded edge of the ‘B’ fabric section, measure 5/8 inch (approximately 1.6 cm) inwards and make a precise mark using your fabric chalk or marker.
- Draw the Curve: Starting from the top right edge of the *seam* (where the ‘A’ and ‘B’ pieces gracefully join), draw a smooth, gentle, and elegant curve downwards, connecting to the mark you just made. This beautifully drawn curve will form the mouth and head area of your fish pouch.
- Cut the Curve: While the fabric is still perfectly folded, carefully cut along the drawn curve with sharp fabric scissors. Cutting it while folded ensures that both sides of the fish’s head are perfectly symmetrical and mirror each other.
- Prepare Lining Pieces (F): Now, retrieve your two ‘F’ fabric pieces (which will form the lining). Place one ‘F’ piece directly underneath the main fish body piece you just cut, ensuring their bottom edges and one side edge align perfectly. This ‘F’ piece will now serve as your first lining pattern.
- Next, place the *second* main fish body piece (the one that hasn’t been cut yet) on top of the stack, with its right side facing down.
- Cut Remaining Fabrics: Using the *first* cut fish body piece (the one with the head curve) as your ultimate template, carefully cut the excess fabric from the *second* main fish body piece and both ‘F’ lining pieces. This crucial step ensures that all four layers (two outer body pieces and two lining pieces) have the exact same contour, making the subsequent assembly much easier, more precise, and resulting in a beautifully consistent pouch.
Step 5: Attaching Dorsal Fin, Tail, and Eyes
Now it’s time to bring even more definition and character to your fish by attaching the remaining fins and adding those charming button eyes. This stage truly starts to define your pouch’s personality.
- Separate Pieces: Gently separate all the meticulously cut pieces. For now, set the two ‘F’ lining pieces neatly aside, as they will be used in a later step.
- Dorsal and Tail Fin Attachment: Take one side of your main fish body. Carefully position one of the prepared dorsal fins onto the upper curve of the fish’s back, aligning its raw edge precisely with the raw edge of the body fabric. Pin it securely in place. Similarly, take one of the prepared tail fins and place it onto the end of the fish, aligning its raw edge with the body fabric.
- Sewing Fins: Stitch the dorsal fin and the tail fin in place with a 1/4 inch (0.6 cm) seam allowance. Alternatively, you can briefly baste them to hold them temporarily before securing them with a permanent seam. Repeat this process for the other side of the fish body with the remaining dorsal and tail fins.
- Trim Excess: After sewing, carefully trim any excess fabric from the back of the fins. This step ensures that the seam allowances are neat, even, and reduce bulk, allowing the fins to lie flat.
- Attaching Eyes: On the upper part of the ‘A’ fabric section, just beside the seam where ‘A’ and ‘B’ gracefully join, carefully hand-sew one of your chosen buttons to serve as the fish’s eye. Repeat this for the other side of the fish with the second button. Ensure both eyes are positioned symmetrically and at a consistent height on both sides for a balanced and endearing look.
Step 6: Assembling the Pouch – Outer and Lining Layers
This is a crucial step where the outer fish body and the inner lining are meticulously brought together, creating the fundamental structure of the pouch and strategically leaving openings for turning and the all-important drawstring.
- Lining Preparation: Take your two ‘F’ lining pieces. Place them right sides together, ensuring all edges align perfectly. Sew along the straight bottom edge with a precise 3/8 inch (1 cm) seam allowance. After sewing, press this seam allowance open with a warm iron for a flatter, neater finish. This creates the bottom of your lining.
- Joining Outer Fish Body: Place the two completed outer fish body pieces (with fins and eyes beautifully attached) right sides together. Align all raw edges carefully around the entire perimeter. Secure with plenty of pins or clips, paying special attention to aligning the seams where the ‘A’ and ‘B’ pieces meet to ensure a smooth transition.
- Securing Tail: This is a *crucial* detail: carefully fold the tail fin inwards slightly so that it is tucked well away from the raw edge of the fish body. This prevents you from accidentally sewing over the tail, which should remain free and unattached at this stage.
- Marking Openings for Drawstring Casing: On the *top curved edge* of the fish (where the mouth will eventually be), measure 3/4 inch (approximately 1.9 cm) from both the left and right sides and mark these points precisely. These marks indicate where your sewing will begin and end for the drawstring casing. The small space between these marks will remain open, forming the entry points for your cord.
- Marking Opening for Turning: On the bottom straight edge of the *lining* pieces (where you just sewed the seam), mark a section of about 2-3 inches (5-7.5 cm) in the middle. This strategically placed section will be the opening through which you will turn the entire pouch right side out later.
- Sewing Outer and Lining Layers Together: Now, place the *lining* (which you prepared in step 6.1) on top of the *outer fish body* (which you pinned in step 6.2), ensuring their right sides are facing each other. The outer fish body and lining should be perfectly aligned around their entire perimeter.
- Carefully sew all around the perimeter of these combined layers with a consistent 3/8 inch (1 cm) seam allowance. *Remember to precisely leave the marked openings:* the two small openings at the top of the fish for the drawstring, and the larger opening at the bottom of the lining for turning. Backstitch securely at the beginning and end of each sewing section to reinforce the stitches and prevent them from unraveling.
- Clip Curves: Before turning the pouch, carefully clip the curves. This means making small cuts perpendicular to the seam line, *without cutting through the actual stitches*, around the head and tail sections. This essential step helps the fabric to lie flat and smooth when the pouch is turned right side out, preventing unsightly puckering.
Step 7: Finishing the Pouch – Turning, Closing, and Topstitching
You’re almost there! This step refines the shape of your fish pouch and meticulously prepares the channel for the drawstring, bringing your creation closer to completion.
- Turning Right Side Out: Carefully reach your hand into the turning opening you thoughtfully left in the lining in the previous step. Gently pull the entire pouch through this opening until it is completely right side out. Take your time with this process, carefully working the fabric slowly, especially around the delicate fins and curves, to avoid straining the seams.
- Close Lining Opening: Once the pouch is fully turned, gently press the raw edges of the opening in the lining inwards, so they are neatly tucked away. Stitch this opening closed either by hand (using a ladder stitch for an invisible and professional finish) or by machine, very close to the edge. Once closed, carefully push the entire lining neatly inside the fish pouch, ensuring it sits smoothly.
- Create Drawstring Casing: Now, focus your attention on the top opening of the fish (the mouth area). Press the fabric nicely, ensuring all raw edges are smoothly tucked inwards. Make a precise topstitch all the way around the mouth of the fish, positioned approximately 1/8 inch (0.3 cm) from the folded edge. This first line of stitching provides stability and a clean edge.
- Second Topstitch for Casing: To create the actual channel (or casing) for the drawstring cord, sew a second distinct line of topstitching all the way around the mouth of the fish. This line should be placed approximately 3/4 inch (1.9 cm) from your first topstitch line. This creates a clear, defined tunnel through which the cord will be effortlessly threaded, forming the functional drawstring mechanism.
Step 8: Inserting the Drawstring and Final Touches
The final steps complete your adorable fish pouch, making it fully functional and ready to use or gift. This is where your hard work truly pays off!
- Prepare the Cord: Take your long cotton cord (the 47-1/2 inch piece you prepared earlier). Cut it precisely into two equal pieces. Each piece should now be approximately 23-3/4 inches (about 60 cm) long.
- Thread the First Cord: Attach a safety pin or a bodkin (a specialized tool for threading elastic or cord) to one end of the first cord piece. Starting from one of the small side openings in the drawstring casing (the 3/4 inch gaps you deliberately left open in Step 6), thread the cord all the way around the casing until it emerges from the *same opening* where you started. Ensure that both ends of this cord are even in length.
- Thread the Second Cord: Take the second cord piece. Attach a safety pin or bodkin to one end. This time, start threading it from the *other side opening* in the drawstring casing. Thread it all the way around until it emerges from the *same opening* where you started. At this point, you should have two cord ends coming out of each of the two side openings in the casing.
- Knotting: Carefully gather the two ends of the first cord piece (the ones emerging from one side opening) and tie them securely together in a neat knot. Repeat this exact process for the two ends of the second cord piece. Trim any excess cord beyond the knots for a clean and tidy finish.
- Admire Your Work: Gently pull both drawstrings simultaneously to close the fish’s mouth. Marvel at your beautiful, handmade DIY Fish Drawstring Pouch! It is now fully complete and ready to hold your treasures or be gifted to a loved one.
Why Sew a DIY Fish Drawstring Pouch?
Beyond being an incredibly fun and engaging craft project, creating this charming fish drawstring pouch offers a multitude of wonderful benefits and reasons to pick up your needle and thread:
- Eco-Friendly Upcycling: This project is a fantastic and responsible way to give new life to those lovely fabric scraps and remnants that might otherwise go to waste. Embrace sustainability and reduce textile waste in your crafting!
- Unique Handmade Gifts: These adorable pouches make incredibly thoughtful, personalized, and memorable gifts for birthdays, holidays, teacher appreciation, or just because. Fill them with small candies, tiny toys, jewelry, or even a heartfelt note for an extra special touch that store-bought gifts can’t match.
- Skill Building for All Levels: For beginners, this is an excellent and manageable project to practice fundamental sewing techniques such as accurate cutting, sewing curves, precisely attaching small details, creating neat linings, and constructing functional casings. Even experienced sewers will enjoy the quick gratification and creative freedom.
- Versatile Storage Solutions: These pouches are perfect for organizing a wide array of small items. Think makeup, delicate jewelry, small craft supplies, loose change, headphones, chargers, or even as a unique, reusable lunch bag for snacks and small edibles.
- Personal Expression and Creativity: The choice of fabrics allows for immense personal expression. Select prints and colors that truly reflect your personality or the tastes of the intended recipient, making each pouch genuinely one-of-a-kind and a reflection of your unique style.
- Potential for Profit: If you thoroughly enjoy making them and produce high-quality finishes, these cute pouches can be a surprisingly popular item to sell. Market them at local craft fairs, online marketplaces like Etsy, or even small local boutiques.
- Mindfulness and Relaxation: The process of sewing, with its repetitive motions and focused attention, can be incredibly therapeutic and meditative, offering a wonderful break from daily stresses.
Creative Variations & Tips for Your Fish Pouch
Once you’ve mastered the basic fish pouch, don’t hesitate to unleash your creativity! Here are some ideas to customize and enhance your next creation, along with valuable sewing tips:
- Explore Fabric Choices: Experiment boldly with different fabric textures and prints. While quilting cottons are ideal for their ease of use, you could try linen blends for a rustic feel, denim scraps for durability, or even small pieces of faux leather or vinyl for unique textures and a more modern look (note: these might require a different needle and foot on your machine).
- Add Embellishments: Give your fish even more character! Consider adding small embroidered details like tiny scales, bubbles, or fins with contrasting thread. Fabric paint can be used for patterns, and beads or sequins can add a playful sparkle. Just ensure any embellishments are securely attached, especially if the pouch will be handled frequently.
- Adjust the Size: Want a bigger fish pouch to hold a small book or a tablet, or a smaller one for just coins and trinkets? Adjust all the pattern pieces proportionally. Remember to also adjust the cord length accordingly to match the new size of your pouch.
- Design Different Fins: While this pattern provides specific, charming fin shapes, you are encouraged to design your own unique fin styles! Imagine longer, flowing fins, or more angular, stylized fins for a truly custom fish.
- Drawstring Alternatives: Instead of traditional cotton cord, consider using satin ribbon for a luxurious touch, braided fabric strips made from leftover scraps for an eco-friendly look, or even thin leather laces for a more sophisticated and durable finish.
- Practice Makes Perfect: If it’s your first time sewing curves, don’t get discouraged. Practice on scrap fabric a few times before working on your main project. Don’t be afraid to unpick stitches if something isn’t quite right – seam rippers are a sewer’s best friend, and it’s an essential part of the learning process!
- Maintain Sharp Tools: Always use sharp fabric scissors (never use them on paper!) and insert a fresh needle into your sewing machine before starting a new project. A sharp needle prevents skipped stitches and fabric snags, making a huge difference in the quality of your stitches and cuts. Clean cuts and smooth stitching are hallmarks of a well-made item.
- Pressing is Key: Don’t underestimate the power of your iron. Pressing after each sewing step (not just at the end) can make a significant difference in the professional appearance and crispness of your finished pouch.
Congratulations on completing your beautiful DIY Fish Drawstring Pouch! We hope you thoroughly enjoyed this rewarding project and are absolutely thrilled with your new, charming creation. Share your finished fish pouches with us online, inspire others to dive into the wonderful world of sewing and upcycling, and keep crafting! Your unique handmade creations are sure to bring a smile to anyone who sees them.