
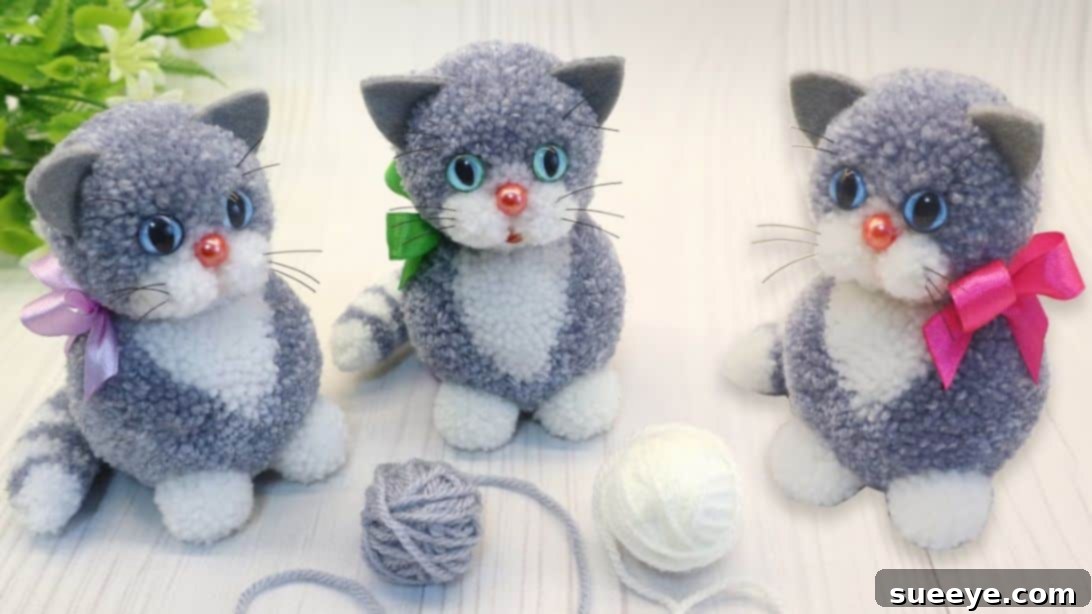
Craft Your Own Adorable DIY Pom-Pom Kitten: An Easy Yarn Project
Unleash your creativity and dive into the enchanting world of yarn crafting with this delightful DIY project. We’re thrilled to share a simple yet incredibly rewarding tutorial, originally inspired by the brilliant craftsmanship of MARLENA-Hand Made on YouTube, that guides you through creating your very own adorable pom-pom kitten entirely out of yarn. This charming handmade craft is not just a project; it’s an opportunity to create something truly special, whether you’re looking for unique home decor, a heartfelt gift box filler, or a standout present for a cat lover.
Crafting these fluffy feline friends is a fantastic way to unwind, express your artistic side, and even involve younger family members in a fun, engaging activity. The beauty of this project lies in its simplicity and the speed with which you can bring these tiny creatures to life. With just a few basic materials and minutes of your time, you can transform ordinary yarn into an irresistible, cuddly companion.
One of the most exciting aspects of making these yarn kittens is the endless potential for personalization. Imagine a miniature kitten charm for your keychain, a larger, more prominent display piece for your living room, or a collection of multi-colored kittens in various sizes to adorn a nursery. You have complete creative control over the size, color, and even the personality of your kitten, making each one a unique reflection of your style. Whether you prefer a classic grey tabby, a pristine white Persian, or even a whimsical rainbow cat, the yarn is your canvas. Follow our detailed instructions below, and for an even clearer visual guide, be sure to watch the original video tutorial.
Looking for more charming yarn ideas? Check out this Easy DIY Yarn Pom-Pom Chick Tutorial for another delightful project!
Essential Materials for Your DIY Pom-Pom Kitten
Gathering your supplies is the first exciting step towards bringing your yarn kitten to life. Most of these items are readily available at craft stores or even around your home. Choosing the right materials will ensure your kitten is not only adorable but also durable.
- Yarn: We recommend using a good quality acrylic or wool blend yarn for its softness and ability to hold shape. Classic white and gray yarn are perfect for a realistic kitten look, but don’t hesitate to experiment with other colors like cream, black, ginger, or even vibrant pastels to create unique characters. The weight of the yarn (e.g., worsted weight) will influence the fluffiness and density of your pom-poms.
- Gray Felt: A small piece of gray felt is ideal for crafting the delicate ears, adding a nice textural contrast to the fluffy body. You can match the felt color to your yarn or choose a contrasting shade for a playful touch.
- Glass Eyes or Beads (8mm): These are crucial for giving your kitten its expressive face. 8mm glass eyes offer a realistic sheen, while small beads provide a simpler, button-eyed charm. Safety eyes, commonly used in amigurumi, are another excellent, child-friendly alternative.
- Bead for the Spout (8mm): A single 8mm bead will serve as the kitten’s adorable nose. Black or pink beads work wonderfully for this purpose, adding a cute focal point to the face.
- Half-Bead for the Mouth: A small half-bead can be used to form a sweet, subtle mouth. Alternatively, you can use embroidery floss to stitch a charming smile or a small inverted “Y” shape.
- Black Fishing Line: This thin, sturdy line is perfect for creating realistic whiskers that stand out. You can also use fine black embroidery thread or thin craft wire for a similar effect.
- Fork: A standard kitchen fork is ingeniously repurposed as a mini pom-pom maker for smaller components like the feet and cheeks.
- Scissors: A sharp pair of craft scissors is essential for precise cutting and shaping of your pom-poms.
- Hot Glue Gun and Glue Sticks: A hot glue gun provides a quick and strong bond for assembling the various parts of your kitten, ensuring all features stay securely in place.
- Toothpick: A toothpick is helpful for applying small amounts of glue, positioning tiny elements, and providing structural support during assembly.
How to Create Your DIY Pom-Pom Kitten: Step-by-Step Tutorial
Before you begin, ensure your workspace is clean and organized. Having all your materials within reach will make the crafting process smooth and enjoyable. Remember, patience is key, especially when shaping the pom-poms for that perfect fluffy finish.
Step 1: Crafting the Kitten’s Head
The head is arguably the most defining feature of your kitten, giving it character and charm. We’ll create a multi-layered pom-pom using a cardboard template for a perfectly rounded shape.
- Start by preparing two cardboard templates. Cut one piece to a width of 6.5 cm (approximately 2.5 inches) and another to 5 cm (approximately 2 inches). These will act as your winding guides. Carefully cut a slit down the middle, lengthwise, in each template, as demonstrated in the video tutorial. This slit is crucial for tying off your pom-pom later. For the kitten’s head, we will use the smaller, 5 cm template.
- To begin forming the head, take a piece of gray yarn, long enough to tie a secure knot, and insert it through the lengthwise slit of your 5 cm cardboard template. Let the ends hang out on either side. Next, grab a continuous strand of gray yarn and begin wrapping it around the template crosswise. For the main body of the head, wrap this gray yarn approximately 110 times. Immediately beside this gray section, wrap white yarn about 30 times. This combination creates a lovely two-tone effect, mimicking a natural kitten’s markings.
- Once you’ve completed your wrapping, use the initial piece of gray yarn that you threaded through the slit to tie the wrapped yarn bundle together very tightly. Carefully remove the looped yarn from the cardboard template. Pull the yarn tight around the center of the loop and knot it securely to form the first part of your pom-pom. Now, repeat the wrapping process using only gray yarn, wrapping it around the same 5 cm template approximately 140 times, and tie it off as you did before.
- Place these two tied yarn bundles directly on top of each other, ensuring they are perfectly aligned. Use a separate strong piece of yarn to tie them together very tightly at their centers. This creates a denser, fuller pom-pom. Once securely tied, insert your scissors into the loops around the edges of the pom-pom and carefully cut through all the loops. After cutting, gently fluff out the yarn, then meticulously trim it with your scissors until you achieve a perfectly round, dense, and uniform shape for the kitten’s head. Set this aside carefully.
Step 2: Constructing the Body and Feet
The body forms the main structure of your kitten, and the tiny feet add an adorable touch, giving your creation a grounded look.
- For the kitten’s body, retrieve the larger 6.5 cm cardboard template. Following the same technique used for the head, thread a tying strand of yarn through the slit. Wrap gray yarn around the template approximately 160 times for the main body section. Beside this, wrap white yarn about 40 times to create a lovely two-tone effect similar to the head. Tie these sections together securely. Then, create another separate yarn bundle, this time wrapping only gray yarn around the template approximately 200 times, and tie it off tightly.
- Combine these two body sections by placing them on top of each other and tying them together very securely at their centers. This ensures a full and robust body. Once tied, carefully cut through all the yarn loops around the edges. Fluff out the yarn thoroughly and then meticulously trim it, shaping it into a neat, round ball that will serve as the kitten’s main body. Set this fluffy ball aside.
- Now, for the kitten’s adorable little feet! Grab a standard kitchen fork. Take white yarn and begin wrapping it around all the prongs of the fork approximately 40 times. Once wrapped, carefully slip a piece of yarn through the middle prongs and tie the wrapped yarn tightly at its center. Gently slide the tied bundle off the fork. Insert your scissors into the loops and cut them all open. Fluff the yarn out and trim it until it forms a small, neat, round pom-pom. You will need to make a second identical piece for the other foot, ensuring both feet are uniform in size and shape.
Step 3: Creating the Tail, Cheeks, and Final Assembly
These smaller details truly bring your kitten to life, giving it character and charm. The assembly phase is where all your hard work comes together!
- To craft the kitten’s distinctive tail, we’ll use the fork again for a segmented, striped look. Begin by wrapping white yarn around the fork approximately 15 times. Tie this section tightly with a long strand of yarn, leaving the ends long for later use. Next, wrap gray yarn 15 times directly beside the white section on the fork. Use one of the excess tail strands from the previous white looped yarn to tie this gray section securely to the white one. Continue repeating these steps, alternating between white and gray yarn segments, wrapping each 15 times and tying them together, until your tail reaches the desired length and segmented pattern as demonstrated in the video. Once satisfied, carefully cut through all the loops along the sides of the tail. Gently fluff out the yarn and meticulously trim it to achieve a tapered, natural-looking tail shape.
- For the rosy cheeks, wrap white yarn around just three prongs of the fork approximately 20 times. This creates a smaller, denser pom-pom. Tie the wrapped yarn tightly at its center and remove it from the fork. Cut through the loops, fluff it out, and trim it into a small, neat ball. Create a second identical piece for the other cheek, ensuring they are perfectly matched.
- Now for the exciting assembly phase! Take a toothpick and carefully insert it vertically through the center of the kitten’s body. Apply a small dab of hot glue to the exposed end of the toothpick on the body, then gently push the kitten’s head down onto the toothpick, adhering it securely to the body. This provides structural integrity and ensures the head stays upright. Next, prepare the felt ears (cut two small, triangular shapes from gray felt), the 8mm glass eyes or beads, the 8mm nose bead (spout), and the half-bead for the mouth. Using your hot glue gun, carefully adhere these features onto the kitten’s head, paying close attention to their placement to create an endearing expression. Finally, cut several short pieces of black fishing line for the whiskers and meticulously glue them in place around the nose. Allow all glue to dry completely.
Your adorable DIY pom-pom kitten is now complete!
Beyond the Basic Kitten: Customization and Creative Ideas
While the basic grey and white kitten is incredibly cute, don’t stop there! This project is a fantastic canvas for your imagination. Here are some ideas to make your pom-pom kittens even more unique:
- Size Variations: Experiment with different template sizes or pom-pom makers to create kittens of various scales. Tiny ones can become charming keychains or delightful earrings, while larger versions make fantastic desk buddies or nursery decorations.
- Color Palettes: Unleash your inner artist with color! Use solid colors like black, orange, or calico patterns. Imagine a fantasy kitten with vibrant blues, purples, or rainbow stripes. You can even use variegated yarn for a quick, multi-color effect.
- Accessories: Dress up your kittens! Add a tiny ribbon bow around its neck, a small felt collar, or even a mini fabric cape. You could even glue a little bell for a jingle.
- Expressions: Change the eyes or mouth for different moods. Use sleepy half-closed eyes made from felt, or embroider a playful smirk instead of a bead mouth.
- Themed Kittens: Create kittens for different seasons or holidays. A red and green kitten for Christmas, or one with a tiny witch hat for Halloween.
Why Crafting Your Own Pom-Pom Kitten is More Than Just a Project
Engaging in DIY crafts like this pom-pom kitten project offers numerous benefits beyond just creating an adorable object:
- Stress Relief: The repetitive motion of wrapping yarn and the focus required can be incredibly meditative and calming, providing a wonderful escape from daily stress.
- Boosts Creativity: From choosing colors to adding unique details, this project encourages creative thinking and personal expression.
- Develops Fine Motor Skills: Cutting, wrapping, and meticulously assembling small parts are excellent for developing and refining fine motor skills, beneficial for both children and adults.
- Sense of Accomplishment: There’s immense satisfaction in seeing your yarn transform into a charming, tangible creation. It’s a wonderful confidence booster!
- Perfect for Gifting: Handmade gifts carry a special sentiment. A pom-pom kitten made with love is a thoughtful present for birthdays, baby showers, or just to brighten someone’s day.
Conclusion: Your Next Favorite Crafting Adventure Awaits
We hope this detailed guide empowers you to create your own collection of delightful DIY pom-pom kittens. This project is a testament to how simple materials and a little imagination can yield truly enchanting results. Whether you’re a seasoned crafter or a complete beginner, the joy of bringing these fluffy felines to life is an experience you won’t want to miss. They make wonderful additions to any home, thoughtful gifts, and provide a fantastic way to spend a creative afternoon.
Don’t forget to share your amazing creations with us! We love seeing how you personalize your yarn kittens. Grab your yarn, your scissors, and let the crafting magic begin!
*All image credit belongs to MARLENA-Hand Made via YouTube. Follow and subscribe to her channel for more inspiring DIY projects!*