
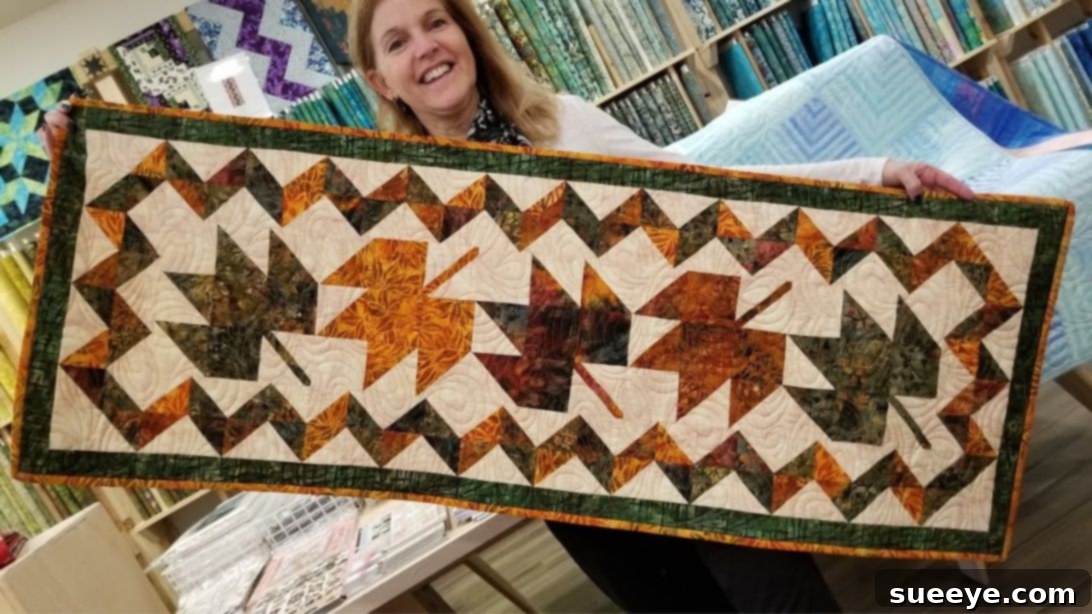
As the vibrant hues of summer gently give way to the warm, earthy tones of autumn, there’s no better time to infuse your home with the cozy spirit of the season. If you’re searching for the perfect fall decorating project that combines creativity with a touch of handmade charm, look no further than a stunning Maple Leaf Table Runner. This exquisite quilt pattern, inspired by the talented folks at Jordan Fabrics, captures the very essence of fall, transforming your dining space into a welcoming autumnal haven.
Imagine your table adorned with a runner showcasing a delightful array of greens, yellows, oranges, and browns – colors that mirror the changing leaves outside your window. What makes this particular design so appealing is its surprising simplicity. It primarily utilizes half-square triangles (HSTs), a fundamental quilting technique that even beginners can master with ease. This guide will walk you through every step, ensuring you can confidently create a beautiful, custom piece of fall decor that will be cherished for years to come. Ready to embark on this delightful quilting journey?
Why Choose the Maple Leaf Table Runner for Your Fall Decor?
The Maple Leaf Table Runner isn’t just another quilting project; it’s an opportunity to celebrate the beauty of fall through fabric art. Its iconic design is instantly recognizable and evokes feelings of warmth, harvest, and family gatherings. For quilters of all skill levels, this pattern offers a rewarding experience. Beginners will appreciate the straightforward construction, which builds confidence in essential techniques like accurate cutting, precise piecing, and effective pressing. More experienced quilters can enjoy experimenting with different fabric combinations or adding intricate quilting stitches to personalize their creation even further.
Beyond its aesthetic appeal, a handmade table runner adds a unique, personal touch to your home decor. Unlike store-bought items, your quilted runner tells a story – a story of creativity, dedication, and love. It’s a focal point that can tie together your entire fall theme, complementing pumpkins, gourds, candles, and other seasonal accents. Whether you’re hosting a Thanksgiving feast or simply enjoying a quiet dinner with loved ones, this Maple Leaf Table Runner will undoubtedly enhance the ambiance, making every moment feel a little more special and autumnal.
Gathering Your Essential Materials for the Maple Leaf Table Runner
Before diving into the fun of cutting and sewing, selecting the right materials is crucial for a successful and beautiful project. High-quality quilting cotton is recommended for its durability, ease of handling, and wide range of vibrant colors and patterns. Consider pre-washing your fabrics to prevent any potential shrinking or color bleeding after your runner is complete. For this project, a curated palette of fall colors will truly bring your maple leaves to life.
Fabrics for the Vibrant Maple Leaves:
- Printed Fabric Squares (3 1/2 inches): You’ll need 15 pieces, which break down to 3 pieces for each of the 5 individual maple leaves. These smaller squares often form the points and inner sections of your leaf, so choose prints that embody the rich tapestry of autumn – think deep reds, fiery oranges, sunny yellows, or mottled browns. Varying the prints slightly for each leaf can add depth and character.
- Printed Fabric Squares (3 7/8 inches): Gather 10 pieces, meaning 2 pieces for each leaf. These larger squares will be paired with background fabric to create your foundational half-square triangles, forming the main body of the leaves. Select prints that complement your smaller squares and contribute to the overall autumnal feel.
- Printed Fabric Strips (1 x 6 inches): You will need 5 pieces, one for each leaf. These narrow strips are essential for forming the distinctive stem of your maple leaves. A darker print is often chosen here to provide a nice contrast and define the stem clearly against the background.
Background Fabrics for Contrast and Depth:
- Background Fabric Squares (3 1/2 inches): Prepare 10 pieces. These squares will be used in conjunction with your stem pieces and other components, providing the negative space that allows your vibrant leaves to truly pop. A light, neutral tone like cream, beige, or a very subtle mottled white is often ideal, but a soft autumn-sky blue or a muted sage green could also offer an interesting effect.
- Background Fabric Squares (3 7/8 inches): You will need 10 pieces. These will be paired with the larger printed squares to create the other set of half-square triangles for your leaf blocks. Ensure your background fabric choice provides sufficient contrast to make the leaf shapes stand out.
Creating the Dynamic Border:
The border adds a professional, finished look to your table runner and often features a complementary design element. For this project, a striking zigzag border is created using numerous half-square triangles.
- Background Squares for Border (3 1/8 inches): Accumulate 54 pieces. These will form one half of your border HSTs.
- Print Squares for Border (3 1/8 inches): Also gather 54 pieces. These will be paired with your border background squares to create the zigzag effect. Choose a print that echoes the colors of your leaves but perhaps with a slightly different scale or texture to add interest without overwhelming the main design.
- Background Squares for Short Border Corners (2 3/4 inches): You will need 4 pieces. These smaller squares provide clean corners for your short border sections, ensuring a polished finish.
Essential Quilting Tools You’ll Need:
Having the right tools at hand will make your quilting experience much smoother and more enjoyable, while also contributing to the accuracy of your finished project.
- Rotary Cutter: A sharp rotary cutter (45mm or 60mm) is indispensable for precise, straight cuts through multiple layers of fabric.
- Self-Healing Cutting Mat: Protect your work surface and keep your rotary blade sharp with a good quality cutting mat.
- Quilting Rulers: Clear acrylic rulers (e.g., 6″ x 24″ for long cuts and a square ruler for trimming HSTs) are essential for accurate measuring and cutting.
- Sewing Machine: A reliable sewing machine with a 1/4-inch piecing foot will ensure consistent seam allowances.
- Iron and Ironing Board: Proper pressing at each step is key to flat seams and accurate blocks.
- Good Quality Thread: Use 100% cotton thread that matches or blends with your fabric colors.
- Fabric Scissors: For snipping threads and other small cuts.
- Pins or Fabric Clips: To hold fabric pieces together before sewing, ensuring alignment.
- Seam Ripper: Even experienced quilters make mistakes – a seam ripper is your friend!
- Fabric Marking Pen/Pencil: For drawing diagonal lines on squares.
Step-by-Step Guide to Crafting Your Maple Leaf Table Runner
Accuracy is the cornerstone of successful quilting. Take your time with each cut and stitch, and remember to press your seams meticulously after every step. This attention to detail will ensure your blocks come together perfectly and your finished runner lays flat and beautiful.
Step 1: Crafting the Sturdy Leaf Stems
The stem is the anchor of your maple leaf block. Begin by taking one of your 3 1/2″ background squares. Carefully cut it in half diagonally, from one corner to the opposite, creating two perfect triangles. Next, take your 1 x 6″ dark print fabric strip. Mark the center point on each of its long 6-inch sides. Now, align the center mark of one of your background triangles with the center mark of the 1 x 6″ strip, right sides together. Stitch them precisely with a 1/4″ seam allowance. Repeat this for the other background triangle, attaching it to the opposite long side of the 1 x 6″ strip, again ensuring the centers align perfectly. Once both triangles are stitched, press the seam allowances towards the center dark print strip. This helps to reduce bulk and creates a clean, defined stem. Finally, trim any excess fabric to ensure this entire stem unit measures a precise 3 1/2″ square. This precision is vital for the blocks to fit together seamlessly.
Step 2: Mastering the Half-Square Triangles (HSTs)
Half-square triangles are the building blocks of this project, so mastering this technique is key. Take one 3 7/8″ dark print square and one 3 7/8″ background square. Place them right sides together, ensuring all edges are perfectly aligned. Using your fabric marking pen or pencil, draw a single diagonal line from one corner to the opposite corner across the top square. This line will serve as your cutting guide. Now, using your sewing machine, stitch a consistent 1/4″ seam allowance along both sides of the drawn diagonal line. Take care to keep your stitches straight. Once sewn, cut precisely along the drawn diagonal line, separating the squares into two individual units. When you open these units, you will have two perfect half-square triangles! Press the seam allowance towards the darker fabric; this often helps to hide the seam and prevents shadowing. Trim each HST unit to a precise 3 1/2″ square to ensure uniformity. You will need to repeat this process until you have a total of four 3 1/2″ HSTs for each maple leaf block, so prepare 20 HSTs in total for all five leaves.
Step 3: Assembling Your Beautiful Maple Leaf Blocks
Now comes the exciting part: seeing your maple leaf take shape! Refer to the image below for the exact arrangement of your pieced stem unit, the 3 1/2″ printed squares, and your newly created 3 1/2″ half-square triangles. Each maple leaf block is constructed by arranging these components into three rows. Carefully lay out all your pieces for one leaf on your design wall or a flat surface. Pay close attention to the orientation of your HSTs to form the classic leaf shape. Stitch the pieces together within each row first, using a consistent 1/4″ seam allowance. Once all three rows are complete, gently press the seams of the first and third rows in one direction, and the seams of the middle row in the opposite direction. This technique, called “nesting seams,” allows the seams to interlock when you join the rows, reducing bulk and ensuring perfectly matched points. Now, stitch your three rows together. Press the entire block flat, ensuring no puckers or distortions. The finished block should measure exactly 9 1/2″ square. Repeat this process until you have successfully created all five stunning maple leaf blocks for your table runner.
Step 4: Constructing the Elegant Long Borders
The border adds a framed finish and an extra layer of design to your table runner. For the long sides of the runner, you’ll be creating a striking zigzag pattern using your 3 1/8″ print and background squares. Follow the same half-square triangle technique as in Step 2: place one print and one background square right sides together, draw a diagonal line, stitch 1/4″ on both sides of the line, cut, press seams, and trim. Ensure all these HSTs are consistent in size after trimming. You will need to make a substantial number of these border HSTs. For each long side of the border, you will stitch together a continuous chain of 40 half-square triangles, alternating their orientation to create the dynamic zigzag effect. Carefully align and stitch these HSTs together, maintaining your 1/4″ seam allowance. When complete, each long border strip should measure an impressive 45 1/2″ in length. Take your time to ensure your points are sharp and your zigzag pattern flows smoothly.
Step 5: Designing the Complementary Short Borders
Just like the long borders, the short borders frame the ends of your table runner, completing the overall aesthetic. For each short side, you will create another sequence of half-square triangles. Utilizing the same 3 1/8″ print and background squares, create 14 half-square triangles following the technique outlined in Step 2. These 14 HSTs will form a smaller zigzag segment. You will also incorporate the 2 3/4″ background squares for the corners. Stitch these 14 HSTs and the 2 3/4″ background squares together, following a layout that creates a cohesive and attractive short border strip. Ensure the orientation of the HSTs continues the zigzag pattern established in the long borders. These short strips will cap the ends of your runner, providing a polished and finished edge.
Step 6: Uniting Your Quilted Masterpiece
With all your leaf blocks and border strips constructed, it’s time to bring them all together. First, carefully arrange your five 9 1/2″ maple leaf blocks in a row. Pin them together, matching seams precisely to ensure a straight and even central panel. Stitch these five blocks together with a 1/4″ seam allowance. Press the seams open or to one side, whichever creates the flattest result. This now forms the main body of your table runner. Next, take your two long border strips (45 1/2″ each) and pin one to each long side of your assembled leaf panel. Match the centers and ends, and pin generously to prevent stretching. Stitch these borders in place, pressing seams towards the borders to avoid adding bulk to the leaf blocks. Finally, attach your two short border strips to the ends of the table runner, again pinning carefully and stitching with a 1/4″ seam allowance. Your table runner top is now complete!
Step 7: The Grand Finale – Quilting, Batting, and Binding
Now that your table runner top is beautifully pieced, it’s time for the final stages that transform it into a functional and durable piece of art: quilting, batting, and binding. First, create your quilt sandwich. Lay your backing fabric (larger than your top) face down, then a layer of batting, and finally your pieced table runner top, centered and face up. Smooth out all layers to eliminate wrinkles. Secure these layers together using pins, basting spray, or thread basting. This prevents shifting during the quilting process.
Next, quilt your runner. You can choose to quilt by hand or machine. Simple “stitch in the ditch” (quilting along the seam lines) or wavy lines are great for beginners. More experienced quilters might opt for intricate free-motion designs that echo the leaf shapes. The quilting stitches hold all three layers together and add texture and durability. Once quilted, carefully trim the excess batting and backing so they are even with the edges of your table runner top.
The last step is to add the binding, which finishes the raw edges and adds a decorative frame. Cut binding strips (typically 2 1/2 inches wide, pieced together to be long enough to go around the entire perimeter of your runner). Fold the binding strip in half lengthwise and press. Attach the binding to the front of your runner with a 1/4-inch seam, mitering the corners. Then, wrap the binding to the back of the runner and hand-stitch or machine-stitch it in place for a clean finish. Take pride in this final step, as it truly completes your handcrafted masterpiece!
Your Finished Maple Leaf Table Runner: A Seasonal Triumph!
Congratulations! You have successfully crafted a stunning Maple Leaf Table Runner, a beautiful testament to your creativity and skill. This exquisite piece, vibrant with the colors of autumn, is now ready to grace your home. Place it on your dining table, a console table, or even a mantelpiece to instantly elevate your fall decor. It’s more than just a table runner; it’s a handcrafted work of art that embodies the warmth and beauty of the season, sure to draw compliments from family and friends.
Don’t stop here! The joy of quilting lies in endless possibilities. Consider making a second runner with a different color palette – perhaps richer jewel tones for a more sophisticated look, or lighter pastels for an early autumn feel. This pattern is also versatile enough to be scaled up for a larger quilt or down for placemats or hot pads. Share your finished project online and inspire others with your beautiful creation. We hope this comprehensive guide, inspired by the wonderful pattern from Jordan Fabrics, has empowered you to embrace the art of quilting and fill your home with handmade charm this fall and for many seasons to come. Happy quilting!