
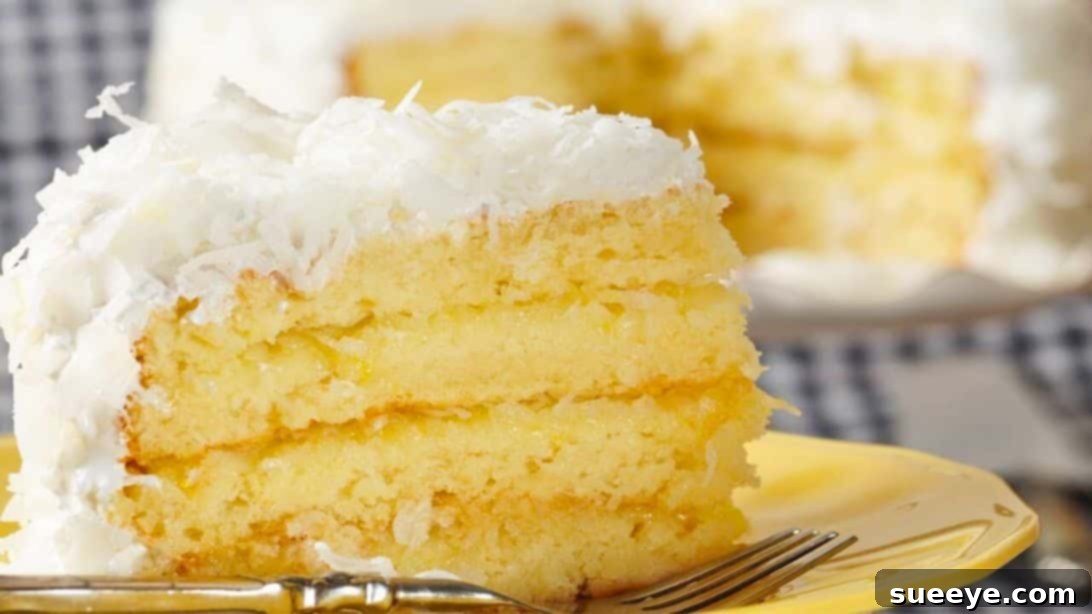
The Ultimate Moist and Fluffy Coconut Cake with Zesty Lemon Curd
Prepare to be enchanted by a dessert that perfectly marries tropical sweetness with a bright, tangy zest. This exquisite Moist and Fluffy Coconut Cake with Lemon Curd, inspired by Joy of Baking, is truly a showstopper. It’s a recipe that transcends ordinary baking, offering a sublime balance of rich, nutty coconut and the invigorating, sweet-tart burst of homemade lemon curd. Every forkful promises a delightful journey for your taste buds, making it an irresistible treat that will have everyone asking for another slice.
This recipe transforms simple ingredients into an extraordinary culinary experience. The cake itself is incredibly tender, boasting a delicate crumb and profound coconut flavor, while the luscious lemon curd filling provides a vibrant counterpoint, cutting through the sweetness with its refreshing acidity. Crowned with a light, airy frosting and a generous sprinkle of toasted coconut, this dessert isn’t just a cake; it’s a celebration of flavors and textures, perfect for special occasions or simply to elevate an everyday moment into something truly memorable.
Key Ingredients for Your Masterpiece
Crafting this incredible cake begins with selecting the right ingredients. Each component plays a vital role in achieving the moist texture, fluffy crumb, and vibrant flavor profile that defines this recipe. Ensure all cold ingredients, especially butter, eggs, and buttermilk, are at room temperature. This is crucial for proper emulsification, leading to a smoother batter and a more uniform, tender cake.
For the Buttermilk Cake Layers:
- 2 1/2 cups (300g) All-Purpose Flour: The foundation of our cake. Sifting it ensures a lighter texture.
- 2 teaspoons Baking Powder: A leavening agent that helps the cake rise, contributing to its fluffiness.
- 1/2 teaspoon Baking Soda: Reacts with the buttermilk to create additional lift and tenderness.
- 1/2 teaspoon Salt: Enhances all the flavors, balancing the sweetness.
- 1 cup (226g) Unsalted Butter (room temperature): Crucial for richness and texture. Room temperature butter creams beautifully with sugar.
- 1 3/4 cups (350g) Granulated White Sugar: Provides sweetness and helps create a moist, tender crumb.
- 4 Large Eggs (room temperature): Bind the ingredients and add structure and richness. Room temperature eggs emulsify better.
- 1 teaspoon Pure Vanilla Extract: A classic flavor enhancer that complements coconut perfectly.
- 1 cup (240ml) Buttermilk (room temperature): Adds moisture, tenderness, and a subtle tang. Its acidity activates the baking soda.
For the Silky Marshmallow Frosting:
- 3 Large Egg Whites (room temperature): Form the base of our light and fluffy frosting.
- 1 1/2 cups (300g) Granulated White Sugar: Sweetens and stabilizes the egg whites.
- 1/4 cup (60ml) Cold Water: Helps dissolve the sugar for a smooth meringue.
- 1 tablespoon Light Corn Syrup: Prevents sugar crystallization, ensuring a smooth, glossy frosting.
- 1/4 teaspoon Cream of Tartar: Stabilizes the egg whites, helping them achieve maximum volume and stiffness.
- 1 teaspoon Pure Vanilla Extract: Adds a beautiful aromatic finish to the frosting.
For Assembly and Decoration:
- 2 cups Sweetened or Unsweetened Dried Coconut: Essential for that authentic coconut flavor and texture on the cake’s exterior. Sweetened adds more richness, while unsweetened offers a more natural coconut note. You can toast some of it for extra depth!
- Lemon Curd: The star filling that provides a vibrant, tangy contrast to the sweet coconut cake. You can use homemade or a high-quality store-bought version.
Detailed Instructions: Crafting Your Coconut Lemon Masterpiece
Creating this stunning cake is a joyful process, demanding a little patience but promising immense rewards. Follow these steps meticulously to ensure a perfect outcome, from the tender cake layers to the luscious frosting and elegant assembly.
Part 1: Preparing the Moist Buttermilk Cake Layers
The foundation of our dessert is a rich, tender buttermilk cake. Precision in mixing and baking is key to achieving that desirable moist and fluffy texture.
Step 1: Prepare Your Dry Ingredients
In a medium-sized mixing bowl, whisk together the 2 1/2 cups of all-purpose flour, 2 teaspoons of baking powder, 1/2 teaspoon of baking soda, and 1/2 teaspoon of salt. Whisk thoroughly for about 30 seconds to ensure that all the leavening agents and salt are evenly distributed throughout the flour. This step is crucial for an even rise and consistent texture in your finished cake. Set this dry mixture aside.
Step 2: Cream Butter and Sugar
In the bowl of a stand mixer fitted with the paddle attachment, or using a large bowl and a handheld electric mixer, beat the 1 cup of room temperature unsalted butter on medium speed for about 1 to 2 minutes. The butter should become light in color and noticeably soft and creamy. Gradually add the 1 3/4 cups of granulated white sugar, about a quarter cup at a time, continuing to beat on medium-high speed. Scrape down the sides of the bowl as needed. Continue beating for a full 3 to 5 minutes, until the mixture is truly light, fluffy, and pale yellow. This process incorporates air, which is essential for the cake’s light texture.
Next, add the 4 large room temperature eggs, one at a time. After each egg addition, beat well until it is fully incorporated into the butter and sugar mixture, scraping down the sides of the bowl to ensure everything is evenly mixed. The mixture might look slightly curdled after adding eggs; this is normal. Finally, stir in the 1 teaspoon of pure vanilla extract until just combined.
Step 3: Alternate Dry and Wet Ingredients
Reduce the mixer speed to low. Begin by adding about one-third of the dry flour mixture to the butter mixture, mixing just until barely combined. Then, pour in half of the 1 cup of room temperature buttermilk, mixing until just incorporated. Repeat this process: add another third of the flour mixture, mix, then add the remaining buttermilk, mix. Finish by adding the last third of the flour mixture. Mix on low speed only until no dry streaks of flour remain. Be very careful not to overmix the batter at this stage, as overmixing can develop the gluten in the flour, resulting in a tough cake. A few small lumps are perfectly fine.
Step 4: Bake the Cake Layers
Preheat your oven to 350°F (175°C). Prepare two 8-inch or 9-inch round cake pans by greasing them, flouring them, and lining the bottoms with parchment paper. This preparation ensures your cakes won’t stick and will release easily. Divide the prepared cake batter evenly between the two pans. Use an offset spatula or the back of a spoon to gently spread and smoothen the surface of each batter-filled pan, ensuring even baking. Bake for approximately 27 to 30 minutes, or until a wooden skewer or toothpick inserted into the center of the cake comes out clean. The cakes should be lightly golden brown and spring back when gently pressed.
Step 5: Cooling the Cake Layers
Once baked, remove the cakes from the oven. Allow them to cool in their pans on a wire rack for about 10 to 15 minutes. This initial cooling period allows the cakes to set properly and become sturdy enough to handle. After this time, carefully invert the cakes onto a greased wire rack, remove the parchment paper, and allow them to cool completely to room temperature. It’s essential that the cakes are entirely cool before frosting and assembling; otherwise, your frosting will melt and slide off.
Part 2: Crafting the Silky Marshmallow Frosting
This light, airy, and incredibly stable frosting provides the perfect cloud-like complement to our dense cake layers. It’s a classic meringue-based frosting that holds its shape beautifully.
Step 1: Combine Frosting Ingredients for a Double Boiler
In a heatproof stainless steel bowl (or the bowl of your stand mixer, if it’s heatproof), combine the 3 large room temperature egg whites, 1 1/2 cups of granulated white sugar, 1/4 cup of cold water, 1 tablespoon of light corn syrup, and 1/4 teaspoon of cream of tartar. Using a handheld whisk, or simply with a fork, lightly whisk these ingredients together until they are just combined and appear well blended. The cream of tartar is crucial here, as it helps stabilize the egg whites and ensures a voluminous, strong meringue.
Step 2: Heat and Whip to Perfection
Place the stainless steel bowl over a saucepan filled with about 1 inch of simmering water, ensuring the bottom of the bowl does not touch the water (creating a double boiler setup). Using a handheld electric mixer, begin beating the egg white mixture on medium-low speed. Continue beating constantly for about 3 to 5 minutes. The mixture will gradually heat up, and the sugar crystals will dissolve. You can test this by rubbing a small amount of the mixture between your fingers; it should feel smooth with no gritty sugar crystals.
Once the sugar is fully dissolved, increase the mixer speed to high. Continue to beat vigorously for another 3 to 4 minutes. During this time, the mixture will become thick, glossy, and form soft, billowy peaks. The mixture should also be warm to the touch, indicating proper pasteurization. Carefully remove the bowl from the heat. Add the 1 teaspoon of pure vanilla extract and continue to beat on high speed for an additional 1 to 2 minutes, or until the frosting is very thick, firm, and holds stiff, glossy peaks. The bowl should feel cool to the touch, indicating the frosting has cooled to room temperature. Use immediately for best results, or store briefly in an airtight container at room temperature.
Part 3: Assembling Your Magnificent Cake
This is where all your hard work comes together! The layering of cake, lemon curd, frosting, and coconut creates a stunning visual and textural feast.
Using a long, serrated knife, carefully slice each cooled cake layer horizontally in half, creating a total of four thin cake layers. Take your time with this step to ensure even layers.
Place one cake layer onto your chosen serving plate or cake stand. Spread approximately 1/3 of your lemon curd evenly over the surface of the cake layer, leaving a small border around the edge. This vibrant, tangy filling is what makes this cake truly unique. Over the lemon curd, sprinkle about 2 tablespoons of the dried coconut, providing a lovely chewiness and extra tropical flavor.
Carefully place the next cake layer on top, gently pressing down to secure it. Repeat the process: spread another 1/3 of the lemon curd, followed by another sprinkle of 2 tablespoons of dried coconut. Add the third cake layer and repeat the lemon curd and coconut application one last time.
Finally, crown the stack with the fourth and final cake layer. Now, generously frost the top and sides of the entire cake with your freshly made marshmallow frosting. Use an offset spatula to create beautiful swirls or smooth, elegant lines. Once the cake is fully frosted, generously sprinkle the remaining dried coconut over the top and sides, pressing gently to adhere. For an extra touch of flavor and visual appeal, you can lightly toast some of the coconut before sprinkling.
Tips for Achieving Coconut Cake Perfection
- Room Temperature Ingredients are Non-Negotiable: This cannot be stressed enough. Cold ingredients don’t emulsify properly, leading to a lumpy batter and a less tender cake.
- Measure Accurately: Especially with flour, use a kitchen scale for the most precise measurement, or spoon flour into your measuring cup and level it off with a straight edge.
- Don’t Overmix: Once you add the dry ingredients, mix only until just combined. Overmixing develops gluten, making the cake tough and dense.
- Prepare Your Pans Well: Greasing, flouring, and lining with parchment paper prevents sticking and ensures your beautiful cakes come out intact.
- Cool Completely: Frosting a warm cake is a recipe for disaster. Be patient and allow the cake layers to cool entirely before assembly.
- For Extra Coconut Flavor: Toast a portion of your dried coconut lightly in a dry pan until golden brown before sprinkling for a deeper, nuttier flavor profile.
- Homemade Lemon Curd: While store-bought works, homemade lemon curd offers an unparalleled freshness and zest that truly elevates this cake.
- Leveling Cakes: If your cake layers bake with domed tops, use a serrated knife to level them flat once cooled. This makes stacking and assembly much easier and more professional-looking.
Serving and Storage Suggestions
This Moist and Fluffy Coconut Cake with Lemon Curd is best served at room temperature, allowing the flavors to fully meld and the cake to remain tender. Slice it with a sharp, warm knife for clean cuts.
Store any leftovers in an airtight cake dome or container at room temperature for up to 2 days, or in the refrigerator for up to 4-5 days. If refrigerating, let the cake come to room temperature for about 30 minutes before serving for the best texture and flavor. The cake also freezes well without the coconut garnish; wrap individual slices tightly in plastic wrap and then foil, and freeze for up to 1 month. Thaw in the refrigerator overnight before bringing to room temperature.
Variations to Explore
- Toasted Coconut Flakes: For an even more intense coconut flavor and delightful crunch, toast some of the dried coconut flakes in a dry pan over medium heat until golden brown before sprinkling them on the cake.
- Lime Curd: If you’re a fan of lime, swap out the lemon curd for a vibrant homemade lime curd for a slightly different citrus kick.
- Cream Cheese Frosting: While the marshmallow frosting is divine, a tangy cream cheese frosting would also pair beautifully with the coconut and lemon.
- Tropical Fruit Garnish: Garnish with fresh passion fruit, mango slices, or delicate pineapple flowers for an added touch of tropical elegance.
The Perfect Dessert: Moist and Fluffy Coconut Cake with Lemon Curd
This Moist and Fluffy Coconut Cake with Lemon Curd is more than just a dessert; it’s an experience. It’s the perfect centerpiece for any celebration, a delightful treat for weekend baking, or simply a way to brighten an ordinary day. The harmonious blend of sweet coconut and tart lemon, encased in a pillowy cake and cloud-like frosting, is a testament to the magic that happens when classic flavors are combined with care and attention. We hope you enjoy baking and sharing this truly spectacular cake as much as we do!