
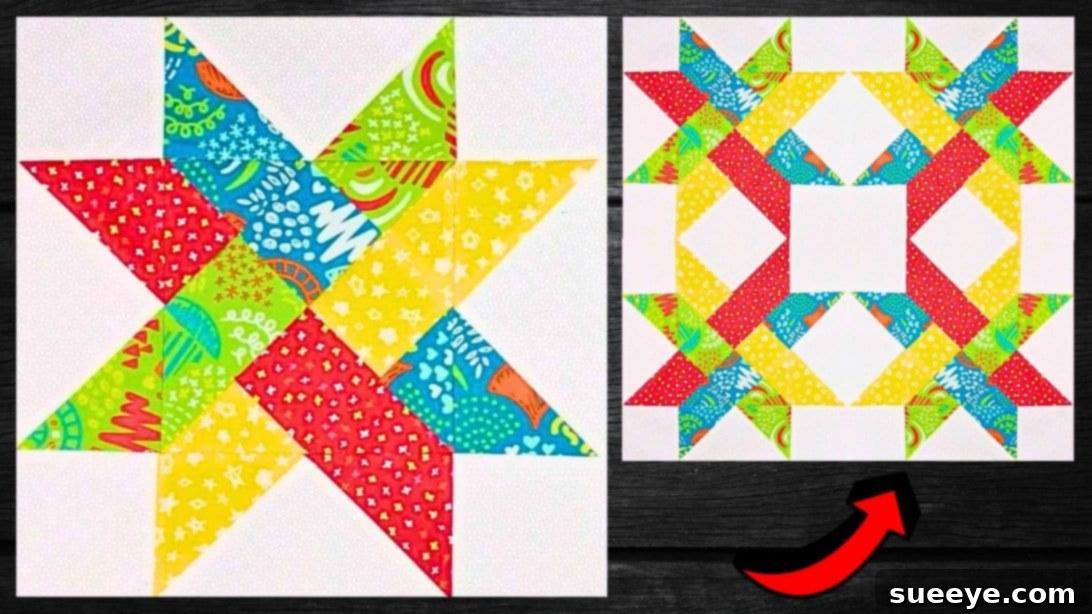
Embark on a delightful quilting journey with the Woven Star Quilt Block, a design that effortlessly combines traditional charm with a captivating optical illusion. This particular approach, inspired by the brilliant insights of Carol Thelen on YouTube, stands out as one of the most rewarding quilt projects you’ll ever undertake. Its appeal lies in the wonderfully fun and seemingly intricate pattern, which, despite its sophisticated appearance, is remarkably accessible for quilters of all skill levels. It offers a perfect balance of ease and a gentle challenge, making the creative process as enjoyable as the finished product.
One of the most exciting aspects of the Woven Star Quilt Block is its incredible versatility. Whether you prefer a meticulously coordinated palette or a vibrant, eclectic mix of fabrics, this block lends itself beautifully to any aesthetic. You have the freedom to choose any combination of colors, patterns, and fabric scraps, allowing your unique creativity to shine. The beauty of a “scrappy” approach, utilizing leftover fabric pieces, is particularly evident here, yielding a result that is undeniably lovely and uniquely yours. Prepare to transform your fabric stash into a stunning work of art. Dive into the detailed tutorial below and discover the secrets to crafting this enchanting quilt block.
The Allure of the Woven Star Quilt Block
The Woven Star quilt block is celebrated for its distinctive design that creates an illusion of intertwining strips, giving it a three-dimensional depth and a dynamic visual texture. This makes it a popular choice for quilters looking to add complexity and interest to their projects without overwhelming difficulty. The star motif, a timeless symbol in quilting, is reimagined here with a contemporary twist, making it suitable for a wide range of applications from classic bed quilts to modern wall hangings and decorative accents.
Beyond its aesthetic appeal, crafting the Woven Star offers a fulfilling experience. It encourages precision in cutting and stitching, which are fundamental skills in quilting, while also providing ample room for creative expression through fabric selection. The repetitive nature of creating multiple blocks can be meditative, offering a peaceful escape and a sense of accomplishment with each completed unit. Whether you’re a seasoned quilter seeking a fresh pattern or a beginner eager to expand your repertoire, this block promises both enjoyment and a beautiful outcome.
Getting Started: Gathering Your Quilting Arsenal
Before you begin piecing together your magnificent Woven Star Quilt Block, gathering the right materials and tools is paramount. Quality supplies not only make the process smoother but also contribute significantly to the durability and beauty of your finished quilt. Here’s a comprehensive list of what you’ll need, along with some insights into making the best choices for your project:
- Background Fabric: This fabric provides the canvas against which your star will pop. Choose a color that offers a strong contrast to your star fabrics to enhance the “woven” effect. Light solids or subtle tone-on-tone prints work wonderfully. Ensure you have enough to create a cohesive background for all your blocks.
- Assorted Contrasting Fabric: These are the stars of your show! Select a variety of fabrics that complement or contrast beautifully with each other and your background. This is where you can truly let your creativity run wild. Consider a mix of prints and solids, or a gradient of colors to achieve a striking effect. Utilizing fat quarters or even fabric scraps is an excellent way to add character and make a “scrappy” quilt.
- Quilting Ruler: Precision is key in quilting. A clear acrylic ruler with accurate measurements (typically 6×24 inches or 8×24 inches) is essential for cutting straight lines and precise shapes.
- Marking Pen, Pencil, or Chalk: For transferring pattern markings or drawing lines on your fabric. Choose a tool that is easily visible on your chosen fabric colors and can be removed or disappears over time (e.g., water-soluble, heat-erasable).
- Scissors or Rotary Cutter and a Cutting Mat: A rotary cutter paired with a self-healing cutting mat is highly recommended for efficient and accurate fabric cutting. If using scissors, ensure they are sharp and dedicated to fabric only.
- Needle and Thread: High-quality 100% cotton thread is ideal for piecing quilt blocks, as it’s strong and blends well with quilting cotton. A universal sewing machine needle (size 80/12 or 90/14) is suitable for most quilting projects.
- Iron and Ironing Board: Crucial for pressing seams. Proper pressing is as important as accurate stitching in quilting, ensuring your blocks lie flat and square.
- Sewing Machine: Any sewing machine capable of a straight stitch will work. Ensure it’s in good working order and you have a quarter-inch foot, which is invaluable for consistent seam allowances.
- Pattern: Don’t forget to download the official pattern (Click here to download the pattern). This will provide the precise measurements and diagrams necessary for cutting your fabric pieces correctly. Print it at 100% scale to ensure accuracy.
Fabric Selection Tips for Your Woven Star
The magic of the Woven Star Quilt Block largely comes from thoughtful fabric choices. To achieve that beautiful interwoven effect, consider these tips:
- Value Contrast: Ensure there’s a clear difference in lightness or darkness between your star fabrics and the background. This contrast is what makes the design “pop.”
- Color Harmony: Decide on a color scheme. You can go for analogous colors (colors next to each other on the color wheel), complementary colors (colors opposite each other), or a monochromatic scheme with varying shades.
- Print Scale: Mix large and small prints to add visual interest. Avoid prints that are too busy if you want the woven effect to be the star.
- Scrappy Charm: If aiming for a scrappy look, pull from your fabric remnants. The varied nature of scraps enhances the dynamic appeal of the Woven Star, making each block unique and full of character.
- Pre-washing: For consistent shrinkage and to prevent color bleeding, it’s often recommended to pre-wash all your fabrics before cutting, especially if you’re mixing different types or colors.
Mastering the Woven Star Quilt Block: A Step-by-Step Guide
With your materials ready, let’s delve into the exciting process of constructing your Woven Star Quilt Block. Follow these detailed steps to ensure precision and a beautiful outcome.
Step 1: Constructing the Heart of Your Block – The 4-Patch Unit
Begin by downloading and accurately cutting your fabrics according to the provided pattern. Pay close attention to the specific dimensions for each piece. The very center of your Woven Star block starts with a classic 4-patch unit. This small but crucial component forms the foundation of the star’s intricate design.
To create the 4-patch:
- Select four squares of fabric designated for the center. Arrange them into a two-by-two grid, visually planning how you want their colors and patterns to interact.
- Stitch these squares together in pairs. For instance, sew the top-left square to the top-right square, and the bottom-left to the bottom-right. Remember to use a consistent scant quarter-inch seam allowance. This small adjustment (just shy of a full quarter-inch) is vital in quilting to account for the fabric taken up by the thread and pressing, ensuring your finished block measures correctly.
- Once you have two pairs, press the seams. For the first pair, press the seam allowance in one direction. For the second pair, press the seam allowance in the opposite direction. This technique, known as “nesting seams,” will allow the seams to interlock perfectly when you join the two pairs, reducing bulk and ensuring flat intersections.
- Finally, stitch the two pairs to each other, carefully aligning the center seams so they nest. Give the entire 4-patch block unit a good final press, making sure it lies perfectly flat and square. This meticulous pressing is essential for creating crisp lines and ensuring subsequent steps align correctly.
Step 2: Building the Star – Adding Triangles and Background
With your perfectly pieced 4-patch unit complete, it’s time to expand it into the stunning Woven Star. This stage involves adding the triangular pieces that form the star points and filling in the remaining areas with your background fabric to define the star’s shape. Close reference to your pattern’s diagram is absolutely essential here to ensure correct placement and orientation of each piece.
- Carefully place the pre-cut triangles around the perimeter of your 4-patch unit, referring directly to the pattern diagram for their specific positions. These triangles are key to creating the star’s distinct points and the illusion of weaving. Pay attention to how the points align and whether they are positioned on the correct sides of your center unit.
- Next, fill the remaining open spaces around the star points with the designated background fabric pieces. These pieces effectively “frame” the star and create the negative space that enhances the woven effect. Ensure all pieces are laid out precisely before you begin stitching. It’s often helpful to lay out your entire block on a design wall or flat surface to visualize the complete picture and double-check all placements.
- Once you are satisfied with the arrangement, begin stitching the pieces together in rows or sections, working your way around the middle you’ve just pieced. Start by sewing individual background pieces to the sides of your star points, or connecting sections that will eventually form the complete outer ring.
- As you stitch, continue pressing your seams regularly. Pressing “as you go” is a golden rule in quilting. It flattens the fabric, removes bulk, helps align subsequent pieces more accurately, and ensures your finished block remains true to size and shape. You can press seams open or to one side, depending on which method results in less bulk and a flatter finish for your specific fabric combinations.
- After all the pieces are sewn together, give the entire Woven Star Quilt Block a final, thorough press. Check that all points meet cleanly and that the block measures the correct finished size. A perfectly pressed block is the hallmark of a skilled quilter and will make joining multiple blocks much easier.
Tips for Quilting Success
- Accuracy is Paramount: Take your time with cutting and stitching. A precise quarter-inch seam allowance is crucial for blocks to fit together without distortion.
- Chain Piecing: If you’re making multiple Woven Star blocks, consider chain piecing. This technique involves feeding several units through your sewing machine one after another without cutting the thread in between, saving time and thread.
- Starch and Pressing: Using a light starch spray before cutting can help stabilize fabrics, making them easier to handle and cut accurately. Always press, don’t iron (ironing can stretch fabric).
- Reference the Diagram Constantly: The Woven Star relies on specific placement. Keep your pattern diagram handy and refer to it frequently throughout the assembly process.
- Enjoy the Process: Quilting is a journey, not just a destination. Embrace any learning curves and celebrate your progress!
Design Possibilities with Your Woven Star Blocks
Once you’ve mastered creating individual Woven Star blocks, the possibilities for incorporating them into larger projects are virtually limitless. Here are a few ideas to inspire your next quilting endeavor:
- Quilts of Various Sizes: Arrange multiple blocks in a straight set, on point, or combine them with sashing and borders to create stunning throw quilts, bed quilts, or baby quilts. The woven effect becomes even more pronounced and beautiful when blocks are joined together.
- Pillow Covers: A single Woven Star block makes an exquisite centerpiece for a decorative pillow cover. It adds a sophisticated, handmade touch to any room.
- Tote Bags and Pouches: Integrate a Woven Star block into the front panel of a tote bag or a small zippered pouch for a personalized accessory that showcases your quilting skills.
- Wall Hangings: Frame a few Woven Star blocks to create an artistic wall hanging. This is a great way to display your work and add textile art to your home décor.
- Table Runners or Placemats: A series of Woven Star blocks can be joined to form an elegant table runner, or individual blocks can be used as unique placemats, perfect for adding a handmade charm to your dining experience.
Experiment with different fabric combinations for each block to create a truly unique masterpiece. The more blocks you make, the more proficient you’ll become, and the more intricate your final project will appear.
The Enduring Joy of Quilting
Quilting is more than just a craft; it’s a passion that offers numerous rewards. It provides a creative outlet, a sense of accomplishment, and the joy of creating something beautiful and tangible. The rhythmic process of cutting, stitching, and pressing can be incredibly therapeutic, offering a peaceful escape from daily stresses. Furthermore, quilts often become treasured heirlooms, passed down through generations, each stitch telling a story.
We extend our sincere thanks to Carol Thelen via YouTube for sharing her wonderful insights and inspiring us with this fantastic Woven Star Quilt Block idea. Her clear instructions and creative vision make complex patterns accessible to everyone. If you’ve enjoyed learning this block, we highly recommend visiting her YouTube channel and subscribing for more brilliant quilting tutorials and inspiration. Happy quilting, and may your creative journey be filled with beautiful stitches and endless joy!