
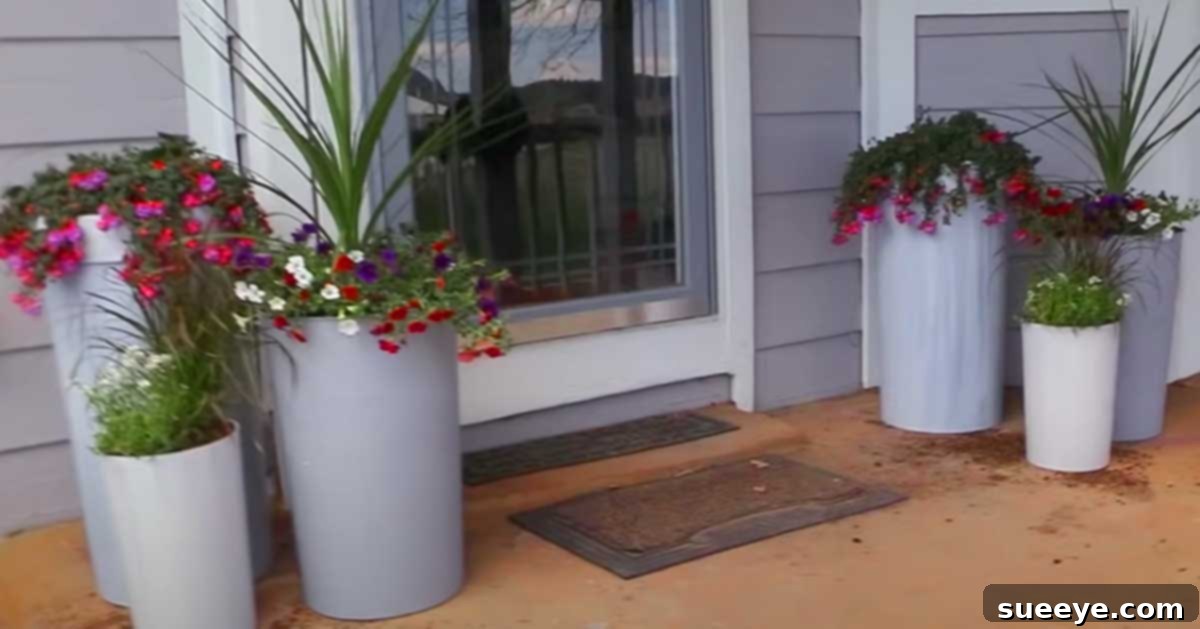
Transforming your outdoor living spaces into inviting havens doesn’t have to break the bank. With the arrival of warmer months, many of us dream of adorning our front porches and patios with vibrant spring flowers and lush greenery. However, the cost of large, attractive garden planters can quickly add up, often making beautiful outdoor decor seem out of reach for budget-conscious homeowners. That’s where creative DIY solutions come into play, offering a fantastic opportunity to achieve high-end looks without the hefty price tag.
I recently stumbled upon an ingenious idea that completely revolutionized my approach to outdoor decorating: turning ordinary trash cans into stunning, tall flower planters! My inspiration came from The Budget Equestrian’s compelling video titled “How To Make Tall Planters – SO EASY!” The concept was so brilliant and straightforward that I immediately ordered the necessary supplies. Imagine transforming inexpensive Amazon trash cans, costing around $30 each, into elegant garden features that typically retail for three times that amount or more!
This DIY project is not just about saving money; it’s about unleashing your creativity and customizing your planters to perfectly complement your existing outdoor aesthetic. I was thrilled to realize these larger planters would pair seamlessly with some of my other DIY patio planters, and I could even paint them to match the ones I had already crafted. The satisfaction of creating something beautiful and functional with your own hands, while also being incredibly kind to your wallet, is truly unmatched. Let’s dive into how you can embark on this rewarding journey to elevate your outdoor spaces with these fantastic upcycled planters.
Essential Materials for Your DIY Tall Planters
Before you begin, gathering your materials is key. The beauty of this project lies in its simplicity and the affordability of the supplies. You likely have some of these items on hand already, making it even more budget-friendly. For a direct link to the specific trash cans and other materials recommended by Lisa in her video, along with comprehensive step-by-step instructions, be sure to check the description box of The Budget Equestrian’s YouTube video.
- Tall Trash Cans: The star of our project! Opt for sturdy plastic trash cans, as they are easier to drill and won’t rust. Consider the size and shape that best fits your space and desired plant arrangement.
- Outdoor Paint and Paint Brushes: This is where your creativity shines. Choose an exterior-grade paint that can withstand the elements. Chalkboard paint, as demonstrated in the inspiring video, offers a unique vintage look, but any outdoor acrylic or spray paint will work beautifully.
- Potting Soil: High-quality potting soil is crucial for the health and vitality of your plants. Ensure it’s suitable for container gardening and provides good drainage and nutrients.
- Plants of Your Choosing: Select plants that thrive in containers and are appropriate for the amount of sunlight your planters will receive. Consider a mix of thriller, filler, and spiller plants for a dynamic arrangement.
- Drill (with appropriate drill bits): Essential for creating drainage holes, which are vital for preventing root rot and ensuring plant longevity.
- Filler Material (Optional but Recommended): Items like pinecones, gravel, empty plastic bottles, or old crushed pots can be used at the bottom of the planter to reduce the amount of potting soil needed and improve drainage.
- Safety Gear: Always wear safety glasses and gloves when drilling or painting.
Step-by-Step Guide: Crafting Your Custom Planters
This project is designed to be straightforward, making it accessible even for beginner DIY enthusiasts. Follow these steps to transform simple trash cans into stunning focal points for your garden or patio.
Step One: Selecting and Acquiring Your Planter Bases
The foundation of your new tall planters begins with the right trash cans. While any tall plastic trash can can technically be used, certain features will make your project easier and more successful. Look for cans that are relatively smooth on the exterior for easier painting and a more refined finish. The dimensions are also important – consider how tall and wide you want your finished planters to be, keeping in mind the types of plants you plan to feature. Many online retailers, including Amazon, offer affordable options that are perfect for this transformation. As mentioned, Lisa from The Budget Equestrian links to the specific ones she uses in the description box of her YouTube video, providing a helpful starting point if you want to replicate her success directly. Once you’ve made your selection, place your order and prepare to be amazed at how these everyday items become extraordinary garden decor.
Step Two: Ensuring Essential Drainage for Healthy Plants
Proper drainage is perhaps the most critical step in creating any successful container garden. Without adequate drainage holes, water can accumulate at the bottom of the planter, leading to root rot and ultimately the demise of your beautiful plants. This step is simple but requires a bit of care. Using your drill, create several holes in the bottom of each trash can. It’s generally recommended to make at least 5-7 holes, spaced evenly, for thorough water evacuation.
When drilling into plastic, it’s crucial to proceed slowly and with a steady hand to avoid cracking the bottom of the cans. Start with a smaller drill bit if you’re unsure, and then you can gradually enlarge the holes if needed. A general-purpose drill bit designed for plastic or wood will work well. For added stability and to protect your work surface, place a scrap piece of wood or an old cutting board underneath the area you are drilling. This not only prevents damage but also provides a more stable surface for the drill bit to penetrate cleanly. Once complete, you’ll have a sturdy base ready to support healthy plant growth.
Step Three: Personalizing Your Planters with Paint
Now for the fun part: adding your personal touch through paint! This is where your trash cans truly transform into stylish garden planters. Before painting, ensure your trash cans are clean and dry. A quick wipe-down with a damp cloth and then allowing them to air dry completely will help the paint adhere better.
The choice of paint and technique offers endless possibilities for customization. In Lisa’s video, she uses chalkboard paint and applies only one coat to achieve a charming, slightly distressed, vintage look. This approach allows some of the original texture or color of the trash can to subtly show through, adding character. However, you are by no means limited to this style!
- For a sleek, modern finish: Opt for exterior spray paint in a matte or glossy finish. Several light, even coats will provide the best coverage and prevent drips.
- For a classic look: Use exterior acrylic paint applied with a brush. This allows for more detailed work, such as stenciling or creating striped patterns.
- For a rustic appeal: Consider distressing your paint job after it dries. Lightly sand areas where natural wear would occur, or apply a second, lighter coat of a contrasting color and then wipe it back before it fully dries.
Always ensure you use paint formulated for outdoor use to withstand sunlight, rain, and temperature fluctuations. Allow adequate drying time between coats and before proceeding to the next step, as per the paint manufacturer’s instructions. This step alone makes your DIY planters indistinguishable from their expensive store-bought counterparts.
Image By: The Budget Equestrian via YouTube
Step Four: Filling, Planting, and Final Touches
With your beautifully painted and drilled planters ready, it’s time to bring them to life with plants. This step involves a few key components to ensure your plants thrive.
First, consider adding a filler layer to the bottom of your trash cans. This is especially useful for very tall planters as it reduces the amount of potting soil needed, making the planters lighter and more economical. Common filler materials include:
- Pinecones: Readily available and excellent for drainage.
- Rocks or Gravel: Adds weight for stability, but can make the planter heavy.
- Mulch or Wood Chips: Biodegradable and helps with drainage.
- Empty Plastic Bottles or Containers: A great way to recycle and take up space without adding significant weight.
- Old Upside-Down Pots: Another clever way to fill volume.
The filler layer should occupy the bottom third to half of the planter, depending on your plant’s root depth requirements.
Next, add your high-quality potting soil on top of the filler. Fill the planter to an appropriate height for your chosen plants. Generally, you want the top of the plant’s root ball to be about 1-2 inches below the rim of the planter, leaving space for watering. Gently remove your plants from their nursery containers, loosen any circling roots, and carefully place them into the potting soil. Arrange them aesthetically, keeping in mind their mature size and sun requirements.
Once your plants are in place, backfill around them with more potting soil, gently tamping it down to remove air pockets. Water thoroughly immediately after planting to help the soil settle and hydrate your new additions. You can then add a layer of decorative mulch on top of the soil for a finished look, which also helps retain moisture and suppress weeds.
Image By: The Budget Equestrian via YouTube
Caring for Your New DIY Planters
Once your beautiful trash can planters are in place, ongoing care will ensure they continue to enhance your outdoor space for seasons to come. Regular watering is essential, especially for container plants, which tend to dry out faster than garden beds. Check the soil moisture daily, particularly during hot or windy weather. Fertilize according to your plant’s specific needs, using a balanced liquid fertilizer or slow-release granules.
These durable plastic planters are designed for outdoor use, but bringing them indoors or covering them during extreme winter conditions can extend their lifespan, especially if you live in a region with freezing temperatures. A simple wipe-down with a damp cloth is usually all that’s needed to keep them looking fresh and clean.
Beyond Flowers: Creative Uses for Your Tall Planters
While these DIY planters are perfect for stunning floral displays, their versatility extends far beyond just flowers. Consider using them for:
- Herbs and Vegetables: Grow a convenient kitchen garden right on your patio with tall herbs like rosemary or small tomato varieties.
- Small Shrubs or Dwarf Trees: Create a more permanent garden feature with a compact shrub or an ornamental dwarf tree.
- Decorative Storage: When not in use for plants, these tall containers can serve as stylish outdoor storage for garden tools, pool noodles, or even blankets for chilly evenings.
- Seasonal Decor: Easily swap out plants for seasonal decorations, such as small pumpkins in the fall or evergreen arrangements in winter.
Share your amazing DIY planter creations with us!
DIY Patio Planters From Trash Cans: An Unbeatable Project
Creating these DIY patio planters from humble trash cans is an incredibly rewarding project that delivers significant impact with minimal investment. Not only will you save a substantial amount of money compared to purchasing large, decorative planters from garden centers, but you’ll also gain the satisfaction of crafting something beautiful and unique with your own hands. This project is a testament to the power of upcycling and creative thinking, proving that you don’t need a huge budget to achieve a stunning and personalized outdoor oasis.
So, gather your materials, unleash your creativity with a paintbrush, and get ready to transform your patio, porch, or garden with these gorgeous, budget-friendly tall planters. You’ll be amazed at the transformation and how much joy these simple containers bring to your outdoor living space. Happy planting!