
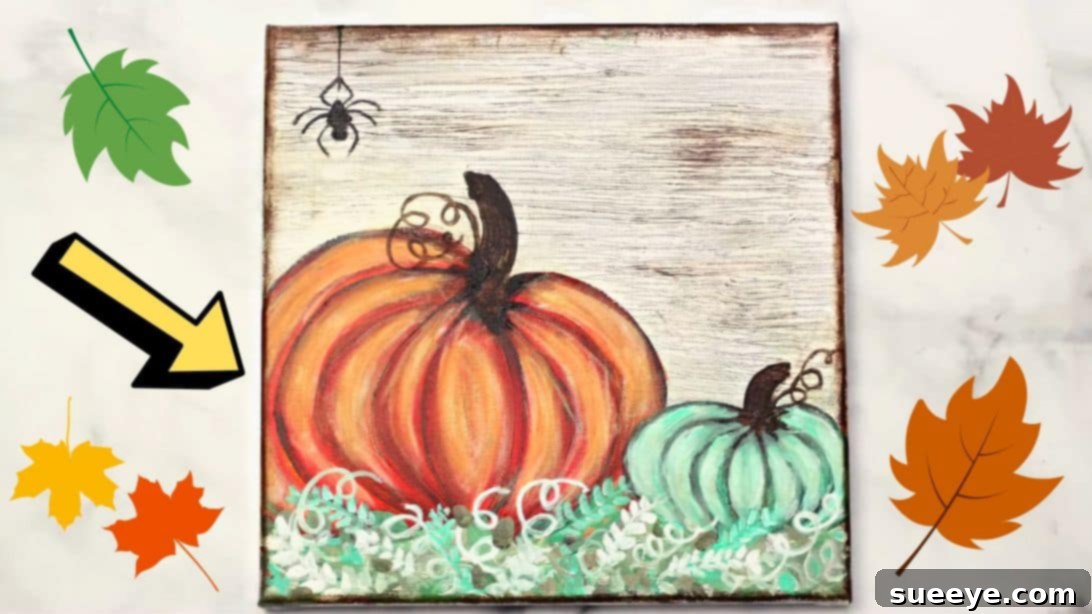
Mastering Fall Art: An Easy Pumpkin Painting Tutorial for Absolute Beginners
Do you admire beautiful fall-themed art but feel intimidated by the idea of creating it yourself? Perhaps you’re new to painting or believe you don’t have a natural artistic talent. It’s time to put those doubts aside! This comprehensive tutorial, inspired by the fantastic video instructions from Jasmine – Feeling Nifty Painting Tutorials on YouTube, is specifically designed for beginners. You’ll discover how to easily paint a charming pumpkin using straightforward techniques and simple steps that will leave you feeling like a seasoned artist. Get ready to transform your canvas into a festive autumn masterpiece and impress yourself with your newfound skills!
Embrace the Autumn Spirit: Why Paint a Pumpkin?
There’s something truly special about autumn. The crisp air, the vibrant foliage, and the cozy atmosphere inspire creativity. Painting a pumpkin isn’t just about putting brush to canvas; it’s about capturing the essence of the season and bringing that warmth into your home. A hand-painted pumpkin can serve as a delightful piece of DIY fall decor, a thoughtful handmade gift, or simply a joyful personal project. This tutorial empowers you to express your love for fall through art, even if you’ve never picked up a paintbrush before. It’s a wonderful way to relax, explore your artistic side, and create something beautiful that reflects the spirit of autumn.
Gathering Your Essential Art Supplies
Before we dive into the painting process, let’s ensure you have all the necessary materials. Don’t worry if you don’t have everything on this list already; most items are readily available at art supply stores or even craft sections of larger retailers. Opt for artist-grade acrylic paints if possible, as they offer good pigmentation and blendability, but student-grade paints are perfectly fine for beginners as well.
Paints You’ll Need:
- Cadmium Orange Hue Paint: This vibrant orange will form the primary color of your pumpkin. Its warm tone is essential for that classic autumn look.
- Burnt Umber Paint: A rich, earthy brown that will be used for shadows, the pumpkin stem, and adding depth and warmth to your piece. It’s also fantastic for creating natural textures.
- Titanium White Paint: An absolute staple for any painter, white is crucial for mixing lighter shades, creating highlights, and preparing your background.
- Mars Black Paint: Used sparingly, black helps define sharp details, create deep shadows, and will be perfect for painting our little spider.
- Aqua Green Paint: This lovely, slightly muted green offers a beautiful contrast and will be used for a smaller pumpkin or accent foliage.
- Light Green Permanent Paint (optional): If you wish to add more variety and dimension to your foliage, a second shade of green can be very effective.
Remember that acrylic paints dry relatively quickly, so be sure to have a palette (a simple plate or plastic lid works) and a water container handy for cleaning your brushes.
Brushes for Every Detail:
- 1″ Flat Wash Brush: This wider, flat brush is ideal for covering larger areas, like your canvas background, quickly and smoothly. Its broad bristles help distribute paint evenly.
- ½” Flat Brush: A versatile medium-sized flat brush, perfect for painting the main body of your pumpkin, applying highlights, and executing the “double loading” technique with precision.
- ¼” Flat Brush: This smaller flat brush is excellent for more controlled strokes, shaping the pumpkin stem, and adding medium-sized details.
- Size 0 Round Brush (or any small round brush): For the tiniest, most intricate details such as the delicate spider, curly vines, and fine foliage elements. Its pointed tip allows for precision.
- A Few of Your Favorite Small Brushes (for the foliage): Having a variety of small, perhaps even slightly stiffer brushes can help create different textures and shapes for your leaves and other botanical elements, adding to the organic feel of the painting.
Caring for your brushes is important. Always rinse them thoroughly with water after use and reshape them before storing. Good brushes, properly maintained, will serve you well for many painting projects.
Additional Tools & Preparations:
- Plastic Cutlery Fork: This might sound unconventional, but a simple plastic fork is your secret weapon for creating unique textures on your background, giving your painting an extra dimension.
- Canvas: Choose a canvas size that suits your preference. A standard 8×10 or 9×12 inch canvas is a great starting point for beginners. You can also use canvas boards or even thick paper suitable for acrylics.
- Water Container: For rinsing brushes between colors.
- Paper Towels or a Rag: Essential for drying brushes, wiping excess paint, and cleaning up any spills.
- A Palette: To mix your paints. A disposable paper plate, an old ceramic plate, or a dedicated plastic palette will work.
- An Easel (optional): While not strictly necessary, an easel can make painting more comfortable by holding your canvas at an ideal angle.
- Apron or Old Clothes (optional but recommended): Acrylics are permanent once dry, so protect your clothing!
Before you begin, set up a clean, well-lit workspace. Lay down newspaper or a protective sheet to prevent paint splatters on your surfaces. Having everything organized will make your painting experience much more enjoyable and efficient.
Step-by-Step Guide to Your Autumn Masterpiece
Now that you have your supplies ready and your workspace prepared, let’s embark on the exciting journey of creating your fall pumpkin painting. Remember, art is about expression, not perfection. Don’t be afraid to experiment and enjoy the process!
Step 1: Laying the Foundation – Sketch, Background, and Pumpkin Base
Our first step is to establish the basic elements of our composition. We’ll start by lightly sketching our pumpkins, creating a textured background, and applying the initial layer of color to our main pumpkin.
Begin by gently sketching the general shape and placement of your pumpkin(s) on your canvas using a light pencil. Don’t press too hard; these lines are just guides. Think about a slightly rounded, organic shape, perhaps with a smaller pumpkin nestled beside it if you choose.
Next, take your 1″ flat wash brush and begin filling in the background with burnt umber paint. Be careful to avoid painting over your pumpkin sketch; we want to keep that area clean for its own vibrant color. This dark, earthy background will provide a lovely contrast to the bright orange pumpkin. Let this layer dry completely to prevent colors from mixing unintentionally in the next step.
Once the burnt umber background is dry, apply a generous, thick layer of titanium white paint over the entire background. Don’t forget to paint the sides of your canvas as well, to give your finished piece a professional, wrapped look. While this white paint is still wet – and this is key for the texture – take your plastic cutlery fork. Gently drag the tines of the fork across the wet white paint in various directions. This technique will create interesting, subtle textures and lines, mimicking wood grain or abstract patterns, adding depth and character to your background. Once you’re satisfied with the texture, allow the canvas to dry thoroughly.
With the background complete, it’s time to move to the pumpkin. Dip your finger (yes, your finger!) into a small amount of burnt umber paint and gently smudge it along the very edges of your canvas. This softens the transition from the painted surface to the edge and adds a subtle antique or weathered feel. Now, using your light pencil or a very fine brush, draw a few curved lines on your main pumpkin sketch. These lines will represent the ridges of the pumpkin, giving it that classic segmented appearance and helping create a three-dimensional effect.
Finally, for the main pumpkin color, we’ll use a technique called “double loading.” Load your ½” flat wash brush with cadmium orange paint, ensuring the bristles are covered up to the metal ferrule. Then, dip just one corner of the brush into a small amount of burnt umber paint. As you paint the pumpkin segments, start with the burnt umber side of the brush on one of your drawn ridge lines and pull the paint across. This technique allows for a beautiful, natural gradient from a darker, shadowed edge to a brighter orange center, instantly adding depth and realism to your pumpkin.
Step 2: Adding Dimension, Highlights, and Finishing Details
With the base colors down, we’ll now bring our pumpkins to life by adding highlights, refining shapes, and incorporating charming details that truly make the painting pop.
Continue to define your pumpkin’s form by painting a “C” stroke with the wide edge of your ½” flat brush for each pumpkin ridge. Start at the top, curve down and outward, and then back in towards the bottom. This stroke naturally enhances the rounded, segmented appearance. Repeat this for all the ridges, ensuring a consistent and organic flow. If you’re painting a smaller, secondary pumpkin, apply the same “C” stroke technique, but use aqua green mixed with a touch of burnt umber for a visually interesting contrast to your main orange pumpkin.
To give your pumpkins a wonderful three-dimensional quality, it’s time to add highlights. Mix a small amount of titanium white with your cadmium orange for the main pumpkin, and white with aqua green for the smaller one. Using your ½” flat brush, apply these lighter mixtures to the areas where light would naturally hit – typically the upper and central parts of each segment. Paint these highlights with soft, curved strokes, following the pumpkin’s shape, to make them appear rounded and full.
Now, let’s give our pumpkins their distinctive stems. Using your ¼” flat brush and burnt umber paint, create a bold, organic stem on the top center of each pumpkin. Vary the thickness and add a few natural twists and turns to make it look authentic. While you have your small brushes out, switch to your size 0 round brush and dip it in burnt umber. Delicately draw some curly branches or tendrils emerging from the base of the stems. These small, elegant details add movement and a touch of realism to your composition.
For a whimsical touch, let’s add a cute spider! Using your size 0 round brush and Mars black paint, carefully paint a small, simple spider at the top of your canvas, perhaps hanging from one of the curly branches. Two small circles for the body and head, and eight tiny legs are all you need to create an adorable arachnid.
Finally, it’s time to add the finishing touches with foliage. Using assorted green colors (your aqua green, light green permanent, and even some mixed with white for lighter shades), and your smaller round or flat brushes, paint various leaves and small sprigs at the bottom of your canvas, around the base of the pumpkins. Use different brush strokes and varying sizes to create a natural, organic look. A few touches of titanium white can be added to the leaves for highlights, making them appear fresh and vibrant. Take a moment to step back, admire your work, and add any final details or touch-ups you feel are needed.
Essential Tips for Beginner Painters
As you embark on your painting journey, keep these helpful tips in mind to make your experience more enjoyable and less intimidating:
Don’t Fear the Blank Canvas
The empty canvas can sometimes feel daunting. Remember that it’s a space for exploration and creativity. There’s no right or wrong way to start; just put that first brushstroke down! The initial layers are just a foundation, and you can always build upon them or adjust as you go.
Practice Makes Progress
Art, like any skill, improves with practice. Don’t expect perfection on your first attempt. Each painting is a learning experience. The more you paint, the more comfortable you’ll become with your materials and techniques, and the more your unique style will emerge.
Experiment with Color Mixing
Don’t just stick to the colors straight from the tube. Experiment on your palette! Mixing different ratios of colors, adding white for lighter tints, or a touch of black (carefully!) for darker shades will expand your palette and allow for more nuanced and interesting results. Notice how the burnt umber mixed with orange creates natural shadows.
Take Breaks
Sometimes, stepping away from your painting for a few minutes or even an hour can give you a fresh perspective. When you return, you might notice details or areas that need adjustment that you didn’t see before.
Enjoy the Process
Painting should be a relaxing and rewarding activity. Don’t get too caught up in trying to make it “perfect.” Focus on enjoying the sensation of the brush on the canvas, the blending of colors, and the satisfaction of creating something with your own hands. The joy in the process will shine through in your finished piece.
Customizing Your Fall Pumpkin Art
While this tutorial provides a fantastic framework, feel free to make this painting your own! Here are a few ideas to personalize your fall pumpkin masterpiece:
- Vary the Colors: Instead of traditional orange, try painting your pumpkin in shades of white, cream, or even a deep teal for a unique touch.
- Add More Elements: Introduce other fall motifs like tiny bats, friendly ghosts, colorful leaves, or a small black cat peeking from behind the pumpkin.
- Change the Background: Experiment with different background colors or textures. Perhaps a starry night sky or a soft, autumnal gradient.
- Different Pumpkin Shapes: Try painting pumpkins of varying sizes and shapes – tall and skinny, round and plump, or even a stack of pumpkins.
- Glitter or Metallic Accents: For a bit of sparkle, add subtle glitter glue or metallic paint to highlights or decorative elements once the painting is completely dry.
Your canvas is your playground. Let your imagination guide you and create a piece that truly reflects your personal style and love for the fall season.
Conclusion: Your Fall Masterpiece Awaits!
Congratulations! You’ve successfully navigated the steps to create a beautiful, fall-themed pumpkin painting. Whether this is your very first painting or simply a new technique you’ve tried, you’ve now experienced the joy and satisfaction of bringing a vision to life on canvas. We hope this tutorial has demystified the painting process and empowered you to explore your creative potential.
Remember, every artist starts somewhere. With practice, patience, and a willingness to experiment, you’ll continue to grow and refine your skills. Don’t hesitate to revisit the inspiring tutorial by Jasmine – Feeling Nifty Painting Tutorials on YouTube for visual guidance and more amazing art ideas. Give her channel a visit and subscribe for more fantastic painting adventures!
Now, display your gorgeous pumpkin painting with pride, knowing that you created something truly special. Happy painting!