
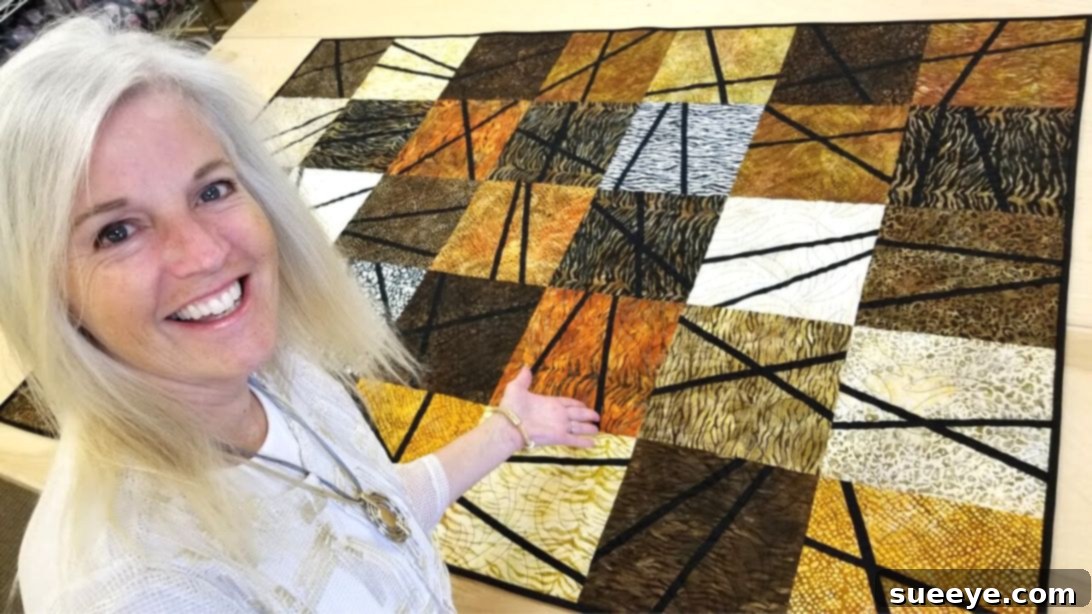
Master the Layer Chops Quilt Pattern: An Easy & Dynamic Quilt Tutorial
Are you searching for your next captivating sewing project, one that combines ease of construction with stunning visual appeal? Look no further than the remarkable Layer Chops Quilt Pattern. This ingenious design, brought to widespread popularity by the talented team at Jordan Fabrics on YouTube, is an absolute delight for quilters of all levels. It’s particularly perfect for beginners, offering a straightforward approach to creating intricate-looking blocks that will impress everyone.
The beauty of the Layer Chops Quilt lies in its dynamic aesthetic, born from simple, strategic cuts and the clever use of contrasting fabrics. Imagine a quilt where each block tells its own story through a vibrant mix of patterns and colors, all unified by a striking accent strip. This pattern transforms pre-cut fabric squares, commonly known as ‘layer cakes,’ into unique, angled designs with surprising ease. The technique encourages creative freedom, allowing you to experiment with various fabric combinations and achieve a truly personalized masterpiece. Whether you aim for a modern, eclectic, or traditional look, the Layer Chops design provides the perfect canvas.
In this extensive guide, we will meticulously walk you through every step required to construct your very own Layer Chops Quilt. From selecting the ideal fabrics and gathering your essential tools to the precise cutting, stitching, and assembly of your quilt top, we’ve got you covered. We’ll share invaluable tips for achieving accurate seams, perfect pressing, and clever ways to customize your quilt. Get ready to turn a stack of beautiful fabrics into a cherished, eye-catching heirloom that will bring warmth and joy for years to come.
Gathering Your Materials and Essential Quilting Tools
A successful quilting journey begins with the right preparation. Before you embark on cutting and stitching, ensure you have all the necessary materials and tools within reach. This pattern brilliantly utilizes pre-cut fabrics, significantly reducing your initial prep time and letting you jump straight into the fun part!
Required Materials:
- 35 Layer Cake Squares: A standard layer cake pack contains 10-inch by 10-inch squares, typically from a coordinating fabric collection. The key to an interesting Layer Chops Quilt is variety. Select a layer cake with a diverse range of designs, colors, and tonal values. Think about how different prints will interact – some bold and graphic, others subtle and delicate – to create visual depth and excitement in your finished quilt blocks.
- One Yard of Accent Fabric: This fabric is crucial as it will form the defining ‘chops’ within your blocks. Choose a color that offers a strong, clear contrast against the majority of your layer cake squares. A solid color is often recommended for maximum impact, making the accent strips truly pop. However, a tone-on-tone print or a subtly textured blender can also be incredibly effective, adding another layer of interest without overwhelming the main fabrics. This accent fabric acts as a cohesive element, tying together the diverse array of your layer cake prints.
Essential Quilting Tools:
While the pattern focuses on materials, a well-equipped workspace is fundamental for precision and enjoyment in quilting. Having these tools ready will streamline your process:
- Rotary Cutter: A sharp rotary cutter (45mm is a common, versatile size) is indispensable for making clean, fast, and accurate fabric cuts. Always use it with a self-healing mat.
- Quilting Rulers: Clear acrylic quilting rulers are vital for precise measuring and cutting. A long ruler (e.g., 6″ x 24″) is excellent for strips, and a square ruler (e.g., 12.5″ x 12.5″) will be helpful for squaring up blocks.
- Self-Healing Cutting Mat: Protects your work surface and extends the life of your rotary blades. Choose one large enough for your fabric pieces.
- Sewing Machine: A reliable sewing machine is a must. Familiarize yourself with its quarter-inch seam allowance. A specialized quarter-inch presser foot is highly recommended for consistent seam accuracy.
- Iron and Ironing Board: Proper pressing is as important as accurate stitching. A good steam iron and a sturdy ironing board are essential for flat, crisp seams and blocks.
- Fabric Marker or Tailor’s Chalk: For making temporary marks on your fabric, choose a marker that is clearly visible but easily removable (e.g., white chalk, disappearing ink pen).
- Fabric Scissors: Useful for snipping threads, trimming fabric, and other small cutting tasks.
- Seam Ripper: An inevitable and valuable tool for every quilter! Don’t be afraid to use it to correct mistakes – precision is worth the effort.
- Pins or Fabric Clips: To securely hold fabric layers together while stitching, ensuring they don’t shift.
Step-by-Step Instructions: Crafting Your Dynamic Layer Chops Quilt Blocks
With your materials and tools at the ready, it’s time to dive into the exciting process of cutting and sewing your unique Layer Chops quilt blocks. Remember, consistency in your seam allowance and careful pressing at each stage will contribute significantly to the beauty and accuracy of your finished quilt.
Step 1: Preparing Your Accent Fabric Strips
Your first task is to prepare the accent fabric that will give your quilt its distinctive ‘chopped’ look. Take your one yard of accent fabric and, using your rotary cutter and a long quilting ruler, cut it into 1-inch wide strips. It is critically important to cut these strips parallel to the selvages (the woven edges of the fabric). This is because fabric has significantly less stretch along the lengthwise grain. Cutting parallel to the selvage ensures your accent strips are stable, minimizing distortion as you sew and press them. This attention to detail will help maintain the precise dimensions of your blocks and prevent wavy seams later on.
Step 2: The Initial Chop and Accent Strip Attachment
Select one of your 10-inch layer cake squares. The charm of the Layer Chops pattern lies in its freedom of design. Position your rotary cutter and make a single, deliberate cut across the square at an *odd and interesting angle*. Avoid making perfectly straight horizontal, vertical, or diagonal cuts. Embrace asymmetry to create visual intrigue. You will now have two irregular halves from your original square. Briefly set these halves aside.
Next, take one of your 1-inch accent fabric strips. Using your fabric marker or chalk, make a small, temporary mark near the middle of both cut edges of your layer cake halves. These marks will serve as alignment guides. Place one of the layer cake halves right side up on your cutting mat. Position an accent strip right side down along the newly cut edge. Ensure that both ends of the accent strip extend beyond the layer cake piece by a comfortable margin. Center the strip visually along the cut. Now, fold the accent strip in half precisely at the point where your white mark aligns with the cut line on the layer cake. Draw a clear line on this fold – this will be your exact stitching line. Carefully stitch the accent strip to the layer cake piece, using a precise quarter-inch seam allowance. A quarter-inch presser foot on your sewing machine is invaluable here for accuracy. After stitching, press the accent fabric *away* from the layer cake piece. This means the seam allowance will be pressed towards the accent strip, creating a smooth, flat surface and minimizing bulk.
Step 3: Completing the First ‘Chopped’ Block
Now, retrieve the other half of your original layer cake square. Place this piece right side down onto the exposed edge of the accent strip, ensuring that the chalk marks you made earlier on both halves align perfectly. This precise alignment is key to rejoining the two original halves with the accent strip seamlessly. Stitch this second layer cake half to the other side of the accent strip, once again using your consistent quarter-inch seam allowance. Once this seam is sewn, press the seam allowance *away* from the accent fabric, towards the layer cake fabric. This pressing technique helps distribute bulk evenly and ensures your finished block lies flat and square. You have now completed your first Layer Chops block!
Step 4: Repeat for All Initial Layer Cake Squares
With your first block complete, repeat the entire process described in Steps 2 and 3 for each of your remaining 34 layer cake squares. As you work through each square, actively embrace variation. Make sure to cut each square at *different angles and in different positions*. Some cuts can be subtle, creating a gentle curve, while others can be more dramatic, slicing sharply across the block. This deliberate lack of uniformity is what gives the Layer Chops Quilt its dynamic, eclectic, and spontaneous charm. The more varied your cuts, the more interesting your final quilt top will be.
Step 5: Introducing the Second Chop (Double Chops)
To add another layer of visual complexity and intrigue, we will now introduce a second ‘chop’ to a portion of your newly created blocks. Select approximately half of your sewn squares – around 17 or 18 blocks. For each chosen block, carefully cut it again in half using your rotary cutter. Crucially, ensure this new cut *crosses over and intersects the existing accent strip*. This action creates a powerful visual effect, where the accent fabric appears to be “chopped” or intersected by another design element. After making this second cut, repeat the same process as in Steps 2 and 3: insert another 1-inch accent fabric strip along the new cut, stitch with a quarter-inch seam allowance, press the seam allowance, and then attach the other half of the block. Once you have completed this double-chop process for all your selected squares, take the time to press them thoroughly with a hot iron. This step introduces a striking, criss-cross element to certain blocks, adding significant depth to your quilt’s overall design.
Step 6: Single Chop, Non-Intersecting Accent Variation
For the remaining half of your initially sewn squares (the blocks you didn’t choose for the double-chop intersecting design in Step 5), you will create another accent, but with a distinct visual outcome. Make a second cut on these squares, but this time, *do not cross the existing accent strip*. Instead, make a cut that runs parallel to, or at a non-intersecting angle with, your first accent strip. This technique will result in blocks featuring two distinct accent strips that do not cross, offering a different kind of visual interest and further diversifying your quilt block collection. Apply an accent strip to this new cut, stitch it, and press just as you did in Steps 2 and 3. By incorporating single chop, double chop (intersecting), and double chop (non-intersecting) blocks, you create incredible depth and a captivating mosaic within your quilt top, all built from simple, repeatable steps.
Step 7: Trimming for Uniformity and Squareness
Once all your blocks have their accent strips sewn in and pressed, it’s time for a critical step: squaring them up. Using a large square quilting ruler and your rotary cutter, carefully trim any excess fabric from the edges of the accent strips and square up each block to a consistent size. For instance, if your original layer cakes were 10 inches and your strips added to this, you might square them down to a uniform 9.5-inch or 9-inch block, depending on your preference and how much fabric was consumed by your seam allowances. This step is absolutely essential for ensuring that all your blocks are the same size and perfectly square. Uniform blocks are crucial for seamless assembly; they prevent wavy rows, mismatched corners, and frustration when joining your quilt top sections.
Step 8: Arranging and Assembling Your Quilt Top
This is arguably the most exciting part where your quilt truly begins to take shape! Find a large, flat surface – a clean floor or a dedicated design wall works perfectly. Begin to lay out all your finished blocks. The pattern suggests an arrangement of 5 blocks per row, but feel free to adjust this based on your desired quilt size. Experiment with the placement of your different block types (single chop, double chop intersecting, double chop non-intersecting). Rotate individual blocks to create different visual flows, patterns, and secondary designs. Play with color and design distribution to achieve a balanced and harmonious look. Step back frequently to view your layout from a distance, as this helps you spot any areas that might need adjustment. Once you are completely satisfied with the arrangement, begin sewing your blocks together into rows. Stitch each block to its neighbor within a row, maintaining that consistent quarter-inch seam allowance. After all blocks in a row are sewn, press the seams for that row. For easier alignment later, consider alternating the direction of seam allowances for adjacent rows (e.g., press seams to the left for row 1, to the right for row 2, and so on). This technique allows seams to “nest” together when you join the rows, reducing bulk and greatly improving alignment. Finally, sew your completed rows together to form the complete quilt top, again using a precise quarter-inch seam. Take your time to carefully align the seams where rows meet for the neatest possible finish. Press the final horizontal seams open or to one side, according to your preference and to ensure a flat quilt top.
Essential Quilting Tips for a Flawless Finish
Beyond following the step-by-step instructions, adopting good quilting practices will significantly elevate the quality of your finished Layer Chops Quilt. Here are some pro tips to help you achieve a beautiful, professional-looking result:
- Maintain a Consistent Quarter-Inch Seam: This is the golden rule of quilting. Even slight variations in your seam allowance can lead to blocks that don’t square up correctly or rows that don’t match. Invest in a dedicated quarter-inch presser foot for your machine, or practice on scrap fabric until your seam is consistently accurate.
- Press, Don’t Iron: In quilting, we typically ‘press’ seams rather than ‘iron’ them. This means lifting your iron, placing it down, holding it for a moment, and then lifting it again, rather than sliding it across the fabric. Sliding the iron can stretch and distort your fabric, especially on the bias. Press seams flat and crisp at every stage for accurate blocks.
- Chain Piecing for Efficiency: To save time, especially when sewing multiple accent strips or joining many blocks, consider chain piecing. This technique involves feeding multiple units through your sewing machine consecutively without cutting the thread in between. Once all units are sewn, you can then snip them apart, saving time on starting and stopping.
- Test Your Stitches: Before sewing your actual quilt blocks, always take a moment to test your stitch length and tension on a scrap piece of the same fabric you are using. This ensures optimal stitch quality and prevents potential issues later.
- Sharp Rotary Blades: A sharp rotary cutter blade is essential for clean, precise cuts. A dull blade can chew fabric, making accurate cuts difficult and potentially fraying edges. Replace dull blades promptly.
- Stay Organized: As you create a large number of blocks with different accent placements, keeping them organized by type (e.g., single chop, double chop intersecting, double chop non-intersecting) can be incredibly helpful when you reach the layout stage.
- Square Up Accurately: Don’t skip or rush the squaring up process (Step 7). This step ensures all your blocks are uniform, which is paramount for a flat, well-aligned quilt top.
Variations and Customization Ideas for Your Unique Quilt
The true brilliance of the Layer Chops Quilt Pattern lies in its incredible versatility. Once you’ve mastered the fundamental technique, you’ll discover endless possibilities for customizing your quilt to reflect your personal style, adjust its size, and experiment with different aesthetics.
- Adjusting Quilt Size: The easiest way to change the final quilt size is by simply making more or fewer blocks. For a smaller project like a decorative table runner, placemat, or baby quilt, reduce the number of blocks accordingly. Conversely, for a larger bed quilt, plan to create more units. You could also start with smaller initial squares, such as 5-inch charm packs, to create a miniature version of this dynamic pattern.
- Fabric Palette Exploration: The choice of fabrics dramatically impacts the quilt’s mood. Experiment with diverse fabric collections: a selection of bright, contemporary prints will create a vibrant, modern aesthetic, while muted, vintage-inspired florals might evoke a cozy, traditional feel. Consider a sophisticated monochromatic scheme using varying shades of a single color, or dive into your scrap bin for a truly unique and eco-friendly scrappy quilt.
- Creative Accent Fabric Choices: While a solid accent fabric provides bold definition, don’t be afraid to experiment. A subtle blender, a small-scale tone-on-tone print, or even a low-volume print can add intriguing texture without competing with the main fabrics. For a touch of glamour, a metallic accent fabric can introduce sparkle, while a neon color can give your quilt a contemporary edge.
- Designing Borders: Once your quilt top is assembled, consider adding one or more borders to frame your design and increase the overall dimensions. Simple solid borders in a coordinating color can provide a clean finish, while pieced borders or even classic flying geese borders can echo the dynamic nature of the Layer Chops blocks.
- Quilting Motifs: The quilting stitches themselves offer another layer of design. Simple straight-line quilting, parallel lines, cross-hatching, or more intricate free-motion quilting patterns can all enhance the texture and visual appeal of your finished quilt. Choose a quilting design that complements the “chopped” lines and the overall feel of your fabric choices.
- Backing and Binding: Don’t overlook the backing fabric and binding as opportunities for further customization. These elements are your final chance to coordinate colors and prints, creating a truly cohesive and beautiful quilt from front to back. A playful backing can offer a delightful surprise, while a carefully chosen binding neatly frames your completed masterpiece, giving it a polished look.
Conclusion: Your Journey to a Stunning Layer Chops Quilt
Congratulations! You have now thoroughly explored the exciting and rewarding world of the Layer Chops Quilt Pattern. From those initial, artistic angled cuts to the meticulous final assembly of your quilt top, each step in this process is designed to be accessible, enjoyable, and incredibly satisfying. This pattern stands as a beautiful testament to how simple, repeatable techniques can be combined to create something truly spectacular and uniquely yours. Whether this marks your very first quilting endeavor or you are a seasoned stitcher, the Layer Chops design offers a refreshing approach to block construction, inviting immense creativity with minimal stress.
We sincerely hope that this detailed tutorial has empowered you with the knowledge and confidence to approach your sewing machine and bring your vision to life. The thoughtful variation in fabric choices, the dynamic angles of each cut, and the clever placement of accent strips all contribute to a finished quilt that is rich in movement, texture, and undeniable personality. Remember to savor every moment of the creative process, embrace any small imperfections as charming features of a handmade item, and most importantly, have immense fun creating something truly beautiful with your own hands.
Now, gather your beloved layer cakes, choose that perfect contrasting accent fabric, and get ready to chop, stitch, and press your way to a stunning new quilt that will be cherished for generations. Happy quilting, and we can’t wait to see your unique Layer Chops creations!