
As the vibrant hues of summer fade into the warm, earthy tones of autumn, there’s a unique sense of magic that permeates the air. Fall is a season rich with beloved traditions, from carving pumpkins and gathering around bonfires to enjoying cozy evenings with loved ones. And, of course, it’s a time for a delightful bounty of seasonal treats! Among these cherished confections, candy corn holds a special place, instantly recognizable as an iconic symbol of autumn and particularly synonymous with Halloween. Its distinctive flavor, unique texture, and vibrant tri-color design evoke a sense of nostalgia and festive cheer that many of us eagerly anticipate each year.
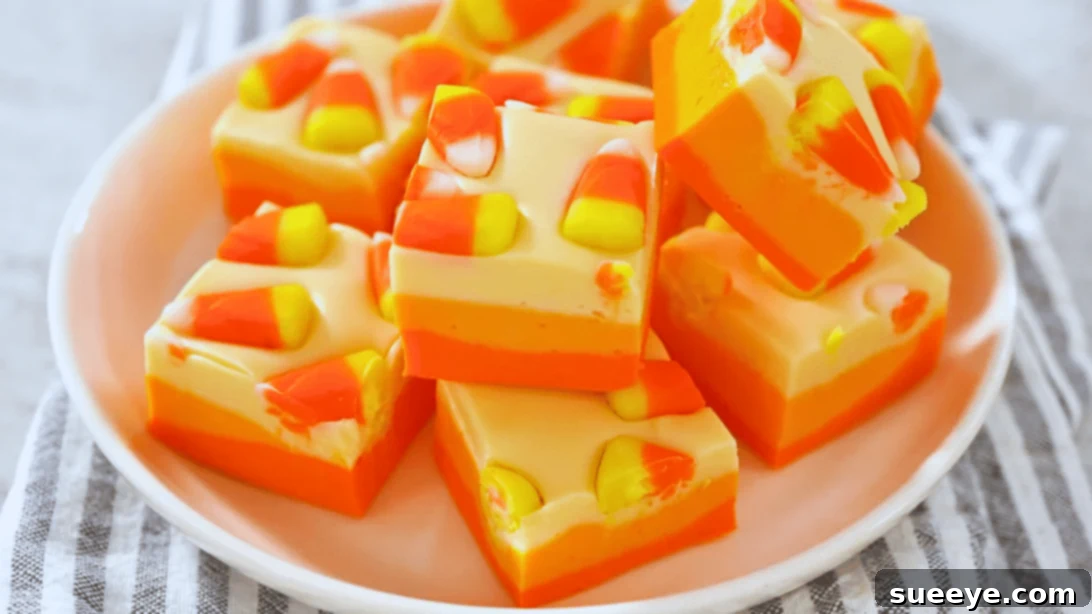
For those of us who love to incorporate this classic treat into new and exciting forms, finding the perfect recipe is always a quest. We’ve certainly tried our fair share of candy corn creations, but few compare to the sheer simplicity and utterly delicious results of this Candy Corn Fudge by Arina Photography on YouTube. This recipe is an absolute revelation for anyone who desires a show-stopping homemade dessert without the hassle of extensive baking. The most remarkable aspect? It requires no baking whatsoever, making it an incredibly accessible and stress-free option for creating a professional-looking and unbelievably tasty treat.
RELATED: Festive Candy Corn Cupcakes Recipe
The resulting fudge is a triumph of texture and taste: wonderfully rich, velvety smooth, and undeniably delicious. Its melt-in-your-mouth creaminess combined with the sweet essence of fall flavors makes it an instant crowd-pleaser. We’re confident that once you taste it, you’ll find it nearly impossible to stop at just one piece – it’s truly that addictive! While the entire process is remarkably straightforward, there is one crucial element that demands a little patience: the chilling time. Each beautiful, distinct layer of this tri-colored confection needs ample time to set completely before the next layer can be added. This meticulous step is vital for achieving those crisp, clean lines that define its iconic candy corn appearance. However, this waiting period is entirely passive, allowing you to relax, tackle other seasonal tasks, or simply anticipate the delightful reward that awaits in your refrigerator. Beyond these brief pauses, this recipe stands out as one of the most beginner-friendly and incredibly rewarding no-bake desserts you’ll encounter for the festive season.
Crafting the Iconic Layers: Essential Ingredients for Candy Corn Fudge
The allure of this candy corn fudge lies not only in its striking visual appeal but also in its surprisingly short and sweet ingredient list. You’ll likely find most of these items already stocked in your pantry or readily available at any grocery store, making it incredibly convenient to whip up a batch whenever a festive craving strikes or an occasion calls for a special, homemade touch. Utilizing high-quality ingredients is paramount to achieving that coveted creamy texture and rich, decadent flavor that elevates this fudge from good to truly unforgettable. Each component plays a vital role in creating the perfect balance of sweetness and smoothness.
- 3 cups of high-quality white chocolate chips: These form the foundational base of your fudge, so choosing a good brand will significantly impact both the flavor and the final texture. Quality chips melt more smoothly and provide a superior taste.
- ¼ cup of unsalted butter, at room temperature: Allowing your butter to come to room temperature is a small but crucial step. It ensures the butter blends seamlessly and evenly into the chocolate mixture, contributing to a wonderfully silky and consistent fudge texture.
- 1 (14 oz) can of sweetened condensed milk: This is the star ingredient that performs magic in no-bake fudge recipes. It provides the essential creamy sweetness and acts as the binder, giving the fudge its firm yet melt-in-your-mouth structure. Be sure to use sweetened condensed milk, not evaporated milk.
- 1 tsp of vanilla extract: A generous teaspoon of pure vanilla extract enhances all the other flavors, adding a warm, aromatic depth that beautifully complements the sweetness of the chocolate and marshmallow.
- ½ cup of marshmallow creme: This delightful addition is the secret to achieving an incredibly soft, fluffy, and smooth texture. Marshmallow creme helps the fudge become light and airy, creating that desirable melt-away sensation.
- Food coloring, yellow and orange: Absolutely essential for replicating the iconic candy corn aesthetic. Using gel food colorings is often recommended as they provide more vibrant, concentrated hues with fewer drops, preventing unwanted liquid from thinning your fudge mixture.
- ½ cup of candy corn: These classic candies are not just for thematic decoration. Gently pressed into the top layer, they add a playful pop of color, a hint of their unique flavor, and a delightful textural contrast to the smooth fudge.
Step-by-Step Guide: How to Master No-Bake Candy Corn Fudge
Creating this visually stunning and utterly delicious batch of candy corn fudge is a delightful journey, and following these detailed instructions will ensure your success. The process is intentionally designed to be straightforward and accessible, making it an enjoyable experience even for those who are new to making homemade confections. Prepare to impress everyone with your vibrant, layered masterpiece!
Step 1: Preparing the Velvety Fudge Base with a Double Boiler
The secret to a truly great fudge lies in its perfectly melted and combined base. To achieve this without the risk of scorching, we’ll employ a classic and simple double boiler method. Begin by taking a medium-sized saucepan and filling it approximately halfway with water. Place this saucepan on your stovetop and bring the water to a gentle simmer over medium heat. Next, carefully position a large, heat-safe glass mixing bowl directly over the saucepan. It is absolutely crucial that the bottom of this glass bowl does not make contact with the simmering water below; the indirect heat from the steam is what will gently melt your ingredients, ensuring a smooth, lump-free mixture. Into this suspended bowl, add your high-quality white chocolate chips, the softened unsalted butter (which should be at room temperature for optimal blending), the entire can of sweetened condensed milk, and the vanilla extract. Using a spatula or a sturdy spoon, gently and continuously stir these ingredients. Your goal is to melt them slowly and incorporate them fully until they transform into a uniformly smooth, glossy, and utterly luxurious mixture. This process may take several minutes, so patience is key. Continue stirring consistently to prevent any ingredients from sticking to the bottom of the bowl. Once everything is perfectly melted and thoroughly combined into a creamy, cohesive base, carefully remove the bowl from the saucepan and set it aside.
Step 2: Dividing and Coloring the Iconic Layers
With your rich, warm fudge base now prepared, it’s time to impart the distinctive hues that mimic the beloved candy corn. To the warm fudge mixture you just created, add the marshmallow creme. Stir vigorously and thoroughly until the marshmallow creme is completely incorporated into the fudge, creating an even softer, silkier, and more yielding consistency. This step is fundamental for achieving that coveted melt-in-your-mouth texture. Next, take this delectable mixture and divide it as evenly as possible among three separate, medium-sized bowls. Precision in division here will greatly assist in creating consistent and attractive layer thicknesses in your final fudge. To the first bowl, add a few drops of orange food coloring. Mix it thoroughly, ensuring the color is uniform and achieves a vibrant, autumnal shade. To the second bowl, add yellow food coloring, mixing it meticulously until you reach your desired bright yellow hue. The third bowl will remain uncolored, serving as your pristine white layer. Confirm that each colored mixture is perfectly blended to avoid any streaking in the finished product. Before pouring, prepare a rectangular baking sheet (ideally 9×13 inches) by lining it generously with parchment paper. Allow a slight overhang on the sides; this will prove invaluable for easily lifting the fudge out of the pan later. Carefully pour the orange fudge mixture onto the prepared baking sheet. Using an offset spatula or the back of a spoon, gently spread it smoothly and evenly across the bottom, ensuring it reaches all corners for a uniform first layer.
Step 3: Layering, Chilling, and the Grand Finale
With the vibrant orange layer beautifully spread across your baking sheet, it’s time for the crucial first chill. Carefully transfer the baking sheet into the refrigerator. Allow it to sit there for approximately 1 hour, or if you’re working with a tighter timeline, you can place it in the freezer for about 20 minutes. The primary objective here is to ensure this layer becomes firm enough to perfectly support the next, preventing any undesirable bleeding of colors. Once the orange layer is sufficiently set and firm, retrieve it from the fridge or freezer. Now, with utmost care, pour the yellow fudge mixture directly over the chilled orange layer, spreading it gently and evenly across the entire surface. Be mindful not to disturb the set layer beneath. Return the baking sheet to the refrigerator for another hour of chilling, or back into the freezer for 20 minutes, allowing this yellow layer to become completely firm. Finally, once the yellow layer has set, pour the white fudge mixture (your uncolored portion) on top, spreading it smoothly and evenly to create the final, pristine white layer. While this top white layer is still slightly soft but stable, it’s the perfect moment to gently press your candy corns onto the surface. You can arrange them in a neat pattern, scatter them playfully, or create a unique design – this step adds not only visual appeal but also a delightful chewiness and reinforces the festive theme. For the final and most critical chill, place the entire fudge back into the refrigerator. This extended chilling time is essential, allowing the fudge to firm up completely and ensuring it’s easy to slice into clean, beautiful bars. Ideally, let it chill for at least 2 hours, or even better, overnight for the best results. Once thoroughly set, use the parchment paper overhangs to carefully lift the entire slab of fudge out of the pan and transfer it to a clean cutting board. Using a sharp, warm knife (warming the knife under hot water and drying it between cuts helps immensely), slice the fudge into your desired bar sizes. Serve and revel in the exquisite taste and stunning presentation of your homemade candy corn fudge!
Tips for Fudge Perfection and Creative Variations
To ensure your candy corn fudge turns out flawlessly every single time and to inspire your culinary creativity, consider these additional tips and exciting ideas for customization:
- Quality Matters Immensely: The type of white chocolate chips you choose will significantly impact both the flavor profile and the final texture of your fudge. Investing in good quality white chocolate will yield a richer, smoother, and more luxurious fudge, while cheaper alternatives can sometimes result in a waxier or less flavorful consistency.
- Achieving Room Temperature Butter: Do not underestimate the importance of allowing your butter to come to a true room temperature. Butter that is too cold will not blend smoothly into the chocolate mixture, potentially leading to lumps and an uneven base. This small step ensures a perfectly silky fudge.
- The Right Spreading Tool: When spreading each individual layer of fudge, an offset spatula is an invaluable tool. Its flat, angled blade allows for seamless and consistent spreading, which is crucial for achieving those beautifully distinct and professional-looking layers.
- Patience is a Virtue (Especially with Chilling): While it can be tempting to rush the process, allowing each layer ample time to chill and set is paramount to the success of this recipe. This crucial step prevents the vibrant colors from mixing or bleeding into one another, guaranteeing sharp, distinct lines between your orange, yellow, and white layers.
- For Perfectly Clean Cuts: To achieve beautifully precise and clean slices, always use a very sharp knife. For an even smoother cut, you can warm your knife by running it under hot water, wiping it dry, and then making each cut. Repeat this process for every slice to prevent the fudge from sticking or dragging.
- Optimal Storage: To maintain the freshness and delightful texture of your candy corn fudge, store it in an airtight container. It will keep beautifully at room temperature for up to one week, or if you prefer to extend its shelf life, you can refrigerate it for up to two weeks. If refrigerated, allow the fudge to sit at room temperature for 10-15 minutes before serving to ensure optimal softness and flavor.
- Creative Variations to Explore:
- A Hint of Spice: For an extra layer of autumn flavor, consider adding a small pinch of ground cinnamon, nutmeg, or even a specialized pumpkin pie spice blend to the white fudge layer. This subtle warmth will complement the sweetness beautifully.
- Textural Delights: Introduce a delightful crunch by folding in some finely chopped pecans, walnuts, or even toasted almonds into the base fudge mixture before dividing it into layers.
- Exploring Extracts: Don’t be afraid to experiment with different flavor extracts! Almond extract can add a sophisticated touch, while a maple extract could further enhance the autumnal theme.
- Playful Sprinkles: For an even more festive touch, especially if making this for a party, consider adding a sprinkle of Halloween-themed nonpareils or sprinkles on top of the white layer while it is still soft, either in addition to or instead of the candy corn.
Making Memories with Homemade Fall Treats
There is an immense satisfaction that comes from creating homemade treats, especially during a season as rich in tradition and warmth as autumn. This no-bake candy corn fudge transcends being merely a dessert; it is a vibrant, edible expression of fall joy, perfectly suited for sharing and making cherished memories with family and friends. Imagine the delight on faces as you present this stunning, tri-colored confection at your next Halloween party, as a unique contribution to a Thanksgiving gathering, or simply as a delightful surprise for a cozy evening spent at home. Its striking appearance alone makes it an instant centerpiece, a conversation starter, and its rich, creamy taste ensures it will be devoured with genuine pleasure.
Beyond its deliciousness, this recipe offers a fantastic opportunity to engage children in the kitchen (always with appropriate supervision, particularly around hot elements). Little hands can assist with simple tasks like mixing the colors, carefully spreading the yellow and white layers, and, of course, the fun part of pressing the final candy corn pieces into place. It’s a wonderful, hands-on activity that fosters creativity, teaches basic culinary skills, and helps create lasting family memories around the joy of cooking and baking. So, gather your simple ingredients, dedicate a little patience to the chilling steps, and prepare to create a truly unforgettable autumn delight. This candy corn fudge is more than just a sweet treat; it’s a celebration of the season, wonderfully easy to make, and utterly impossible to resist. Enjoy every vibrant, delicious bite!
*All images for this delightful recipe are credited to Arina Photography via YouTube. We highly recommend visiting her channel and subscribing for more inspiring and delicious culinary creations!