
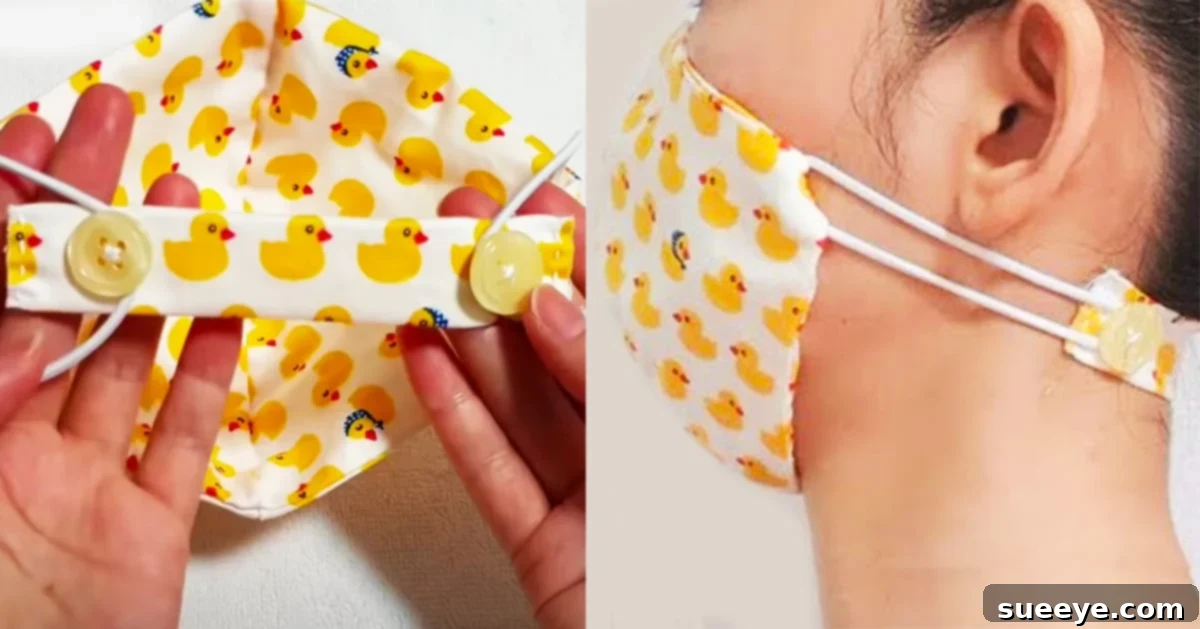
DIY Ear Pain Relief Face Mask: Craft a Comfortable Solution with Merry Craft’s Ingenious Design
For many, wearing a face mask has become an essential part of daily life, yet it often comes with an unwelcome side effect: ear pain. The constant tugging and pressure of elastic straps behind the ears can lead to discomfort, chafing, and even headaches. While countless tutorials exist online for various mask styles, a particular design by Merry Craft stands out as a true game-changer. This innovative face mask promises to prevent ear pain, offering a much-needed reprieve for those who struggle with traditional designs. Its unique construction is not only remarkably comfortable but also surprisingly simple to create, requiring no sewing machine and minimal supplies. This article will guide you through understanding the brilliance behind this mask, why it’s a must-try DIY project, and how you can craft your own personalized, pain-free face covering.
The beauty of Merry Craft’s design lies in its elegant solution to a widespread problem. Instead of relying on ear loops that pull directly on sensitive skin, this mask incorporates a clever buttoned strap system that redirects the tension to the back of the head. This simple modification transforms the mask-wearing experience, making it far more comfortable for extended periods. Imagine a mask that stays securely in place without causing irritation or leaving unsightly marks. This isn’t just a fantasy; it’s a tangible reality achievable through this accessible DIY method. Beyond its comfort, the mask also boasts a sleek appearance, avoiding the bulky look that some ear-saver alternatives can have. It’s designed to slip on easily while maintaining a snug fit for optimal coverage, blending functionality with a refined aesthetic. For anyone seeking a more enjoyable and sustainable mask-wearing experience, diving into this DIY project is an excellent starting point.
The Innovation Behind Comfort: How It Works
The core genius of Merry Craft’s ear pain prevention mask lies in its distinctive attachment mechanism. Unlike conventional masks that rely solely on elastic loops hooked around each ear, this design integrates a supplementary strap, often referred to as an “ear saver,” directly into the mask’s structure. This strap, adorned with buttons, extends from the mask’s side panels and wraps around the back of the wearer’s head, providing an anchor point for the elastic. The elastic loops, instead of stretching directly to the ears, attach to the buttons on this strap. This clever system effectively bypasses the ears entirely, distributing the mask’s tension across the broader, less sensitive area at the back of the head.
This subtle yet impactful shift in pressure distribution is what makes all the difference. By alleviating the direct pull on the delicate skin and cartilage of the ears, it eliminates the common causes of pain, rubbing, and irritation. Furthermore, the buttoned strap often allows for adjustability, providing multiple attachment points for the elastic. This means wearers can customize the tightness and fit of their mask, ensuring optimal comfort and security tailored to their unique head shape and preferences. The result is a mask that feels lighter, more secure, and infinitely more comfortable, even after hours of wear. It’s a testament to how a small design modification can lead to a monumental improvement in user experience.
Why DIY? The Benefits of Crafting Your Own Ear-Saver Mask
Choosing to craft your own ear pain relief face mask, especially one inspired by Merry Craft’s brilliant design, offers a multitude of compelling advantages beyond just comfort. In an era where personalized solutions are increasingly valued, DIY projects empower individuals to create items that perfectly meet their needs and aesthetic preferences. This particular mask project is a shining example of how accessible crafting can lead to practical, everyday benefits.
Customization and Personal Style
One of the most appealing aspects of DIY is the freedom to customize. When you make your own mask, you’re not limited to a few generic patterns or colors. You can select fabrics that truly reflect your personality, match your outfits, or feature fun designs. From vibrant florals to subtle geometrics, the choice is entirely yours. Moreover, you can experiment with different button styles and sizes, transforming a functional item into a personal fashion statement. This level of personalization makes wearing a mask a more enjoyable experience rather than a mere necessity.
Cost-Effectiveness
Purchasing comfortable, high-quality masks can quickly add up, especially if you need several for daily rotation. By making your own, you can significantly reduce costs. Fabric scraps, leftover elastic, and spare buttons can often be repurposed, turning what might have been waste into a valuable and practical item. The initial investment in basic sewing supplies is minimal, and the return on investment in terms of comfort and savings is substantial.
Accessibility: No Sewing Machine Required
A common barrier to many sewing projects is the need for a sewing machine. Merry Craft’s tutorial explicitly demonstrates how this mask can be made without one, relying solely on a needle and thread. This opens up the world of mask-making to anyone, regardless of their access to specialized equipment or their sewing expertise. Hand sewing is a meditative and rewarding process that allows for precision and a deeper connection to the item being created. It’s a perfect project for beginners or those who prefer traditional crafting methods.
Empowerment and Entrepreneurial Potential
There’s a unique sense of accomplishment that comes from creating something useful with your own hands. Completing this mask project not only provides you with a comfortable mask but also builds confidence in your crafting abilities. Furthermore, as the original article hints, there’s genuine entrepreneurial potential here. Given the widespread demand for comfortable masks, crafting these ear pain prevention masks could be an excellent way to start a small business. People are actively seeking solutions to mask-related discomfort, and a well-made, comfortable, and stylish mask could find a ready market.
Environmental Considerations
Homemade fabric masks are reusable, reducing the environmental impact associated with single-use disposable masks. By washing and sanitizing your fabric mask, you contribute to less waste in landfills, making it a more sustainable choice for personal protection.
In essence, choosing the DIY route for this ear pain relief mask is not just about making a mask; it’s about embracing comfort, personal style, economic sensibility, and a rewarding creative endeavor. It’s a practical skill that benefits you, your community, and potentially, your wallet.
Supplies Needed for Your Comfort Mask Project:
Gathering the right materials is the first step towards crafting your comfortable, ear-friendly face mask. The beauty of this project lies in its simplicity, requiring readily available items that you might even have around your home. Here’s what you’ll need:
- Plastic Cut Twist Ties: These are surprisingly versatile for this project, likely used for shaping or providing a flexible nose bridge.
- Thread and Needle: The fundamental tools for hand-sewing, making this project accessible even without a sewing machine. Choose a strong, coordinating thread.
- Fabric: Opt for tightly woven, breathable cotton fabric for the best protection and comfort. Consider multiple layers and fun patterns.
- Buttons: These are crucial for the ear-saver strap. Choose flat buttons that are comfortable against the skin and sturdy enough to hold elastic.
- Round Flat Plate: A medium-sized plate will serve as a template for cutting the initial circular fabric pieces, ensuring consistency in shape.
- Fabric Pins: Essential for holding fabric layers together precisely before and during sewing, preventing shifting.
- Iron: Used for pressing seams flat and giving your mask a crisp, professional finish.
- Elastic: A soft, stretchy elastic cord or strip, preferably ¼ inch wide, for the loops that will connect to the button strap.
Step-by-Step Guide: Crafting Your Pain-Free Face Mask
Creating this innovative ear pain prevention face mask is a rewarding process, even for novice sewers. While the full, intricate details are best observed in Merry Craft’s comprehensive video tutorial, we can outline the key stages and principles to help you prepare and understand the construction. This guide expands on the initial steps provided and illuminates the core concept of the ear-saver strap, which is central to the mask’s comfort.
1. Fabric Preparation and Cutting the Base Shape
Begin by selecting your desired fabric. It’s always a good idea to pre-wash and dry your fabric to prevent shrinkage after your mask is completed. Once dry, press it with an iron to remove any wrinkles, ensuring your cuts are precise. The first step in the actual construction involves cutting the primary fabric pieces for the mask body. Using a medium-sized flat round plate as a template, carefully cut out a perfect circle from your fabric. The specific diameter of the plate will determine the final size of your mask, so choose one appropriate for the wearer.
Next, take your fabric circle and fold it into pieces. The tutorial specifically mentions folding and cutting along these folded lines. This technique typically helps create symmetrical, identical segments. After these cuts, you will have four fabric pieces. These pieces are crucial for creating the contoured shape of the mask and for forming multiple protective layers. Lay two of these fabric pieces directly on top of each other, ensuring they are perfectly aligned. This usually forms one half of your mask, with the other two pieces forming the second half. Pin these layers together securely with fabric pins to prevent them from shifting as you proceed to sew.
2. Assembling the Mask Body and Creating Elastic Channels
Once your initial pieces are cut and aligned, the general process involves sewing these layers together to form the main body of the mask. Typically, you would sew along the curved edges to create a slightly cupped shape that fits over the nose and mouth. An important part of most fabric mask designs is creating channels for the elastic. This usually involves folding and stitching the side edges of the mask to create small tunnels through which the elastic can be threaded. Ensure these channels are wide enough for your elastic but snug enough to hold it securely. This is where precision in hand-sewing pays off.
3. The Innovative Ear-Saver Strap with Buttons
This is where Merry Craft’s design truly shines and deviates from standard mask construction. Instead of simply knotting the elastic loops to go around the ears, this design introduces a separate fabric strip, generously adorned with buttons. This strap is designed to connect the elastic loops from the mask body, allowing them to bypass the ears completely.
The key to this tutorial, as highlighted, is indeed this strip with buttons. The elastic from the mask sides is threaded through its respective channel, and then instead of looping around the ear, it creates a loop that hooks onto one of the buttons on this separate strap. This strap then extends around the lower back of your head or neck, distributing the tension away from your ears. The placement of multiple buttons along the strap allows for adjustable tension, ensuring a custom, comfortable fit for various head sizes. This method not only prevents ear strain but also provides a more secure fit, as the mask is held firmly by the back of the head. For the exact steps on how to create and integrate this crucial buttoned strap, including precise measurements and sewing techniques, you’ll want to watch Merry Craft’s full tutorial on YouTube. The video demonstrates the nuanced steps of sewing the mask layers, creating the channels, and attaching this innovative strap, ensuring you get a perfectly crafted, painless face mask.
4. Finishing Touches
Once all your sewing is complete, give your mask a final press with the iron. This not only makes it look professional but also helps to set the stitches. Trim any loose threads and inspect your mask for durability. Your comfortable, ear-friendly face mask is now ready to wear!
Frequently Asked Questions and Pro Tips for Your DIY Mask
Embarking on a DIY project like crafting an ear pain relief face mask can spark several questions, especially for those new to sewing or looking to optimize their creation. Here are some common inquiries and professional tips to help you succeed and enjoy your comfortable new mask.
What type of fabric is best for face masks?
For optimal protection and breathability, choose tightly woven cotton fabrics. Quilting cotton, cotton poplin, or even high-thread-count bed sheets are excellent choices. Avoid fabrics that are too thick, which can hinder breathing, or too loosely woven, which may not offer sufficient filtration. Combining multiple layers (e.g., two layers of cotton) is generally recommended for enhanced protection.
Can I use a sewing machine for this tutorial?
Absolutely! While Merry Craft’s tutorial beautifully demonstrates how to hand-sew this mask, all the steps can easily be adapted for a sewing machine. Using a machine will generally make the process faster and result in more uniform stitches. If you’re using a sewing machine, remember to backstitch at the beginning and end of seams to secure them.
How do I choose the right size for my mask?
The “medium-sized flat round plate” in the instructions is a good starting point, but mask sizing can be highly personal. If you’re making masks for different individuals, consider experimenting with slightly larger or smaller plates for the initial circle cut. The adjustable button strap also offers flexibility in fitting, but the main mask body should comfortably cover the nose, mouth, and chin without gapping.
What kind of elastic should I use?
For maximum comfort, opt for soft, flat elastic that is gentle on the skin. Braided or knit elastic is often more comfortable than cord elastic. A width of ¼ inch (6mm) is typically ideal for mask loops. Ensure the elastic has good stretch and recovery so it doesn’t lose its shape over time.
How many buttons should I put on the strap?
Having at least two or three buttons evenly spaced on each side of the strap provides good adjustability. More buttons offer finer adjustments, allowing the wearer to achieve the perfect tension and fit. Ensure the buttons are securely sewn on, as they will bear the tension of the mask.
How do I care for my handmade fabric mask?
To maintain hygiene and extend the life of your mask, it’s recommended to wash it after each use. Machine wash on a gentle cycle with hot water and regular detergent. Tumble dry on low heat or, preferably, air dry to prevent elastic degradation and fabric shrinkage. An iron can be used on a cotton setting to reshape and sanitize the mask, avoiding direct heat on the elastic.
What if my mask feels too tight or too loose?
The beauty of the buttoned strap is its adjustability. If it feels too tight, try attaching the elastic loops to buttons further apart on the strap. If it’s too loose, use buttons closer together. For persistent fit issues, consider adjusting the length of your elastic loops or creating a new strap with different button placements.
Can I add a nose wire?
Yes, incorporating a nose wire can significantly improve fit and reduce glasses fogging. You can easily add a channel for a flexible nose wire (like a plastic-coated twist tie or a metal craft wire) along the top edge of your mask during the assembly phase. This can be either sewn into a channel or inserted into a small opening that can be sewn closed after the wire is in place.
By keeping these tips in mind, you can confidently create a series of comfortable, effective, and stylish ear pain relief face masks for yourself, your family, or even to share with your community. Enjoy the process of crafting and the newfound comfort!
Final Thoughts: Embrace Comfort and Style
The discomfort associated with traditional face masks has been a significant barrier for many, leading to frustration and, at times, reduced compliance. However, with ingenious designs like the one shared by Merry Craft, a solution is readily available. This ear pain prevention face mask is more than just a piece of fabric; it’s a testament to thoughtful design and practical innovation, addressing a common problem with remarkable simplicity and effectiveness. Its ability to redistribute pressure away from the ears, combined with the ease of hand-sewing, makes it an accessible and highly desirable project for anyone seeking a better mask-wearing experience.
This tutorial offers a fantastic opportunity to not only alleviate personal discomfort but also to explore your creativity and even contribute to the well-being of others. Whether you’re making one for yourself, a loved one, or considering it as a small crafting venture, the benefits are clear. I wholeheartedly encourage everyone to pass on this DIY gem to friends and family, especially those who frequently voice their struggles with ear pain from masks. Give this DIY project a try, and discover the unparalleled comfort and peace of mind that comes with a mask designed with your well-being in mind. It truly is a new style that promises to work wonders for many.