
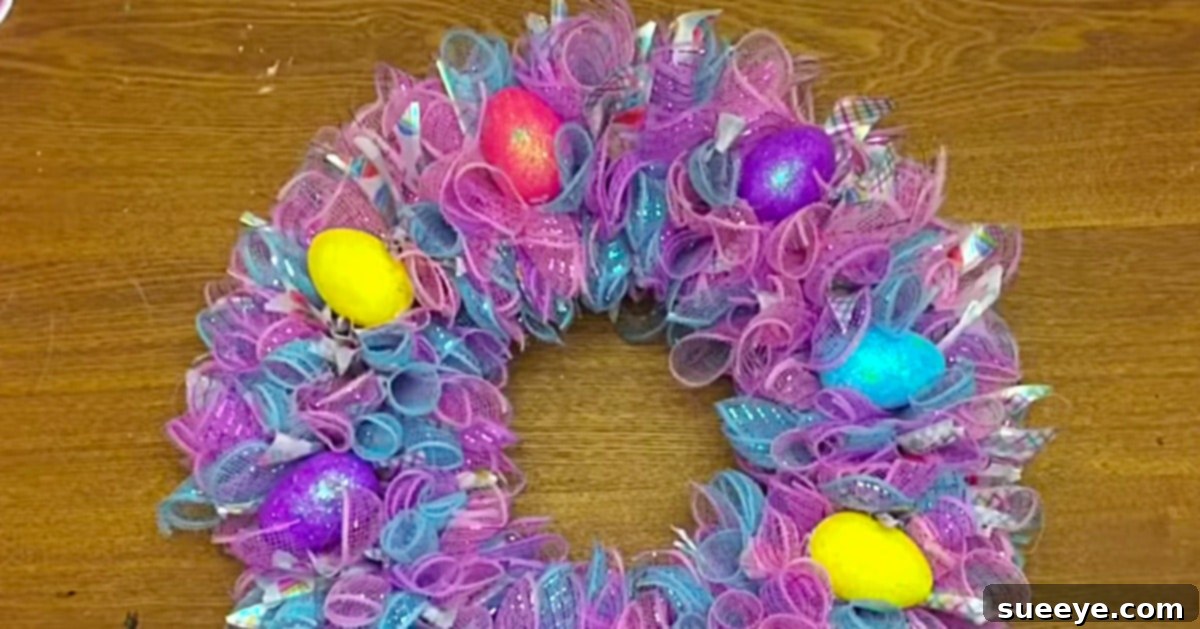
DIY No-Sew Mesh Easter Wreath: Create a Beautiful, Festive, and Easy Front Door Decoration
As the days grow longer and hints of spring fill the air, our thoughts turn to refreshing our homes with bright, cheerful decorations, and Easter provides the perfect excuse! While store-bought wreaths offer convenience, there’s an unparalleled joy and satisfaction that comes from crafting your own. This year, why not embrace the charm of a handmade Mesh Easter Wreath? It’s a project that combines rustic appeal with a touch of feminine flair, creating a welcoming statement for your front door or any space in your home.
Inspired by a love for cozy, ruffle-adorned decor – from bedspreads to curtains – the idea of extending this charming aesthetic to an Easter wreath seemed like a natural fit. We often associate ruffles with softness and comfort, and when applied to a seasonal decoration, they transform into something truly special and unique. This particular no-sew mesh wreath design, discovered through a simple online tutorial, promised both ease of creation and a stunning visual impact that beautifully complements a rustic yet elegant decor theme.
Crafting your own Easter wreath isn’t just about saving money; it’s about infusing your personality into your home. It’s an opportunity to select colors, textures, and embellishments that resonate with your personal style, creating a piece that truly feels like “you.” Plus, the process itself is wonderfully therapeutic, allowing for a creative escape from daily routines. You don’t need to be an experienced crafter to achieve impressive results with this project. With just a few affordable materials and a willingness to get a little creative, you can transform simple supplies into a captivating Easter masterpiece.
Why Choose a Mesh Wreath for Easter?
Mesh wreaths, particularly those made with decorative mesh (often called deco mesh), have become incredibly popular for several compelling reasons, especially for seasonal decorations like an Easter wreath:
- Durability and Longevity: Deco mesh is a resilient material that holds its shape well, making it ideal for wreaths that need to withstand varying weather conditions if hung outdoors. It’s also easy to clean and store, ensuring your wreath can be enjoyed for many seasons to come.
- Vibrant Colors and Textures: Mesh comes in an astonishing array of colors, patterns, and finishes, from solid pastels perfect for Easter to metallic shimmers and open weaves. This variety allows for endless creative possibilities, enabling you to match your wreath perfectly with your existing decor or seasonal theme.
- No-Sew Simplicity: One of the biggest advantages of this specific project is its “no-sew” nature. This makes it incredibly accessible for beginners or anyone looking for a quick and satisfying craft. You won’t need a sewing machine or any complex needlework skills.
- Lightweight and Easy to Hang: Despite its full and fluffy appearance, a mesh wreath is surprisingly lightweight, making it easy to hang on any door or wall without requiring heavy-duty hooks.
- Affordability: Many of the core materials for a mesh wreath, like the mesh itself and the wreath form, can be found at budget-friendly stores, allowing you to create a high-quality decoration without breaking the bank.
- Versatility in Design: While this guide focuses on an Easter theme, the techniques learned can be applied to create wreaths for any holiday or season. You can easily swap out colors, ribbons, and embellishments to create a completely different look.
Gathering Your Materials: What You’ll Need
Before you embark on your creative journey, gathering all your supplies in one place will ensure a smooth and enjoyable crafting experience. Most of these items are readily available at craft stores like JoAnn’s Fabric Store, Hobby Lobby, or even dollar stores, allowing for a budget-friendly project. Don’t forget to check for coupons if you’re shopping at larger craft chains!
- 2 Spools of Mesh Ribbon: For a full and voluminous wreath, two standard spools of deco mesh (typically 6-10 inches wide and 10 yards long) are recommended. You can choose complementary colors or two spools of the same color for a uniform look. Pastels like lavender, soft pink, robin’s egg blue, or spring green are perfect for Easter, or you can opt for classic white and cream for a more timeless feel. Look for mesh with a slight shimmer or a subtle texture to add depth. (Sourcing Tip: Dollar Tree often has great options!)
- One Wreath Form: A 12-18 inch wire wreath form is ideal for this project. Wire forms provide a sturdy base for attaching your mesh bows. You can also use a foam wreath form, but wire forms typically offer more “anchoring” points for pipe cleaners. The size you choose will determine the final dimensions of your wreath, so consider where you plan to display it. (Sourcing Tip: Dollar Tree is a fantastic source for affordable wreath forms.)
- Hot Glue Gun and Glue Sticks: Your trusty hot glue gun will be essential for securing embellishments. Ensure it’s in good working order and have plenty of glue sticks on hand. Safety first: always be mindful of the hot nozzle and melted glue.
- Sharp Scissors: A good pair of sharp fabric scissors will make cutting your mesh and ribbon much easier and produce cleaner edges. Avoid using dull scissors, as they can fray the mesh.
- Pipe Cleaners (Tinsel Kind Recommended): Approximately 20-30 pipe cleaners will be needed to secure your mesh bows to the wreath form. While regular pipe cleaners work, tinsel pipe cleaners (glittery ones) add an extra touch of sparkle and can blend seamlessly with glittery mesh or Easter decor. Choose colors that either match or complement your mesh and ribbon.
- Easter Themed Ribbon: A roll or two of festive ribbon (about 1.5 – 2.5 inches wide) will be used to create small accent bows. Look for patterns featuring bunnies, eggs, spring flowers, or simple polka dots in coordinating Easter colors. Wired ribbon often holds its shape best for bows.
- Easter Egg Decorations: These are your primary embellishments! Choose an assortment of glittery, colorful, or pastel Easter eggs in various sizes. You can find plastic, foam, or even small natural eggs that can be hot-glued onto the finished wreath. Consider adding other small Easter-themed accents like mini bunnies, chicks, faux flowers, or sprigs of greenery to enhance the festive look.
- (Optional) Floral Wire: While pipe cleaners are excellent for securing the mesh, a bit of floral wire can be useful for attaching heavier embellishments or creating a sturdy hanger for your wreath.
- (Optional) Fabric Marker or Chalk: Useful if you decide to mark specific cutting lengths on your mesh or ribbon for consistency, though often not strictly necessary for this free-form style.
- (Optional) String or Extra Ribbon: For creating a hanging loop once your wreath is complete.
Step-by-Step Directions: Crafting Your Mesh Easter Wreath
With your materials gathered and your workspace organized, you’re ready to begin creating your beautiful Easter wreath. Remember, there’s no right or wrong way to be creative; let your personal style guide you!
Step 1: Cut Mesh Sections and Create Individual Bows
The foundation of your fluffy wreath lies in these individual mesh bows. This step is repetitive but incredibly satisfying as you watch your pile of vibrant bows grow.
- Prepare Your Mesh: Unroll one spool of your mesh ribbon. Decide on the length for each mesh section. A good starting point is approximately 8-10 inches per piece for a medium-sized wreath. This length allows for a nice ruffle and fullness. You can experiment with slightly longer or shorter pieces if you want varying textures.
- Cut Mesh Sections: Carefully cut numerous pieces of mesh to your chosen length. For a full 12-18 inch wreath, you’ll likely need between 40-60 sections, depending on how dense you want your wreath to be. Cutting them all at once can save time.
- Form the Ruffled Bow: Take one cut section of mesh. Gently gather it accordion-style (like folding a fan) from one end to the other along its center. Pinch it tightly in the middle to form a bow-like or ruffled shape. This creates the “fluff” that gives the wreath its characteristic look.
- Secure with Pipe Cleaner: Take one tinsel pipe cleaner and wrap it tightly around the pinched center of your mesh bow. Twist the ends of the pipe cleaner together several times at the back to secure the bow firmly. Leave the pipe cleaner ends long enough to attach to the wreath form later. Repeat this process for all your cut mesh sections until you have a pile of prepared mesh bows.
Step 2: Attach the Mesh Bows to Your Wreath Form
Now comes the exciting part: seeing your wreath take shape! Attaching the bows is straightforward and allows for plenty of creative freedom in how you arrange them.
- Choose Your Starting Point: Begin attaching your bows at any point on the wire wreath form. It’s often easiest to start at the top, bottom, or a specific section and work your way around.
- Thread and Twist: Take one prepared mesh bow. Thread the long ends of its pipe cleaner through the wire frame of the wreath form. Position the mesh bow against the frame. On the backside of the wreath form, twist the pipe cleaner ends securely around the wire frame. Ensure the bow is tightly attached and won’t slip. Trim any excess pipe cleaner if desired, but leaving them slightly longer can make adjustments easier.
- Maintain Even Spacing: Continue attaching bows, working your way around the entire wreath form. Aim for relatively even spacing to ensure a consistent, full appearance. You might choose to attach them to the outer ring, inner ring, or alternate between the two for added dimension.
Step 3: Continue Until Full and Begin Initial Decoration
This phase is where your wreath truly comes alive. Keep adding bows until you achieve your desired fullness, then start incorporating your chosen Easter embellishments.
- Achieve Fullness: Continue attaching mesh bows until the entire wreath form is completely covered and appears lush and full. Don’t be afraid to fluff and adjust the bows as you go to fill in any gaps. If you’re using two different colors of mesh, you can alternate them for a striped effect or cluster them for color blocks.
- Integrate Ribbon Accents: While the original instruction was to cut small sections of ribbon and make bows *before* attaching, it’s often easier to do this once the mesh is mostly attached. Cut short pieces of your Easter-themed ribbon (about 6-8 inches). Tie these into small, simple bows. Using your hot glue gun, strategically place these ribbon bows throughout the mesh, adding pops of color and pattern. You can also thread them onto existing pipe cleaner twists for extra security.
- Add Easter Eggs and Initial Decor: Once the mesh is complete, begin attaching your Easter egg decorations. Decide on your arrangement – do you want them clustered in one area, evenly distributed, or perhaps hanging from the bottom? Use your hot glue gun to firmly attach the eggs to the mesh or the underlying wreath form. Don’t overload one area, and step back frequently to assess the overall balance and design.
Adding the Finishing Touches and Embellishments
Once your mesh base is complete and your initial eggs are in place, it’s time to truly personalize your wreath with the final decorative elements. This is where your creativity can truly shine!
- Strategic Placement of Embellishments: Consider adding other small Easter-themed accents like miniature bunnies, chicks, faux spring flowers (daisies, tulips, cherry blossoms), or sprigs of artificial greenery or berries. Use your hot glue gun for secure attachment. Think about creating a focal point or scattering elements organically.
- Creating a Hanger: If your wreath form doesn’t have a built-in hanger, you’ll need to add one. Cut a piece of sturdy ribbon or floral wire (approximately 12-18 inches). Loop it through the top of your wreath form, tie the ends securely, and create a loop for hanging. Ensure it’s strong enough to support the weight of your finished wreath.
- Fluff and Adjust: Take a final look at your wreath. Gently fluff any squashed mesh bows, adjust embellishments, and ensure everything is securely attached. Step back and view it from different angles.
- (Optional) Weather Protection: If your wreath will be displayed outdoors, consider applying a clear acrylic craft sealant spray. This can help protect the mesh and embellishments from fading and light moisture, though it won’t make it entirely waterproof.
Tips for a Perfect DIY Mesh Easter Wreath
To ensure your crafting experience is smooth and enjoyable, and your finished wreath looks professionally made, keep these helpful tips in mind:
- Prepare Your Workspace: Lay down a protective cloth or newspaper to catch any stray glitter or hot glue drips. Having all your materials within reach will make the process more efficient.
- Cut All Mesh First: Before you start forming bows, cut all your mesh sections. This creates a production line that saves time and ensures consistency in size.
- Don’t Be Afraid to Fluff: Mesh is designed to be voluminous. Don’t hesitate to gently pull and fluff the mesh bows once they’re attached to create a full, lush appearance and fill any bare spots.
- Layer Colors and Textures: If using multiple colors of mesh or different types of ribbon, layer them thoughtfully. Alternate colors or textures to create visual interest and depth.
- Safety with Hot Glue: Always exercise caution when using a hot glue gun. Have a heat-resistant mat or surface, and keep a small bowl of ice water nearby in case of accidental burns.
- Step Back and Evaluate: Periodically step away from your wreath as you’re working on it. This allows you to view it from a distance and assess the balance, symmetry, and overall fullness, helping you make adjustments as needed.
- Consider Your Display Location: If your wreath is for an outdoor area exposed to direct sunlight or rain, choose weather-resistant embellishments. For indoor use, you have more freedom with delicate items.
- Personalize it: Don’t feel limited by traditional Easter themes. Incorporate elements that are meaningful to you, whether it’s a specific flower, a family initial, or a unique color palette.
Variations and Customization Ideas
The beauty of a DIY project is its adaptability. Once you master the basic mesh wreath technique, you can easily adapt it for different occasions and styles:
- Seasonal Wreaths:
- Christmas: Use red, green, gold, and silver mesh with festive ornaments, berries, and pinecones.
- Fall/Thanksgiving: Opt for orange, brown, deep red, and gold mesh. Add artificial leaves, miniature pumpkins, gourds, and burlap accents.
- Halloween: Black, orange, purple, and lime green mesh with spooky spiders, bats, and ghostly figures.
- Patriotic (4th of July): Red, white, and blue mesh with star-spangled ribbons and small flags.
- Beyond the Front Door: While perfect for the front door, this wreath can also adorn an interior wall, serve as a centerpiece on a large table (with a candle in the middle), or be scaled down for smaller spaces.
- Different Embellishments: Experiment with faux flowers, silk scarves woven into the mesh, LED fairy lights for a magical glow, small signs with festive greetings, or even fabric scraps for a shabby-chic look.
- Monogram or Initial: Hot glue a wooden or glittery initial to the center of your wreath for a personalized touch.
- Theme Wreaths: Create a specific theme, such as a “bunny patch” wreath with many different bunny figures, or a “garden party” wreath overflowing with faux flowers and butterflies.
Caring for Your Handmade Mesh Wreath
To keep your beautiful DIY Mesh Easter Wreath looking fresh and vibrant for many Easters to come, a little care goes a long way:
- Indoor vs. Outdoor: While mesh is durable, prolonged exposure to harsh direct sunlight can cause colors to fade over time. If displaying outdoors, a covered porch or entryway is ideal to protect it from extreme weather elements like heavy rain, strong winds, or intense sun.
- Cleaning: For light dust, a soft, dry cloth or a feather duster works well. You can also use a hairdryer on a cool, low setting to gently blow away dust from intricate areas. For spot cleaning, a very lightly dampened cloth with mild soap can be used on mesh, but test a small, inconspicuous area first. Avoid saturating the wreath.
- Storage: When Easter is over, carefully store your wreath in a sturdy box or a dedicated wreath storage container. This protects it from dust, damage, and getting crushed. Place tissue paper or soft fabric between layers if you have delicate embellishments. Store it in a cool, dry place, away from direct sunlight and extreme temperatures, which can degrade materials over time.
- Periodic Checks: Before and after each season, quickly check all embellishments to ensure they are still securely attached. Re-glue anything that feels loose to prevent loss.
Frequently Asked Questions About DIY Mesh Wreaths
- How much mesh ribbon do I really need for a full wreath?
- For a standard 12-18 inch wire wreath form, two rolls of 6-inch by 10-yard or 10-inch by 10-yard deco mesh usually provide a beautifully full wreath. If you prefer a very dense look, or if your wreath form is larger, you might consider a third roll. It’s always better to have a little extra than to run short!
- Can I use fabric instead of mesh ribbon?
- While you can use fabric (like burlap, cotton, or even old sheets cut into strips) for a similar ruffled effect, the technique might vary slightly. Fabric typically doesn’t hold its shape as stiffly as deco mesh, and you might need more of it or a different method of attachment (e.g., tying knots instead of pipe cleaners) to achieve a similar volume. Fabric also tends to fray more, so using pinking shears might be helpful.
- Is this wreath suitable for outdoor display?
- Deco mesh is fairly weather-resistant, making these wreaths suitable for outdoor display on a covered porch or entryway. However, prolonged exposure to direct sunlight can fade colors over time, and heavy rain or strong winds can potentially damage delicate embellishments. For maximum longevity, displaying it in a sheltered spot is best, or bringing it indoors during inclement weather.
- How long does it typically take to make one of these wreaths?
- For a first-timer, expect to spend anywhere from 2 to 4 hours, including gathering materials, cutting mesh, forming bows, and attaching embellishments. Once you get into a rhythm, subsequent wreaths can be made more quickly, often in 1 to 2 hours.
- What if I don’t have pipe cleaners?
- Small pieces of floral wire or even thin crafting wire can be used as an alternative to pipe cleaners for securing the mesh bows. You could also use small rubber bands to secure the bow and then tie a piece of string or wire around the rubber band to attach it to the wreath form. The key is to have a flexible, strong material that can be twisted to hold the mesh firmly in place.
- Can I make this wreath without a hot glue gun?
- While a hot glue gun is highly recommended for securely attaching embellishments, you could opt for strong craft adhesive or even tying some embellishments onto the wreath form with floral wire or string. However, some items, especially smaller, lightweight eggs or faux flowers, are much easier and more securely attached with hot glue.
Embrace the Charm of Handmade Easter Decor
There’s an undeniable magic in creating something beautiful with your own hands, and this DIY No-Sew Mesh Easter Wreath is a testament to that joy. From the moment you begin gathering your materials to the final flourish of an embellished egg, each step is an opportunity for personal expression and creative satisfaction. This project isn’t just about decorating; it’s about crafting memories, adding a unique touch to your home, and celebrating the festive spirit of Easter.
The delightful fluff and feminine charm of this mesh wreath, combined with its rustic Easter theme, will undoubtedly bring smiles to anyone who sees it. Imagine the warm welcome it extends to guests at your front door, or the cheerful accent it provides above your mantelpiece. It’s a conversation starter, a labor of love, and a beautiful reflection of your creativity. So, gather your supplies, put on some inspiring music, and allow yourself to indulge in the simple pleasure of making. Your home, and your spirit, will thank you for it!
Happy Easter and happy crafting!