
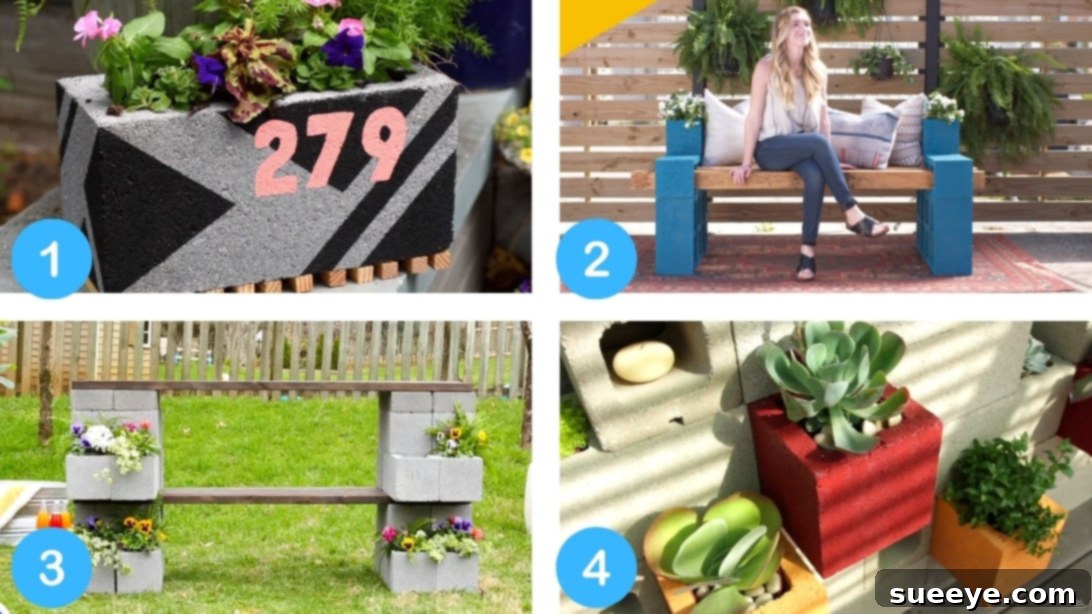
Summer is here, bringing with it long, sunny days—the perfect invitation to tackle those outdoor projects you’ve been dreaming about! If you’re looking for incredibly versatile, durable, and surprisingly affordable materials to kickstart your DIY adventures, look no further than the humble cinder block. These readily available concrete blocks aren’t just for construction; they’re a blank canvas for transforming your outdoor spaces into stylish, functional, and personalized havens.
Whether you’re a seasoned DIY enthusiast or just starting your crafting journey, cinder blocks offer endless possibilities for creating stunning garden decor, practical furniture, and unique accents. They’re robust enough to withstand the elements, easy to paint, and simple to arrange, making them ideal for everything from quaint garden features to robust outdoor entertaining areas. Their uniform shape allows for modular designs that can be expanded or reconfigured as your needs change, offering unparalleled flexibility in outdoor design. Plus, the satisfaction of building something beautiful and functional with your own hands is truly rewarding.
Get ready to unleash your creativity and enhance your home’s curb appeal without breaking the bank. We’ve compiled 7 fantastic and easy-to-follow cinder block DIY projects, inspired by the innovative ideas from HGTV Handmade. These projects are designed to be completed with minimal tools and experience, providing maximum impact. So, grab your blocks, some paint, and let’s start building the outdoor space of your dreams!
7 Fun and Creative Cinder Block DIY Projects to Transform Your Outdoor Space
1. Custom Cinder Block House Number Planter
Welcome guests with a unique and personalized touch right at your doorstep. This clever house number project combines essential functionality with charming greenery, making your address stand out in style. It’s an excellent way to add significant curb appeal and a vibrant pop of color to your front entrance, creating a lasting first impression.
Materials:
- Painter’s tape (for achieving crisp, clean lines in your design)
- Spray paint (choose a durable outdoor-grade paint in a vibrant or complementary color for your base)
- Outdoor acrylic paint (preferably a contrasting color from the spray paint for the numbers, ensuring visibility)
- Small brush (ideal for precise application on numbers and small details)
- One sturdy cinder block (the foundation of your personalized sign)
- Number stickers or stencils (for accurate and uniform numbering)
- Clear adhesive waterproof caulk (essential for securing wood strips and weatherproofing the assembly)
- Small wood strips (cut to the width of the cinder block, providing stability and elevation for drainage)
- Landscape fabric (to line the planting holes, holding soil while allowing water to drain)
- Potting soil and a small, low-maintenance plant or succulent (to complete the planter aspect)
Instructions:
- Prepare and Design: Start by ensuring your cinder block is thoroughly clean and completely dry. Using painter’s tape, carefully create your desired design or pattern on the block’s surface. This could range from simple stripes or geometric shapes to masking off specific areas you wish to keep unpainted.
- Apply Base Color: With your design securely taped, apply your chosen spray paint evenly over the cinder block. For a professional-looking finish, it’s recommended to apply several light coats, allowing each layer to dry partially in between. This technique prevents drips and ensures a smooth, durable finish.
- Add Your House Numbers: Once the spray paint is completely dry (always check the manufacturer’s recommendations, usually 2-4 hours), meticulously remove the painter’s tape. Position your number stickers or stencils precisely where you want your house numbers to appear, ensuring they are centered and legible.
- Paint the Numbers: Using your small brush and outdoor acrylic paint, carefully fill in the stencil or sticker outlines to create your numbers. Take your time to achieve clean, crisp edges. Allow the paint to dry thoroughly before proceeding to the next step.
- Secure and Elevate: Once the numbers are dry, gently peel off the stickers or stencils. Apply clear adhesive waterproof caulk to the bottom edges of the small wood strips and attach them securely to the underside of the cinder block. This critical step lifts the block slightly, preventing moisture buildup underneath and ensuring better drainage for your plant.
- Plant Your Greenery: Line the rectangular holes of the cinder block with landscape fabric. This acts as a protective barrier, preventing soil from washing out while still allowing excess water to drain effectively. Fill the lined holes with potting soil and carefully plant your chosen small plant or succulent. Water lightly to settle the soil.
Tips for Your House Number Planter:
- Consider using reflective paint or numbers for enhanced visibility, especially during nighttime hours.
- Opt for drought-resistant plants like succulents, sedums, or air plants for effortless maintenance.
- Apply a clear outdoor sealant over the entire block once finished for extra durability and weather protection against the elements.
- Experiment with contrasting textures, like rough-hewn wood strips against the smooth paint, for added visual interest.
2. Inviting Outdoor Cinder Block Bench
Create a charming, robust, and surprisingly comfortable seating area for your garden, patio, or backyard with this simple cinder block bench. This project is not only highly practical but also adds a beautiful architectural element to your outdoor living space. When paired with plush outdoor cushions, it transforms into an inviting spot for relaxation or social gatherings, making your outdoor area more hospitable and functional.
Materials:
- 14 cinder blocks (for optimal results and durability, pre-paint them with outdoor spray paint in your desired color)
- Outdoor construction adhesive (absolutely essential for creating strong, lasting bonds between blocks)
- 4 stained and sealed 4×4 lumber pieces (ensure these are weather-treated and robust for outdoor use)
- Flower pots (for integrating greenery into the bench ends, adding a touch of natural beauty)
- Optional: Comfortable outdoor cushions (for enhanced seating comfort and a splash of color and style).
Instructions:
- Build the Base Pillars: Begin by stacking four cinder blocks vertically on their sides to form one sturdy pillar. Apply generous amounts of outdoor construction adhesive between each block as you stack them, ensuring a strong bond that will withstand varying outdoor conditions. Repeat this process to create a second identical pillar; these will serve as the two end supports for your bench.
- Form the Seat Supports: On top of each completed four-block pillar, carefully place two cinder blocks horizontally, ensuring their holes are facing outwards. These strategically placed blocks will act as the crucial anchors for your wooden seat planks. Secure these two blocks firmly to the pillar below using additional construction adhesive.
- Add Top Planter Blocks: For a delightful integrated planter feature, place one additional cinder block on its end, with its holes facing upwards, on the outermost side of each pillar’s second layer. This creates a perfect, ready-made spot for your flower pots or small plants. Secure these with adhesive as well, reinforcing the structure.
- Insert Wooden Planks: Once the construction adhesive has sufficiently cured (always refer to the product instructions, which typically recommend 24-48 hours), carefully slide the four stained and sealed 4×4 lumber pieces into the horizontal holes located on the second layer of cinder blocks on both pillars. Ensure the planks are evenly spaced, level, and provide a stable, secure seating surface.
- Decorate with Flowers: Finally, place your chosen flower pots into the upright holes of the top-end cinder blocks. Fill them with appropriate soil and your favorite outdoor plants or vibrant flowers to complete your beautiful, functional, and inviting outdoor bench.
Enhancing Your Outdoor Bench:
- Choose wood stain colors that not only complement your outdoor decor but also provide UV protection for the wood.
- Invest in high-quality, weather-resistant outdoor cushions for enhanced comfort and to introduce additional style and color.
- Consider utilizing the top planter holes for growing fragrant herbs, small ornamental grasses, or installing solar-powered decorative lights for evening ambiance.
- For extra stability, especially if you anticipate heavy use, consider filling the empty holes of the base blocks with gravel or concrete mix.
3. Practical Cinder Block Potting Bench
Every dedicated gardener understands the value of a dedicated space for potting, repotting, and lovingly tending to their beloved plants. This cinder block potting bench is not only incredibly functional but also remarkably simple to construct, requiring minimal effort for maximum utility. It provides ample working space and convenient storage for all your essential gardening tools and supplies, transforming your gardening tasks from a chore into a truly enjoyable experience.
Materials:
- 6 cinder blocks (for both aesthetics and protection, thoroughly spray-paint these with an outdoor-grade paint; choose a color that harmonizes with or brightens your garden space)
- One 16″ x 4″ board (this will serve as the primary workbench surface, providing ample space for your potting activities)
- One 8″ x 4″ board (for creating an elevated shelf or an additional, easily accessible workspace)
Instructions:
- Form the Base Supports: On a perfectly level and stable surface, position two cinder blocks vertically on their ends to form the left support structure. Repeat this step for the right support, ensuring that both supports are perfectly parallel and spaced appropriately to stably accommodate the length of your 16″ x 4″ board.
- Create the Main Workbench: Carefully lay the 16″ x 4″ board across the top of the two vertical cinder block supports. Ensure it is perfectly centered and remains stable and secure, providing a robust surface for your gardening tasks.
- Build the Upper Supports: Place two more cinder blocks vertically on their ends, directly on top of the 16″ x 4″ board, one at each end. These strategically placed blocks will serve as the stable supports for your upper shelf, adding another layer of functionality.
- Add the Upper Shelf: Finally, place the 8″ x 4″ board on top of these two upper cinder block supports. This completes the creation of a multi-tiered workspace, which is ideally suited for organizing small pots, storing hand tools, or displaying decorative items, keeping everything within arm’s reach.
- Organize Your Garden Essentials: Once your potting bench is fully assembled, take pleasure in arranging all your plants, gardening tools, and supplies. The open, tiered design allows for exceptionally easy access and efficient organization, making your gardening sessions more productive and enjoyable.
Tips for Your Potting Bench:
- Consider applying a clear coat of exterior sealant to the wood boards for extended weather protection and durability against moisture and UV rays.
- Utilize the natural holes in the cinder blocks as convenient storage compartments for small hand tools, gardening gloves, or seed packets.
- This versatile bench can also double as an attractive display stand for your thriving plant collection, seasonal decor, or other outdoor embellishments when not in active use for potting.
- For a semi-permanent setup, a small amount of outdoor construction adhesive can be used between the blocks and boards.
4. Sturdy Cinder Block Log Holder
Keep your firewood neatly stacked, organized, and easily accessible with this incredibly simple yet highly effective cinder block log holder. This ingenious design is not only supremely practical, ensuring your logs are ready when you need them, but it also adds a charming rustic aesthetic to your outdoor space. It’s the perfect addition for homes that boast a cozy fireplace, a lively fire pit, or any area where firewood storage is a necessity.
Materials:
- 2 sturdy cinder blocks (the foundational elements for your log holder)
- 4 pieces of 4×4 lumber planks (each approximately 41 inches long, ensuring they are robust and thick enough to safely bear the weight of stacked logs)
Instructions:
- Position the Base Blocks: Place the two cinder blocks horizontally on a flat, stable, and level surface. Ensure they are perfectly parallel to each other and spaced at a distance that will optimally accommodate the length of your firewood. This spacing is crucial for stability and support.
- Insert the Support Planks: Carefully insert one end of each of the four 4×4 lumber planks into the holes of the cinder blocks. Angle the planks diagonally outwards from the cinder blocks. Specifically, two planks should point outwards from the holes of one cinder block, and the other two from the second cinder block, thereby creating a stable and supportive A-frame or V-shape structure.
- Stack Your Logs: Once the planks are securely and firmly in place, you can confidently begin stacking your firewood. The angled planks are designed to cradle the logs effectively, keeping them neatly organized, elevated off the ground, and allowing for optimal air circulation, which is vital for drying wood and preventing moisture buildup and rot.
Benefits of This Log Holder:
- Enhanced Airflow: Keeping logs elevated off the ground and adequately separated promotes significantly better airflow around each piece. This is crucial for efficient drying of wood and is a key factor in preventing moisture buildup and subsequent rot, ensuring your firewood burns cleaner.
- Easy Access and Organization: Your firewood will be neatly stacked, orderly, and readily available whenever you need it for your fireplace, fire pit, or outdoor stove, saving you time and effort.
- Simple Construction: This DIY project requires minimal materials and tools, making it a quick, straightforward, and highly satisfying build that can be completed in a short amount of time.
- Cost-Effective: Cinder blocks and common lumber are inexpensive, offering a budget-friendly solution for efficient firewood storage.
5. Tranquil Cinder Block Zen Garden
Create a serene, peaceful, and truly meditative retreat right in your own backyard with a DIY cinder block Zen garden. This innovative project allows for beautiful modular arrangements and offers a tranquil spot perfect for relaxation, mindfulness, and quiet reflection. It’s a wonderful, cost-effective way to introduce a calm, minimalist aesthetic and a touch of Japanese garden inspiration to your outdoor area, fostering a sense of harmony and balance.
Materials:
- Chicken wire (essential for containing gravel, sand, or soil securely within the block holes)
- Plain cinder blocks (these will form the robust structural elements of your Zen garden)
- Spray-painted cinder blocks (select calming, earthy colors such as soft grays, gentle blues, or pristine whites to significantly enhance the Zen aesthetic and create visual interest)
- Small decorations such as flickering candles, smooth river pebbles, miniature rakes, or small, exceptionally low-maintenance plants like succulents or air plants.
- Sand or fine gravel (for creating traditional raked patterns within the designated areas).
Instructions:
- Prepare Planter/Decorative Holes: Cut pieces of chicken wire to precisely fit inside the holes of your spray-painted cinder blocks. Gently push and shape the wire into the holes, creating a basket-like liner. This liner will securely hold soil, decorative pebbles, or sand without it spilling out.
- Arrange the Base Structure: Begin by carefully arranging your plain cinder blocks to form the desired base structure of your Zen garden. This could be a linear arrangement, a perfect square, a rectangle, or any other geometric shape you desire. Ensure the base is level and stable.
- Integrate Sprayed Blocks: Strategically stack the spray-painted cinder blocks (with their pre-lined chicken wire inserts) into your arrangement. Position them so that the holes with the wire point outwards or upwards, depending on whether you envision them as functional planters, display niches for candles, or areas for raked sand patterns. Alternate between plain and painted blocks to create engaging visual interest and dynamic textures.
- Add Plants and Decorations: Once your entire structure is stable and secure, fill the wire-lined holes with appropriate soil and plant small, low-maintenance plants such as hardy succulents, fragrant herbs, or delicate mosses. Alternatively, fill these holes with decorative pebbles or fine sand to create miniature raked patterns. Artfully arrange candles, smooth river stones, or other Zen-inspired decorations around and within the blocks to complete your tranquil and contemplative space.
Designing Your Zen Garden:
- Experiment creatively with different block orientations and stacking patterns to achieve varying heights, depths, and unique textures within your garden.
- Consider integrating a small, trickling water feature or strategically placing solar-powered lights to enhance the evening ambiance and create a magical glow.
- Regularly rake the sand in the block holes, if applicable, to maintain the traditional meditative appeal and pristine appearance of your Zen garden.
- Incorporate natural elements like driftwood, polished stones, or small Buddha statues for added authenticity and serenity.
6. Welcoming Cinder Block Front Garden Bed
Elevate your home’s curb appeal instantly with a simple yet remarkably elegant cinder block front garden bed. This versatile project is perfect for creating beautifully defined planting areas, whether strategically placed along a welcoming pathway, nestled beneath a picturesque window, or acting as a neat border for your lush lawn. It’s an exceptionally clean, organized, and visually appealing way to showcase your favorite vibrant flowers, lush shrubs, or fragrant herbs, adding structure and beauty to your home’s exterior.
Materials:
- 7 spray-painted cinder blocks (carefully select a durable outdoor paint color that harmonizes with or provides a striking contrast to your home’s existing exterior)
- Heavy-duty plastic sheet or landscape fabric (essential for lining the bed, preventing soil erosion, and acting as an effective weed barrier)
- High-quality potting soil (providing the best start for your plants) and your selection of desired plants or flowers.
Instructions:
- Prepare the Area: Begin by thoroughly clearing the chosen area of any weeds, debris, or existing vegetation. Lay down the heavy-duty plastic sheet or landscape fabric, ensuring it extends slightly beyond the planned footprint of your garden bed. This critical layer serves as an effective weed barrier, prevents soil from washing away, and helps to retain vital moisture for your plants.
- Arrange the Cinder Blocks: Carefully begin stacking the spray-painted cinder blocks to form the desired shape for your garden bed. Common and easy designs include an L-shape for corners, a straightforward rectangular border, or even a simple linear arrangement. Ensure that all blocks are perfectly level and securely stable on the prepared surface. For a corner design, stack them to form a sturdy right angle. You have the flexibility to arrange them with their holes facing upwards for individual small planters, or facing inwards to create a continuous, larger planting bed.
- Trim Excess Plastic: Once all the cinder blocks are precisely arranged and the structure is complete, carefully trim any excess plastic sheet or landscape fabric that extends too far beyond the outer edges of your cinder block structure. Make sure the plastic effectively lines the entire inside of your new garden bed, providing comprehensive coverage.
- Add Soil and Plants: Fill the newly formed cinder block garden bed with high-quality potting soil, ensuring it reaches an appropriate depth for your chosen plants. Carefully plant your selected flowers, herbs, or small shrubs, making sure they have ample space to grow and thrive. Water thoroughly immediately after planting to help the soil settle and reduce transplant shock.
Tips for Your Front Garden Bed:
- For enhanced stability, especially in areas prone to high winds or where the bed might be bumped, consider using outdoor construction adhesive between layers of blocks to secure them together.
- Intelligently utilize the inherent holes in the cinder blocks as individual mini-planters for succulents, vibrant annuals, or small, trailing plants, adding another captivating layer of visual interest and texture to your garden.
- Select plants that are known to thrive in your local climate and sun exposure conditions. This approach ensures a low-maintenance, flourishing, and consistently beautiful display throughout the growing season.
- Consider varying the height of the blocks for a multi-level planter effect, adding depth and dimension.
7. Stylish Outdoor Cinder Block Bar
Elevate your outdoor entertaining game with a functional, incredibly stylish, and durable cinder block bar. Perfect for hosting lively gatherings, casual barbecues, or simply enjoying a refreshing drink in the sunshine, this impressive project provides ample robust counter space and can even include integrated storage or charming planters. It’s an imposing yet welcoming addition to any patio, deck, or backyard space, transforming it into the ultimate hub for outdoor enjoyment and hospitality.
Materials:
- 20 sturdy cinder blocks (for a truly polished and integrated look, consider painting them with a durable exterior paint)
- Landscape adhesive or outdoor construction adhesive (absolutely essential for creating a secure, long-lasting, and stable structure that withstands the elements)
- 4 stained 6 ft – 2×4 lumber pieces (or other suitable, weather-treated wood for the robust countertop, ensuring longevity and appeal)
- 4 cinder block caps (these provide a smooth, finished top surface for the block sections, enhancing both aesthetics and usability)
- Optional: Additional plants, bar accessories, and comfortable stools for decoration and full functionality.
Instructions:
- Build the Base Layers: Start by laying two cinder blocks horizontally on a perfectly level and stable surface. At one end of these two blocks, place a third cinder block in the opposite direction (perpendicular to the first two). This forms a stable and robust corner foundation. Repeat this exact configuration for the other side, ensuring the two base sections are perfectly parallel and spaced appropriately to accommodate the length of your wooden planks for the countertop.
- Create the Second Layer: On top of the cinder block that is perpendicular to the first two, stack two more cinder blocks horizontally. Secure these with generous amounts of landscape adhesive applied between all contact points. This crucial step begins to build up the ‘arms’ of your bar, adding height and structural integrity. Do the same for the other side, mirroring the construction.
- Install the First Countertop Layer: Once the adhesive has had sufficient time to set and cure (refer to product instructions), carefully lay three of your stained 6 ft – 2×4 lumber planks across the top of these two ‘arms’ to form the first functional level of your bar countertop. Securely attach the planks to the cinder blocks using additional adhesive. Ensure they are perfectly level, evenly spaced, and firmly in place.
- Repeat for Upper Layers: Repeat the stacking process from step 2 for the second and third layers of cinder blocks on each side. Each subsequent layer of blocks should be securely adhered to the one below it, progressively building the desired height and robust framework for your bar.
- Add Cinder Block Caps: Once your desired bar height is achieved and the adhesive has completely cured, meticulously place cinder block caps on top of the uppermost cinder blocks. These caps provide a smooth, finished, and aesthetically pleasing surface for the block sections. Secure them firmly with adhesive.
- Final Wooden Countertop: Glue the last piece of your wooden plank on top of the cinder block caps to create a sturdy, continuous, and expansive bar top surface that is perfect for serving drinks and food.
- Personalize and Decorate: Lastly, add some vibrant plants to the open holes of the cinder blocks (if desired) or stylishly decorate your new outdoor bar with comfortable stools, atmospheric lighting, and all your favorite entertaining essentials to make it truly your own.
Tips for Your Outdoor Bar:
- For a truly professional and enduring finish, consider mortaring the cinder blocks together instead of solely relying on adhesive, though adhesive is perfectly sufficient for most DIY projects.
- Integrate a practical ice bucket or a small cooler into one of the open block holes for chilled drinks and easy access during entertaining.
- Enhance the evening ambiance by adding festive string lights, stylish lanterns, or under-counter LED strips.
- Consider a protective sealant for your wooden countertop to guard against spills and weather damage, prolonging its life and beauty.
- Utilize the internal spaces of the blocks as open shelving for storing glassware, napkins, or other bar essentials.
As you can see, cinder blocks are far more than just utilitarian construction materials. They are a gateway to boundless creativity, offering robust, durable, and exceptionally cost-effective solutions for significantly enhancing your outdoor living spaces. These 7 inspiring DIY projects vividly demonstrate the incredible versatility of concrete blocks, expertly transforming them into everything from charming garden features and practical outdoor furniture to vibrant entertaining hubs and personalized decor.
Embrace the profound satisfaction of building something beautiful and functional with your own hands. These projects are meticulously designed to be accessible to all skill levels, providing a rewarding experience and creating lasting, impactful additions to your home and garden. So, pick your favorite project, gather your materials, and make the absolute most of the sunny weather by bringing these inspiring cinder block ideas to life. Your personalized, inviting, and uniquely styled outdoor oasis awaits!