
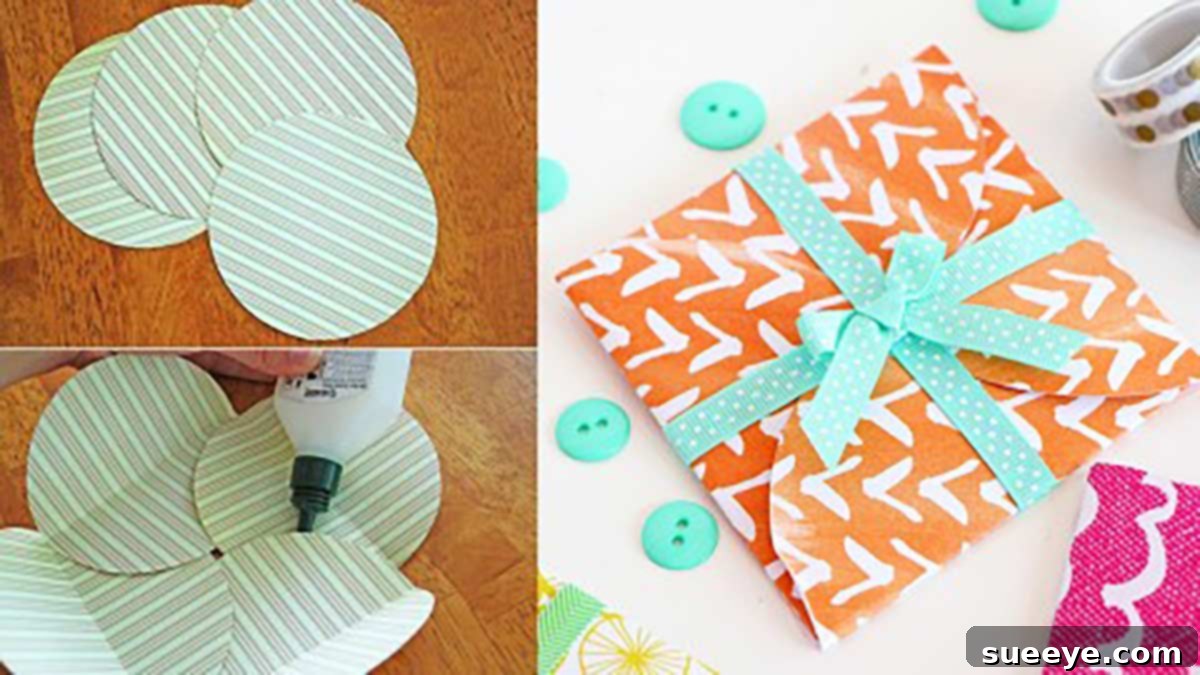
Mastering the Art of Handmade Envelopes: Your Ultimate DIY Guide
There’s an undeniable charm and personal touch that comes with a handmade card. But what truly elevates that sentiment, making it unforgettable, is a perfectly matching, custom-made envelope. As an avid paper craft enthusiast, I’ve always found immense joy in creating unique cards. However, the prospect of crafting my own envelopes initially seemed a little daunting – a challenge reserved only for advanced crafters. I quickly learned that this couldn’t be further from the truth! Following a simple, ingenious method, making your own envelopes is not just easy, but often more straightforward and enjoyable than the card-making process itself.
Imagine being able to complement every single handmade card with an envelope that mirrors its beauty, theme, and color palette. Picture no longer having to discard store-bought cards just because their original envelope went missing, or having the power to transform a generic purchase into a personalized masterpiece with a unique paper pattern. This comprehensive guide will walk you through everything you need to know, from essential tools to creative embellishments, ensuring you can craft stunning, bespoke envelopes for any occasion.
Why Choose Handmade Envelopes Over Store-Bought?
The decision to make your own envelopes is driven by a desire for personalization, creativity, and practicality. While convenient, mass-produced envelopes often fall short in several key areas:
- Unmatched Personalization: Store-bought envelopes rarely match the intricate details, specific color schemes, or unique themes of your handmade cards. Crafting your own allows for perfect coordination, making your creation truly cohesive and professional. This level of customization ensures your gift makes a lasting impression.
- Express Your Creativity: Handmade envelopes offer an additional canvas for your artistic expression. Experiment with different papers, textures, patterns, and closures to reflect your individual style and the recipient’s personality. It’s an extension of your creative journey.
- Cost-Effective Solution: Specialty envelopes can be surprisingly expensive. By utilizing paper scraps from other projects, recycled materials, or bulk-purchased paper, you can significantly reduce costs, making your hobby more sustainable and budget-friendly.
- Solve Practical Problems: Have you ever made an odd-sized card that won’t fit a standard envelope? Or perhaps lost the original envelope for a beautiful card? DIY envelopes provide the perfect solution, allowing you to create custom sizes on demand, from tiny gift card holders to oversized invitations.
- Eco-Friendly Choice: With control over your materials, you can opt for recycled or sustainably sourced papers, reducing your environmental footprint one envelope at a time. This mindful approach contributes to a more sustainable crafting practice.
- Enhance the Recipient’s Experience: The effort put into a handmade envelope signals extra care and thoughtfulness. It sets the tone, building anticipation even before the card is revealed, making the entire gifting experience more special and memorable.
Essential Tools and Materials for Your Envelope Crafting Journey
Before diving into the actual crafting process, it’s crucial to gather your supplies. The beauty of this method lies in its simplicity, requiring only a few basic items you likely already have around your home or can easily acquire. You don’t need expensive specialized equipment to start creating beautiful custom envelopes, making it an accessible hobby for everyone.
The Core Essentials:
- Paper: This is where your creativity truly shines and sets the tone for your envelope.
- Choice is Key: Select paper in your preferred color, pattern, or texture. Consider the occasion – elegant pastels for weddings, vibrant patterns for birthdays, or sophisticated textures for thank-you notes. The possibilities are endless.
- Types of Paper:
- Cardstock: Offers good durability and holds its shape well, providing a sturdy feel.
- Patterned Paper/Scrapbook Paper: Available in countless designs and themes, perfect for adding visual interest and matching specific events.
- Designer Paper: Often features unique textures, finishes, or foil accents for a luxurious and premium feel.
- Recycled Paper: An eco-conscious choice, adding a rustic or uniquely textured aesthetic.
- Weight Considerations: Aim for paper that’s sturdy enough to protect your card but not so thick that it becomes difficult to fold or too heavy for postage. Generally, 65lb to 80lb text weight is ideal for envelopes, though lighter cardstock up to 100lb can work for smaller, more rigid envelopes.
- Cutting Tool: A clean and precise cut is vital for a professional finish.
- Scissors: A good pair of sharp craft scissors is sufficient for most projects. Precision scissors can be incredibly helpful for intricate details or sharp corners.
- Paper Trimmer/Guillotine: For perfectly straight lines and efficient cutting, especially if you’re making multiple envelopes or need consistent sizes.
- Craft Knife & Cutting Mat: Offers ultimate precision and razor-sharp edges, but requires careful handling and a protective surface.
- Adhesive: To hold everything together securely and neatly.
- Glue Stick: Easy to use, less messy, and great for light-duty adhesion. Look for acid-free options if the longevity of your crafts is a concern.
- Liquid Craft Glue: Provides a stronger bond but requires careful application to avoid wrinkles or excess squeeze-out. A fine-tip applicator can be very beneficial.
- Double-Sided Tape: Offers a strong, instant bond without drying time. Excellent for crisp seams and a clean finish.
- Adhesive Rollers: A clean and quick alternative to glue sticks, providing a smooth, even application.
- Scoring Tool: For creating crisp, professional folds that make your envelopes look polished and well-constructed.
- Bone Folder: Essential for creating sharp creases and smoothing out folds, preventing cracks in your paper.
- Ruler: A metal ruler is best for scoring straight lines with a bone folder or for guiding a craft knife securely.
- Scoring Board: A specialized tool that makes scoring multiple lines quickly and accurately, particularly useful if you plan to make many envelopes with consistent dimensions.
- The Secret Template – A CD: Yes, an ordinary compact disc! You’ll learn more about its ingenious application in the tutorial below. Its circular shape serves as the perfect, readily available guide for creating the foundational cuts of your envelope, making the initial drafting process incredibly simple and accessible for beginners and experienced crafters alike.
Optional Embellishments and Advanced Tools:
- Ribbons, Buttons, Wax Seals: For unique and decorative closure mechanisms that add a touch of elegance or whimsy.
- Stamps, Ink Pads, Stickers: To decorate the envelope’s exterior with personalized messages, patterns, or themes.
- Envelope Punch Board: A dedicated tool designed to create envelopes of various sizes with ease and consistency. While not essential for this tutorial, it’s a great investment for serious crafters looking for speed and precision.
- Die-cutting Machine: For cutting intricate shapes, decorative edges, or text from paper to embellish your envelopes.
- Embossing Folders: To add beautiful texture and raised patterns to your paper, providing a sophisticated tactile element.
Step-by-Step Guide: Crafting Your Own Envelopes with a CD Template
Now that you have all your materials ready, let’s dive into the fun part: making your envelopes! This method is incredibly adaptable and yields beautiful results every time, turning a simple piece of paper into a personalized vessel for your messages.
1. Prepare Your Paper:
Start with a perfectly square piece of paper. The size of your square will directly determine the size of your finished envelope. For instance, a 9×9 inch square is a good starting point for an A2 card (approximately 4.25″ x 5.5″). For larger cards, you’ll simply need a proportionately larger square of paper. Ensuring your paper is cut perfectly square is crucial for a symmetrical and well-balanced final envelope.
2. Position Your CD Template:
Place your chosen paper square flat on your work surface. Take your CD and position it directly in the center of the paper. Use a ruler to ensure it’s precisely centered by measuring the distance from the CD’s edge to each of the paper’s four edges. This precision is key for a symmetrical envelope that folds cleanly.
3. Trace and Extend the Guide Lines:
Using a sharp pencil, carefully trace a circle around the CD. Once the circle is traced, align your ruler with the edge of the CD (or the traced circle) and extend four straight lines outwards from the circle, reaching to each corner of your square paper. Imagine you’re drawing a cross that intersects the circle and connects to the paper’s corners. These lines will form the creases for your envelope flaps, so ensure they are straight and light enough to erase later if needed.
4. Cut Your Envelope Shape:
With your pencil lines as guides, carefully cut along the lines that extend from the circle to the corners of the paper. You will essentially be cutting out four triangular shapes from each corner of the square, leaving you with a cross-like shape with a rounded center base. Discard the cut-off triangles. Take your time with this step to ensure clean, precise edges, as they will define the look of your finished envelope.
5. Score for Crisp Folds:
This step is absolutely crucial for creating professional-looking envelopes with sharp, clean edges. Place a ruler along each of the four straight lines you drew (the ones extending from the circle towards the corners). Use your bone folder to gently but firmly score along these lines. Scoring creates a defined crease, making folding much easier, preventing paper cracking, and resulting in sharp, clean edges. Alternatively, if you’re using a scoring board, align your paper and score along the appropriate lines with a scoring tool.
6. Fold the Flaps:
- Side Flaps First: Carefully fold in the two opposite side flaps along their scored lines. Ensure the folds are neat and crisp using your bone folder to reinforce them.
- Bottom Flap: Next, fold up the bottom flap. The rounded edge of the bottom flap (formed by the CD circle) should align perfectly with the folded edges of the side flaps, forming the base and the primary pocket of your envelope.
- Top Flap: Finally, fold down the top flap. This flap typically remains unsealed until you’re ready to insert your card, allowing for easy access and embellishment.
7. Secure the Envelope:
Apply your chosen adhesive (glue stick, liquid glue, or double-sided tape) to the outer edges of the two side flaps and the bottom flap where they overlap. Be careful not to use too much glue, especially liquid glue, to prevent wrinkles or excess squeeze-out. Press firmly along the glued seams to ensure a strong bond. Allow adequate drying time if using liquid glue before handling further.
Congratulations! You’ve just made your first custom envelope!
Tips for Success and Elevating Your Envelope Designs
Once you’ve mastered the basic technique, the possibilities for customization are endless. Here are some tips to help you refine your craft and add your unique flair, making each envelope a miniature work of art:
- Practice Makes Perfect: Don’t be discouraged if your first few attempts aren’t flawless. Use scrap paper to practice the cutting, scoring, and folding until you feel confident and achieve consistent results.
- Experiment with Paper Types: Try different weights, textures, and finishes. Vellum can create a translucent, elegant effect, while glitter cardstock adds sparkle, and handmade papers offer unique textures.
- Adapt Sizes: The CD template is great for smaller envelopes, but for larger cards (like a 5×7 inch invitation), you can easily use a larger circular object, such as a dinner plate, a larger bowl, or a pre-made stencil, as your base template. Just remember to start with a proportionately larger square of paper.
- Layering for Visual Impact:
- Lined Envelopes: Cut a slightly smaller piece of patterned or contrasting paper in the same shape as your envelope’s interior, then carefully adhere it inside before sealing the side flaps. This adds a luxurious touch, can hide any internal glue lines, and provides a delightful surprise upon opening.
- Contrasting Flaps: Use a different patterned or colored paper for just the top flap, or even the side flaps, to create a multi-toned effect that highlights different elements of your design.
- Custom Closures: Move beyond simple adhesive seals to create unique and secure closures.
- Ribbon Tie: Punch small holes in the top and bottom flaps and thread a ribbon through to tie a charming bow.
- Button and String: Attach a decorative button to the top flap and wrap a string or twine around it and the bottom flap to secure.
- Wax Seals: For an elegant, vintage feel, use sealing wax and a custom stamp to close your envelopes, adding a touch of old-world charm.
- Magnetic Closures: Small, thin magnets can be discreetly hidden within the paper layers for a strong and reusable closure.
- Adhesive Dots/Velcro: For convenient and reusable closures, perfect for gift card holders or mini albums.
- Embellish with Flair:
- Stamping and Inking: Add decorative stamps or distress the edges with ink for a weathered or artistic look.
- Die-Cuts: Incorporate intricate die-cut shapes onto the envelope or its flaps for added detail and elegance.
- Embossing: Use dry or heat embossing to add texture and dimension to your paper, creating raised patterns.
- Hand Lettering/Calligraphy: Personalize the recipient’s name, address, or a special message directly on the envelope for a truly unique touch.
- Mass Production Made Easy: If you’re making many envelopes for invitations or events, create a sturdy, reusable template from cardboard or chipboard using the CD method. This allows you to quickly trace and cut multiple identical shapes with efficiency and consistency.
Beyond Cards: Creative Uses for Handmade Envelopes
Your newly acquired envelope-making skills extend far beyond just holding cards. Here are a few inspiring ideas to put your crafting prowess to good use, demonstrating the versatility of this simple paper project:
- Gift Card Holders: Create smaller, personalized envelopes perfect for presenting gift cards for birthdays, holidays, or thank-yous.
- Seed Packets: Design charming envelopes for sharing homemade seed collections from your garden with friends or for organizing your own seeds.
- Party Favors: Craft miniature envelopes to hold small treats, confetti, personalized messages, or thank-you notes for party guests.
- Organization: Use them to organize small items like buttons, beads, paper clips, stamps, or labels in your craft room or office.
- Scrapbooking & Junk Journaling: Integrate handmade envelopes into your memory books or journals to hold ephemera, journaling tags, secret notes, or photos, adding interactive elements.
- DIY Advent Calendars: Fill small custom envelopes with daily treats, messages, or activities for a unique and personalized holiday countdown.
- Memory Keepsakes: Create envelopes to store small mementos like concert tickets, pressed flowers, or tiny letters, preserving precious memories.
Conclusion: Unlock Your Creative Potential with Handmade Envelopes
Making your own envelopes is a truly rewarding aspect of paper crafting. It transforms the act of giving a card from a simple exchange into a thoughtful, personalized experience. What might seem like a small detail can significantly enhance the perceived value and emotional impact of your gift, leaving a lasting impression on the recipient.
From choosing the perfect paper to adding a bespoke closure, every step in the process is an opportunity to infuse your personality and care into your creation. This comprehensive tutorial has hopefully demystified the process, proving that crafting beautiful, custom envelopes is well within reach for anyone, regardless of their crafting experience. It’s a skill that adds immense value and joy to your paper crafting repertoire.
So, gather your supplies, embrace your creativity, and start making those gorgeous, one-of-a-kind envelopes today. You’ll not only enjoy the meditative and satisfying process but also delight everyone who receives a piece of your handmade artistry, showcasing your unique style and thoughtful effort!