
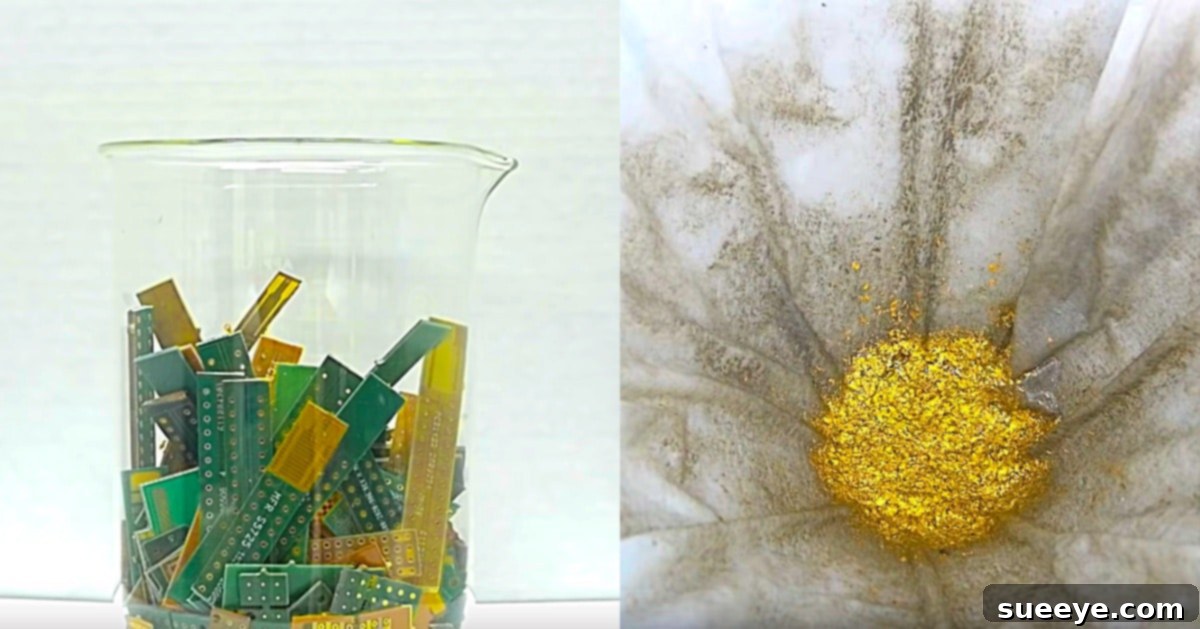
Unlock Hidden Value: A Comprehensive Guide to Recovering Gold from Old Computer Parts
In an era where sustainability and smart investments converge, the allure of gold remains timeless. Physical gold, renowned for its stability and intrinsic value, is a wise addition to any investment portfolio. While traditional methods of acquiring gold often involve purchasing coins from reputable dealers or finding antique jewelry, a surprisingly innovative and environmentally conscious approach has gained traction: harvesting gold from discarded electronic waste, specifically old computer parts. This fascinating process, reminiscent of the adventurous gold panners during the California Gold Rush, allows individuals to uncover a hidden treasure within everyday technology.
Modern electronics, especially older computer components, are veritable treasure troves of precious metals. Gold, celebrated for its superior electrical conductivity and resistance to corrosion, is strategically integrated into various critical parts. Processors, memory modules, connectors, and circuit boards often contain minute quantities of this valuable element. Extracting this gold involves a series of chemical processes and meticulous filtering. This guide will walk you through the steps, emphasizing safety, environmental responsibility, and the practicalities of transforming electronic scrap into shimmering gold.
Why is Gold Found in Computer Parts?
Gold’s presence in electronics is not arbitrary; it’s a testament to its unique properties that are indispensable for high-performance computing. Its exceptional conductivity ensures efficient electrical flow, vital for rapid data transfer and processing. More critically, gold’s unparalleled resistance to corrosion and oxidation guarantees long-term reliability for connections and contact points, preventing performance degradation over time. Even in the harsh environments of constant electrical currents and heat, gold maintains its integrity, ensuring the longevity and functionality of our devices. Common components rich in gold include:
- CPU Pins: The numerous pins on older Central Processing Units (CPUs) that connect to the motherboard are often gold-plated for optimal conductivity and durability.
- RAM Sticks: The ‘fingers’ or contacts on Random Access Memory (RAM) modules are typically gold-plated to ensure a stable and fast connection with the motherboard slots.
- Connector Ports: USB ports, HDMI ports, Ethernet ports, and various expansion card slots often feature gold plating to resist wear and corrosion, ensuring reliable connections.
- Circuit Board Traces and Components: While less common for entire traces, specific contact points, solder pads, and tiny components on circuit boards may contain gold.
- Motherboards and Daughterboards: Various connectors and small components on these main boards will have gold plating.
The Economic Reality: Is DIY Gold Recovery Worth It?
While the prospect of recovering gold from e-waste is exciting, it’s crucial to approach this endeavor with realistic expectations regarding its economic viability. For most hobbyists, the primary motivation is often the thrill of the process, the learning experience, and contributing to environmental recycling, rather than significant financial profit. The quantity of gold in individual computer parts is minuscule, often measured in milligrams or even fractions of a milligram per component.
- Cost of Materials: The chemicals required (Muriatic Acid, Hydrogen Peroxide, precipitants) can be expensive, especially when factoring in safety equipment and proper waste disposal.
- Time Investment: The process is labor-intensive, involving disassembly, preparation, chemical soaking for extended periods, multiple filtration stages, and careful precipitation.
- Yield vs. Effort: To yield even a gram of pure gold, a considerable volume of electronic scrap is typically required. The value of the recovered gold might barely cover or even fall short of the costs associated with chemicals, equipment, and the time invested.
For commercial operations, economies of scale and specialized equipment make e-waste refining profitable. However, for the individual enthusiast, it’s best viewed as a challenging and rewarding hobby that offers a unique insight into metallurgy and chemistry, with the bonus of contributing to sustainable waste management.
Safety First: Non-Negotiable Precautions
Working with strong acids and oxidizing agents is inherently dangerous and poses significant health risks if proper precautions are not meticulously followed. This is not a casual DIY project. Extreme caution and a thorough understanding of chemical safety protocols are absolutely essential. Any deviation can lead to severe injury, chemical burns, respiratory damage, or environmental contamination.
Personal Protective Equipment (PPE):
- Chemical-Resistant Gloves: Nitrile or neoprene gloves are mandatory. Standard latex gloves are insufficient.
- Eye Protection: Chemical splash goggles or a full face shield are critical to protect against splashes and fumes.
- Respiratory Protection: A respirator with acid gas cartridges is essential to prevent inhalation of toxic fumes, even in well-ventilated areas.
- Protective Clothing: A long-sleeved lab coat or chemical-resistant apron, along with closed-toe shoes, should be worn to protect skin and clothing.
Work Environment:
- Excellent Ventilation: Perform all chemical operations in a professional fume hood or, at minimum, outdoors in a well-ventilated area, away from people, pets, and flammable materials. Never work indoors without proper ventilation.
- Chemical-Resistant Surfaces: Work on a surface that can withstand chemical spills, such as a plastic tray or a dedicated workbench.
- Emergency Preparedness: Have a source of running water (e.g., a garden hose or emergency shower) immediately accessible for rinsing chemical splashes. Keep a basic first-aid kit nearby.
- Neutralizing Agents: Have baking soda or a commercial acid neutralizer on hand for small spills.
Chemical Handling and Storage:
- Labeling: Always keep chemicals in their original, clearly labeled containers.
- Storage: Store acids in a cool, dry, well-ventilated area, away from bases, oxidizers, and flammables. Never store acids near food or drinks.
- Mixing: Always add acid to water, slowly, not the other way around, to control heat generation. When mixing acids and peroxides, do so very slowly and carefully.
- Disposal: Never pour chemical waste down the drain. All chemical byproducts are hazardous and must be collected and disposed of according to local environmental regulations. Contact your local hazardous waste facility for guidance.
Disclaimer: This article provides information for educational purposes only. Attempting gold recovery from electronics carries significant risks. The author and publisher assume no responsibility for any personal injury, property damage, or environmental contamination resulting from attempting these procedures. Proceed only if you are fully trained in chemical handling and safety.
Materials You’ll Need: Equipping Your DIY Gold Refinery
To embark on your gold recovery journey, assembling the correct materials is paramount. Each item plays a specific role in the chemical process, from dissolving base metals to precipitating pure gold. Ensure all containers are chemically resistant and made of appropriate materials like glass or specific plastics (HDPE, polypropylene).
- Muriatic Acid (Hydrochloric Acid – HCl): This common pool chemical is typically 20-30% hydrochloric acid. It acts as a solvent to strip away base metals (like copper, nickel, lead, and tin) from the gold-plated parts. Its highly corrosive nature demands extreme caution.
- Hydrogen Peroxide (H2O2): A strong oxidizer, typically available in concentrations of 3% (household) up to 30% (industrial grade). When combined with Muriatic Acid, it forms a potent solution capable of dissolving gold by oxidizing it into solution, forming chloroauric acid. Higher concentrations are more effective but also significantly more dangerous.
- Aquarium Air Pump with Air Stone and Tubing: Used to provide continuous agitation and oxygenation to the chemical solution, ensuring even contact between the chemicals and the electronic parts, thus accelerating the dissolution process.
- Glass Beakers or Chemical-Resistant Plastic Containers: For mixing chemicals and soaking computer parts. Ensure they are large enough to safely contain the bubbling reaction without overflowing.
- Basic Kitchen Strainer (Plastic or Stainless Steel): For the initial separation of large debris from the gold-bearing liquid solution.
- Coffee Strainer or High-Quality Filter Paper (e.g., Whatman filter paper): For fine filtration to remove suspended particulates from the gold solution, ensuring a cleaner final product. A Buchner funnel with vacuum filtration can significantly speed up this step if available.
- Sodium Metabisulfite (SMB) or Urea: Crucial reducing agents used in a later step (not explicitly mentioned in the original text but essential for gold recovery) to precipitate the dissolved gold out of the solution, converting it back into solid gold powder.
- Distilled Water: For rinsing and diluting chemicals, ensuring no impurities contaminate the gold.
- Heating Plate (Optional but Recommended): A controlled heat source can often accelerate chemical reactions.
- pH Test Strips: Useful for monitoring the acidity of your solutions, especially during waste treatment.
Detailed Directions: Recovering Gold from Your E-Waste
This process is divided into several meticulous steps, designed to first remove base metals and then dissolve, filter, and finally precipitate the gold. Remember, each step requires unwavering attention to safety.
Step 1: Preparation and Initial Chemical Soak
Begin by carefully disassembling your old computer parts. Focus on components known to contain gold, such as CPU pins (especially older ones), RAM sticks, expansion card fingers, and motherboard connectors. Using pliers, wire cutters, or even a dremel, cut these parts down into smaller, manageable pieces to maximize the surface area exposed to the chemical solution. This helps the chemicals penetrate more effectively and reduces the overall soaking time.
In a well-ventilated area, preferably outdoors or under a fume hood, carefully prepare your chemical solution. Using a large, chemical-resistant glass beaker or container, first add your Muriatic Acid. Then, very slowly and carefully, add an equal volume of Hydrogen Peroxide (e.g., 500ml Muriatic Acid to 500ml Hydrogen Peroxide) to create a 50/50 ratio. This mixture is highly reactive. The reaction will generate heat and fumes, so ensure you are wearing all your PPE.
Once the solution is prepared, gently introduce your prepared computer parts into the mixture. Connect your aquarium pump with an air stone to provide continuous bubbling. This agitation ensures that the chemicals consistently come into contact with all surfaces of the electronic components, promoting an even and efficient reaction. You may notice vigorous bubbling initially; if it becomes too violent, consider making additional slits in larger pieces to reduce trapped air and control the reaction. To contain fumes and prevent splashing, loosely cover the top of your beaker with a piece of plastic cling film, ensuring there’s still enough space for gases to escape without building pressure. Allow the parts to soak in this solution for approximately one week. During this time, the powerful acid-peroxide mixture will work to dissolve the base metals, and eventually, the gold itself, into the solution.
Step 2: Initial Straining to Remove Large Debris
After the week-long soaking period, the solution will likely contain dissolved metals, tiny fragments of plastic, and other non-metallic residues. The next step is to remove these larger solid contaminants while carefully preserving the liquid, which now holds your dissolved gold. Place a basic kitchen strainer (preferably plastic or stainless steel that won’t react with the acid) over another clean, chemical-resistant collection container or beaker.
Carefully and slowly pour the entire contents of the soaking beaker through the kitchen strainer. The strainer will catch the larger pieces of plastic, fiberglass, and any remaining non-dissolved electronic components. It is absolutely crucial to reserve all the liquid that passes through the strainer. This liquid is where your gold is now suspended in solution, likely as chloroauric acid. Dispose of the solid residue caught by the strainer according to local hazardous waste regulations, as it may still contain trace amounts of hazardous chemicals.
Step 3: Fine Filtration for Purity
The liquid collected from the initial straining will still contain very fine particulates that could contaminate your final gold product. To achieve a higher level of purity, further filtration is necessary. This step will help remove any suspended solids, leaving you with a clearer gold-bearing solution.
Place a coffee strainer (or a funnel lined with high-quality filter paper, such as Whatman No. 42 or similar) over yet another clean, chemical-resistant collection beaker. Slowly pour the liquid from the previous step through this finer filter. The coffee strainer or filter paper will trap the smaller, microscopic particles that the kitchen strainer missed. For optimal clarity, you may need to repeat this fine filtration process several times, pouring the filtered liquid through a fresh coffee filter or filter paper each time. Continue until the liquid appears as clear as possible, indicating the removal of most suspended solids. Again, meticulously reserve all the filtered liquid, as this is your concentrated gold solution. The excitement builds as you move closer to seeing your gold!
Step 4: Precipitating the Gold from Solution
At this stage, your gold is dissolved in the liquid, invisible to the naked eye. To recover solid gold, you need to precipitate it out of the solution using a reducing agent. This is where the magic truly happens, transforming the chemical solution back into tangible gold powder.
The most common and effective precipitating agent for gold is Sodium Metabisulfite (SMB). First, it’s advisable to neutralize any residual chlorine in your solution, which can interfere with precipitation. You can achieve this by adding a small amount of Urea (approximately 1 gram per 100ml of solution) and allowing it to react for about 15-30 minutes, or until bubbling ceases. Once neutralized, dissolve about 5-10 grams of Sodium Metabisulfite in a small amount of distilled water. Slowly add this SMB solution to your filtered gold-bearing liquid, stirring continuously. You should observe a color change in the solution, often turning darker, and fine brown or blackish powder (which is your gold) will begin to fall out of the solution and settle at the bottom of the beaker. This can take anywhere from a few minutes to several hours, depending on the concentration of gold and the purity of your solution. Add SMB gradually until no more gold precipitates.
Step 5: Washing and Drying the Recovered Gold Powder
Once all the gold has settled, carefully decant the liquid from above the gold powder without disturbing the precious metal. This liquid is still highly acidic and hazardous, containing dissolved base metals and leftover chemicals, so it must be collected and disposed of properly. Wash the gold powder several times with distilled water to remove any remaining chemical impurities. To do this, add distilled water to the beaker, gently swirl, allow the gold to settle, and then carefully decant the wash water. Repeat this process at least three to five times until the wash water tests neutral with pH strips.
After thorough washing, transfer the gold powder onto a clean, heat-resistant surface (like a porcelain evaporating dish or a clean watch glass). Gently heat the dish to evaporate any remaining water, leaving behind dry, pure gold powder. Be careful not to overheat, as this can cause the fine powder to become airborne. Your retrieved gold will appear as a fine, metallic brown or yellow powder.
Step 6: Melting the Gold (Optional)
For those wishing to turn their gold powder into a more recognizable solid form, melting is the final step. Using a high-temperature torch (like an oxy-acetylene or propane torch with appropriate safety gear) and a ceramic crucible, gently heat the gold powder until it melts into a molten bead. You may need to add a small amount of flux (like borax) to help gather the gold and remove any lingering impurities. Once molten, the gold will coalesce into a single, shiny nugget. Allow it to cool completely before handling. Congratulations, you’ve successfully recovered gold from old computer parts!
Environmental Responsibility and Disposal
The chemical solutions used in gold recovery are highly hazardous. Improper disposal can lead to severe environmental damage and legal penalties. Never pour these solutions down the drain or into the ground. After the gold has been precipitated and washed, the remaining liquid (containing various dissolved metals and unreacted chemicals) must be collected in a sealed, labeled container. Contact your local hazardous waste management facility or environmental protection agency for instructions on proper disposal. Some facilities may accept small quantities from individuals; others may require specialized services. Responsible waste management is as critical as the gold recovery process itself.
Conclusion: A Glimpse into the World of Hidden Treasures
The journey of recovering gold from old computer parts is an exhilarating blend of chemistry, metallurgy, and environmental consciousness. It’s a modern-day echo of the California Gold Rush, where patience, meticulous effort, and a keen eye for detail lead to the discovery of precious metal. While the financial returns for hobbyists may be modest, the educational value, the satisfaction of transforming waste into something valuable, and the contribution to sustainable e-waste recycling are immensely rewarding.
Remember, safety is paramount. Always prioritize personal protection and environmental responsibility. This fascinating endeavor not only offers a unique hobby but also highlights the intrinsic value hidden within our discarded technologies, encouraging a more thoughtful approach to consumption and waste. So, gather your old electronics, don your safety gear, and prepare to uncover the hidden gold that lies within!