
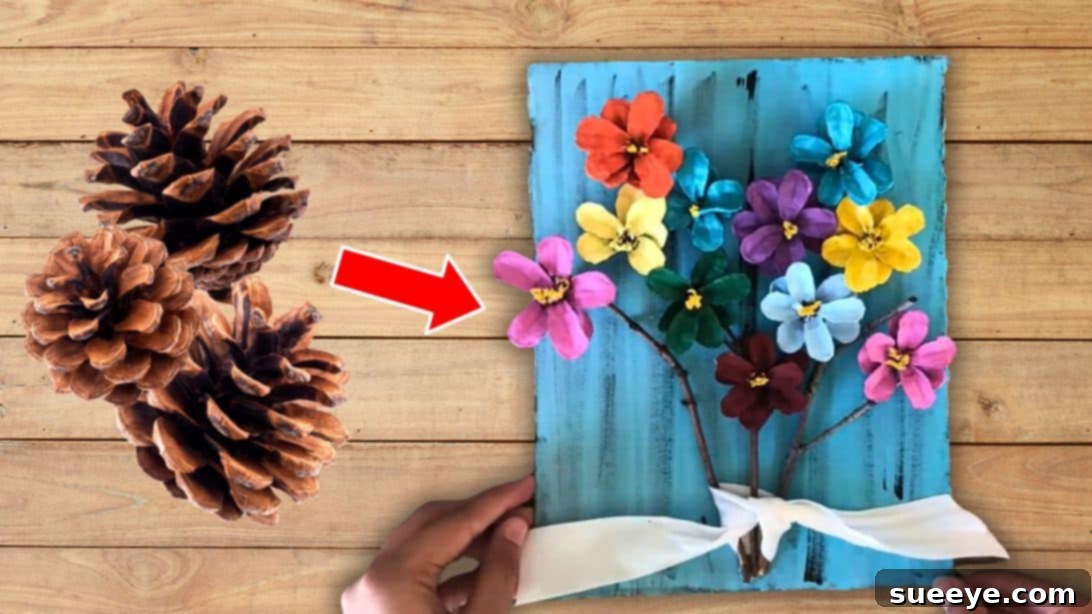
Are you searching for your next inspiring art project, one that combines creativity with the beauty of nature? Look no further! If you have a collection of pine cones from previous outdoor adventures or craft sessions, it’s time to bring them out. We’re about to embark on a delightful journey to transform these humble natural elements into truly exquisite DIY pine cone flowers. Just imagine: from a distance, these handcrafted blossoms possess an artistic quality, much like a beautiful painting, adding a unique touch to any space. This project is not just a craft; it’s an opportunity to create stunning, sustainable decor that will captivate and charm.
RELATED: How To Make A Pinecone Flower Bouquet
Pine cones are incredibly versatile and offer a world of creative possibilities far beyond traditional holiday decorations. While they are quintessential for Christmas and autumn themes, their unique structure makes them ideal for crafting throughout every season, including vibrant spring and sunny summer decor. With a little imagination, pine cones can be transformed into elegant wreaths, intricate roses, or, as you’ll discover here, charming floral arrangements. The internet is brimming with inspiration for your next nature-inspired craft; a quick search will unveil countless innovative ideas. Today, we’ll focus on creating these captivating pine cone flowers, guided by the excellent tutorial from Naturally Creative.
Gathering Your Creative Toolkit: Essential Materials for DIY Pine Cone Flowers
Before diving into the crafting process, ensure you have all the necessary materials at hand. Most items are easily accessible, and you might even have some lying around your home. Selecting quality materials will ensure your pine cone flowers are not only beautiful but also durable.
- Pine Cones: The star of our project! Collect various sizes for a diverse bouquet. Ensure they are clean and free of debris.
- Sharp Scissors or Pruners: Essential for carefully cutting the pine cones. A sharp pair will make the process much easier and safer.
- Craft Paint: Acrylic paints work wonderfully. Choose a range of vibrant colors for your petals and a good yellow for the flower centers. White paint is also needed for priming.
- Paintbrushes: A selection of sizes, including a finer brush for detail work and a broader one for base coats.
- Cardboard: A sturdy piece, approximately 9.45 inches by 7.5 inches (or similar dimensions suitable for your display). This will serve as the canvas for your floral arrangement. You can also opt for a wooden panel or stretched canvas.
- Small Dry Stems or Twigs: Collected from your garden or a craft store. These will act as the “stems” for your pine cone flowers, giving them an authentic botanical feel.
- Hot Glue Gun and Glue Sticks: Indispensable for securely attaching the pine cone flowers and stems to your cardboard base. Always exercise caution when using a hot glue gun.
- Ribbon: A decorative ribbon to tie around the stems, adding an elegant finishing touch to your rustic floral display. Choose a color that complements your painted flowers.
Transforming Pine Cones into Blooms: A Step-by-Step Guide
Step 1: Preparation is Key – Cleaning and Curing Your Pine Cones
The first crucial step in crafting your pine cone flowers is proper preparation. Begin by soaking your pine cones in a bucket of water for approximately 2 to 3 hours. This soaking process helps to soften the pine cones, making them much easier to cut, and also aids in dislodging any dirt, sap, or tiny critters that might be residing within. After soaking, give them a thorough wash to ensure they are pristine. Once clean, let them air dry completely for at least a day. For those eager to expedite the process, you can bake them: place the pine cones on a foil-lined baking sheet and bake at 370°F (187°C) for about 45 minutes. Baking serves multiple purposes: it quickly dries them, helps them open up beautifully, and kills any lingering pests. Always allow them to cool completely before handling, as they will be hot and delicate right out of the oven.
Step 2: Unveiling the Petals – Cutting Your Pine Cones
Once your pine cones are thoroughly dry and cool, it’s time to transform them into individual “petals.” Using your sharp scissors or pruners, carefully cut each pine cone into two or three distinct sections. The trick here is to observe the natural scales of the pine cone; cut along these lines to create sections that resemble floral petals. Different parts of the pine cone will yield varying petal shapes and sizes, adding organic diversity to your final arrangement. Exercise patience and precision, ensuring clean cuts for the best results. This step is where the magic truly begins, as you start to see the potential flowers emerge from the raw material.
Step 3: Laying the Foundation – Priming Your Pine Cone Petals
With your pine cone sections ready, it’s time to prepare them for their colorful transformation. Using your paintbrush, apply a generous coat of white paint to all sides of each pine cone “petal.” This white base coat serves as an excellent primer, creating a uniform surface that allows subsequent colors to appear more vibrant and true. It also helps to seal the natural woody texture, providing a smoother canvas for your artistic endeavors. Ensure every crevice and surface is covered for optimal results. Once painted, set them aside in a well-ventilated area and allow them to dry completely. This might take a few hours, depending on the paint thickness and humidity.
Step 4: Bringing Your Flowers to Life with Color
Now for the most exciting part: infusing your pine cone petals with color! Choose your preferred palette. You might opt for bright, cheerful spring hues, soft pastels, or rich autumnal tones to match your decor. Paint each individual “petal” section with your chosen colors. Don’t be afraid to experiment with blending colors or adding subtle gradients for a more realistic or artistic effect. Once the petal colors are applied and partially dry, paint the center of each pine cone flower with bright yellow paint. This yellow center mimics the natural heart of many blossoms, adding a cheerful contrast and completing the floral illusion. Allow all the painted pieces to dry thoroughly before proceeding to the next step. Patience here ensures crisp, beautiful colors.
Step 5: Crafting Your Artistic Canvas Background
While your painted pine cone flowers are drying, turn your attention to the cardboard base. Begin by painting the cardboard in your preferred background color. This color will significantly influence the overall aesthetic of your finished piece, so choose wisely – perhaps a neutral tone to make the flowers pop, or a complementary color to enhance their vibrancy. To add depth and character, use black paint to create subtle brush strokes or a distressed effect. This technique can give your backdrop an aged, artistic, or rustic charm, making the entire piece look more sophisticated and handcrafted. This background will serve as the perfect canvas, allowing your vibrant pine cone flowers to truly shine.
Step 6: Assembling Your Floral Masterpiece
With both your flowers and background ready, it’s time to bring them together. First, arrange your small dry stems or twigs along the bottom part of your painted cardboard. Secure them in place using hot glue, but here’s a crucial tip: avoid gluing the entire length of the stems onto the cardboard. Leave the upper sections free so you’ll have space to tie a decorative ribbon around them later. Once the stems are securely attached and the glue has dried, begin arranging your painted pine cone flowers onto these stems. Use your hot glue gun to firmly attach each flower, creating a balanced and visually appealing composition. Experiment with different placements and angles to give your arrangement a natural, organic feel. Ensure each flower is securely fastened, creating a lasting display.
Step 7: The Finishing Touch – Adorning with Ribbon
To complete your stunning pine cone flower arrangement, add an elegant ribbon. Gather the free ends of the dry stems that you intentionally left unglued in the previous step. Choose a ribbon that complements the colors of your flowers and the background. Carefully tie the ribbon around the stems, forming a neat bow or a simple knot. This small detail adds a charming, rustic touch and helps to unify the entire composition, creating a cohesive and beautifully finished piece of art. Step back and admire your unique creation, a testament to the beauty that can be crafted from nature’s simple offerings.
Unleash Your Creativity: Displaying Your DIY Pine Cone Flowers
Congratulations, you’ve successfully created a breathtaking piece of DIY pine cone flower art! This project is a testament to the magic of transforming simple, natural elements into beautiful home decor. The beauty of these handcrafted flowers lies not just in their aesthetic appeal but also in the personal satisfaction of bringing them to life with your own hands. This project encourages sustainability by utilizing natural resources and offers a wonderfully therapeutic creative outlet.
Creative Display Ideas and Variations:
- Wall Art: As demonstrated in this tutorial, your pine cone flower arrangement makes for exquisite wall art, adding a touch of rustic elegance and natural charm to any room.
- Table Centerpiece: Instead of a cardboard base, consider gluing your pine cone flowers into a decorative bowl or basket filled with moss for a unique table centerpiece.
- Garlands: Attach multiple pine cone flowers to a long piece of twine or ribbon to create a stunning garland that can adorn mantels, doorways, or windows.
- Gift Toppers: Use a single, beautifully painted pine cone flower as a unique and personal embellishment for a wrapped gift.
- Wreaths: Incorporate these flowers into a larger wreath design for your front door, suitable for any season.
- Varying Textures: Experiment with different types of paint finishes, like metallic paints for a glamorous look, or glitter for a festive sparkle.
- Seasonal Adaptations: Use bright, airy colors for spring and summer, deep reds and oranges for autumn, or whites and silvers for a winter wonderland theme.
- Combine with Other Elements: Enhance your display by adding other natural elements like dried leaves, small acorns, or artificial berries.
This project is more than just making flowers; it’s about connecting with nature, expressing your artistic flair, and creating something truly unique for your home or as a thoughtful gift. The process is not only enjoyable but also incredibly rewarding, resulting in a piece of art that looks much more intricate than its simple origins suggest. So, gather your pine cones, unleash your inner artist, and start crafting these beautiful DIY pine cone flowers today. Share your creations and inspire others to embrace the joy of natural crafting!