
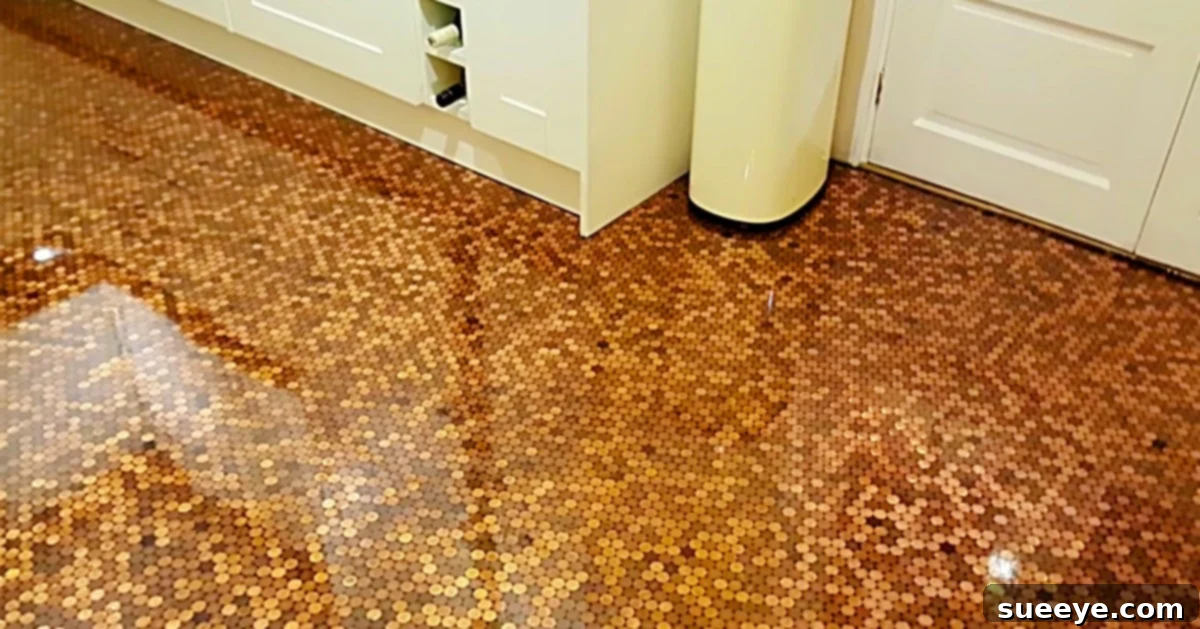
The allure of custom home finishes has never been stronger, and in recent years, **epoxy floors** and **epoxy countertops** have soared in popularity. Homeowners everywhere are falling in love with the seamless, durable, and infinitely customizable surfaces these materials offer. Social media platforms like Instagram and Pinterest are brimming with awe-inspiring examples, showcasing everything from dazzling metallic epoxy floors to elegant solid-color finishes. Amidst this vibrant landscape of design possibilities, one particular trend caught my eye and captured my imagination: the extraordinary **penny floor**. After countless hours spent sifting through stunning images of various **DIY epoxy floor ideas** for my kitchen, a single, captivating image of an epoxy penny floor, similar to one I discovered on YouTube, instantly clarified my vision. It was truly extraordinary, unlike anything else I had seen, and I knew right then that this was the project for me. The decision was made. Serendipitously, my uncle, a keen collector of pennies, offered a generous donation for my project, jesting that I could simply get the rest from the bank. And laugh I did, but his advice was spot-on! Wells Fargo was more than happy to provide all the pennies I needed, making the initial gathering surprisingly simple. To embark on this remarkable journey, the fundamental first step is to ensure you have a perfectly smooth, impeccably clean, and fully prepared concrete surface. This crucial foundation sets the stage for a flawless and long-lasting **DIY penny floor** masterpiece.
Learn To Make A DIY Epoxy Penny Floor
Why Choose a DIY Epoxy Penny Floor?
Opting for a **DIY epoxy penny floor** is more than just a home improvement project; it’s an artistic statement and a smart investment. The primary appeal lies in its unparalleled uniqueness. Unlike traditional flooring options, a penny floor transforms ordinary currency into an extraordinary mosaic, giving your space a distinctive character that’s truly one-of-a-kind. Each penny, with its individual sheen and subtle variations, contributes to a rich, metallic tapestry that shimmers under the light. Beyond aesthetics, the durability of an epoxy finish is a major draw. Epoxy creates a hard, resilient, and non-porous surface that is highly resistant to stains, moisture, impacts, and daily wear and tear. This makes it an ideal choice for high-traffic areas like kitchens, bathrooms, or even entryways, where longevity and easy maintenance are paramount. From a cost-effectiveness standpoint, while the epoxy itself is an investment, the primary decorative material—pennies—are incredibly budget-friendly, often making it a more affordable custom flooring option compared to high-end tiles or hardwoods. Furthermore, the satisfaction of creating such a stunning feature with your own hands is immensely rewarding. It’s a project that combines creativity, practicality, and the joy of crafting a truly personalized space.
Essential Materials and Tools for Your Penny Floor Project
Before diving into the installation, gathering all necessary materials and tools is crucial for a smooth and successful **epoxy penny floor** project. Proper preparation will save you time and frustration later on. Here’s a detailed list:
Materials:
- Pennies: Estimate approximately 250-300 pennies per square foot, depending on how tightly they are laid. You’ll need a substantial amount, so plan to source them from banks, friends, or family. Consider cleaning them with a vinegar and salt solution for a uniform, shiny look, or leave them tarnished for a more rustic, antique aesthetic.
- Silicone Caulk: Opt for a clear, high-quality, waterproof silicone caulk. This will be your adhesive for securing the pennies to the subfloor. Ensure you have plenty of tubes and a caulk gun.
- Grouting Stain: Choose a color that complements your pennies and desired aesthetic. Darker stains can create a dramatic contrast, while lighter shades offer a more subtle blend. Traditional grout can also be used, but a stain offers easier application and cleaning around pennies.
- Epoxy Resin Kit: This is a two-part system (resin and hardener). Choose a clear, high-quality, self-leveling epoxy designed for flooring or countertops. Calculate the square footage of your area to determine the quantity needed, often requiring multiple coats for optimal depth and protection.
- Cleaning Supplies: Degreaser, heavy-duty floor cleaner, shop vacuum, mops, and rags are essential for thorough surface preparation.
- Painter’s Tape: For masking off edges and protecting adjacent surfaces.
- Plastic Sheeting: To protect walls and surrounding areas from spills.
- Protective Gear: Safety glasses, chemical-resistant gloves, and a respirator (especially when working with epoxy) are non-negotiable for your safety.
Tools:
- Caulk Gun: For applying the silicone caulk efficiently.
- Q-Tips or Small Sponges: Absolutely essential for wiping away excess caulk and grout around the pennies.
- Grouting Tool (Rubber Float): For spreading grout or stain evenly and pressing it into the gaps between pennies.
- Mixing Buckets: Several clean buckets for mixing epoxy resin.
- Stir Sticks: For thoroughly mixing the epoxy components.
- Squeegee or Trowel: For spreading the epoxy resin evenly across the penny surface.
- Rollers (Optional): For thin epoxy coats or applying a primer.
- Spiked Shoes (Optional): To walk on wet epoxy without leaving marks, allowing you to reach all areas for bubble removal.
- Heat Gun or Propane Torch: Crucial for removing air bubbles from the wet epoxy surface (use with extreme caution and keep moving).
- Utility Knife or Metal Shears: For cutting pennies to fit irregular edges (handle with care).
- Level: To check your surface for evenness.
Step-by-Step Guide: Crafting Your Epoxy Penny Floor
Creating a **DIY epoxy penny floor** is a rewarding project that involves several meticulous steps. Following this guide carefully will help ensure a professional-looking and durable finish.
1. Preparing Your Surface: The Foundation for Success
The success of your **penny floor** hinges on the quality of your subfloor preparation. Your concrete surface must be perfectly smooth, thoroughly clean, completely dry, and level. Start by removing any existing flooring, adhesive, or debris. Vacuum the area extensively, then use a heavy-duty degreaser or concrete cleaner to eliminate any grease, oil, or contaminants. Rinse thoroughly and allow the floor to dry completely, which may take several days. Any cracks or uneven spots should be repaired and leveled using a suitable concrete patch or self-leveling compound. For optimal adhesion and to prevent moisture issues, it’s highly recommended to apply a high-quality epoxy primer to your clean, dry concrete floor. This step creates a strong bond for subsequent layers and helps seal the concrete, preparing it for the adhesive and epoxy resin. A well-prepared surface ensures your pennies lay flat and your epoxy cures beautifully, preventing future issues like delamination or bubbling.
2. Laying Down Your Penny Design with Silicone Caulk
With your surface prepped, it’s time for the creative part: laying out your pennies. This step is where your **DIY penny floor** truly begins to take shape. Using clear silicone caulk, apply a small bead to the back of each penny or in small sections directly onto the floor. Carefully press each penny into place, ensuring it’s level and tightly spaced with its neighbors. You can choose to lay them in precise rows, a herringbone pattern, a random scattered design, or even create intricate motifs. For edges and corners, you may need to carefully cut pennies using metal shears or a Dremel tool to fit the spaces perfectly. As you go, keep a supply of Q-tips or small, damp sponges handy to immediately wipe away any excess silicone caulk that squeezes out between the pennies. This prevents unsightly smudges and ensures a clean base for the subsequent steps. Work in manageable sections, allowing the caulk to cure according to the manufacturer’s instructions before proceeding to the next stage. This meticulous placement forms the heart of your stunning new floor.
3. Applying the Grout or Stain to Enhance Your Pennies
Once all your pennies are securely in place and the silicone caulk has fully cured, the next step is to apply a grouting stain. The purpose of this step is twofold: to fill any small gaps between the pennies, creating a more uniform surface, and to enhance the visual appeal by adding contrast or depth. Choose a stain color that complements your pennies—a darker shade will make the copper pop, while a lighter tone might soften the overall look. Apply the grouting stain with a rubber float or a similar grouting tool, working it diagonally across the penny surface to push the stain into every crevice. Work in small sections, allowing you to manage the application and cleaning effectively. Immediately after applying the stain to a section, use a clean, damp sponge to carefully wipe away any excess from the surface of the pennies. This ensures that the metallic sheen of the pennies remains vibrant and isn’t dulled by the stain. Allow the grouting stain to cure completely according to the product’s instructions before moving on to the final epoxy application.
4. Mixing and Pouring the Epoxy Resin for a Durable Finish
Now comes the exciting final stage: mixing and pouring the epoxy resin that will seal and protect your **epoxy penny floor**. This step requires precision and attention to detail. Always refer to your specific epoxy kit’s instructions for exact mixing ratios, as these can vary between brands. In a clean mixing bucket, combine the resin and hardener according to the specified proportions. Mix thoroughly for the recommended duration (usually 3-5 minutes), scraping the sides and bottom of the bucket to ensure all components are fully integrated. Inadequate mixing will lead to soft spots and improper curing. Once mixed, immediately pour the epoxy onto your penny-covered floor, starting from one corner and working your way across the room. Use a squeegee or a clean grouting tool to spread the epoxy evenly, ensuring it covers all pennies and fills any remaining minuscule gaps. Maintain a consistent thickness for a smooth, self-leveling finish. As you work, you’ll likely notice air bubbles rising to the surface. These must be removed to achieve a crystal-clear finish. Use a heat gun or a propane torch, moving it gently and consistently about 6-12 inches above the surface. Do not hold it in one spot, as this can scorch the epoxy. The heat causes the bubbles to pop, leaving a smooth, glass-like surface. Depending on the desired thickness and finish, you may opt for multiple thin coats, allowing each coat to cure to a tack-free state before applying the next.
Curing and Maintaining Your New Epoxy Penny Floor
After the final pour, the curing process is critical for the durability and longevity of your **epoxy floor**. The epoxy will typically be tack-free to the touch within 12-24 hours, but it’s essential to protect the area from dust, debris, and foot traffic during this initial period. Most epoxies require 72 hours for light foot traffic and a full 7 days to achieve their maximum hardness and chemical resistance. Avoid placing heavy furniture or walking on the floor with street shoes until the full cure time has passed. Once cured, maintaining your **epoxy penny floor** is remarkably simple. The non-porous surface makes it exceptionally easy to clean; simply sweep or vacuum to remove loose dirt, then mop with a mild cleaner and warm water. Avoid abrasive cleaners or harsh chemicals, as these can dull the epoxy’s shine over time. With proper care, your stunning and unique epoxy penny floor will remain a gorgeous focal point in your home for many years to come, reflecting your unique style and craftsmanship.
Potential Challenges and Troubleshooting for Your DIY Epoxy Floor
While creating a **DIY epoxy penny floor** is incredibly rewarding, it’s also a project that can present a few challenges. Being aware of these potential issues and knowing how to troubleshoot them can save you significant time and frustration. One common problem is unevenness in the penny layout or subfloor, which can lead to pooling epoxy or an irregular surface. Thorough subfloor preparation and meticulous penny placement are the best prevention. If you encounter significant bubbles in your epoxy that a heat gun doesn’t fully resolve, it might be due to rapid application, trapped air from porous concrete (which a primer helps prevent), or simply not enough passes with the heat gun. For persistent bubbles, ensure you’re working in a well-ventilated area with consistent temperature. Another frustrating issue is epoxy not curing properly, resulting in sticky or soft spots. This is almost always due to inaccurate measurement or insufficient mixing of the resin and hardener. Always measure precisely and mix for the full recommended time, scraping the sides and bottom of your bucket thoroughly. Discoloration can occur if the epoxy is exposed to direct sunlight over long periods or if improper cleaning agents are used; choosing a UV-resistant epoxy is key for areas with high sun exposure. Lastly, dealing with edges and transitions requires careful planning. Use painter’s tape to create clean lines and consider transition strips where your penny floor meets other flooring types. Addressing these challenges proactively will ensure your **custom epoxy floor** project results in a truly professional and beautiful outcome.
It is truly no wonder these **epoxy floors** are all the rage and continue to captivate homeowners looking for bespoke design solutions. The transformation from a collection of humble pennies into a shimmering, durable, and completely unique floor is nothing short of amazing. My own **epoxy penny floor** is an absolute showstopper – it’s not just a floor, it’s a conversation piece, a testament to creativity, and truly gorgeous. I love the way it catches the light and adds an unexpected touch of brilliance to my home. If you’re seeking a project that combines personal style with long-lasting function, embarking on a **DIY epoxy penny floor** could be the perfect adventure for you.