
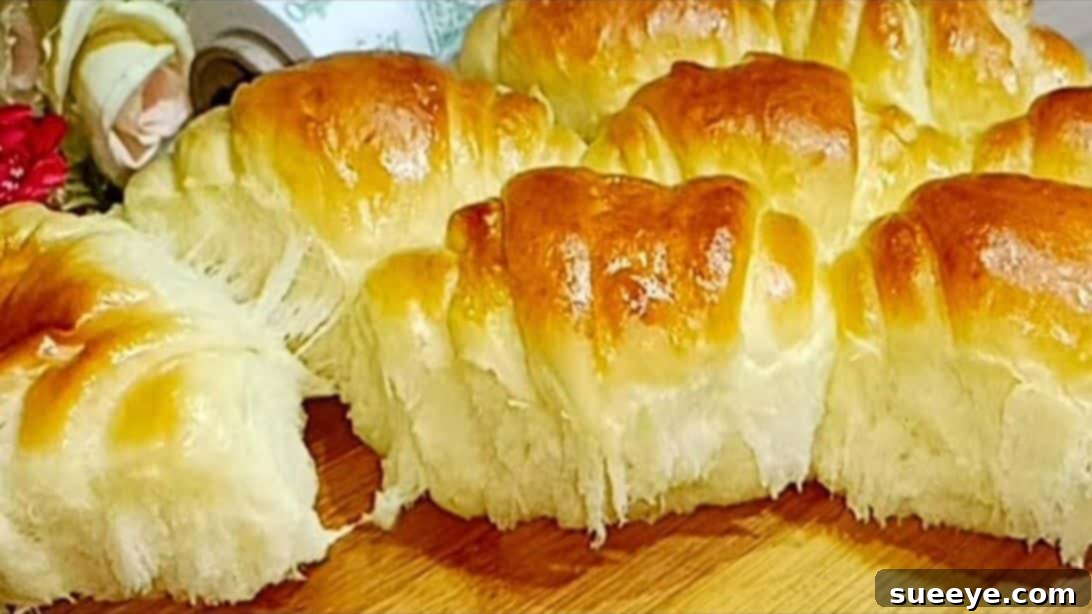
There’s nothing quite like the comforting aroma and taste of freshly baked bread. If you’ve been searching for that perfect homemade loaf that boasts an incredibly soft crumb and a delightful fluffiness, your quest ends here. We’re diving into a phenomenal bread recipe, inspired by the expertise of “Let Me Show,” that promises to deliver one of the most irresistible loaves you’ll ever pull from your oven. Imagine sinking your teeth into a slice so tender it practically melts in your mouth, perfect with a dollop of strawberry jam and a warm cup of coffee, transforming an ordinary breakfast into an extraordinary experience.
This recipe for soft and fluffy bread isn’t just delicious; it’s also incredibly rewarding to make. While it requires a bit of patience due to proofing times, the process itself is straightforward, making it accessible even for those new to baking with yeast. The magic lies in a carefully balanced blend of everyday ingredients and a methodical approach that ensures a consistently superior texture. Forget bland, dense loaves; this recipe elevates homemade bread to a new level of culinary excellence.
RELATED: Explore other simple baking ideas like this No-Knead 4-Ingredient Air Fryer Bread Recipe
The beauty of this soft and fluffy bread recipe lies in its simplicity, requiring just a handful of staple ingredients you likely already have in your pantry. You won’t need to make a special trip to the store for exotic items, which means you can whip up a batch of this delightful bread whenever the craving strikes. The core ingredients include all-purpose flour for structure, milk and milk powder for richness and tenderness, instant yeast for a beautiful rise, sugar for a touch of sweetness and golden-brown crust, salt to enhance flavor, butter for moisture and flavor, and an egg to add richness, color, and improve the dough’s texture. For the essential egg wash, a simple combination of egg yolk, milk, and a touch of vinegar will give your loaf that irresistible golden sheen. While the overall process is user-friendly, remember that bread baking is a journey that rewards patience. The time dedicated to kneading, resting, and proofing is crucial for achieving that signature soft and airy texture that makes this bread truly special. Trust the process, and you’ll be rewarded with an incomparable loaf.
Ready to expand your baking repertoire? Don’t miss out on mastering another delicious classic: How to Make Focaccia Bread in 6 Easy Steps
Essential Ingredients for Your Easy Homemade Bread
Crafting the perfect loaf of soft, fluffy bread starts with selecting high-quality ingredients and measuring them precisely. Here’s everything you’ll need to bring this delightful recipe to life:
- All-Purpose Flour: 2 1/2 cups. Flour forms the structural backbone of your bread. For best results, use unbleached all-purpose flour.
- Milk (Lukewarm): 3/4 cup and 2 tablespoons. Milk adds richness, tenderness, and helps create a softer crust compared to water. Ensuring it’s lukewarm is critical for activating the yeast without killing it.
- Instant Yeast: 2 teaspoons. Instant yeast is a baker’s best friend, as it can be mixed directly with dry ingredients and doesn’t require prior proofing. It’s responsible for the bread’s rise and airy texture.
- Salt: 1 1/4 teaspoon. Salt is vital for enhancing the flavor of the bread, controlling yeast activity, and strengthening the gluten structure.
- Granulated Sugar: 1/4 cup. Sugar feeds the yeast, aids in browning the crust, and contributes to the bread’s tender texture and subtle sweetness.
- Unsalted Butter (Softened): 3 tablespoons and 2 teaspoons. Butter adds incredible flavor, moisture, and richness to the dough, resulting in a wonderfully soft crumb. Ensure it’s softened to room temperature for easier incorporation.
- Large Egg: 1. An egg enriches the dough, adds moisture, contributes to a finer crumb, and provides color.
- Milk Powder: 3 1/4 tablespoons. This secret ingredient is key to achieving an extra level of softness and tenderness, as well as a richer flavor profile.
For the Luminous Egg Wash:
A simple egg wash provides a beautiful golden-brown crust and a lovely sheen to your finished bread. This mixture is brushed on before baking.
- Egg Yolk: 1. The yolk provides rich color.
- Milk: 1 tablespoon. Milk thins the yolk slightly and adds to the gloss.
- White Vinegar: 1 teaspoon. A touch of vinegar helps break down the egg proteins, making for a smoother, shinier wash and preventing the egg from getting streaky on the dough.
Crafting the Perfect Fluffy Bread: A Step-by-Step Guide
Baking this soft and fluffy bread is a meditative process that yields incredible results. Follow these detailed steps carefully, and you’ll soon be enjoying a magnificent homemade loaf.
Step 1: Activate and Combine Wet Ingredients
Begin by preparing your wet ingredients in a large mixing bowl. Measure out 3/4 cup and 2 tablespoons of lukewarm milk. The temperature of the milk is crucial here – it should be warm to the touch (around 105-115°F or 40-46°C), but not hot, as excessive heat can kill the yeast. To this lukewarm milk, add the granulated sugar, instant yeast, milk powder, and the large egg. Stir the mixture gently with a whisk or spatula until all ingredients are well combined and the sugar has dissolved. This initial step allows the yeast to begin activating, preparing it to leaven your dough.
Step 2: Form the Basic Dough and First Rest
Now, it’s time to introduce the dry components. Add the measured flour and salt to the wet mixture in the bowl. Using a sturdy spatula or a wooden spoon, begin to mix until a shaggy, cohesive dough starts to form. At this point, you don’t need to knead extensively; just bring the ingredients together. Once the dough has mostly come together, cover the bowl with plastic wrap or a clean kitchen towel and let it rest at room temperature for 30 minutes. This resting period, often called autolyse, allows the flour to fully hydrate, making the subsequent kneading process much easier and more effective for gluten development.
Step 3: Incorporate Butter and Refrigerate
After the initial 30-minute rest, the dough will be slightly more relaxed. Add the softened butter directly into the dough. This is a crucial step for achieving the bread’s signature richness and tenderness. Continue kneading the dough, either by hand or with a stand mixer fitted with a dough hook, until the butter is completely incorporated and the dough feels smooth and elastic. This can take several minutes. Once the butter is fully integrated, cover the bowl again and refrigerate the dough for another 30 minutes. Chilling the dough helps firm up the butter and makes the dough easier to handle in the next steps, preventing it from becoming too sticky.
Step 4: Achieve a Smooth, Elastic Dough
Remove the dough from the refrigerator and transfer it to a lightly floured work surface. Now, it’s time for more intensive kneading. Continue to knead the dough until it is truly smooth, pliable, and springs back slightly when gently poked. Proper kneading is essential for developing the gluten, which creates the bread’s structure and elasticity, allowing it to trap the gasses produced by the yeast and achieve that wonderful fluffy texture. You’ll know it’s ready when you can stretch a small piece of dough thinly without it tearing easily (the “windowpane test”).
Step 5: First Proofing (Bulk Fermentation)
Lightly grease a clean bowl with a neutral-flavored vegetable oil. Place the kneaded dough into the greased bowl, turning it once to coat all sides with a thin layer of oil. This prevents the dough from sticking and drying out during proofing. Cover the bowl tightly with plastic wrap to create a warm, humid environment. Place the bowl in a warm spot in your kitchen (an oven with the light on, or a draft-free corner works well) and let the dough rise for 50 to 60 minutes, or until it has doubled significantly in size. This first rise, known as bulk fermentation, is where most of the flavor develops, and the yeast does its primary work of leavening the dough.
Step 6: Divide and Shape into Balls
Once the dough has doubled, gently punch it down to release the accumulated gases. Transfer the dough from the bowl to your work surface and lightly flatten it into a rough rectangle. Using a bench scraper or a sharp knife, divide the dough into 12 equal pieces. Precision here helps ensure uniform baking. Take each piece and roll it into a smooth, tight ball. The goal is to create surface tension that will give your rolls a nice shape. Cover the dough balls with a clean kitchen towel and let them rest for 10 minutes. This short rest allows the gluten to relax, making the dough much easier to shape in the next step.
Step 7: Elongated Shaping for Ultimate Fluffiness
Now for the specific shaping technique that contributes to the bread’s soft texture. Take one of the rested dough balls and, on a lightly floured surface, flatten it out into an oval shape using a rolling pin. The oval should be relatively thin and even. Next, starting from one of the longer ends, tightly roll the oval lengthwise towards the opposite end. As you roll, gently pinch the seams closed to create a neat cylinder. This method of rolling creates layers within the dough, which contribute to the bread’s internal softness and tender crumb. Repeat this shaping process with all the remaining dough balls, ensuring each one is rolled and sealed properly.
Step 8: Final Shaping and Layering
Take one of the elongated rolls you just formed. Lightly sprinkle a little flour on your work surface if needed. Using your rolling pin, gently flatten this roll out again, just like you did in the previous step, aiming for a consistent oval shape. Refer to the photo below for visual guidance on the desired thickness and form. This second flattening and rolling step further enhances the layering inside the bread, leading to an even fluffier result. Now, starting from the wider end of this flattened oval, roll the dough tightly towards the other end, securing the seam at the bottom. Repeat this crucial step with all the remaining rolls. This double-rolling technique is key to achieving the incredibly soft, almost shreddable texture of the finished bread.
Step 9: Second Proofing (Final Rise)
Carefully arrange the shaped dough rolls in a baking tray, leaving a little space between each for expansion. Line your baking tray with parchment paper beforehand to prevent sticking and for easy cleanup. Cover the tray with plastic wrap or a light kitchen towel and place it in a warm, draft-free area for the second proofing. This final rise will take approximately 30 minutes, or until the rolls have visibly doubled in size and look puffy. This stage is crucial for the bread’s final texture and volume, so avoid rushing it. Properly proofed dough will feel light and airy. While the dough is proofing, preheat your oven to 356°F (180°C).
Step 10: Prepare and Apply the Egg Wash
While your dough is completing its final rise, prepare the glorious egg wash that will give your bread rolls their beautiful golden hue and irresistible shine. In a small bowl, combine the egg yolk, one tablespoon of milk, and one teaspoon of white vinegar. Whisk these ingredients together until they are thoroughly blended and smooth. Once the dough has finished proofing and is ready for the oven, gently brush this egg wash evenly over the tops and sides of each roll. Be careful not to deflate the delicate, risen dough. The egg wash not only contributes to the visual appeal but also helps create a slightly crisper, more flavorful crust.
Step 11: Bake to Golden Perfection
With your oven preheated to 356°F (180°C), carefully place the baking tray with your proofed, egg-washed rolls into the oven. Bake for approximately 25 to 30 minutes. Keep an eye on your bread; the exact baking time can vary depending on your oven. The rolls are done when they are beautifully golden brown on top and sound hollow when tapped on the bottom. To ensure they are fully cooked through, an internal temperature of around 200-210°F (93-99°C) is ideal. Once baked to perfection, remove the tray from the oven. For an extra touch of decadence and to keep the crust exceptionally soft, immediately brush the tops of the hot bread rolls with a generous amount of melted butter. This not only adds flavor but also locks in moisture, ensuring your bread remains wonderfully tender. Transfer the rolls to a wire rack to cool slightly before serving. Enjoy the unparalleled taste and texture of your homemade soft and fluffy bread!
Tips for Achieving Bakery-Quality Fluffy Bread Every Time:
- Accurate Measurements: Baking is a science. Use kitchen scales for dry ingredients like flour for the most precise results.
- Yeast Viability: Always check the expiration date of your instant yeast. Dormant yeast won’t give you a good rise.
- Lukewarm Milk is Key: Ensure your milk is between 105-115°F (40-46°C). Too cold and the yeast won’t activate; too hot and it will die.
- Don’t Skimp on Kneading: Proper kneading develops gluten, which is essential for the bread’s structure and chewiness. If kneading by hand, it can take 10-15 minutes.
- Patience with Proofing: Resist the urge to rush the rising times. A warm, draft-free environment is crucial for yeast activity. The “poke test” (gently poke the dough; if it springs back slowly, it’s ready) can help determine if it’s sufficiently proofed.
- Oven Temperature: Invest in an oven thermometer to ensure your oven is truly at the set temperature. Inconsistent oven temperatures can lead to under or over-baked bread.
- Cooling Rack: Always cool your bread on a wire rack to allow air circulation, preventing the bottom from becoming soggy.
Delicious Variations to Explore:
- Garlic Herb Rolls: Mix in 1-2 teaspoons of dried Italian herbs and 1 clove of minced garlic with the flour.
- Cheese Rolls: Fold in 1/2 cup of shredded cheddar or mozzarella cheese during the last minute of kneading.
- Sweet Rolls: Increase sugar by 1-2 tablespoons and add a pinch of cinnamon. Great for breakfast!
- Sesame Seed Topping: Sprinkle sesame seeds on top of the egg-washed rolls before baking for added flavor and crunch.
Serving Suggestions:
This incredibly soft and fluffy bread is versatile and pairs beautifully with a multitude of accompaniments:
- Breakfast Bliss: Serve warm with butter, various jams, honey, or a drizzle of chocolate spread.
- Savory Sides: It’s the perfect accompaniment to soups, stews, or a hearty chili, ideal for soaking up flavorful broths.
- Sandwich Perfection: Slice them horizontally to create small, tender sandwiches with your favorite fillings – deli meats, cheese, or fresh vegetables.
- Dinner Rolls: A fantastic addition to any family dinner, especially holiday meals.
- Just Enjoy: Sometimes, the best way to eat this bread is simply on its own, appreciating its delicate texture and fresh-baked goodness.
Storage Recommendations:
To keep your homemade bread fresh and delicious:
- Room Temperature: Store in an airtight container or a bread bag at room temperature for up to 2-3 days.
- Freezing: For longer storage, slice the cooled bread and freeze in an airtight freezer bag. Thaw individual slices as needed, or warm them directly from frozen. It retains its softness wonderfully after thawing.
Baking bread at home is a truly rewarding experience, and this soft and fluffy bread recipe is a shining example of how simple ingredients, combined with a little love and patience, can create something truly spectacular. The aroma that fills your kitchen, the warmth of the fresh loaf, and the unparalleled taste of a perfectly tender crumb are moments to cherish. Whether you’re a seasoned baker or just starting your journey, this recipe offers a reliable path to success, guaranteeing a loaf that will impress everyone at your table. Don’t hesitate to give it a try – your taste buds will thank you!