
Vintage Wings Quilt Pattern: Your Next Easy Layer Cake Project
Are you searching for your next enchanting quilting adventure? Look no further than the delightful **Vintage Wings Quilt Pattern**! This charming design, brought to life by Moonkin Stitchery on YouTube, is a true gem for both seasoned quilters and eager beginners alike. What makes it so special? It’s remarkably fun, incredibly straightforward, and only requires two main fabric components: a pre-cut layer cake and a complementary background fabric. Forget complex techniques or overwhelming fabric requirements; this project is designed for simplicity and speed. We’re confident that even if you’re new to the world of quilting, you’ll be able to create this gorgeous quilt top within a day!
This step-by-step tutorial will guide you through the process of creating this stunning quilt pattern with absolute ease. The “Vintage Wings” design has a timeless appeal that will quickly make it an instant favorite in your collection of handmade treasures. Get ready to transform beautiful fabrics into a cozy masterpiece that you’ll cherish for years to come. Dive into the instructions below and watch the video tutorial from Moonkin Stitchery to bring your Vintage Wings Quilt to life.
RELATED: Sunshine Shoofly Quilt Pattern With Jenny Doan
Why Choose the Vintage Wings Quilt Pattern?
The Vintage Wings Quilt Pattern isn’t just another project; it’s an invitation to experience the joy of quilting without the intimidation. Here’s why this pattern stands out:
- Beginner-Friendly Design: If you’ve been hesitant to try quilting, this pattern is your perfect starting point. It uses basic cutting techniques and a straightforward block construction method known as “snowball corners,” which is simple to master. The repetitive nature of the blocks makes it an excellent way to practice your precision and get comfortable with your sewing machine.
- Quick Assembly with Layer Cakes: The use of a layer cake significantly speeds up the cutting process. Layer cakes are collections of pre-cut 10-inch fabric squares, typically coordinated in color and pattern, saving you hours of initial cutting time. This means you can jump straight into the fun part: sewing!
- Versatile Aesthetic: Despite its “vintage” name, this pattern is incredibly versatile. Depending on your fabric choices, it can lean traditional, modern, whimsical, or sophisticated. A layer cake often provides a curated collection of prints, ensuring a cohesive and visually appealing final product with minimal effort.
- A Sense of Accomplishment: Finishing a quilt, especially quickly, provides an immense feeling of satisfaction. This project is designed to be completed efficiently, allowing you to enjoy the fruits of your labor sooner and motivating you for future quilting endeavors.
- Perfect for Gifts or Home Decor: A handmade quilt makes a thoughtful gift for birthdays, weddings, or baby showers. Alternatively, create one to add a touch of handmade charm and warmth to your own living space.
Materials for Your Vintage Wings Quilt
Before you begin sewing, gather all your materials. Having everything at hand will make the process smoother and more enjoyable. The beauty of this pattern lies in its simplicity, requiring just a few key supplies:
- Layer Cake: This is the star of the show! A standard layer cake contains 42 squares of 10×10 inch fabric. For this pattern, you will need enough squares to yield 21 main blocks and 21 alternate 9-inch print squares. Choose a layer cake with prints and colors that speak to you – it’s the easiest way to ensure a harmonious design.
- 1/2 Yard Background/Accent Fabric: This fabric provides contrast and structure to your quilt blocks. Select a solid or tone-on-tone print that complements your layer cake beautifully. Lighter colors often make the patterned fabrics pop, while darker shades can create a dramatic effect.
- Rotary Cutter: An essential tool for precise and efficient fabric cutting. Ensure your blade is sharp for clean edges.
- Cutting Mat: Protects your work surface and provides grid lines for accurate measurement.
- Quilting Ruler (Acrylic): A clear acrylic ruler with clear markings, ideally at least 6″ x 24″, is invaluable for making straight and accurate cuts.
- Sewing Machine: A reliable machine is crucial. Make sure it’s threaded properly and test your stitch settings on a scrap piece of fabric.
- Iron, for Pressing: A good iron and ironing board are indispensable for flat, professional-looking seams. Pressing as you go makes a huge difference in the final outcome of your quilt.
- Basic Sewing Notions: Don’t forget thread (matching or neutral), fabric clips or pins, and a seam ripper (just in case!).
Step-by-Step Directions to Create Your Vintage Wings Quilt
Step 1: Precision Cutting and Fabric Preparation
Accuracy in cutting is the foundation of a successful quilt, especially when working with pre-cut fabrics like layer cakes. Take your time with this step to ensure all your pieces are perfectly sized.
- Background Fabric Strips: Begin by taking your 1/2 yard of background fabric. From this, cut six strips, each measuring 2 inches wide by the Width of Fabric (WOF). WOF typically ranges from 42 to 44 inches.
- Subcut Background Squares: Next, take these six 2-inch WOF strips and subcut them into 105 individual 2-inch squares. These will be used to create the signature “snowball” corners of your Vintage Wings blocks.
- Layer Cake Preparation – Block Components: From your chosen layer cake squares, you will need to prepare pieces for 21 main “Vintage Wings” blocks. For each of these 21 blocks, carefully cut four 4-inch squares and four 2-inch by 4-inch rectangles from your selected print fabrics. This means you’ll end up with a total of 84 (4-inch) squares and 84 (2-inch x 4-inch) rectangles.
- Layer Cake Preparation – Alternate Squares: Additionally, select another 21 of your 10-inch layer cake squares. These will serve as simple, alternating blocks in your final quilt top. Trim each of these 21 squares down to a 9-inch square.
Organize your cut pieces by type and size to keep your workspace tidy and efficient.
Step 2: Constructing the Vintage Wings Quilt Block
This is where the magic begins, as you start to see the “wings” of your quilt blocks take shape. Each Vintage Wings block will measure 9 inches finished.
- Select Block Components: For one block, gather four of your 4-inch print squares, four of your 2-inch x 4-inch print rectangles (ensure these all match for a cohesive block), and five of your 2-inch background squares.
- Center Placement: Place one 2-inch background square in the very center of your block layout. This square will not be “snowballed.”
- Preparing Snowball Corners: Take the remaining four 2-inch background squares. On the wrong side of each square, draw a diagonal line from one corner to the opposite corner. These lines will be your sewing guides.
- Attaching Corners: Position these marked 2-inch background squares onto the corners of your four 4-inch print squares. Place them right sides together, aligning the corners carefully. The drawn line should be facing up, towards the center of the larger square. This creates the “snowball” effect.
- Sewing the Snowball: Sew directly on the drawn diagonal line for each of the four background squares attached to the 4-inch print squares. Press the seams open or to one side (away from the background fabric for less bulk).
- Trimming the Excess: After sewing, trim away the excess fabric a 1/4 inch away from the sewn line, towards the outer corner. This creates a crisp corner unit. Unfold and press the corner triangle outwards.
- Assembling the Block Unit: Once all corners are snowballed on your 4-inch squares, arrange these units and your 2-inch x 4-inch rectangles around the central 2-inch background square to form a 9-patch style block. You’ll have three rows of three units each.
This process results in a square unit with a distinctive “wing” effect created by the background fabric corners.
Step 3: Completing Your Quilt Blocks
With your individual components ready, it’s time to sew them into complete Vintage Wings quilt blocks. Consistency is key here to ensure all your blocks are the same size.
- Sewing into Rows: Carefully sew the individual units of your prepared block into three rows. Use a consistent 1/4-inch seam allowance. For best results, try to “nest” your seams where units meet to ensure points align perfectly.
- Pressing Rows: After sewing each row, press the seams. For the first and third rows, press seams in one direction. For the middle row, press seams in the opposite direction. This will help reduce bulk when joining the rows.
- Joining Rows to Form the Block: Now, sew your three rows together to complete one 9-inch Vintage Wings block. Again, aim for a precise 1/4-inch seam allowance and carefully align your rows. Press the final seams of the block.
- Repeat for All Blocks: Repeat these steps until you have a total of twenty-one completed Vintage Wings quilt blocks. This repetitive process is perfect for honing your piecing skills and achieving consistent block sizes. Chain piecing can save a lot of time here – sewing multiple units one after another without lifting the presser foot.
Step 4: Assembling the Quilt Top
With all your individual blocks ready, it’s time to bring them all together to form the striking quilt top. This is a very satisfying stage as your quilt design truly comes to life.
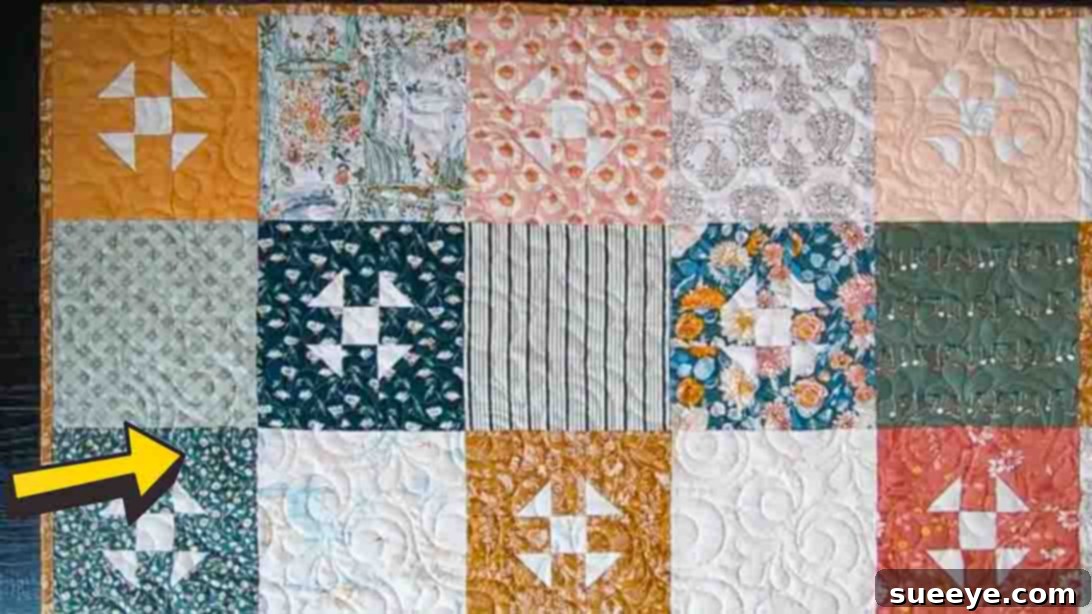
- Layout Your Blocks: Find a large flat surface – a design wall, the floor, or a large table – and carefully lay out all your completed Vintage Wings blocks alongside your twenty-one plain 9-inch print squares.
- Create the Alternating Pattern: Arrange them in a grid pattern. The tutorial suggests a 6 x 7 block layout. Alternate between a Vintage Wings block and a plain 9-inch print square. Play with the arrangement until you achieve a design that you love. Step back frequently to view the overall pattern.
- Sew Rows Together: Once you are satisfied with your layout, begin sewing the blocks together into rows. Sew each block in a row to the next, maintaining your consistent 1/4-inch seam allowance. Press seams within each row in alternating directions (e.g., press seams of row 1 to the right, row 2 to the left, and so on). This helps seams to “nest” when joining rows, creating flatter and more precise intersections.
- Join Rows to Complete Quilt Top: Finally, sew the individual rows together to complete your quilt top. Carefully align the seams where rows meet, using pins to hold them securely. Sew with a 1/4-inch seam. Press your finished quilt top thoroughly, ensuring all seams are flat and smooth.
Congratulations! Your Vintage Wings quilt top is now complete. The alternating patterns create a beautiful visual rhythm and showcase both the intricate block design and the lovely prints of your layer cake.
Tips for Quilting Success
To ensure your Vintage Wings Quilt project is as enjoyable and successful as possible, consider these helpful tips:
- Measure Twice, Cut Once: Accuracy is paramount in quilting. Double-check your measurements before making any cuts. Even a slight discrepancy can throw off your block assembly.
- Use a Fresh Needle: A sharp needle prevents skipped stitches and fabric snags. Change your needle regularly, especially when starting a new project.
- Press, Don’t Iron: When quilting, “pressing” means lifting and placing the iron down, rather than sliding it. This prevents fabric distortion. Pressing after every seam is critical for flat, crisp blocks.
- Chain Piecing: To save time and thread, especially when making multiple identical units (like the snowball corners or many small block components), try chain piecing. Sew one unit, then feed the next unit under the needle without cutting the thread in between. You can snip them apart later.
- Test Your Seam Allowance: Before starting your project, sew a test seam on scrap fabric and measure it to ensure your 1/4-inch seam allowance is accurate. Adjust if necessary.
- Take Breaks: Quilting should be enjoyable! If you feel frustrated or tired, step away for a bit. A fresh perspective can make a big difference.
- Embrace Imperfection: While precision is good, remember that handmade items have character. Don’t let the pursuit of perfection detract from the joy of creating.
Caring for Your Handmade Quilt
Once your beautiful Vintage Wings Quilt is finished, you’ll want to ensure it lasts for years to come. Proper care will help maintain its beauty and integrity.
- First Wash: For the initial wash, especially if you’ve used different fabric types or colors, consider using color catchers to prevent dye bleeding. Wash in cold water on a gentle cycle.
- Drying: Tumble dry on low heat or, ideally, lay flat to dry to minimize shrinkage and preserve the quilt’s shape.
- Regular Washing: For subsequent washes, use a mild detergent and cold water. Avoid harsh chemicals or bleach.
- Storage: Store your quilt folded or rolled in a breathable cotton bag, away from direct sunlight and extreme temperatures, to prevent fading and deterioration.
Vintage Wings Quilt Pattern Tutorial
Ready to see these steps in action? Watch the full video tutorial from Moonkin Stitchery to guide you through each stage of creating your stunning Vintage Wings Quilt. Visual learners will find this an invaluable resource for perfecting their technique and ensuring a beautiful finish.
Watch the Vintage Wings Quilt Pattern Tutorial on YouTube!