
Unlock Your Kitchen’s Potential: Genius Organization Hacks for a Tidy Home
Is your kitchen feeling cluttered, disorganized, or simply not as efficient as you’d like? Many homeowners struggle with maximizing their kitchen space, especially in smaller homes or apartments. A well-organized kitchen not only looks more inviting but also dramatically improves your cooking experience, saving you time and reducing stress. Imagine finding exactly what you need, precisely when you need it, without rummaging through overflowing drawers or cramped cabinets. Thanks to some ingenious tips from BuzzFeed Nifty on YouTube, transforming your kitchen into a beacon of order and functionality is easier than you think. These clever hacks are designed to help you utilize every inch of your space, turning everyday items into smart storage solutions. Dive into these practical, budget-friendly DIY ideas and prepare to revolutionize your kitchen!
Why Smart Kitchen Organization is a Game-Changer
A tidy and efficiently organized kitchen offers far more than just aesthetic appeal. It’s about creating a more enjoyable and productive environment for everyone who uses it. When every item has a designated place, meal preparation becomes faster and less chaotic. You’ll spend less time searching for ingredients or utensils and more time focusing on cooking and enjoying your culinary creations. Furthermore, proper organization can extend the life of your produce, prevent food waste, and make cleaning up a breeze. A decluttered space also contributes to a calmer mind, reducing the everyday stresses that often accompany a busy household. By implementing these simple yet effective hacks, you’re not just organizing your kitchen; you’re investing in a smoother, more efficient, and ultimately happier home life.
Essential Tools & Materials for Your Kitchen Transformation
Embarking on these kitchen organization projects requires a few basic materials, many of which you might already have around the house. We’ve curated a list of affordable and readily available items that form the foundation for these smart storage solutions. Having these tools on hand will make the DIY process smooth and enjoyable, allowing you to quickly implement these space-saving strategies.
- Adhesive hooks (various sizes, strong hold recommended)
- Storage baskets (wire or plastic, suitable for hanging)
- 12-inch steel bracket (for magnetic spice rack)
- ½-inch wood screws (for bracket installation)
- Strong magnets (neodymium magnets are ideal for holding jars)
- 4-ounce mason jars with lids (perfect for spices)
- Cooking oil (for removing sticker residue)
- Empty shampoo bottles or similar plastic containers (for upcycling)
- Rubbing alcohol (to clean surfaces and remove marks)
- Marker pen (for precise marking)
- Cutter or utility knife (for cutting plastic bottles)
- Sanding paper (fine-grit for smoothing edges)
- Heat gun (for shaping plastic, optional but helpful for one hack)
- Clean cloths or paper towels
Clever Kitchen Hacks to Maximize Your Space and Efficiency
1. The Mighty Power of Adhesive Hooks: Instant Organization Solutions
Adhesive hooks are arguably one of the most underrated heroes of kitchen organization. These versatile tools offer an immediate and drill-free way to create extra storage, making them perfect for renters or anyone hesitant to make permanent changes. Their simple application belies their incredible utility, transforming unused vertical spaces into functional storage zones. From decluttering countertops to streamlining daily tasks, adhesive hooks are a must-have in any organized kitchen.
Versatile Applications for Adhesive Hooks:
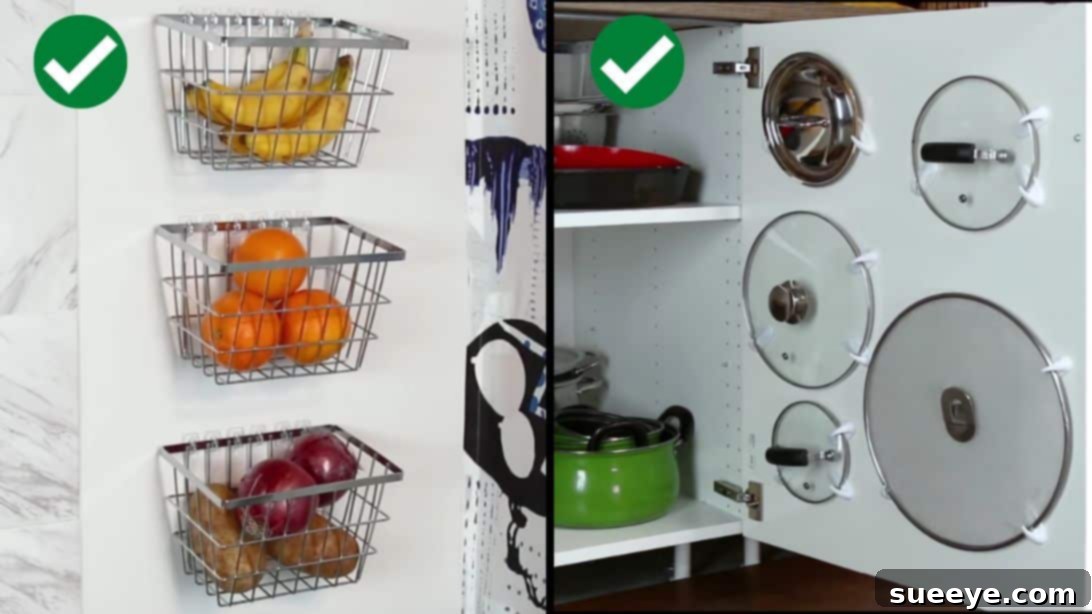
- Produce & Pantry Storage: Attach a couple of strong adhesive hooks to an empty section of your kitchen wall or the inside of a pantry door. Hang lightweight wire or fabric baskets from these hooks, creating instant storage for fresh produce like onions, garlic, or potatoes, keeping them off the counter. This method also works wonderfully for storing snack bags, small cooking essentials, or even cleaning supplies.
- Pot & Pan Lid Organization: Tired of rummaging through cabinets for matching pot lids? Place adhesive hooks on the inside of your kitchen cabinet doors, spaced appropriately to hold lids by their handles or rims. This simple trick keeps lids neatly tucked away, freeing up valuable drawer and cabinet space and making them easily accessible when cooking.
- Plastic Wrap & Aluminum Foil Holders: Mount two adhesive hooks vertically on the inside of a cabinet door, just wide enough to cradle a box of plastic wrap or aluminum foil. The hooks will hold the box securely in place, allowing for easy dispensing without taking up drawer space or clattering around in a cabinet.
- Temporary Jewelry Caddy: For those who love to cook but worry about damaging jewelry, an adhesive hook near the sink is a brilliant solution. When you’re washing dishes, kneading dough, or handling raw ingredients, you can quickly and safely hang your rings, bracelets, or watches on the hook, keeping them out of harm’s way until you’re done.
- Dish Towel & Utensil Hangers: Use hooks to hang dish towels for quick drying or to keep frequently used utensils like spatulas or whisks within arm’s reach near your cooking area.
Remember to clean the surface thoroughly before applying the hooks for maximum adhesion. Always check the weight capacity of your hooks to ensure they can safely hold the items you intend to store.
2. Elevate Your Spices: A DIY Magnetic Spice Organizer
Spices are the soul of any culinary creation, but their small containers often lead to cluttered cabinets and frustrating searches. A magnetic spice organizer is an ingenious solution that not only frees up valuable counter and cabinet space but also keeps your spices neatly displayed and instantly accessible. This DIY project is surprisingly simple and adds a touch of modern efficiency to your kitchen design.
Step-by-Step Magnetic Spice Rack Creation:
- Install the Bracket: Begin by selecting a strategic location, ideally underneath an upper kitchen cabinet or a sturdy shelf where spices will be within easy reach but out of the way. Position a 12-inch steel bracket, ensuring it’s level, and securely attach it using ½-inch wood screws. Make sure the bracket is firmly fixed to support the weight of the spice jars.
- Attach the Magnets: Once the bracket is in place, arrange a row of strong magnets along its length. You can use adhesive-backed magnetic strips, individual disc magnets with strong adhesive, or even small rare-earth magnets that can be glued onto the bracket. Ensure the magnets are evenly spaced to accommodate your chosen spice jars.
- Prepare Your Spice Jars: Fill several 4-ounce mason jars with your favorite spices. These small jars are perfect for holding a good quantity of spice while remaining compact. Securely close the lids on each jar. For optimal magnetism, you may need to attach a small metal washer or a disc magnet to the top of each jar’s lid (if the lid itself isn’t magnetic enough) to ensure a strong hold.
- Organize and Display: Gently match each filled jar to a magnet on the bracket, allowing the magnetic force to hold the spice jars firmly in place. This vertical storage not only looks incredibly neat but also makes it easy to quickly identify and grab the spice you need. For added convenience, consider labeling the bottom or side of each jar.
This magnetic spice organizer transforms a previously unused space into a functional and eye-catching feature, making your spices both a convenience and a decorative element in your kitchen.
3. Eco-Friendly Sponge Holders from Upcycled Bottles
Sponges are essential kitchen tools, but where do they go when not in use? Often left in the sink, they can harbor bacteria and create a messy look. These brilliant DIY sponge holders, crafted from empty shampoo bottles, offer a sustainable and stylish solution. Not only do they keep your sponges tidy and allow them to dry properly, but they also give new life to plastic waste.
Version 1: Single Faucet-Mounted Sponge Holder
This design tucks neatly around your sink faucet, keeping your sponge elevated and out of the way.
- Prepare the Bottle: Grab an empty shampoo bottle or a similar plastic container. Peel off any existing stickers. If there’s sticky residue, a dab of cooking oil and a good rub with a cloth will typically remove it. Rinse the bottle thoroughly to eliminate any oiliness and soap residue, ensuring it’s completely clean and dry.
- Marking for the Cut: Use a marker pen to draw your cutting lines. Start by drawing a circle at the front of the bottle, towards the bottom. Then, draw a straight line across the body of the bottle, effectively separating it in half horizontally. Crucially, make sure this horizontal line aligns with the top part of the circle you just drew. This creates the opening for the sponge and the base for the faucet.
- Cut and Refine: Carefully use a cutter or utility knife to cut along your marked lines. Dispose of the bottom part of the bottle. Once cut, use rubbing alcohol to erase any remaining marker ink. Now, take your sanding paper and meticulously sand all the rough edges of your newly cut holder to ensure they are smooth and safe to handle. Finally, remove the bottle cap.
- Installation: Place the finished sponge holder upside down. Insert the neck of the sink faucet through the circular opening you created, so the holder drapes over the faucet base. Position it securely, then place your sponge inside. This design allows for excellent drainage and keeps your sponge elevated.
Version 2: Double Sponge Holder for Dual Sinks
Ideal for kitchens with double sinks, this version offers more storage and takes advantage of the sink barrier.
- Marking the Hourglass Shape: Instead of a central circle, curve each side of the bottle inward, creating an hourglass-like shape when viewed from the front. The top part should be wider, narrowing in the middle, and then widening again at the bottom. This unique design allows it to drape over the sink divider.
- Cut and Punch Drainage Holes: Carefully cut along your marked hourglass shape. After cutting, use a punch or a small drill bit to create several drainage holes along the bottom part of the holder. These holes are crucial for allowing water to escape, preventing mildew and keeping your sponges hygienic.
- Shape with Heat Gun: This step requires caution. Using a heat gun, gently apply heat to the narrow middle area of the plastic bottle. As the plastic becomes pliable, carefully bend it to create a V-shape or a curve that will comfortably sit over the barrier between your double kitchen sinks. Allow it to cool and harden in this new shape.
- Position and Organize: Once cooled, place or hang the newly shaped holder onto the barrier of your double kitchen sink. The curved middle section should sit snugly over the divider. Now you have two convenient compartments to place your sponges, scrubbers, or even dish brushes on each side, ensuring they stay dry and organized.
Always exercise caution when using sharp tools and heat guns. Ensure proper ventilation and wear protective gloves if needed. These DIY sponge holders are not only practical but also a testament to creative upcycling, adding a personalized touch to your kitchen.
General Tips for Sustained Kitchen Organization
Implementing these hacks is a great start, but maintaining an organized kitchen requires ongoing effort. Here are some broader tips to ensure your kitchen remains a haven of order and efficiency:
- Declutter Regularly: Periodically go through your pantry, fridge, and drawers. Discard expired items, donate unused gadgets, and get rid of anything that doesn’t serve a purpose or bring you joy.
- Utilize Vertical Space: Don’t just think horizontally. Shelves, stackable containers, and wall-mounted organizers (like our adhesive hooks!) can double your storage capacity.
- Use Drawer Dividers and Organizers: Keep cutlery, cooking utensils, and small gadgets neatly separated in drawers with custom inserts or dividers.
- Label Everything: Especially in the pantry, clear labels on containers for flour, sugar, pasta, and spices make it easy to find what you need and keep track of inventory.
- Maintain Clear Countertops: While some appliances are necessary, try to keep countertops as clear as possible. This creates a sense of spaciousness and makes cleaning much easier.
- Designate a “Landing Zone”: Create a small area near the entrance or a common drop-off point for keys, mail, and other everyday items to prevent them from scattering across kitchen surfaces.
Transform Your Kitchen Today!
From freeing up counter space with magnetic spice racks to embracing sustainable solutions with upcycled sponge holders, these ingenious kitchen organization hacks from BuzzFeed Nifty offer practical, affordable, and incredibly effective ways to bring order and efficiency to your culinary domain. An organized kitchen is more than just aesthetically pleasing; it’s a functional space that inspires creativity, reduces stress, and makes daily life a little bit easier. By incorporating these DIY projects and general organization tips, you’re not just tidying up – you’re reclaiming your kitchen and making it work smarter for you. Don’t let clutter hold you back any longer; pick one hack to start with and experience the immediate benefits of a beautifully organized kitchen!
*These amazing images and original concepts are all credited to BuzzFeed Nifty via YouTube. Check their other content and follow for more innovative ideas and home improvement hacks!