
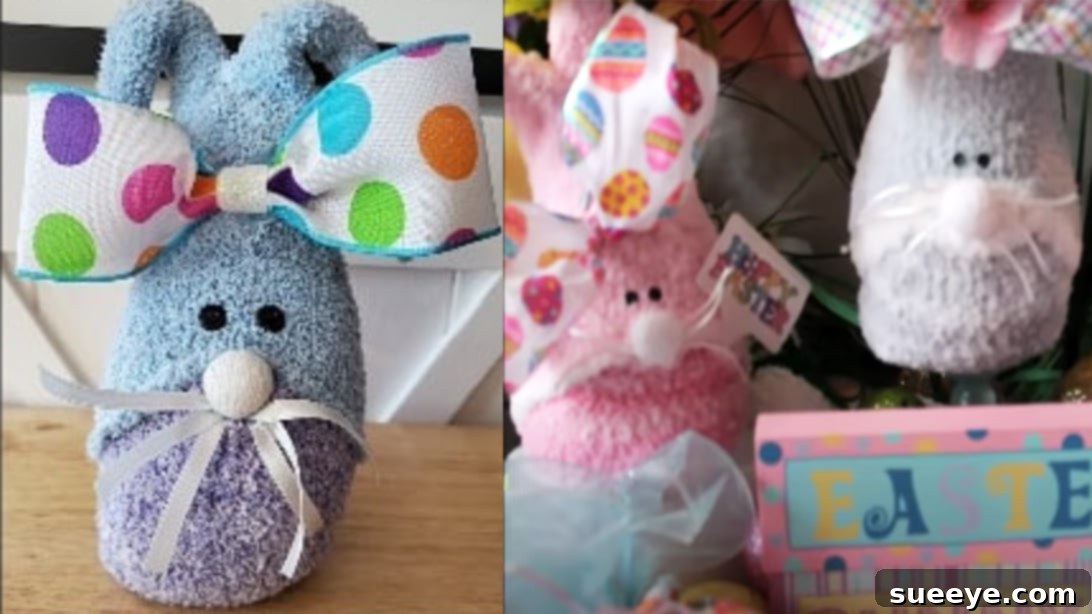
Craft Adorable No-Sew Sock Bunnies for Spring and Easter
Bunnies have an undeniable charm that captivates hearts of all ages. Their cuteness makes them a beloved symbol of spring, new beginnings, and, of course, Easter. Imagine bringing this delightful charm into your home with handmade decorations that are not only adorable but also incredibly simple to create. We’re thrilled to share an ingenious and super easy DIY project inspired by Lori Blye DIY on YouTube: the no-sew spring sock bunny! This craft is perfect for adding a touch of seasonal whimsy to your decor, making it ideal for spring festivities and Easter celebrations. The best part? It’s budget-friendly, often utilizing items found at your local Dollar Tree, and requires absolutely no sewing!
Why Choose a No-Sew Sock Bunny DIY?
In the world of DIY crafts, projects that require minimal skill and investment but yield maximum cuteness are always a win. Our no-sew sock bunny project ticks all these boxes and more. Here’s why this craft stands out as a must-try for beginners and seasoned crafters alike:
- Beginner-Friendly: No need for a sewing machine or intricate stitches. If you can tie a knot and use hot glue, you can make this bunny!
- Cost-Effective: Many of the materials can be sourced from dollar stores, making this an incredibly affordable way to spruce up your holiday decor.
- Quick & Easy: These bunnies come together surprisingly fast, making them perfect for a last-minute decoration project or a fun afternoon craft session.
- Customizable: With various sock patterns, ribbons, and embellishments, you can easily personalize each bunny to match your home decor or create unique gifts.
- Charming Decor: Whether nestled on a mantelpiece, brightening a bookshelf, or adorning an Easter basket, these sock bunnies add a heartwarming, whimsical touch.
- Great for All Ages: With adult supervision for hot glue, this is a fantastic project to do with children, fostering creativity and fine motor skills.
Materials You’ll Need for Your Adorable Sock Bunny
Gathering your materials is the first step to bringing your charming sock bunny to life. Most of these items are readily available and affordable, especially at craft stores or dollar stores. Here’s a comprehensive list of what you’ll need:
- 2 Fuzzy Socks: These will form the bunny’s outer “clothing” and ears, giving it a soft, cuddly texture. Choose colors and patterns that evoke spring – pastels, florals, or subtle stripes work wonderfully.
- 1 Plain Sock: This sock will serve as the bunny’s inner body, holding the weight and shaping. A crew sock or ankle sock made of a sturdy material is ideal.
- 2 Containers of Bath Salts: Or use rice, lentils, or poly-pellets. These provide the necessary weight and bulk to give your bunny a stable base and a pleasing shape.
- Plant Labels: Small wooden or plastic plant labels will be repurposed for your bunny’s “Happy Easter” sign.
- Pipe Cleaners (Chenille Stems): Essential for creating posable ears that can be bent and shaped to give your bunny personality.
- Paper: A small piece of paper will be used for crafting the bunny’s eyes.
- Black Marker: For drawing on the eyes and adding other facial details.
- Hole Puncher: To create perfectly round eyes from paper.
- Scissors: For cutting socks, paper, string, and ribbons.
- Assorted Ribbons: These are for making a charming bow to adorn your bunny, adding a pop of color and personality.
- Hot Glue Gun & Glue Sticks: Your primary tool for assembling and securing all the components without any sewing. Ensure you have plenty of glue sticks on hand!
- Elastics (Rubber Bands): Crucial for shaping the bunny’s body, head, and nose securely.
- Cotton Balls or Pom Poms: The perfect fluffy addition for the bunny’s iconic tail.
- String or Twine: Thin string or twine will be used to create the bunny’s delicate whiskers.
- Floral Wire: A small piece of floral wire helps secure the ribbon bow and allows for easy positioning.
Step-by-Step Directions: Crafting Your No-Sew Sock Bunny
With all your materials at hand, let’s embark on the fun journey of creating your very own no-sew sock bunny. Follow these detailed instructions carefully for the best results, and don’t hesitate to infuse your own creativity!
1. Prepare Your Workspace and Materials
Before you begin, lay out all your materials on a clean, flat surface. This ensures easy access to everything you need and helps keep your crafting process smooth and organized. Having everything prepped will make the assembly much more enjoyable and efficient.
2. Form the Bunny’s Body and Head
Take your plain sock and carefully pour about 1 ½ containers of bath salts (or your chosen filler) into it. The amount can be adjusted based on the desired size and plumpness of your bunny. Once the bath salts are inside, use an elastic band to securely tie the sock closed, forming the main body. Next, gently pull and shape a section of the filled sock to create the bunny’s nose area. Secure this section with another elastic band, ensuring it’s tight enough to define the nose. This creates the basic head and body structure.
3. Dress Your Bunny in Its Fuzzy Outfit
Now it’s time to give your bunny its soft, fuzzy “coat.” Take one of your fuzzy socks. Using scissors, make a neat cut just above the sock’s heel. This open end will be the bottom of the bunny’s clothing. Carefully slide this cut fuzzy sock over your plain sock bunny body. Adjust the sock so that the toe band (the ribbed part) faces the back of the bunny, creating a seamless front for the bunny’s attire.
4. Add Charming Whiskers
Whiskers are a classic bunny feature! Cut three pieces of string or twine, each approximately 8 inches long. These will form your bunny’s whiskers. Carefully tie these strings around the nose area of the fuzzy sock, right where you defined the nose with an elastic. You might need a dab of hot glue to secure them in place underneath the sock. Once tied, trim the whiskers to your preferred length, making them as subtle or prominent as you like. After adding the whiskers, secure the fuzzy sock permanently to the bunny’s body by applying hot glue around the base of the “neck” and any other areas that need tightening.
5. Craft the Bunny’s Perky Ears
To create the bunny’s inner ear structure, take the excess top end of the plain sock (the part extending above the fuzzy outfit). Cut this excess fabric directly in half down the center, creating two flaps. Tie a knot at the end of each flap; these knots will help shape the base of your ears. Next, grab your second fuzzy sock. This sock will become the bunny’s ears. Place it on top of your bunny, measuring to see how long you want the ears to be. With the bunny laid down and the intended ear area facing you, cut directly into the center of the sock, creating two separate ear pieces. Do not cut completely through; leave a small connecting piece at the bottom if possible, or you can glue them individually later.
6. Insert Posable Ear Wires
To make the ears posable, prepare five pipe cleaners. Take two pipe cleaners, fold them in half, and twist them together tightly to form a stronger wire. Repeat this process with two more pipe cleaners. You’ll now have two twisted pipe cleaner sets. Place one twisted set on each side of the bunny’s ears (the two fuzzy sock pieces you just cut). Use the remaining single pipe cleaner to secure the base of these twisted sets, wrapping it around to hold them in place. Now, carefully insert these pipe cleaner structures into each fuzzy sock ear, ensuring they reach the tip. Secure them inside the sock ears using hot glue. Finally, fold and glue the raw edges of the sock inward to create a neat, seamless finish for each ear.
7. Assemble and Secure the Bunny
Stand your bunny upright. Apply hot glue along the remaining open sides of the fuzzy sock and press them together firmly to seal the bunny’s body, ensuring a smooth silhouette. Now, gently bend the ears into your desired position – upright, slightly flopped, or playfully askew. Turn your bunny to its back. Using hot glue, attach the top part of the fuzzy sock “clothing” to the bottom part of the fuzzy sock, ensuring the bunny’s “outfit” is securely attached and neat from all angles.
8. Create and Attach the Ribbon Bow
A pretty ribbon bow adds a lovely decorative touch to your bunny. Choose a ribbon that complements your bunny’s color scheme. Fashion a small bow from the ribbon. To secure it effectively and make it posable, gently wrap a small piece of floral wire around the center of the bow. This allows you to easily attach and position the bow anywhere you desire on the bunny’s head or neck using hot glue.
9. Bring the Face to Life with Eyes and a Sign
Now for the expressive face! Take a small piece of paper and use a black marker to draw a small, solid black circle or block. Then, use your hole puncher to create two perfectly round “eyes” from this marked area. Apply a tiny dot of hot glue to the back of each paper eye and carefully attach them to your bunny’s face. For the festive sign, take a plant label. If you have “Happy Easter” stickers, apply one to the label. Alternatively, you can hand-letter “Happy Easter” or “Spring” onto the label with your black marker. Once done, glue the sign onto your bunny, perhaps held by its paws or placed on its belly.
10. The Finishing Touch: A Fluffy Tail
No bunny is complete without a fluffy tail! Take a cotton ball or a small pom pom. Apply a generous amount of hot glue to one side and firmly attach it to the back of your bunny, just above the base. Press down gently until the glue sets, ensuring the tail is secure. And there you have it – your adorable no-sew sock bunny is complete!
Tips for Crafting Your Perfect No-Sew Sock Bunny
To ensure your crafting experience is smooth and your bunnies turn out perfectly, consider these helpful tips:
- Experiment with Fillers: While bath salts provide good weight, you can also use rice, lentils, dried beans, or even poly-pellets for a different feel and weight distribution.
- Sock Selection Matters: Different fuzzy socks offer unique textures and patterns. Don’t be afraid to mix and match or choose socks with fun prints for a whimsical touch.
- Hot Glue Safety: Always exercise caution when using a hot glue gun, especially if crafting with children. Low-temp glue guns are a safer option.
- Customization is Key: Beyond ribbons and eyes, consider adding tiny buttons for noses, small fabric flower embellishments, or even a tiny vest made from felt for extra personality.
- Make a Family of Bunnies: Create bunnies of different sizes by using various sock lengths and filler amounts. A “mama” bunny with “baby” bunnies makes a charming display.
- Pre-plan Your Face: Before gluing, place the paper eyes and whiskers on the bunny to visualize the placement and expression. This helps avoid mistakes.
- Secure Everything: Hot glue is your friend! Don’t be shy about using it to secure all parts firmly, ensuring your bunny lasts for many seasons.
Caring for and Displaying Your Handmade Bunnies
These no-sew sock bunnies are primarily decorative items. To keep them looking their best, avoid getting them wet. If they collect dust, gently dab them with a lint roller or a soft cloth. Display your charming creations on shelves, windowsills, mantelpieces, or as a delightful centerpiece for your Easter table. They also make thoughtful, handmade gifts for friends and family!
Conclusion: Your Adorable No-Sew Sock Bunny Awaits!
Creating these no-sew sock bunnies is more than just a craft; it’s an opportunity to infuse your home with warmth, personality, and the joyful spirit of spring and Easter. With simple materials, straightforward steps, and no sewing required, anyone can embark on this delightful DIY journey. Whether you’re looking for an easy project to do with kids, a budget-friendly way to update your seasonal decor, or a unique handmade gift, these charming sock bunnies are the perfect solution. So grab your socks, fire up your glue gun, and get ready to welcome spring with the cutest little bunnies you’ve ever made!
Happy crafting, and may your home be filled with the joy of your handmade creations!