
Master the Easy Railroad Crossing Quilt Block: A Beginner-Friendly Guide
Embark on your next quilting adventure with the timeless and incredibly simple Railroad Crossing Quilt Block! Whether you’re a complete novice looking for an encouraging first project or a seasoned quilter seeking a quick and satisfying make, this block, brilliantly demonstrated by Cut and Create on YouTube, is an absolute gem. Its straightforward construction makes it a fantastic starting point for understanding fundamental quilting techniques, while its classic appeal ensures a beautiful finished product every time.
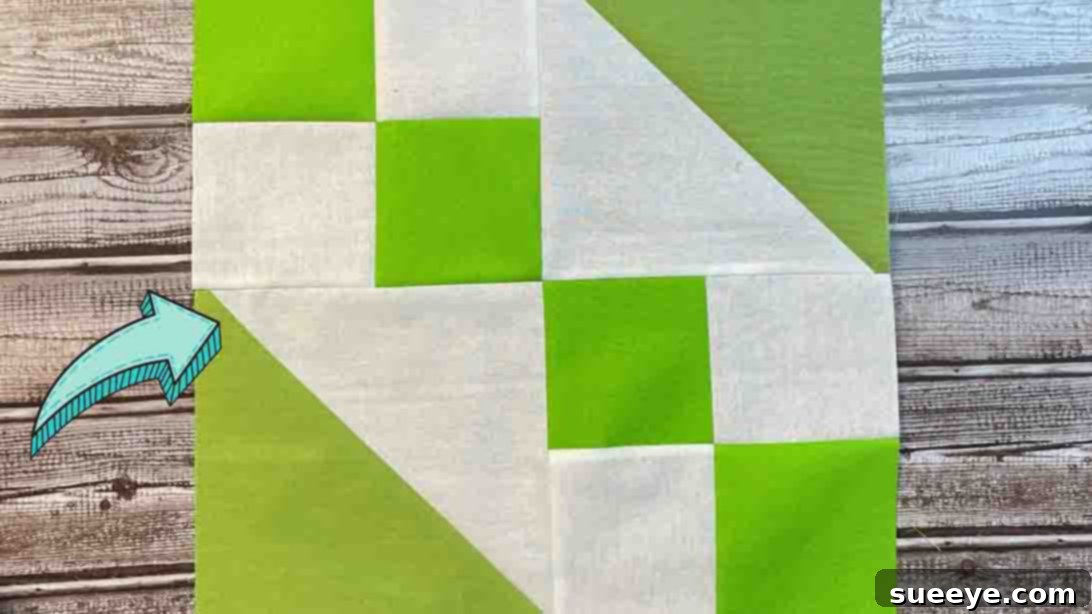
The beauty of the Railroad Crossing Quilt Block lies in its elegant simplicity. It’s composed of just a few basic units: the four-patch and half-square triangles (HSTs). These elements combine to create a dynamic design reminiscent of railway tracks intersecting, offering a charming visual rhythm to any quilt. This pattern has been a favorite among quilters for generations, cherished for its adaptability and the satisfying speed at which it comes together.
One of the many reasons this quilt block stands out is its ability to beautifully showcase your fabric selections. If you have a collection of gorgeous solid-colored fabrics that you’ve been saving for the perfect project, or even an assortment of coordinating prints you’re eager to display, this pattern is an ideal candidate. It allows your chosen fabrics to truly shine, highlighting their textures and colors without overwhelming them with complex piecing. Dive into this delightful quilting journey today and discover the joy of creating something truly special. For a visual walkthrough, make sure to watch the comprehensive video tutorial from Cut and Create linked below.
Why Choose the Railroad Crossing Quilt Block for Your Next Project?
Beyond its beginner-friendly nature, the Railroad Crossing Quilt Block offers a wealth of advantages that make it a perennial favorite in the quilting community:
- Perfect for Beginners: It introduces essential quilting skills such as accurate cutting, precise piecing of small units, and efficient pressing techniques, all within a manageable framework.
- Timeless Design: The classic “crossing” motif adds a sophisticated touch to any quilt, suitable for traditional or modern aesthetics depending on fabric choices.
- Versatile Fabric Play: Experiment with high-contrast solids for a bold statement, use various prints for a scrappy look, or combine solids and prints for unique visual interest. It’s an excellent pattern for using up fabric scraps too!
- Quick to Assemble: Once you get the hang of the two main components (four-patches and HSTs), blocks come together remarkably fast, making it ideal for creating larger quilts in a shorter timeframe.
- Foundation Skill Builder: Mastering this block builds confidence and competence in techniques that are fundamental to countless other quilt patterns. You’ll be ready for more complex designs in no time!
- Great for Gifts: Due to its ease and beauty, quilts made with the Railroad Crossing block make thoughtful and impressive gifts for any occasion.
Gather Your Quilting Essentials: Materials for One Block
Before you begin, ensure you have all your materials neatly organized. Precision in cutting is paramount for successful quilting, so take your time during this initial phase. For this specific Railroad Crossing Quilt Block, you’ll need three distinct fabrics, labeled A, B, and C, to create the visual contrast and design:
Fabric A:
- 1 – 7″ x 7″ square
This fabric often serves as a primary design element or a strong contrasting color within your half-square triangles. Consider a bold solid or a distinct print.
Fabric B:
- 4 – 3 1/2″ x 3 1/2″ squares
Fabric B is crucial for creating the central four-patch unit. Choosing a fabric that complements or contrasts with Fabric A and C will define the overall look of your block. Often, a medium tone works well here.
Fabric C:
- 1 – 7″ x 7″ square
- 4 – 3 1/2″ x 3 1/2″ squares
Fabric C will be paired with Fabric A for the half-square triangles and also forms part of your four-patch. For a striking effect, select a fabric that provides a good visual contrast to Fabric A, perhaps a lighter or darker shade, or a complementary print.
Additional Essential Tools: Beyond your fabrics, ensure you have these quilting staples on hand:
- A reliable sewing machine with a fresh needle and good quality thread (cotton is recommended).
- A rotary cutter with a sharp blade.
- A self-healing cutting mat.
- Clear acrylic rulers for accurate measuring and cutting (a square ruler is particularly helpful for trimming).
- An iron and ironing board for crisp pressing.
- Fabric clips or pins to hold your pieces together.
- A seam ripper (just in case!).
Step-by-Step Instructions: Assembling Your Railroad Crossing Quilt Block
Follow these detailed instructions carefully to construct your beautiful Railroad Crossing Quilt Block. Remember, accuracy in every step, especially cutting and pressing, will yield the best results.
Step 1: Preparing Your Units – Four-Patches and Half-Square Triangles
To begin, meticulously cut all your specified fabric pieces according to the measurements provided above. For organization, you might want to label them temporarily as Fabric A, B, and C. Set them aside until needed.
Creating the Four-Patch Unit:
Take your four 3 1/2″ x 3 1/2″ squares from Fabric B and Fabric C. You will have two squares of Fabric B and two squares of Fabric C. Arrange them into a 2×2 grid, alternating colors (e.g., B, C, B, C or B, C, C, B, depending on your desired look for the central square). Sew them together into two pairs first: a B square to a C square. Use a precise scant 1/4-inch seam allowance. Once sewn, press the seams open or towards the darker fabric to reduce bulk. Then, sew these two pairs together, carefully nesting your seams in the middle for a perfectly matched intersection. Press the final four-patch block again, ensuring it lies perfectly flat. This meticulous pressing is key to sharp, professional-looking blocks.
Crafting the Half-Square Triangle (HST) Pairs:
Next, retrieve your two 7″ x 7″ squares: one from Fabric A and one from Fabric C. Place these two squares right sides together. Using a ruler and a fabric marker or pencil, draw a diagonal line from one corner to the opposite corner across the back of the lighter fabric. Now, using your scant 1/4-inch seam allowance, sew a seam on both sides of the drawn line. Once both seams are sewn, carefully cut along the drawn diagonal line, separating the two pieces. You now have two half-square triangles. Press each HST open, pressing the seam allowance towards the darker fabric or open to reduce bulk. The goal is to have flat, smooth HSTs. Repeat this process with the remaining 7″ squares if you’re making multiple blocks, ensuring your HSTs are crisp and accurate.
Step 2: Trimming and Assembling the Quilt Block
Now that you have your individual units, it’s time for a critical step: trimming. Your half-square triangles, once pressed open, will likely be slightly larger than needed. Using a square ruler, carefully trim down each half-square triangle to 6 1/2″ square. This step is non-negotiable for accuracy; it squares up your HSTs and ensures your final block will be the correct size and lay flat. Take your time, aligning the 45-degree line on your ruler with the seam line of your HST for perfect alignment.
Arranging the Block Components:
With your trimmed HSTs and the prepared four-patch unit, you’re ready to assemble the Railroad Crossing Quilt Block. Arrange your pieces on a flat surface, following the traditional layout:
Place one four-patch unit in the top-left position.
Next to it, in the top-right position, place one of your 6 1/2″ half-square triangles.
Below the four-patch, in the bottom-left position, place another 6 1/2″ half-square triangle.
Finally, in the bottom-right position, place the remaining four-patch unit.
Visually, the two HSTs should form a diagonal line, and the two four-patches should complete the opposing diagonal, creating the “crossing” effect. Double-check your layout against the reference image to ensure correct placement. This stage is crucial for the final design.
Sewing the Block Together:
Once you are satisfied with the arrangement, sew these pieces together row by row. First, sew the top two units (four-patch and HST) together. Then, sew the bottom two units (HST and four-patch) together. Use your scant 1/4-inch seam allowance. Press the seams for the top row in one direction (e.g., to the right) and the seams for the bottom row in the opposite direction (e.g., to the left). This will allow you to nest your seams when joining the two rows, minimizing bulk and ensuring a perfectly matched center seam.
Finally, sew the top row to the bottom row, carefully aligning your nested seams at the center. Pin generously at this intersection to prevent shifting. Press the completed Railroad Crossing Quilt Block one final time, making sure all seams lie flat and the block is perfectly square. Congratulations, you’ve completed your first Railroad Crossing Quilt Block! To create a larger quilt, simply repeat these steps to produce as many blocks as needed for your desired quilt size.
Essential Quilting Tips for a Flawless Finish
Achieving beautiful results in quilting is often about attention to detail. Keep these expert tips in mind as you work on your Railroad Crossing Quilt Block and future projects:
- The Scant 1/4-Inch Seam: This is the golden rule of quilting. It means your seam allowance should be just a hair under a true 1/4 inch. This slight reduction accounts for the thickness of the thread and the fold of the fabric, ensuring your finished block measures accurately. Practice makes perfect!
- Pressing vs. Ironing: In quilting, we “press” seams, not “iron” them. Pressing involves lifting and placing the iron down, rather than sliding it, to avoid distorting your fabric. Always press seams open or to one side consistently to create flat blocks.
- Accuracy Above All: From cutting to sewing, every step requires precision. A ruler that slips or a seam that’s off by even an eighth of an inch can accumulate across multiple blocks, leading to a wavy quilt top. Invest in good tools and take your time.
- Chain Piecing for Efficiency: When making multiple blocks, use chain piecing. Sew one seam, feed another pair of fabrics under the needle without cutting the thread, and continue. This saves time and thread, especially for repetitive units like HSTs.
- Test Your Stitch: Before starting on your project, always do a test stitch on a scrap piece of fabric to ensure your machine tension is correct and your seam allowance is accurate.
- Fabric Preparation: Pre-wash your fabrics if you’re concerned about shrinkage or color bleeding, especially if mixing different fiber types or strong colors. Otherwise, simply press them flat to remove wrinkles before cutting.
Expanding Your Railroad Crossing Quilt Project: From Block to Quilt
Once you’ve mastered making a single Railroad Crossing Quilt Block, the possibilities for creating larger projects are endless. This versatile block can be used in numerous ways to achieve different quilt sizes and designs:
- Calculating Quilt Size: Determine how many blocks you need by deciding on your desired finished quilt dimensions. For example, a baby quilt might use 3×4 blocks, while a throw quilt could be 4×5 or 5×6 blocks.
- Adding Sashing: Introduce strips of fabric (sashing) between your blocks to create a grid effect and give your eyes a resting place. Cornerstones (small squares at the intersection of sashing strips) can add an extra design element.
- Borders for Framing: Frame your quilt top with one or more borders. Borders can enhance the size of your quilt, provide visual balance, and allow you to incorporate additional colors or patterns.
- Creative Layouts: While traditionally blocks are laid out in straight rows, try rotating alternate blocks for a dynamic look or experimenting with different color placements to create secondary patterns.
- Beyond Quilts: Don’t limit yourself to full quilts! A single Railroad Crossing block or a few joined together can become charming placemats, pot holders, throw pillows, tote bag panels, or even wall hangings.
Finishing Your Quilt: The Final Steps
After your quilt top is pieced and pressed to perfection, the journey isn’t over. You’ll move on to the “quilt sandwich” phase:
- Basting: Secure your quilt top, batting (the middle layer), and backing fabric together. This can be done with safety pins, spray adhesive, or long basting stitches.
- Quilting: This is where you stitch through all three layers, either by hand or machine, to add texture, durability, and a final design element. You can opt for simple straight lines, meandering patterns, or intricate free-motion quilting.
- Binding: The final touch! Attach strips of fabric around the raw edges of your quilt to create a neat, durable finish. This can be sewn by machine or hand-finished for a classic look.
Caring for Your Handmade Quilt
A handmade quilt is a treasure, and proper care will ensure it lasts for generations. Generally, cotton quilts can be machine washed on a gentle cycle with cold water using a mild detergent. Tumble dry on low heat or, ideally, lay flat to dry to prevent shrinking and preserve the fabric. Avoid harsh chemicals or excessive agitation. For very old or delicate quilts, hand washing is recommended.
Your Visual Guide: Railroad Crossing Quilt Block Tutorial
While these written instructions provide a comprehensive guide, sometimes seeing the process in action makes all the difference. We highly recommend watching the detailed video tutorial by Cut and Create on YouTube. The visual demonstrations for cutting, sewing, and pressing each component will clarify any uncertainties and provide invaluable tips for achieving perfect results. It’s the perfect companion to these written steps!
Start Your Quilting Journey Today!
The Railroad Crossing Quilt Block is more than just a pattern; it’s an invitation to explore the rewarding world of quilting. Its straightforward nature makes it an accessible and enjoyable project for anyone, regardless of experience level. You’ll not only create a beautiful block but also build fundamental skills that will serve as the foundation for countless future projects. So, gather your fabrics, prepare your workspace, and let the rhythmic hum of your sewing machine guide you to a stunning handmade creation. We can’t wait to see what you make!